• Post Reply Bookmark Topic Watch Topic
  • New Topic
permaculture forums growies critters building homesteading energy monies kitchen purity ungarbage community wilderness fiber arts art permaculture artisans regional education skip experiences global resources cider press projects digital market permies.com pie forums private forums all forums
this forum made possible by our volunteer staff, including ...
master stewards:
  • Nancy Reading
  • Carla Burke
  • r ranson
  • John F Dean
  • paul wheaton
  • Pearl Sutton
stewards:
  • Jay Angler
  • Liv Smith
  • Leigh Tate
master gardeners:
  • Christopher Weeks
  • Timothy Norton
gardeners:
  • thomas rubino
  • Jeremy VanGelder
  • Maieshe Ljin

Ways to repair the hub on an Ashford spinning wheel

 
steward
Posts: 12421
Location: Pacific Wet Coast
6991
duck books chicken cooking food preservation ungarbage
  • Likes 7
  • Mark post as helpful
  • send pies
    Number of slices to send:
    Optional 'thank-you' note:
  • Quote
  • Report post to moderator
A friend of mine was given the spinning wheel pictured below. He had grown some flax and has lots of contacts and a slightly faulty memory. I was looking for a way to turn some thin "thread" into thicker, multiple-ply "string" and it was suggested to me that a spinning wheel could do that (well, at least *some* could - clearly I'm in the sub-basement of a very large learning curve!). Sooo... the spinning wheel is now in my living room, I've oiled the parts that the internet said to oil (although I used 3-1 machine oil which is heavier than ideal, but if necessary I can clean everything when I have the right stuff).

1. From the web, I believe it is some version of "Ashford Traditional" - do knowledgeable permies agree?

2. Where the spokes of the wheel join the hub, there is what seems to me to too much "range of motion" ~10degrees either way from vertical. The hub is in two parts and it seems as if the two parts are too far apart. Is this something I need to fix to use it?  It does seem as if the cord falls off very easily, but I haven't really started practicing with it yet.

I have started reading permies threads about spinning and stuff on the web, but I feel going further makes no sense until I figure out if the reason this wheel was given to B was because the giver was hoping B would fix it, which in fact, isn't likely to happen, so now it's on my plate! I admit I was shocked at the apparent price of such a thing on the web, so I don't want to do it harm if this is normal, or if it's not, I want to fix it correctly.
Ashford_traditional.jpg
[Thumbnail for Ashford_traditional.jpg]
unstable_wheel.jpg
[Thumbnail for unstable_wheel.jpg]
 
steward & author
Posts: 38381
Location: Left Coast Canada
13632
8
books chicken cooking fiber arts sheep writing
  • Likes 3
  • Mark post as helpful
  • send pies
    Number of slices to send:
    Optional 'thank-you' note:
  • Quote
  • Report post to moderator
ooohhh... pretty!  

age late 1970s at a glance.  Ashford still sells parts for wheels made 1975 onwards, but the older ones work well, but sometimes need a bit of extra love.  the biggest problem is poor repair jobs.  lets see if we can get her working.

is that a crack in the hub?  the hole for the spokes should be snug and glued.  the hub is one piece.

 
r ranson
steward & author
Posts: 38381
Location: Left Coast Canada
13632
8
books chicken cooking fiber arts sheep writing
  • Likes 1
  • Mark post as helpful
  • send pies
    Number of slices to send:
    Optional 'thank-you' note:
  • Quote
  • Report post to moderator
don't give it any more three in one please.

it needs a much lighter oil.  sewingmacine oil works in a pinch, nut i find that's a bit heavy long term.

but you have the right idea about oil in general.
 
Jay Angler
steward
Posts: 12421
Location: Pacific Wet Coast
6991
duck books chicken cooking food preservation ungarbage
  • Mark post as helpful
  • send pies
    Number of slices to send:
    Optional 'thank-you' note:
  • Quote
  • Report post to moderator
I promise - no more 3-1 oil. I don't think we have anything lighter, but I'll check with Hubby and buy something suitable if needed. I wanted it to run at least well enough that I could trouble shoot what all might need to be done to get it working.

The gap in the hub is 2.95 mm wide where I just measured with calipers and seems pretty even all around and it does *not* seem as if finger pressure will bring the two sides back together. I'm glad to see you write that this is not normal, because it seemed to me that it should be solid at the hub. Of course that leads to tomorrow's question of possible repair routes.

Thanks
 
r ranson
steward & author
Posts: 38381
Location: Left Coast Canada
13632
8
books chicken cooking fiber arts sheep writing
  • Mark post as helpful
  • send pies
    Number of slices to send:
    Optional 'thank-you' note:
  • Quote
  • Report post to moderator
could we have some photos of the back?  

Good to find out if everything else is working before disassembling it to repair the hub.
 
r ranson
steward & author
Posts: 38381
Location: Left Coast Canada
13632
8
books chicken cooking fiber arts sheep writing
  • Likes 2
  • Mark post as helpful
  • send pies
    Number of slices to send:
    Optional 'thank-you' note:
  • Quote
  • Report post to moderator
For the record, this wheel is a single drive, Ashford Traditional.  

This is a fantastic resource for old Ashford products: https://www.ashford.co.nz/support/past-products

A side note, it won't ever spin as well as the currently made wheels as there's been a huge improvement in technology in the last forty years.  But it's still an excellent wheel and my very first wheel is only a few months younger and still one of my favourites to use for production work.

the timeline (pdf) puts it at 1980-81.  That means that it fits between these two assembly instructions - the frame is constructed with screws like the circa 1970s (pdf) but the crank and other mechanism are more like this 1980s instructions(pdf)


It's not going to be the most simple of fixes, but it is possible with care and persistence.  

Also, could we get a close up of the flyer and bobbin part and the back of side of the crank?

I'm going to try to find a guide to spinning wheel part names as it's easier to describe parts if we're working with the same lexicon
 
Jay Angler
steward
Posts: 12421
Location: Pacific Wet Coast
6991
duck books chicken cooking food preservation ungarbage
  • Likes 2
  • Mark post as helpful
  • send pies
    Number of slices to send:
    Optional 'thank-you' note:
  • Quote
  • Report post to moderator
I will look at those links later, thanks.
For now more pictures - I don't know how to decrease the density of pixles? - so I'll post twice in the hopes that they will load.
Ashford_back.jpg
[Thumbnail for Ashford_back.jpg]
A_flyer_etc.jpg
[Thumbnail for A_flyer_etc.jpg]
 
Jay Angler
steward
Posts: 12421
Location: Pacific Wet Coast
6991
duck books chicken cooking food preservation ungarbage
  • Likes 2
  • Mark post as helpful
  • send pies
    Number of slices to send:
    Optional 'thank-you' note:
  • Quote
  • Report post to moderator
More pics! There are 4 of those solid flexible translucent bits I placed one of on the base of the bobbin holder that are in the bag of spare parts - I have *no* idea what they are or if they even belong. From my totally uneducated mind, all the bits related to the flyer seem to be there and look OK. The wood itself seems very "dry" as if it needs to be oiled with something appropriate, but I will not do any such thing until advised by much wiser, more experienced spinning wheel people! There are some bits of wool tied to 3 of the bobbins (Yes - I'll work on learning the language, also!) which suggests that this wheel was used at some point, but I have no idea how much or how long ago. I suspect the answer is, "not much and a very long time ago"!
A_flyer_adjustment.jpg
[Thumbnail for A_flyer_adjustment.jpg]
A_extra_parts.jpg
[Thumbnail for A_extra_parts.jpg]
 
r ranson
steward & author
Posts: 38381
Location: Left Coast Canada
13632
8
books chicken cooking fiber arts sheep writing
  • Mark post as helpful
  • send pies
    Number of slices to send:
    Optional 'thank-you' note:
  • Quote
  • Report post to moderator
Looking pretty good.

There is a crack in the flyer (see attached) that might cause problems, but you can buy a new one pretty easily.  http://harmonique.ca/catalog/standard-flyer

Is there anything else in the maintenance kit (zip-lock bag of supplies)?  Here's a link to what it contains http://harmonique.ca/catalog/maintenance-kit

This is a really good kit for tuning the wheel once it's repaired.  The oil has that tiny applicator that makes it easy to put just the right amount in the exact spot it's needed.


crack.JPG
[Thumbnail for crack.JPG]
 
r ranson
steward & author
Posts: 38381
Location: Left Coast Canada
13632
8
books chicken cooking fiber arts sheep writing
  • Mark post as helpful
  • send pies
    Number of slices to send:
    Optional 'thank-you' note:
  • Quote
  • Report post to moderator
The clear rubber thingy (Ashford calls it a Flexible Conrod Joint) is for the wheels made from the mid-1980s to 2012.  Not needed for your wheel as it uses a bit of leather for that task.  


Between the two, I think the leather was better, although the new black conrod joints are pretty fantastic.
 
r ranson
steward & author
Posts: 38381
Location: Left Coast Canada
13632
8
books chicken cooking fiber arts sheep writing
  • Likes 4
  • Mark post as helpful
  • send pies
    Number of slices to send:
    Optional 'thank-you' note:
  • Quote
  • Report post to moderator
oiling the wood.  When the wood is really dry like this, I use furniture friendly oil like walnut (because I like the colour) or linseed and apply oil a couple of times a week until it stops soaking in, then I do a coat or two of furniture wax.  I used to use tried and true, but I find the Ashford Wax is easier to apply and I use this on all the household furniture now.  http://harmonique.ca/catalog/finishing-wax-polish

You can also make your own wax.

Before you start oiling, let's fix that hub.  We don't want the oil interacting with the glue.

And to do that, we need more words

https://midnightyarn.com/wp-content/uploads/2019/07/anatomy-of-a-spinning-wheel-parts-801x1024.jpg


It was hard to find a picture with all the words we need.  This one is missing the hub and axel/crank.  Also, it's a bit inaccurate, but I think we can muddle through.
 
Jay Angler
steward
Posts: 12421
Location: Pacific Wet Coast
6991
duck books chicken cooking food preservation ungarbage
  • Mark post as helpful
  • send pies
    Number of slices to send:
    Optional 'thank-you' note:
  • Quote
  • Report post to moderator
r ranson wrote:

There is a crack in the flyer  

The flyer is made with plywood and the crack is only in a single layer, so I think it's a symptom of the dryness of the wood and unless you feel it will tend to catch the wool, it will be OK in the short term.

r ranson also wrote:

Is there anything else in the maintenance kit

It has all the parts in the picture except that round black thing with the funny hole in it, and, of course the oil is missing!I will look for a source of oil sold separately when we get to that point. If proper oil had come with it, I would have used that. Hubby called (he's in the States for another week) and he suggested WD40, but I suspect you won't approve of that option either, but I also feel that issue isn't critical path. That said, I had to install the flyer myself (it was in a bag with various bits) which I did by following a YouTube video, but the shaft that the bobbin slides on will eventually need some polishing - I recall the video said emery cloth and I'm sure Hubby has some of that, but it will wait until he's back.

r ranson also wrote:

Before you start oiling, let's fix that hub.  We don't want the oil interacting with the glue.

Absolutely! I'd already figured you'd say that, but I still wanted to give you a heads up as I think the way the hub's broken and the dry wood are related. I read the thread here: https://permies.com/t/54431/permaculture-fiber-arts-tools/fiber-arts/bought-spinning-wheel-photos-questions  last night and noted what one member had said about how wood ages. I know this wheel isn't hugely old by some standards, but how wood is cared for makes a big difference. My sister in Ontario refinished a beautiful bedroom set from my grand-parents and she used a lot of linseed oil until, as you say, it stopped soaking it up and it looks gorgeous now. Other fixes first though.

I understand the vocabulary in the image you posted, and I know what the hub and crank are, so now I just have to get used to using the correct words until I don't have to refer back to the image. Thanks for your help so far!
 
r ranson
steward & author
Posts: 38381
Location: Left Coast Canada
13632
8
books chicken cooking fiber arts sheep writing
  • Likes 1
  • Mark post as helpful
  • send pies
    Number of slices to send:
    Optional 'thank-you' note:
  • Quote
  • Report post to moderator
great.  I'm very glad it's just one layer of crack on the flyer.  That should repair with oil, although if you think it would help you could use a bit of glue and a syringe to glue that layer down.  Maybe take the hooks out so it's easier to clamp/weight while the glue drys.

To repair the wheel, let's take it off the frame.  

(I'm going to explain this really simply not because you need it, but for future readers, if they ever have to do this)

There's a crank/axel that goes through the wheel and is held in place with the hubpin.  But before taking out the hubpin, try to remove the top of the footman by bending the cotter pin back straight and slip the footman off the crank.

footman.JPG
[Thumbnail for footman.JPG]
removing the footman
 
r ranson
steward & author
Posts: 38381
Location: Left Coast Canada
13632
8
books chicken cooking fiber arts sheep writing
  • Likes 1
  • Mark post as helpful
  • send pies
    Number of slices to send:
    Optional 'thank-you' note:
  • Quote
  • Report post to moderator
Next is to remove the hubpin.  (if you break the pin, it's easy to get a new one - so if it's a choice between wood and pin, break the pin.)


If the hub was whole, I would take a nail about the right size and hammer the hubpin out.  But I can't tell without being there the best path to remove the pin.  

The pin is a little bit shorter than the hub and goes through a hole in the axel.  

Once the pin is out, you should be able to carefully (and with much swearing) pull the crank (axel) out.  Might have to work it out a bit.  It should fit in there extremely snugly.  


From there, assess the hub and see if it can be glued back together.  

I thought about screwing it together, but this will affect the balance of the wheel which isn't desirable.  If possible, glue and clamp will be the way to go.
 
Jay Angler
steward
Posts: 12421
Location: Pacific Wet Coast
6991
duck books chicken cooking food preservation ungarbage
  • Likes 1
  • Mark post as helpful
  • send pies
    Number of slices to send:
    Optional 'thank-you' note:
  • Quote
  • Report post to moderator
r ranson wrote:

(I'm going to explain this really simply not because you need it, but for future readers, if they ever have to do this)

I agree completely!
I used needle nosed pliers to close the cotter pin and gently wiggled it until I could get it free. I then slid the cotter pin onto an extra-long twist-tie and fastened it around the footman and the frame so there wouldn't be bad forces on the leather connection. I've got spare leathers, and I can get a replacement cotter-pin, but at least this way I won't be tripping over stuff, and have a suitably sized example if it needs replacing.
 
Jay Angler
steward
Posts: 12421
Location: Pacific Wet Coast
6991
duck books chicken cooking food preservation ungarbage
  • Mark post as helpful
  • send pies
    Number of slices to send:
    Optional 'thank-you' note:
  • Quote
  • Report post to moderator
Question: There is "hub pin" showing on both the top and the bottom of the hub, and about the same amount on both. Does this mean that it's one pin going all the way through the hub and axle and out the other side? If so, Hubby has some flat "nail set" type tools that might be the best thing to get the job started. First I will even just try wiggling it.
 
r ranson
steward & author
Posts: 38381
Location: Left Coast Canada
13632
8
books chicken cooking fiber arts sheep writing
  • Mark post as helpful
  • send pies
    Number of slices to send:
    Optional 'thank-you' note:
  • Quote
  • Report post to moderator

Jay Angler wrote:Question: There is "hub pin" showing on both the top and the bottom of the hub, and about the same amount on both. Does this mean that it's one pin going all the way through the hub and axle and out the other side? If so, Hubby has some flat "nail set" type tools that might be the best thing to get the job started. First I will even just try wiggling it.


It should be one pin... but if it's longer than the hub is wide, it might mean someone was creative in the past... which might be why the damaged happen.  So we might uncover a mystery when trying to take it out.  

Go gentle and slow.  It will come out with persistence easier than with brute strength.

 
Jay Angler
steward
Posts: 12421
Location: Pacific Wet Coast
6991
duck books chicken cooking food preservation ungarbage
  • Likes 4
  • Mark post as helpful
  • send pies
    Number of slices to send:
    Optional 'thank-you' note:
  • Quote
  • Report post to moderator
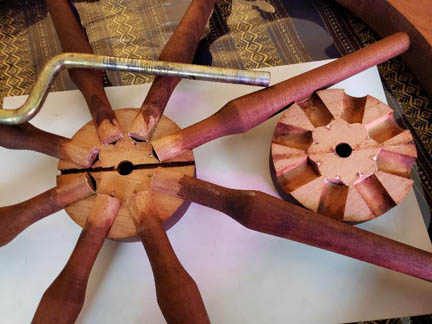
Sooo...I determined with a flash light that in fact the hub pin (which is hollow) went all the way through. I hoped that meant it was all one piece, but alas, no. To the right of the hammer in the picture are the two pieces of the hub pin. The short piece came out first leaving nothing showing, and the nail set had no more length. Good thing we've got a good collection of #8 machine screws - I found one just long enough to tap the longer hub pin far enough out that I could pull it the last bit. The screw driver was back-up in case the machine screw got stuck, but is was loose enough that once I had a hold on it, it slid out nicely. "I love it when a plan comes together!"

So next I firmly twisted the crank little bits either way until it slid out.  As soon as it was out, the pieces of wood easily pushed together.


So now it's back into the consultant's hands! I'm thinking I will need some way to support the rim of the wheel in the correct plain, put lots of wood glue around the bases of the spokes and hub parts, assemble the two halves, and then put a lot of weight on it? I do have a friend with a horizontal press if that would work. I've got various clamps, but the issue would be supporting it while trying to get the clamps on. I'm sure my permie friends, particularly r ranson, will voice their opinions and a plan will evolve, but evening chores come first.
 
r ranson
steward & author
Posts: 38381
Location: Left Coast Canada
13632
8
books chicken cooking fiber arts sheep writing
  • Likes 1
  • Mark post as helpful
  • send pies
    Number of slices to send:
    Optional 'thank-you' note:
  • Quote
  • Report post to moderator
wow!  Good work!

weird about the hubpin.  But each wheel develops a life of its own as it ages.


I'm thinking I will need some way to support the rim of the wheel in the correct plain, put lots of wood glue around the bases of the spokes and hub parts, assemble the two halves, and then put a lot of weight on it?  


That sounds perfect.

um... the how bit is going to be interesting.  My technique for this sort of thing involves using a lot of cookbooks to prop things up and weigh them down, which I admit, has inconsistent results.  

The wheel needs to be well balanced and with as little twist/warp in it as possible.  Some warp is fine, but less is better.  Getting everything just right before glueing is going to be key.
 
Jay Angler
steward
Posts: 12421
Location: Pacific Wet Coast
6991
duck books chicken cooking food preservation ungarbage
  • Likes 3
  • Mark post as helpful
  • send pies
    Number of slices to send:
    Optional 'thank-you' note:
  • Quote
  • Report post to moderator
So, since r ranson has had inconsistent results, I thought about options and then discussed the options with the friend who gave me the wheel (which it turns out he actually paid money for and now doesn't know if it came broken, or got wobbly at his place while waiting for him to have time to try using it - could be either).

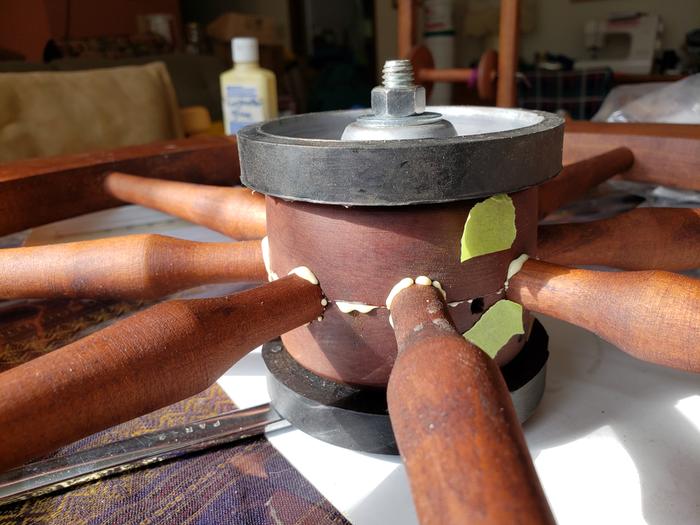
So between us, we figured the way to clamp it was with a bolt through the hub. A 3/8" bolt is a perfect fit. I needed a 4" long one, and of course, Hubby's spare parts collection had lots shorter than that, and a couple too long, but B also had two discs from an obsolete Troy tiller that would work as giant washers, so I popped over and picked up what I needed.

So here's the wheel with the bolt head on the bottom out of sight, then the first disc (you can see the second one near the bottom left of the picture). The books are supporting the rim at as close to the correct height as I could calculate to keep everything square. Then a thorough glue job, then the top half of the hub, the second disc, a washer, the nut and firmly tightened.

The pieces of green tape were put on the hub to make sure it went back in the orientation it started out in before disassembling. If I'd been smart, I would have marked exactly how the spokes were oriented as well, but I was just very careful not to rotate it while working, because by the time I realized I should have marked it, I had glue on my fingers. I assumed it was appropriately tight by the glue that squished out (I cleaned off the blobs after the picture!)

So now we wait. I'm thinking I should leave it 3 days for the glue to firmly set, but I might be being overly cautious. I'm also trying to think of a way to clamp the hub while reinstalling the axle, as the axle is a very snug fit.  Fingers crossed and wood touched - it's going to work!
 
pollinator
Posts: 2538
Location: RRV of da Nort, USA
721
  • Likes 2
  • Mark post as helpful
  • send pies
    Number of slices to send:
    Optional 'thank-you' note:
  • Quote
  • Report post to moderator
Well, Jay.....I can safely say that my gluing job and overall repair looks a lot uglier and more slap-dash than yours! :-)

Our house just has too many dogs and pigs running around in it and over many years, my wife's Ashford got tipped over too many times.  In the end, I think the hub just split in two after one final mishap.  Somehow between glue and drilling two holes into which were sunk two bolts for integrity (you can see one bolt head in the photo), the wheel still turns and somehow was true enough for her to continue to use.  Not sure how old it is now, but it was bought new probably in the mid to late '90s.
ashfordhub.JPG
[Thumbnail for ashfordhub.JPG]
 
Jay Angler
steward
Posts: 12421
Location: Pacific Wet Coast
6991
duck books chicken cooking food preservation ungarbage
  • Mark post as helpful
  • send pies
    Number of slices to send:
    Optional 'thank-you' note:
  • Quote
  • Report post to moderator
John Weiland wrote:

Well, Jay.....I can safely say that my gluing job and overall repair looks a lot uglier and more slap-dash than yours! :-)  

Thank you for the compliment. The person who gave it to me wanted to use screws or bolts, but r ranson didn't feel that was her first choice, and I think between B and I we came up with something that will work well. I think the bolt through the center will have kept the alignment in one plain true, but how well I've kept the spokes at right angle to the axle we won't know until the glue sets. Bolts will be the back-up plan!
 
John Weiland
pollinator
Posts: 2538
Location: RRV of da Nort, USA
721
  • Likes 1
  • Mark post as helpful
  • send pies
    Number of slices to send:
    Optional 'thank-you' note:
  • Quote
  • Report post to moderator
Agreed that bolts/screws would be the last-ditch effort.  I wonder why they decided to put the pin on the outside of the hub in model that my wife bought.....looks like that same pin was more centrally located in your hub..?   I can't recall what attempts I made to keep the wheel true during re-assembly, but my wife has not commented about it being more difficult to use.  She's not spinning as often now....still pulls out some 15 year old fleece from a bag to keep in practice and also cards and spins some longer dog hair.  Anyway, the good news is that the unit has gotten knocked over again a few times since the repair and the hub is holding steady.
 
r ranson
steward & author
Posts: 38381
Location: Left Coast Canada
13632
8
books chicken cooking fiber arts sheep writing
  • Likes 1
  • Mark post as helpful
  • send pies
    Number of slices to send:
    Optional 'thank-you' note:
  • Quote
  • Report post to moderator
WOW!  That is looking good!

Depending on the glue, it should be cured in 12-24 hours and you can unclamp it.

While we wait for the wheel to finish, let's have a look at the frame.  Just to be sure we have the same word, I made a picture and circled what I mean by frame.

Notice how the fancy part with the flyer isn't circled.  That whole section is the "motherofall" (all one word) or maiden bar and flyer assembly (as Ashford calls it).  We'll tune that up last.

For the frame, check to see that all the screws are tight and hold onto the wood (don't just turn round and round).

**NOTE please don't oil the grove of the wheel where the drive band goes***

You could probably start oiling the frame and wheel once the glue is cured.  It will be easier to oil the wheel while it's disassembled.
frame.JPG
ops, it was supposed to include the treadle and legs
 
r ranson
steward & author
Posts: 38381
Location: Left Coast Canada
13632
8
books chicken cooking fiber arts sheep writing
  • Likes 2
  • Mark post as helpful
  • send pies
    Number of slices to send:
    Optional 'thank-you' note:
  • Quote
  • Report post to moderator
I took this picture from learn to spin on an Ashford Wheel (pdf).  You can buy a paper copy for pretty cheap or download the free PDF.


This is set up like your wheel for "single drive spinning with a Scotch tension" - which I totally understand look like a bunch of random words.  Just stash them in the brain for later.

When oiling this, there are two places we don't want any oil.  In the groves of the bobbins and the groves where the drive band goes.  The drive band and brake band both require friction to work, and a lot of trouble comes when people make those groves too smooth.  The less friction there is, the more work you the spinner has to do - which kind of defeats the purpose of having a machine to do the work for us.

If I have to do a lot of coats of oil, I will remove the drive band (this usually needs replacing anyway) and throw it away.  Remove the flyer hooks (don't throw these away) and the brake band by removing the "brake band tension knob", and unscrewing the eye that guides the band (keep these too as yours look in good condition and set up nicely).

Before you oil, decide if you want to repair that crack with glue.  If so, nows a good time to get a small syringe and some wood glue to get the glue in there.  The placement is that it probably won't catch on the yarn.

Maybe before oiling, give the flyer a quick sanding if you find any rough bits.


While we're thinking about things that are easy to fix, can we have a closeup picture of the leather at the bottom of the footman?

 
r ranson
steward & author
Posts: 38381
Location: Left Coast Canada
13632
8
books chicken cooking fiber arts sheep writing
  • Mark post as helpful
  • send pies
    Number of slices to send:
    Optional 'thank-you' note:
  • Quote
  • Report post to moderator

John Weiland wrote:Well, Jay.....I can safely say that my gluing job and overall repair looks a lot uglier and more slap-dash than yours! :-)

Our house just has too many dogs and pigs running around in it and over many years, my wife's Ashford got tipped over too many times.  In the end, I think the hub just split in two after one final mishap.  Somehow between glue and drilling two holes into which were sunk two bolts for integrity (you can see one bolt head in the photo), the wheel still turns and somehow was true enough for her to continue to use.  Not sure how old it is now, but it was bought new probably in the mid to late '90s.


If you post a photo of the full wheel, I should be able to give you a rough date on when it was made.
 
r ranson
steward & author
Posts: 38381
Location: Left Coast Canada
13632
8
books chicken cooking fiber arts sheep writing
  • Likes 3
  • Mark post as helpful
  • send pies
    Number of slices to send:
    Optional 'thank-you' note:
  • Quote
  • Report post to moderator
I want to point something out in this picture


You can see the hub pin length is less than the diameter of the hub.  The newer ones are a bit longer, but this is a good length.

When assembling a wheel, I usually leave mine sticking out one side just enough to get a pair of needle-nose plyers to grip it if I ever have to take it out.  
 
John Weiland
pollinator
Posts: 2538
Location: RRV of da Nort, USA
721
  • Mark post as helpful
  • send pies
    Number of slices to send:
    Optional 'thank-you' note:
  • Quote
  • Report post to moderator
Thanks, r!.... She bought it new I'm pretty sure back in the 1990s..?..  The attached photos are not the best but show most of the parts.  The rug with the primitive pig art was done with some of her yarn if I recall correctly.  The sheep we were shearing at the time were all sorts of colors and she also tried some of the natural dyeing of the white wool at the time.  Don't know if she will ever pick up in earnest again, but currently is too busy with construction projects.  Thanks again!....
AshfordPlus.JPG
[Thumbnail for AshfordPlus.JPG]
AshfordAngle.JPG
[Thumbnail for AshfordAngle.JPG]
 
r ranson
steward & author
Posts: 38381
Location: Left Coast Canada
13632
8
books chicken cooking fiber arts sheep writing
  • Mark post as helpful
  • send pies
    Number of slices to send:
    Optional 'thank-you' note:
  • Quote
  • Report post to moderator
pretty wheel.

John can we see a photo of the other side?
 
John Weiland
pollinator
Posts: 2538
Location: RRV of da Nort, USA
721
  • Likes 1
  • Mark post as helpful
  • send pies
    Number of slices to send:
    Optional 'thank-you' note:
  • Quote
  • Report post to moderator
Again, apologies for the quality of the photos.....and the backdrops! :-/

Top photo illustrates the "State of the Problem"..... a creature that uses it's snout like we use our hands.  He's done his share of furniture arrangement including the spinning wheel. :-)

Bottom photo is the flip side of the wheel....the "sitting side".  Let me know if you need another angle......Thanks, r!
AshfordGuiltyParty.JPG
[Thumbnail for AshfordGuiltyParty.JPG]
AshfordFlipSide.JPG
[Thumbnail for AshfordFlipSide.JPG]
 
r ranson
steward & author
Posts: 38381
Location: Left Coast Canada
13632
8
books chicken cooking fiber arts sheep writing
  • Likes 1
  • Mark post as helpful
  • send pies
    Number of slices to send:
    Optional 'thank-you' note:
  • Quote
  • Report post to moderator
Beautiful John, thanks for sharing the photos and the repair.

Love the "problem".  Gorgeous!  

The late 1980s or possibly early to mid-1990s (the ballbearing wheel thingies came in circa 91)
 
Jay Angler
steward
Posts: 12421
Location: Pacific Wet Coast
6991
duck books chicken cooking food preservation ungarbage
  • Likes 2
  • Mark post as helpful
  • send pies
    Number of slices to send:
    Optional 'thank-you' note:
  • Quote
  • Report post to moderator
Things have been crazy busy! Late yesterday I removed the bolt and the wheel looks great - just looking at it, everything looks lined up in the correct plains. Hopefully it will look as good once it's mounted.
Last night I got the crack on the flyer sanded and glued. I wouldn't say it's "vanished", but it's harder to see.
Next I was going to work on oiling the wood - being *very* careful to avoid areas that need friction - however the "adult-proof" cap on the twice-boiled Linseed oil defeated me. Tonight I asked my BSB (Big Strong Boy) to get the lid off - not a chance! We ended up breaking the lid, but since I was suspicious that was going to be the case, I'd already found a suitable glass replacement container. Tomorrow I will make sure the label comes off the old container and gets duck-taped to the new one!

I may try to do a second coat tomorrow. It seemed to all soak in pretty quickly. If I get to it early in the day, I might be able to do an early and an evening coat depending on how it reacts.
 
r ranson
steward & author
Posts: 38381
Location: Left Coast Canada
13632
8
books chicken cooking fiber arts sheep writing
  • Mark post as helpful
  • send pies
    Number of slices to send:
    Optional 'thank-you' note:
  • Quote
  • Report post to moderator
for those who are new to this, oily rags can cause fire.  here is how to safely dispose of oily rags https://www.statesman.com/article/20140507/NEWS/305079607
 
Jay Angler
steward
Posts: 12421
Location: Pacific Wet Coast
6991
duck books chicken cooking food preservation ungarbage
  • Likes 1
  • Mark post as helpful
  • send pies
    Number of slices to send:
    Optional 'thank-you' note:
  • Quote
  • Report post to moderator

r ranson wrote:for those who are new to this, oily rags can cause fire.  here is how to safely dispose of oily rags https://www.statesman.com/article/20140507/NEWS/305079607


Yes, I meant to make that important point. The container mentions a couple of ways, but I admit I cheated - I put the rag directly into our wood stove! It did not spontaneously combust overnight, which Linseed-oil rags are capable of doing, but if it had, it wouldn't have done any harm.
 
r ranson
steward & author
Posts: 38381
Location: Left Coast Canada
13632
8
books chicken cooking fiber arts sheep writing
  • Mark post as helpful
  • send pies
    Number of slices to send:
    Optional 'thank-you' note:
  • Quote
  • Report post to moderator
how is it going?
 
Jay Angler
steward
Posts: 12421
Location: Pacific Wet Coast
6991
duck books chicken cooking food preservation ungarbage
  • Likes 4
  • Mark post as helpful
  • send pies
    Number of slices to send:
    Optional 'thank-you' note:
  • Quote
  • Report post to moderator
I'm afraid things stalled for three reasons: 1. I wanted to get some seeds in pots to start germinating - priorities! 2. I wanted to get duck eggs in the incubator - same! 3. I didn't have any furniture polish. I thought about buying some, but the internet is my friend.

Sooo...
What I did:

~1 Tbsp of a beeswax sheet finely chopped (measured after chopping)
~3 Tbsp of olive oil (slightly rancid, so I figured this was a good use)

I put water in a pot and put a canning jar ring in the bottom.
I set a small jar on the ring with the wax in it.
I started the burner and tried not to get the water to boiling, but it was close.
When the wax was melted, I slowly poured in the olive oil, stirring while I did.
I turned the heat off and carefully lifted out the jar and let the mixture cool.

I didn't want to make as much as the internet suggested for my first try, and the advantage of that little jar is that it has a lid, so the only things to clean were the measuring spoon and the stirring spoon.

Home-made-wood-polish.jpg
[Thumbnail for Home-made-wood-polish.jpg]
Tonight's job is to actually use this concoction! I'll report on the results tomorrow.
 
Jay Angler
steward
Posts: 12421
Location: Pacific Wet Coast
6991
duck books chicken cooking food preservation ungarbage
  • Likes 3
  • Mark post as helpful
  • send pies
    Number of slices to send:
    Optional 'thank-you' note:
  • Quote
  • Report post to moderator
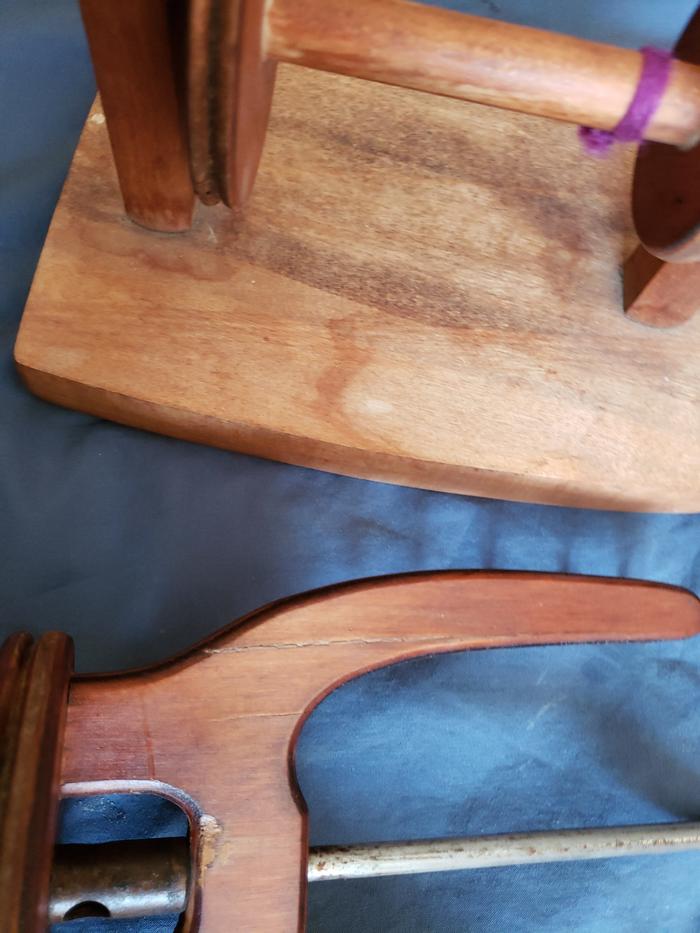
I used my homemade polish one evening and yesterday afternoon I wiped and "polished" with a clean piece of cotton t-shirt. Quite a bit of my homemade goop came off from the frame which I'd done last and maybe was more generous when applying. The goop was fairly soft. My gut feeling, from zero experience, is that I should have used only 2 tablespoons of the olive oil. If I decide to use the stuff I've got left for a project, I'm thinking I'll add one more tablespoon of the finely chopped wax (under heated conditions). The wheel feels dry and not oily this morning but the base feels the tiniest bit greasy under my fingers. Unless more experienced people vote otherwise, I'm quite prepared to leave it as is and assume it will soak in over the next week.

I gave the flyer 2 coats of double-boiled linseed oil, and one coat of my homemade polish and I've done nothing for the "lazy kate" as the frame with bobbins appears to be called. I'm not sure how well the difference really shows in the picture but in real life, I feel the wood is happier with the TLC I've given it, and I will make an effort to give the lazy kate some - maybe add that extra bee's wax and I'll have another "experimental variant".

Earlier, r ranson asked about loose screws (Hubby would accuse me of having several for just tackling this project, but I think I've learned a lot already and learning is good for the brain!) The frame screws are all tight and the frame feels very solid. The Motherofall is not perfectly tight to the base, but I gather that may need some adjustment anyway and it doesn't look damaged and the screws are very tight - there's just a little give in the system. The screw to the Maiden on the "sitting side" was loose, but not stripped. I tightened it a wee bit, but I'm wondering if the maiden should be able to rotate a little just to make it easier to get the bobbins on and off by removing the flyer. If so, it may have loosened over time with use, but that's just a guess. The screws are slot - has someone educated the builders about how much easier Robertson screws are to operate? (Actually I've been hearing some really good things about the modern "star" drives also - apparently they're becoming a favorite with tradespeople.)

So over to r ranson again for further expert opinion!
 
r ranson
steward & author
Posts: 38381
Location: Left Coast Canada
13632
8
books chicken cooking fiber arts sheep writing
  • Likes 2
  • Mark post as helpful
  • send pies
    Number of slices to send:
    Optional 'thank-you' note:
  • Quote
  • Report post to moderator
It looks much happier!

Softer is good for the first few coats.  You could thicken it up for a final coat, if you want to.

When you do your final coat - no matter what you choose - leave on for 24 hours, then buff with a dry cloth.  Any standing oil/wax left on the outside will become tacky and icky to touch, so the final buff helps avoid that.

The maiden on the side closer to the spinner is usually slightly loose so you can turn it by hand, but not have it turn when you don't want to.  But we'll adjust this when we put it all together.

I'll gather my thoughts together for the next step.  I think it involves looking at the hub pin (the long one) and seeing if it was too big and therefore the cause of it splitting.  The pin has a crack all the way down the side so it can compress?
 
Jay Angler
steward
Posts: 12421
Location: Pacific Wet Coast
6991
duck books chicken cooking food preservation ungarbage
  • Mark post as helpful
  • send pies
    Number of slices to send:
    Optional 'thank-you' note:
  • Quote
  • Report post to moderator
r ranson wrote:

Softer is good for the first few coats.  You could thicken it up for a final coat, if you want to.

That makes it sound as if you'd add a second coat of the wax polish as it is, and possibly a 3rd coat of the polish thickened, as opposed to considering the wood is sufficiently finished with what I've already done. Since I've never done this before, I have know way to know "when done is done". But if you think I should do more wax coats, I will absolutely start that cycle today!

r ranson wrote:

I think it involves looking at the hub pin (the long one) and seeing if it was too big and therefore the cause of it splitting.  The pin has a crack all the way down the side so it can compress?

Yes, the pin has a crack - I can stick my thumbnail in it easily. Hubby has a measuring tool I could measure it with - used for adjusting spark plugs among other things - if that info would be helpful? I would say that even when the pin was well out, it was too stuck for me to use pliers to easily pull out, so I kept tapping. That said, I was also erring on the side of not damaging things further. My friend Lloyd has a ginormous press if you think the pin would benefit from a "little squishing" - the trick would be deciding how much squishing! But I'm assuming the pins are available by mail if not at a local shop?
 
r ranson
steward & author
Posts: 38381
Location: Left Coast Canada
13632
8
books chicken cooking fiber arts sheep writing
  • Mark post as helpful
  • send pies
    Number of slices to send:
    Optional 'thank-you' note:
  • Quote
  • Report post to moderator
how many coats depends on the wood.  A chair I did recently had 5 coats of oil and 4 coats of wax.  A month later, it was dry again, so it had two more coats of wax.  

Other things only need one coat every few years.  

My general feeling is more is better, but each wood is unique, so it's up to you to decide when it's had enough oil/wax.  
 
I'm gonna make him a tiny ad he can't refuse!
permaculture and gardener gifts (stocking stuffers?)
https://permies.com/wiki/permaculture-gifts-stocking-stuffers
reply
    Bookmark Topic Watch Topic
  • New Topic