Dan Henn

+ Follow
since Dec 28, 2012
Merit badge: bb list bbv list
For More
Metro Detroit Michigan
Apples and Likes
Apples
Total received
In last 30 days
0
Forums and Threads

Recent posts by Dan Henn

Hi guys,

I did get to the brick supplier last week and bought some full size fire brick. The full bricks are 9”x4.5”x2.5” while the splits are 9”x4.5”x1.25” to confirm othe comments above.

I decided to get 40 bricks to play with, waiting for a dry Saturday or warmer weather to start experimenting, but being in SE Michigan might keep me waiting for a while.

I plan to dry-stack a J-Tube if I have enough brick. Ultimately, I want to build a batch box, but will experiment my way toward that design.

Best Regards,
Dan
1 year ago
Sorry for the goofy wording, not half the cost at TSC, but rather split bricks cost about half the price you’d pay at TSC and the full bricks were only an additional $0.50 above the split brick price.
2 years ago
To support Thomas and Scott’s remarks, I called a local brick supplier and they have full and split bricks along with mortar material. The guy said most often contractors are building pizza ovens with the brick.

The only limit was in getting the temperature rating for the brick. The most the guy would confirm was 2000F and the manufacturer of the brick. I’ll have to do some looking to see what the manufacturer says for temperature rating.

The good news is the full and split brick cost about half the price at TSC and they only have split brick available (4x9x1” or a bit more than 1”) so it’s worth a call to a masonry supplier.

Best of Luck,
Dan
2 years ago
I've added a couple pictures of the doors with the frames.  They are on hinges, but the air openings are inadequate.

The stove had a burn box inside with an air jacket all the way around, hence the rectangular holes at the top and bottom corners of the wider panel with the double doors.  Below the double doors is a separate door for the ash tray.  Otherwise there are no openings intended to feed air to the fire in this panel.

The side panel has several holes for different tools that were attached to axles that extend through the openings.  Below the door are two holes for ash agitators that help drop the ash below the floor of the burn box into a tray.  The larger hole above the door is for a secondary air inlet that fed tubes below a catalyst honeycomb.  The small hole above the door operated a bypass damper, after starting a fire and getting it up to temp the damper can be switched to exhaust through the catalyst for a cleaner burn, in theory.  

I'd prefer to use a secondary air tube that runs on the floor of the batch box.  I wouldn't try to cut a new air hole in the cast iron, but rather try to weld an extension to the air feed tube that brings the fresh air opening to the side of the batch box.  So far I haven't read anything that indicates a limit on length of fresh air feed tube, just about the material type of the secondary air riser tube itself and how using regular carbon steel is inadequate.
2 years ago
Greetings,

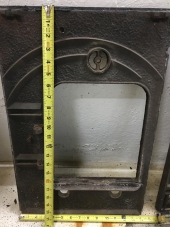
Recently I've been doing some remodeling and in doing so disassembled a cast iron woodstove that I haven't used in 10 years.  The stove is a rectangular shape of assembled cast iron panels, they're bolted together and have tongue & groove channels filled with fire-mortar.  The stove has a double front door for loading and has some glass panels, but the face holding the door is the largest panel of all panels.  I also have a side panel with a door that is used for side loading the wood.  I was thinking of using one of these panels/ door assemblies as a RMH batch box door.  The side panel is attractive because of it's slim profile, but does not have any glass in the door.

Attached are some pics of the cast iron panels that hold the cast iron doors with some tape measures to show approximate dimensions.

I've been told the door can be larger than the batch box opening, so that shouldn't be a problem.  I'm wondering if anybody else has recycled woodstove doors for batch box doors?  I also welcome the discussion and ideas that stem from topics like this, I enjoy reading the thoughts and experiences of others in this forum.

Thanks,
Dan
2 years ago
William Bronson - It seems your response is the most direct toward the question and I have the same question.  I'm getting ready to do my first RMH build and want to put the RMH in my basement.  I'm in SE Michigan and have an endless supply of very fine clay on my property.  My concrete floor is on that same clay and could soak up a lot of heat, making it tough to harvest the heat for my bench.

I've thought about using the pink foam insulation board between my basement floor slab and some concrete board for the foundation of my RMH.  I'll probably need to use a layer of brick/ block on top of the concrete board for the base layer and then start building my J-Box out of fire brick.  The pink foam insulation board has a compressive strength of 30 psi so it should be able to bear the weight of the stove.  I am concerned about making the base of the RMH too high above the floor to where my bench would need to be uncomfortably tall.  

Back to the original question - what are your opinions of insulating the RMH from the concrete floor?  Best methods?  Materials to avoid?  

Additional question - when ducting the bench, what are the "rules" for ducting at/ below the elevation of the horizontal burn tunnel?
2 years ago
Allen - Thanks for the tips. I have been tinkering around with various rocket stoves for the past year and have been learning how things behave. One of my favorite little projects was a wood gas stove, I think a TLUD stove. All these different gizmos are very fickle and my clumbsy nature doesn't work well on it's own so I've had to pay much greater attention to detail than I originally thought. With this little project, I'll likely tack-weld things in place and test it out in the wide open outdoors. I was considering a 3" inlet and a 4" outlet and Jacob suggested that as well. Having the stack run vertically was another thing I was somewhat certain on to avoid failure. So all the suggestions are welcomed.

I think I'll need to draw up a diagram to illustrate my plan. I'll also need to take some photos to post later. I'm hoping this experiment ends up being fun if nothing else and if I'm lucky it'll burn wood as well. If things go well, I'll move on to a larger scale project with proper materials and insulated components, but what you said about most of the heat going out the stack sounds reasonable.

Thanks again guys,
Dan
10 years ago
Regarding Jacob's comments - all taken in good faith. My main goal is to get something that works for the specific goal I set, this one being a vessel with a closed combustion chamber. I'm simply expecting to burn small sticks and other fuel similar to a rocket stove used for cooking, but if done right it will contain the smoke gasses and vent them how and where I want.

The goes-out must handle the goes-in so the obvious starting point is to make intake and exhaust the same size. This should work in regard to air in = air out.

Picture a 20 lb propane tank safely decommissioned, valve removed. Where the valve once was, cut a 3" hole for the steel riser, weld riser to tank about 1 1/2" from bottom of tank. Flip over tank, add legs as required, add burn tube, J-tube and elbow from burn tube to heat riser. Near the bottom of the tank (formerly the top) cut another 3" hole for the exhaust and weld in a bulkhead/ pipe stub. Then add an elbow and enough vertical pipe to get comfortably above the level of the top of the heat riser and it should be ready for testing.

The design is crude, uninsulated and likely inefficient. However, before I attempt to build a full-on RMH with insulated burn tube and heat riser and thermal battery bench, I'd like to know that I can make a gas-tight vessel that applies at least one principle, that being the rocket action. The added benefit of using the propane tank as a bell (hopefully) is to allow for a greater area for the heat from exhaust gases to radiate out before being vented to the atmosphere. Crude, but a baby-step if you will.

Thus far, the scariest part of the process has been emptying the propane tank safely and burning off the residual gas that remains in the tank. Fortunately I didn't create a bomb and the remainder of the project shouldn't have anything near the risk level as decommissioning the tank.

Thanks for the input,
Dan
10 years ago

Bob Jackson wrote:A friendly exhaust shop might let you scavenge their junk pile for a piece of 3" stainless, might find a good shape and it would last longer.


That's a pretty good idea!
10 years ago
Hey all,

At risk of sounding like a broken record, I've not yet built a RMH and have an idea. I'm trying to build a prototype just to aid in my own education. I have an emptied 20 lb propane tank that I will use for my bell. I will cut a 3" or larger hole in the bottom for the heat riser. I plan to cut an identical size hole near the bottom of the bell for the exhaust. I plan to use thinwall conduit or 3" exhaust pipe for the burn tunnel and heat riser, keeping the top of the heat riser about 1 1/2" from the top of the bell. I know using regular steel won't hold up, but this is strictly an experiment. I don't expect much in the way of performance, but I do want to be able to burn sticks similar to the way I can with a "soup can" Rocket Stove. I figure it's worthwhile to experiment a little, maybe even use the heater in my fishing shanty until I burn it out.

I don't expect this to be a long-term appliance, nor do I expect to do much more than build a really cool miniature wood stove. I've seen a lot of discussion on RMH design not working very well below a 6" burn chamber/ heat riser. Understanding my low expectations, does anybody have any advice? I will try the build anyway, but I hate to overlook something obvious.

Thanks, this forum has been made great by great people.

Dan
10 years ago