I feel it is good to move in the direction of the materials ethics you mention, but it is a question of what kind of progress is made and how. RMHs come from a 'scrapper' ethic, making real world improvements for people that need something that works. Now.
For me, the priority is materials that are affordable and promise to be environmentally neutral or positive. I avoid cement because of embedded energy, but also because a large slab in the ground will remain an obtrusive part of the environment well after it's initial purpose is forgotten. Cinder blocks on the other hand can easily be removed and repurposed, so I consider them a compromise sometimes acceptable when alternatives offer little promise.
Of course, cement isn't an option for a RMH in any aspect that doesn't have an easy, preferable alternative. Firebricks seem a comparable situation. There is an embodied level of energy and cultural dependence to make and transport them. But I see no downside past that point. They present no threat of toxicity to the environment and break down into natural elements solely by physical means as far as I'm aware. For my ethical calculations, the good they can do in application far outweighs the costs of production, assuming the general manufacturing and transportation base exists in anything close to what it is at present.
One element of "local" is how to view the existing production and distribution networks. 'Scrapping' makes use of readily available materials that would otherwise become landfill waste. But if use of such materials becomes part of a codified, growing system, it helps reinforce production methods that produce waste and excess. It would seem a tough call at what point making use of 'waste' products becomes encouragement to produce more of that waste. Using scrapped materials though often makes an RMH more reliable and reproducible than creating a similar element from local, scratch material. I guess that is the trade off you are looking to find help deciding on?
This is just to reflect on the difficulty of innovating in the direction you mention without practical experience of working examples, knowing what change has decent promise of being part of a fully functional system and all the possible trade-offs a change may have on connected elements. I believe there are many innovators out there who have made systems that include incredible novel changes, but they work in such a way that it is difficult to communicate what they embody and how others may implement them.
So I have some experience to address your questions, but it is impossible to say if the would apply to something you construct if you plan to deviate much from common design elements my system is based upon.
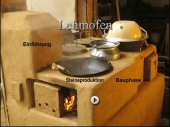
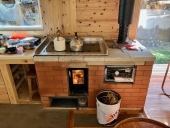
I have an 8" system based upon the Ernie and Erica barrel/ducted bench model. I am in a yurt with limited insulation (my primary deviation from the assumed norm), and have found the need to have the system running to keep the room livable during the winter. As such, I've discovered it would likely have been better to install a 6" system. I do cook on the barrel as my almost sole source of cooking heat in the winter. I don't notice the lack of fine controls over temperature, it is something I find easily adjusted to through any number of creative innovations and the overall aesthetic just feels wonderful. I can boil water in the center of the barrel top, but it takes a good while running at full blast. The only other problem that comes to mind is that one of my go to dishes is a 'stir fry' that is more of an enhanced sautee' I'm told. Keeping frying temperatures going for close to an hour can make the space uncomfortably hot even when it is -10* outside. (I also found out that high temperatures can destroy the coating on plastic eyeglass lenses, need to find actual glass ones somewhere.) Not sure if a 6" system would be different. Then again, a little sweat in the winter season is probably an overall healthy thing.
For a situation with a well sealed and insulated space, an 8" system basically means you need to run the system less than a 6" one. I suspect the only reason to go with 6" would be if you wanted to save a bit of space with your mass.
I have to wonder what objections you have to wool insulation? Are you referring to rock wool/super wool? Or actual sheep's wool?