Julian Adam

+ Follow
since Jan 25, 2024
Merit badge: bb list bbv list
For More
Apples and Likes
Apples
Total received
In last 30 days
0
Forums and Threads

Recent posts by Julian Adam

Thanks for replying, Peter. I didn't realize you re-tested the top exhaust at 70% of chimney CSA riser port at later stage. I'm assuming building this out of 50 or 60 mm thick bricks will also be OK. Should the front wall then be continued upwards to the top of the roof, or should only the roof itself be added? (Leaving the front wall a bit lower as in your link).
2 months ago
Another beautiful implementation to be found on Peter's file-sharing platform:
https://pberg0.home.xs4all.nl/pictures/Vrijlemerij/DSR3%20sidewinder/
It shows the same message: a lot of extra work but can give an amazing result.
2 months ago
Hi, see-through sidewinders have been built. I believe they are usually executed by putting the port in the middle of the firebox depth and splitting the total air amount over the two air inlets. If you are fabricating a door and airframe yourself, this means twice the work, though
https://youtu.be/cly0VlIBcS0?si=0GH_ougJbp-t4vkS
2 months ago

Peter van den Berg wrote:
The pros could be extended with: very forgiving at reloading, a choice of core exhaust directions, highly resistant to fuel overload.


On the dutch batchrocket site (great that you were able to find the time to update, many thanks!), I saw you mentioned the shorty could also be exhausting in the 'roof' of the afterburner. In that case, where is the port located? Are there running references? I'm interested because flow-wise this may be more interesting for my own application.
2 months ago

Leonardo Bevilacqua wrote:
I made a little research to see what's available in Italy. there are plenty of choices for firebricks. And Alumina is only one of the specifics for firebricks. Which ones should I get?

And then, is there a difference between firebricks and IFB? Should I use firebricks for the main part of the core and IFB for the riser? I'm a little confused.


You could show your options here for more experienced people to comment, from the bricks I have bought, higher alumina firebricks have usually been lighter in color, so what you want (in my opinion) are the light-colored high-density firebricks. There is a big difference between firebrick and insulating firebrick (IFB). Insulating firebrick is much more porous/softer, and lighter (less dense). Because it is so light, it insulates much better than dense firebrick. In industrial applications it is usually only applied behind the dense firebricks (so not coming in contact with the flame). Because of limited mechanical strength, these are usually not used for the firebox. Many people have used it as a riser material in a regular batch box - in this case it is best to use it only above the riser port, again because of the flame touching it. For my shorty core, I will be using only dense  firebricks, because the 'riser' is so short, and to my understanding there is already a lot less mass to heat up compared to a 1st gen. batchbox. Just make sure to insulate at least the 'afterburner'/riser part with calcium silicate board, superwool (wear a mask!), perlite, or equivalent.

Leonardo Bevilacqua wrote:
The second question would be: how to I calculate how many brick I would need for the core (and the bell)? For firebricks the standard size here is 220x110x60mm. For clinkers I believe it is 240x120x60mm.


Others probably do it in sketchup or similar, but I've just drawn out the different projected views (knowing the core dimensions) on scale 1:10 and drawn my brick size onto that, and counted the bricks.
2 months ago
Peter, thanks for your clarification!

Peter van den Berg wrote:
Bar one example from an entirely other source, a chimney sweep, in fact. He used a simple formula to calculate what a rectangular chimney cross section would be when compared to a circular one. This goes as follows: twice the width multiplied by the depth of the rectangle, devided by width plus depth will give the comparable diameter. This would look like this: 2xWxD : (W+D) = comparable diameter.


It's nice to see this coming from such a practical implementation, because this is indeed exactly the formula for hydraulic diameter applied to a rectangle!

Peter van den Berg wrote:
To keep it simple enough for the ordinary layman, I recommend at least 5 times cross section area of the chimney pipe. Without taking a lot of small slits into account, and the more space the better.  


Clear! Anyway, should anyone be reading this while doubting if the gases will be able to flow freely enough, I can calculate hydraulic diameter for you if you just give me a cross-section of the top view, where the gases go past the core, with all dimensions on it of the channel.

Peter van den Berg wrote:
My original take on this was derived from the work of Heikki Hyytiäinen. His Finnish contraflow worked with two 70 mm wide slits, each slightly larger than the chimney csa. One could say, roughly 2.25 times the masonry chimney csa in total. Later on, I realised this could lead to far too much friction or even a non-functional bell-type heater, so I switched to 5 times, just to be sure.


Interesting Peter, I had no previous knowledge about counterflow heaters, but now that you mention it you can indeed clearly see that the downdraft channels are quite small compared to your advice for the bbr bell.

Thanks for taking the time to reply!
2 months ago

Kabouter Klus wrote: Hi everyone, greetings from Belgium.


Dag Klus. Van welke provincie ben je?

Kabouter Klus wrote:
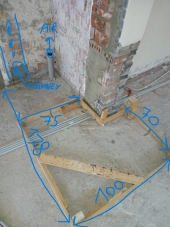
I assume it's best not to install the RMH in proximity to the underfloor heating pipes as they are at shallow depth +- 40 mm/1,57”.


I don't believe the multilayer pipe will get that hot. The bottom of the bell will be the coldest + the screed (chape) should help dissipate any heat. What i did was put 10 cm Ytong below my bell walls to insulate. Possibly even better, would be to put down foamglass insulation and build on top of that. Personally I would have left out the 12 cm of screed and built the heater immediately on the concrete vaults, but now that it's there, it will probably be fine. For your first layer (ytong/foamglass), you could lay down a mortar bed and press a 'chapenetje' (steel screed webbing) into it for some extra strength.

I am doing something similar as you with the external air supply. Peter has mentioned multiple times that adding external air immediately into the stove is creates more problems than it solves. 80 mm is too small in any case, for your stove.


Cook top - then you are looking at a Shorty core.
Oven: I believe I've seen a post passing by saying it's very hard to get them to work properly (usually they stay too cold). There is an article by Yasin Gach somewhere. Firebox = better solution to use this as oven.
I cannot open your skp file apparently, if you are building a heated bench, you should make the hole to it from your main bell as high and wide as the bench itself.

Lining and insulating the chimney is best for good chimney pull and to avoid this surface must be counted in the ISA.
Bypass - not strictly necessary if you are building a 1st gen batchrocket but I've read it can be helpful. Required for shorty core.

Kabouter Klus wrote:
[b]#5 Core And Bell

If anyone could check, are the dimensions of the core and bench ok for proper "air/gas" flow to the chimney?


Do you have a screenshot of the heater, cross-section from top view, where the gases are flowing past the core, including dimensions?
2 months ago
Hi Glenn, thanks for your input. Personally, I would be suprised if you are able to calculate the free flowing CSA, but not the circumference, especially since most of these areas are likely to be rectangular or a sum of rectangles. I do agree with you that it is good to have the 5 times CSA as a simple rule of thumb. At the same time, maybe it could kill a project for someone because of space restrictions, while there is a setup which could be acceptable in terms of friction, but without following the 5 times riser CSA rule.
2 months ago

Peter van den Berg wrote:
The bell could be deep and tall, no problem. Down to just wide enough to house the core, although in that case there should be at least a space at the back. Size of that space: at the bare minimum, 5 times the cross section area of the stove pipe, more being better. That space is there to lead the gases down to the bell exhaust.


Peter, I have been thinking about your requirement to have the section around the core where the gases pass at least 5 times riser CSA. You gave me the advice last year not to count narrow slits. Since then, I've discovered the 'hydraulic diameter', which I believe, covers the load better, when we are talking about friction through a section. Are you aware of this? If so, what is the reason you chose not to use it?
I have made a small comparison between hydraulic diameter and your expression in function of riser CSA.

For those wanting to skip to the conclusion: it seems encasing a core in a drum, produces a (roughly calculated) free section of 6.8 times the riser CSA, but only results in a hydraulic diameter of 175 mm. If we take this same hydraulic diameter, and assume the passageway is a rectangle behind the core (green), it would only need to be 340 x 117 mm2, which is a mere 2.27 times the riser CSA.

Curious to hear your or anyone elses take on this.

2 months ago

Leonardo Bevilacqua wrote: Hello everyone, this is Leonardo from North Italy.


Welcome! You will find many helpful people here! I'm also still constructing my first RMH, so experts may correct me or chime in.

Leonardo Bevilacqua wrote:
For the bell I thought about a stratification chamber made of concrete clinkers lined with firebricks in the upper part. I also thought of a double layered bell so that it would retain the heat longer.


Peter has proven this is possible with the pottery shop build which you probably have seen. I think it's a good idea. At least where I live, many people renovating their driveway give away these clinkers for free. You could copy where Peter applied his firebricks for some peace of mind. If you don't object the look, having the chimney outside the bell is more simple and more robust to execute. That being said, I will incorporate it into the bell myself, because I find it more aesthetically pleasing.

Leonardo Bevilacqua wrote:
Does this project sound good to you all? Is there anything that I'm not considering, or considering wrong? Do you think I could go on calculating and drawing a detailed design? Would such a heater heat the two rooms? Would it somehow heat a bit also the second floor?


Have you thought of putting it here:
In my opinion this is a better (more central) location of the house + putting the heater in a corner, facing exterior walls on 2/4 sides, is a bit of a shame I believe. You could use those corrugated sheeting which I believe Peter has behind the red heater in his house, inbetween the heater and the wall to transfer the radiant heat to convective heat, or at least pull it away from one exterior wall.
Drawing it out will never hurt in my opinion, I'd start with a top cross-section. The heater would also contribute to heating the upper rooms, in the way that heat always rises, but not in an active way. If you want that, you would have to continue the bell upstairs or make a second bell there. Personally, I would not invest in high-end firebricks for the bell (second-hand or cheap will be sufficient). But for the firebox, just buy new, decent dense firebricks and lay them with refractory mortar or with a tension frame and ceramic gasket (watch your lungs!)
Make the heater perform better: follow Peter's design meticulously. Allow for enough room for the gases to pass the core while cooling down. Insulate the chimney.

Good luck!
2 months ago