• Post Reply Bookmark Topic Watch Topic
  • New Topic
permaculture forums growies critters building homesteading energy monies kitchen purity ungarbage community wilderness fiber arts art permaculture artisans regional education skip experiences global resources cider press projects digital market permies.com pie forums private forums all forums
this forum made possible by our volunteer staff, including ...
master stewards:
  • Carla Burke
  • Nancy Reading
  • John F Dean
  • r ranson
  • Jay Angler
  • paul wheaton
stewards:
  • Pearl Sutton
  • Leigh Tate
  • Devaka Cooray
master gardeners:
  • Christopher Weeks
  • Timothy Norton
gardeners:
  • thomas rubino
  • Matt McSpadden
  • Jeremy VanGelder

Peter channel for my dragon

 
rocket scientist
Posts: 6355
Location: latitude 47 N.W. montana zone 6A
3209
cat pig rocket stoves
  • Likes 8
  • Mark post as helpful
  • send pies
    Number of slices to send:
    Optional 'thank-you' note:
  • Quote
  • Report post to moderator
Hi all;  
Picked up a 10" W x 12" long piece of new 3/16th steel plate while in Sandpoint last week.
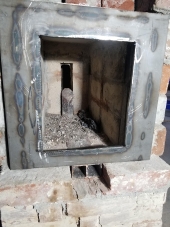
Today I had the time to turn it into a  Peter channel for my new dragon.
I built a templet with cardboard first & then transposed that onto the metal. A 4.5" angle grinder with a metal cutting skinny wheel on it, made short work of cutting.


I noticed this morning before lighting, that the edge of the ceramic board roof of my burn tunnel was being abused by the wood in the feed tube.  Not any more !


DSCN0122.JPG
[Thumbnail for DSCN0122.JPG]
new Peter channel
DSCN0123.JPG
[Thumbnail for DSCN0123.JPG]
back side
DSCN0124.JPG
[Thumbnail for DSCN0124.JPG]
it likes it
DSCN0127.JPG
[Thumbnail for DSCN0127.JPG]
Full load good to go
 
Posts: 400
Location: SW Missouri
86
hugelkultur duck trees chicken pig bee solar wood heat
  • Likes 2
  • Mark post as helpful
  • send pies
    Number of slices to send:
    Optional 'thank-you' note:
  • Quote
  • Report post to moderator
This was enlightening. I was under the impression this channel was supposed to run down the feed tube, turn 90 degrees, run the length of the burn tunnel and then deposit air at the base of the heat riser.

Your telling me the whole time I just needed a little slot to deposit air at the beginning of the burn tunnel?  That's so much easier to design and build!

Glorious I tell ya!
 
Eric Hammond
Posts: 400
Location: SW Missouri
86
hugelkultur duck trees chicken pig bee solar wood heat
  • Mark post as helpful
  • send pies
    Number of slices to send:
    Optional 'thank-you' note:
  • Quote
  • Report post to moderator
What's the width between the plates?
 
thomas rubino
rocket scientist
Posts: 6355
Location: latitude 47 N.W. montana zone 6A
3209
cat pig rocket stoves
  • Likes 3
  • Mark post as helpful
  • send pies
    Number of slices to send:
    Optional 'thank-you' note:
  • Quote
  • Report post to moderator
Yup Eric;  apx a 1/4" gap from the wall and  apx  1/4-3/8"  below the roof of the burn tunnel.  That's all.  Only other thing you can do to improve a J tube is carve a "trip wire" in the roof of the burn tunnel.
 
pollinator
Posts: 290
Location: The Arkansas Ozarks
53
8
cat dog forest garden rabbit building solar rocket stoves woodworking wood heat homestead
  • Mark post as helpful
  • send pies
    Number of slices to send:
    Optional 'thank-you' note:
  • Quote
  • Report post to moderator

thomas rubino wrote:Yup Eric;  apx a 1/4" gap from the wall and  apx  1/4-3/8"  below the roof of the burn tunnel.  That's all.  Only other thing you can do to improve a J tube is carve a "trip wire" in the roof of the burn tunnel.


Hi Thomas,

Please explain what you mean by carve a trip wire in the roof of the burn tunnel.

Thanks.
 
thomas rubino
rocket scientist
Posts: 6355
Location: latitude 47 N.W. montana zone 6A
3209
cat pig rocket stoves
  • Likes 5
  • Mark post as helpful
  • send pies
    Number of slices to send:
    Optional 'thank-you' note:
  • Quote
  • Report post to moderator
Hey Ralph;
I haven't built one myself but here's what I remember reading.
This is for a core built with firebricks. Part way down the burn tunnel roof you modify a roof brick so it hangs down into the gas flow. There is a specific shape involved that you carve into the brick.

This trip wire along with the peter channel are the two "high performance" mods you can make with a J tube.
EDIT)
A feature that projects into the burn tunnel, ahead of the riser, to create turbulence in the smooth (Laminar) flow of gasses, to mix unburnt gasses with oxygen-containing gasses in order to achieve more complete combustion.

https://permies.com/t/60402/channel-explain    check here
 
Rocket Scientist
Posts: 1809
Location: Kaslo, BC
525
building solar woodworking rocket stoves wood heat greening the desert
  • Likes 4
  • Mark post as helpful
  • send pies
    Number of slices to send:
    Optional 'thank-you' note:
  • Quote
  • Report post to moderator
Hi Ralph,  Donkey explains and builds a trip wire brick in this video trip wire explanation
 
Ralph Kettell
pollinator
Posts: 290
Location: The Arkansas Ozarks
53
8
cat dog forest garden rabbit building solar rocket stoves woodworking wood heat homestead
  • Likes 2
  • Mark post as helpful
  • send pies
    Number of slices to send:
    Optional 'thank-you' note:
  • Quote
  • Report post to moderator
Thanks Thomas!
 
Rocket Scientist
Posts: 797
Location: Guernsey a small island near France.
299
  • Likes 2
  • Mark post as helpful
  • send pies
    Number of slices to send:
    Optional 'thank-you' note:
  • Quote
  • Report post to moderator

Eric Hammond wrote:This was enlightening. I was under the impression this channel was supposed to run down the feed tube, turn 90 degrees, run the length of the burn tunnel and then deposit air at the base of the heat riser.
!


I think that would work very well though, the air would be very hot and unused until it reached the most useful point.
However that method would be best implemented during the build.

I have a video of my P plate in action, it seems to work but to what effect I can’t really say!
I can see flames exiting the riser with the P plate in action but I don’t actually see much rise in my hot plate temperature.

One thing is does allow, is to turn the fire into a gasifier, that seems to keep the heat up and drop wood consumers by half!
When I build my next one I will be putting much more effort into secondary air and its control.
Haveing a lid on the feed tube and adjustable controls over the air flow seems to offer huge benefits to a J tube rocket.
 
Ralph Kettell
pollinator
Posts: 290
Location: The Arkansas Ozarks
53
8
cat dog forest garden rabbit building solar rocket stoves woodworking wood heat homestead
  • Likes 1
  • Mark post as helpful
  • send pies
    Number of slices to send:
    Optional 'thank-you' note:
  • Quote
  • Report post to moderator
Thank you also Gerry!  When I thanked Thomas I had not seen your post.
 
Gerry Parent
Rocket Scientist
Posts: 1809
Location: Kaslo, BC
525
building solar woodworking rocket stoves wood heat greening the desert
  • Likes 6
  • Mark post as helpful
  • send pies
    Number of slices to send:
    Optional 'thank-you' note:
  • Quote
  • Report post to moderator

Fox James wrote:

Eric Hammond wrote:This was enlightening. I was under the impression this channel was supposed to run down the feed tube, turn 90 degrees, run the length of the burn tunnel and then deposit air at the base of the heat riser.


I think that would work very well though, the air would be very hot and unused until it reached the most useful point.
However that method would be best implemented during the build.


Hi Fox,      In the "channel explanation" link that Thomas gave above, Peter says: : "The first one, the simple plate is meant for the j-tube Evans' style. It provides pre-heated fresh air in the spot where it is most needed, at the top of the burn tunnel. By hanging down a bit lower than the ceiling of the burn tunnel it'll also creates a slightly narrower pass-through in the spot where the majority of the wood gas is formed. This narrowing creates a Bernoulli effect, in that the gas velocity goes up temporarily accompanied by a pressure drop. So it will suck in air from behind the plate, cooling the plate and the first firebrick in one go. Bringing in air at the bottom of the feed or tunnel doesn't trigger the same effect, air feeding into the riser is too far downstream since all the mixing has been done in the tunnel already."

Of course, you are certainly free to try your own experimentation on this but remember that Peter does his testing with a Testo gas analyzer and is a pro at his work so I think most people here trust his input as way not to make the same mistakes or waste time on something that has already "been there done that" kind of thing.
 
Fox James
Rocket Scientist
Posts: 797
Location: Guernsey a small island near France.
299
  • Likes 4
  • Mark post as helpful
  • send pies
    Number of slices to send:
    Optional 'thank-you' note:
  • Quote
  • Report post to moderator
Hi Gerry, yes sorry I am not always very good at explaining things?...
No I don’t have a gas analyser or even wish to own one, my testing is based around my hot plate and a watch.

With the fullest and deepest respect to Peter, I feel he has moved on from the J tube design and is now more interested in developing batch burning stoves.
I fully understand how his simple but clever P plate works .... I have one fitted to my own fire!

However I also follow various face book pages and you tubers who follow a slightly different path than Peter walks.

I am primarily interested in top loading rocket stoves for cooking and heating, I see quite a bit of further potential for J tube designs and one aspect is secondary air!
The design I have seen and watched being developed is a removable and replaceable sort of cartridge that fits in the top of the fire tunnel, or just a bent piece of steel for the same effect.
Not that dissimilar to a batchbox top placed secondary air tube, but it is full width of the tunnel and only 6mm deep.

The other development that appeals to me is the big fire box and glass lid approach as this no only offers a long burn time but also a gasification mode.

Pre heating primary air Is also popular on many U.K. builds as are vortex designs, I don’t think any of the builds I follow use a gas analyser so they might not be as efficient as possible but as long as folk can’t see any smoke and the combustion does not leave a lot of ash them I think most folk would call it a success.

Facebook is such a poor platform  for finding back dated post, otherwise I would of copied some pictures... so I will show you a basic sketch of one design, some folk say stoping the plate at mid point works better but both work very well.

B9D6645E-2737-4E12-8B42-0A0A23908219.jpeg
[Thumbnail for B9D6645E-2737-4E12-8B42-0A0A23908219.jpeg]
 
Posts: 6
  • Mark post as helpful
  • send pies
    Number of slices to send:
    Optional 'thank-you' note:
  • Quote
  • Report post to moderator

thomas rubino wrote:Hi all;
I noticed this morning before lighting, that the edge of the ceramic board roof of my burn tunnel was being abused by the wood in the feed tube.  Not any more !

hi thomas, i m not sure of what i see in the first 2 pics. is it an L welded, long over the tunnel, short leg in feed tube? any advancemnet on secondary air for Js? i m trying to finish my J model (4th version of same rsmh of 2016) the third didn t work so good, too long to begign the fire in  a mild climate.
my other bbr works great. lighnting in 10 min or so from cold. 1 ton eucaliptus per winter , plus carpentry rets for the initial. love it, today, 24C inside, 10C outside, less than 1 usd a day for now
thanks for all the info rgds, carlos from mvd uy
south 33 west 55
 
Rocket Scientist
Posts: 4530
Location: Upstate NY, zone 5
576
5
  • Likes 4
  • Mark post as helpful
  • send pies
    Number of slices to send:
    Optional 'thank-you' note:
  • Quote
  • Report post to moderator
That is one flat piece of plate, cut into a "T" shape. The wings at the top sides are to hold the plate from falling down. There are bolts attached through the plate to serve as spacers to keep the plate at the desired spacing from the wall of the feed tube.
 
thomas rubino
rocket scientist
Posts: 6355
Location: latitude 47 N.W. montana zone 6A
3209
cat pig rocket stoves
  • Likes 5
  • Mark post as helpful
  • send pies
    Number of slices to send:
    Optional 'thank-you' note:
  • Quote
  • Report post to moderator
Good Day Carlos;
The first two pictures show the steel plate held in my vise,
This is showing the overall design of the plate and the placement of the 1/4" bolts I used to space it out from the firebricks .
No welding involved.  The narrower portion is the width of your feed tube,
The wider portion sits on top of the feed tube, its width and height  is optional.
The bolts keep a consistent gap of 1/4-3/8" to allow cooler air to reach the burn tunnel.
The narrower portion hangs 3/8" past the burn tunnel roof to help create good air flow.
This plate will need replaced every  few  years  as the temps will warp and spall  the metal.  

 
Glenn Herbert
Rocket Scientist
Posts: 4530
Location: Upstate NY, zone 5
576
5
  • Likes 7
  • Mark post as helpful
  • send pies
    Number of slices to send:
    Optional 'thank-you' note:
  • Quote
  • Report post to moderator
My feed tube insert is made of 1/8" steel plate welded up and including a P-channel extension at the burn tunnel side. It guides secondary air all around to cool the feed and preheat the air. It is in perfect condition after six winters except for the extension which has warped (I have straightened it on my anvil a couple of times) and spalled at its lower edge until paper-thin. It is close to time to cut the extension off and bolt on a lighter piece of sheetmetal which will be easily replaced.
IMG_1346.JPG
top view - 7" x 7" opening
IMG_1348.JPG
extension with spacer tabs in front
IMG_1946.JPG
after one season
after one season
 
You will always be treated with dignity. Now, strip naked, get on the probulator and hold this tiny ad:
Freaky Cheap Heat - 2 hour movie - HD streaming
https://permies.com/wiki/238453/Freaky-Cheap-Heat-hour-movie
reply
    Bookmark Topic Watch Topic
  • New Topic