• Post Reply Bookmark Topic Watch Topic
  • New Topic
permaculture forums growies critters building homesteading energy monies kitchen purity ungarbage community wilderness fiber arts art permaculture artisans regional education skip experiences global resources cider press projects digital market permies.com pie forums private forums all forums
this forum made possible by our volunteer staff, including ...
master stewards:
  • r ranson
  • Nancy Reading
  • Carla Burke
  • John F Dean
  • Jay Angler
  • paul wheaton
stewards:
  • Nicole Alderman
  • Pearl Sutton
  • Anne Miller
master gardeners:
  • Christopher Weeks
  • Timothy Norton
gardeners:
  • Nina Surya
  • Matt McSpadden
  • thomas rubino

Making raised beds--preservative suggestions?

 
gardener
Posts: 5540
Location: Southern Illinois
1550
transportation cat dog fungi trees building writing rocket stoves woodworking
  • Mark post as helpful
  • send pies
    Number of slices to send:
    Optional 'thank-you' note:
  • Quote
  • Report post to moderator
Hello,

So my obsessions with all things rot and decay continues.  This weekend, weather permitting, I plan on spreading out a large chip pile (5'x5'x12' approx) into a new bed.  The new bed has been gardened on before, but has been fallow for about 2 years.  In order to spread the chips to a depth of about 12" I need to have some border to keep all of those chips from spilling outside the garden.  Originally I planned to use some plastic wood decking, but after checking, the cost is prohibitive.  Instead I was thinking about using 2x10 lumber.  For obvious reasons, this will not be PT lumber, but given that I will have a bed infused with aggressive wine cap spores, I do need to do something to keep the fungus from digesting the wood borders.

What I had in mind was using foundation sealant.  This is the tar that you would see on the outside of a basement while it is under construction.  I checked with someone at the local hardware store and the guy did know his stuff.  He recommended the foundation sealant because it was very thick and had a fiber infused in the tar to make it even more durable.  We opened a can at the store and this was indeed thick stuff.  Imagine La Brea tar pits in Los Angeles and you might get an idea.  The plan would be to use a combination of a putty knife and a very stiff bristle brush and really coat the whole board to seal it from any intruding micro organism.

So my question for everyone is two-fold.  Firstly, is the basement tar going to be as resistant to microbial attack as I think it is?  Secondly, would there be any problem having this in contact with the same soil my veggies are being grown in?  I would think that once the tar dries out that it will be pretty immobile--after all, that is why the stuff is put on foundations--to protect the cement and not diffuse out into the soil.  

Again, I think that this would be a winner of an option, but I do not know that for absolute certainty so if anyone has any specific knowledge to the contrary (or perhaps experience in general), please let me know.

I am positively itching to get my garden started and if this idea is worth it and if the weather does cooperate then I would be starting this project out this weekend.


Thanks in advance and I look forward to any input or sage advise.

Eric
 
gardener
Posts: 6814
Location: Arkansas - Zone 7B/8A stoney, sandy loam soil pH 6.5
1654
hugelkultur dog forest garden duck fish fungi hunting books chicken writing homestead
  • Likes 6
  • Mark post as helpful
  • send pies
    Number of slices to send:
    Optional 'thank-you' note:
  • Quote
  • Report post to moderator
Yes, there will be issues if you plan to grow vegetables in soil that is in contact with a tar product.
No the fungi will not penetrate the tar product, that's because it will kill them when they get near it because it will leach into the soil forming a thin film.

Better idea, get a trough that is as long as your longest board will be. Make up a solution of borax soap powder and water and fill trough, lay boards in that borax water filled trough and walk away for two days.
Come back and remove soaking boards and lay out on "stickers" to air dry, once dry use boards to form the garden bed.

Borax will saturate the wood and it will prevent the lignin from being attacked by fungi, termites and carpenter ants. These boards will last a minimum of 4-5 years before needing to be replaced.

This method keeps you from having nasty contaminates in your garden soil. Of course you can always go with your original plan.

There is another option that has less chance of contamination than a tar product it is a latex water sealant used on concrete blocks called Ug Dryloc and usually is readily available at home depot, Lowe's and even Walmart.
be sure to let it dry completely before you start the installation, for this use 2 coats would do very well but you will have to coat the entire board for a good seal and long lasting coating.


Redhawk
 
Eric Hanson
gardener
Posts: 5540
Location: Southern Illinois
1550
transportation cat dog fungi trees building writing rocket stoves woodworking
  • Mark post as helpful
  • send pies
    Number of slices to send:
    Optional 'thank-you' note:
  • Quote
  • Report post to moderator
Redhawk,

Wow!  Thanks very much for that warning and for offering up two viable alternatives.  Given that I went through all the trouble to get the fungi to grow in the first place, I certainly don't want my sides to be toxic to this very desirable fungi.  I don't have a trough that can come anywhere close to fitting the size boards I need, but I can get the Dryloc easily.  I am glad you mentioned this specific product as I was doing a google search on this very issue and one of the products mentioned was Dryloc.  Those same articles also mentioned polyurethane sealer which I am finding is very expensive.  I had thought that once the tar dried that it would be immobile, but I guess I assumed wrong. Again, I am glad I asked the question and I am especially glad that you answered.  I think I will be getting the wood this weekend and coating it in my garage for installation either later this weekend or sometime next week.

You have helped me a lot on this journey and thanks again.  I am sure I will have more questions for you later and maybe eventually I will have an update.

Thanks,

Eric
 
pollinator
Posts: 225
56
duck forest garden chicken cooking building
  • Likes 1
  • Mark post as helpful
  • send pies
    Number of slices to send:
    Optional 'thank-you' note:
  • Quote
  • Report post to moderator

Eric Hanson wrote:Instead I was thinking about using 2x10 lumber.  For obvious reasons, this will not be PT lumber


Why not use pressure-treated wood? In the early 2000's, they switched away from the harmful arsenic methods of pressure-treating, to several alternatives that are supposedly alot safer (some are safer than others, though).
https://www.naturalhandyman.com/iip/infxtra/infptforraisedgardens.html

I have all my beds made out of 2x12 pressure-treated lumber.
Specifically, I use ACQ - which is available at my local ma and pa lumberstore. ACQ uses copper almost exclusively for its treatment, and while some amount supposedly leaches out, it's not harmful to humans. Baby mice, lizards, spiders, and bugs haven't had any noticeable issue with it either.
My oldest beds have lasted six years now, with no foreseeable need of replacement.

(Scroll to the bottom for details of ACQ:)
https://www.finegardening.com/article/does-pressure-treated-wood-belong-in-your-garden

NOTE: I am not an expert on any of this. I feel comfortable enough to risk it for me and my family, thinking, even if I planted directly in a vat of agent orange, it's gotta still be better then what's in the stores. =P

Also, I made my beds double-stacked, so they are 2' tall, which is hugely easier on my back - everything is right at excellent levels for working.
Three years ago, I started filling the bottom of the beds with large deadfall logs of wood, hoping for hugelkultural benefits, though my first few ACQ beds were just dirt all the way down. For any new beds I do, I'll likely fill the bottom with deadfall logs, and dirt covering it and filling in the gaps, and then lasagna layer the beds.
 
Posts: 747
Location: Morocco
103
cat forest garden trees solar wood heat woodworking
  • Likes 3
  • Mark post as helpful
  • send pies
    Number of slices to send:
    Optional 'thank-you' note:
  • Quote
  • Report post to moderator
If it doesn't need to look very tidy, the boundary can be made of branches and thin trunks: The larger ones vertically pounded into the ground and then the smaller branches horizontally on the inside, filling the inside with material as you build up.
The one I build 4 years? ago is still standing. Will make a photo today.

The downside is that the outside dries out, which protects the wood, but may not help the plants…
hugel.jpg
[Thumbnail for hugel.jpg]
compost.jpg
[Thumbnail for compost.jpg]
 
Eric Hanson
gardener
Posts: 5540
Location: Southern Illinois
1550
transportation cat dog fungi trees building writing rocket stoves woodworking
  • Mark post as helpful
  • send pies
    Number of slices to send:
    Optional 'thank-you' note:
  • Quote
  • Report post to moderator
Sebastian,

I actually rather like your idea of using natural materials for the edges.  As it was, I did use old logs for many years.  I got these logs from my woods after a major storm toppled about twenty large oak and hickory trees.  The storm was severe.  We had sustained 100 mph winds and much of the area was without power for three weeks!  At any rate it was heartbreaking to see so many trees felled all at once and I had to do something with those tree trunks.  I turned several of them into borders for raised beds.

After several years those logs rotted through and through and I eventually dug trenches in the garden bed and buried the former borders as a sort of mini hugle bed.  Now I need new borders.  While I like the wattle-hurdle bed you describe (and in fact I have plenty to f those on hand), I am pretty sure my wife would like the beds to be a bit more tidy.

In any case, earlier today I bought 2x10x16 lumber along with some drylock sealer as was earlier suggested.  With a little luck I will put on a coat later today and coat again tomorrow.  I would like to get the frame set up this week and fill with chips before next weekend.

At any rate I am hoping to get more beds set up and inoculated in the coming weeks.

Thanks for your suggestion though.  In a different circumstance I may have been much more inclined to go that route.

Eric
 
gardener
Posts: 2532
Location: Ladakh, Indian Himalayas at 10,500 feet, zone 5
865
trees food preservation solar greening the desert
  • Likes 1
  • Mark post as helpful
  • send pies
    Number of slices to send:
    Optional 'thank-you' note:
  • Quote
  • Report post to moderator
The idea of growing fungus in a medium that is in contact with wood that has to be protected from allowing fungus to grow seems difficult. Is it maybe the wrong material for the wrong use in the wrong place? One possibility is accept it and use wood, a fairly rot resistant type, knowing that it will rot out after "several" years as you said above, in which case maybe by then you'll be wanting a design change anyway? Another idea is using a non-wood material like bricks, stones, concrete, or digging down into the earth?
 
Posts: 83
1
  • Likes 3
  • Mark post as helpful
  • send pies
    Number of slices to send:
    Optional 'thank-you' note:
  • Quote
  • Report post to moderator
why sides at all?  just form it with a rake and have a 45 degree angled side ith a small itch at he outside edge
any thing that goes down into the ditch can be raked back up hill if desired
saves a lot of work and money  and last for ever
a show ditch about 3 inches deep a few inches wide
look at Chans chineese growing for examples.
 
pollinator
Posts: 1345
Location: Virginia USDA 7a/b
357
4
hugelkultur forest garden hunting chicken food preservation bee
  • Likes 1
  • Mark post as helpful
  • send pies
    Number of slices to send:
    Optional 'thank-you' note:
  • Quote
  • Report post to moderator
Raised bed construction from Iowa State with some data on copper leaching from CCA. they recommend a plastic liner inside the boards, which makes sense.  

Where they are getting the data for the nerds. It appears that ACQ-B loses about 20% of the copper in below ground studies in 44 months (page 12). I am not familiar with the toxicity of the a
Didecyldimethylammonium chloride, but that stuff leaches alot faster. Those are the ingredients in ACQ B&D, although there are other variants that use boron (page 2).  

Personally, I used ACQ to make a raised bed hugel. I did not line it, but if I knew then what I know (I think) now, I would put at least a 6 mil liner. This would be a one time plastic use, and even if there are some small holes the amount would be proportional to the rents in the plastic and would be very minimal. the soil would tend to hold it in place after installation. I didn't do it initially because they are hugelbeds and I figured the wood would tear it up, but it certainly seems prudent, and I could have painted it on before installation anyway (duh!!!). It won't probably make it last longer, the rot tends to be at the soil line anyhow. I would personally never use CCA, but it's been so long since it has been sold it has probably leached what it will already. Kind of like mercury fillings- just don't mess with them, the bill is already paid.

I think the barrier methods Dr Redhawk has recommended sound very smart and should reduce proportionally the contamination, and I am testing some borax-soaked lumber.

My new gardens are much lower, and I use massive untreated logs as the sides of the wood chips. At least 16" diameter. I stake them in place on installation (and they suck to get in position) but my feeling is that they will last around one year per two inches. After a year they are so heavy they are a little buried. I've also done an experiment with Lion's Mane plugs in the logs, buried halfway. I'm hopeful but I doubt it will work. But if it does I am sooooo awesome!  
 
Eric Hanson
gardener
Posts: 5540
Location: Southern Illinois
1550
transportation cat dog fungi trees building writing rocket stoves woodworking
  • Mark post as helpful
  • send pies
    Number of slices to send:
    Optional 'thank-you' note:
  • Quote
  • Report post to moderator
TJ,

We are sort of like ships passing in the night.  You are moving from dimensional lumber to logs.  The bed for which I am starting this project was a raised bed garden, held up with old logs, about 12" diameter.  Those logs have rotted into absolute nothingness, hence the reason I am looking for a new barrier for the edge of my garden.  I literally just got back from my neighbor's garage (he has heat in a huge outside shed) where I was applying  the drylock to 2x10x16 lumber.  I plan on heading out again later today to give a second coat.  I can tell you that the stuff I put on is THICK!  This is not like paint, and looks and even feels like a cross between latex paint and mortar.  It does dry fast and I believe that it will be a nice, stable coat that will last a long time and with luck not kill the microbes I am trying to encourage.  I would have gone the borax route if I had a 16' long trough in which to soak them.

Good luck with your timbers.  Mine lasted over a decade before they rotted away into nothingness.  I have two other beds that also have timber edges and they are getting very close to no longer being a viable edge to the garden (they are just utterly falling apart).  Either this year or next year (depending on the speed of decomposition) I will probably dig them out and add their remains to my chip-beds.  I knew when I added the wine caps that the logs would not last long and that was OK as they had already been sitting in place for almost a decade.  Now they are being turned into some nice, soft, crumbly compost and they will just become a part of my soil.

I will update this as I get the new beds set up.  It should look interesting as the Drylock is bright white.

Eric
 
pollinator
Posts: 888
Location: 6a
284
hugelkultur dog forest garden trees cooking woodworking
  • Likes 5
  • Mark post as helpful
  • send pies
    Number of slices to send:
    Optional 'thank-you' note:
  • Quote
  • Report post to moderator
I use regular untreated boards.  The beds I have in the ground now are on their 3rd year and still look pretty good.  I don't use a lining or anything.  The next time I do the beds I will use the Shou Sugi Ban method.

I have used this torch method on woodcraft but never on something larger.


Eric Hanson
gardener
Posts: 5540
Location: Southern Illinois
1550
transportation cat dog fungi trees building writing rocket stoves woodworking
  • Likes 1
  • Mark post as helpful
  • send pies
    Number of slices to send:
    Optional 'thank-you' note:
  • Quote
  • Report post to moderator
Scott,

That is an outstanding idea!  I had heard of Shou Sugi Ban before, but I was never sure quite how to do it.  I imagine that I could use my little propane torch on 2x10 lumber.  I might well try this on my next raised bed project.  I have a total of 3 raised beds.  The bed I am rebuilding now I wanted to get done in a timely manner in order to accommodate my chips & inoculation that I plan to do sometime in April.  I did think about Shou Sugi Ban, but it was one additional variable I was trying to eliminate.  the old logs for my other two wood chip beds are rapidly decaying to the point that they will not be able to hold back anything, so I may have to replace them either this year or next year.  When I do so I may opt for the Shou Sugi Ban method.

Thanks for mentioning this, it encourages me to think of something other than essentially paint, and also helps me preserve the wood even cheaper than how I am doing it at present.

Thanks much,

Eric
 
Jamin Grey
pollinator
Posts: 225
56
duck forest garden chicken cooking building
  • Likes 1
  • Mark post as helpful
  • send pies
    Number of slices to send:
    Optional 'thank-you' note:
  • Quote
  • Report post to moderator

Scott Foster wrote:The next time I do the beds I will use the Shou Sugi Ban method.


Thank you for sharing that!

While I'm quite happy with using ACQ for my beds, this charred-wood method seems very interesting - now I want to try it and make some outdoor furniture.
 
Eric Hanson
gardener
Posts: 5540
Location: Southern Illinois
1550
transportation cat dog fungi trees building writing rocket stoves woodworking
  • Mark post as helpful
  • send pies
    Number of slices to send:
    Optional 'thank-you' note:
  • Quote
  • Report post to moderator
I am posting this just to review Redhawk’s suggested Drylock as a wood preservative.

My 2x10’s have been thoroughly painted and double coated.  At this point I need to cut one board to length and then I will touch up and be ready for assembly.  Drylock is some very strange feeling stuff.  As I stated earlier, it looks and feels like a mixture of latter paint and mortar.  There is the usual latex paint smell as it goes on, but once it dries, there is little to no odor.  

The dry time is stated as 3 hours.  This is probably for second coating purposes.  After drying overnight, I checked on the boards and the “paint” feels more like ceramic armor.  It is really, really hard stuff once dry, and almost a little bit brittle.  The surface maintains a gritty texture, almost like a cement block.  As far as being a preservative, I am pretty certain that as long as the coat completely covers the wood, absolutely nothing will penetrate this coating.  Imagine being able to coat an entire plank of wood with a thin coat of granite and you probably get the idea.

Again, I can’t imagine any fungi or bacteria being able to penetrate the coating, but the real test might be as to whether or not the material cracks or flakes off.  The stuff is incredibly hard, but might shatter and flake off if struck hard, or if I bump the sides with the mower.  Time will tell, and I will update later, but so far this stuff looks tough.

Eric
 
gardener
Posts: 967
Location: Ohio, USA
205
dog forest garden fish fungi trees urban food preservation solar woodworking
  • Mark post as helpful
  • send pies
    Number of slices to send:
    Optional 'thank-you' note:
  • Quote
  • Report post to moderator
This is not a suggestion of treatment, merely a different route from my experience with lumber. Cinder blocks have little planting holes and are not super expensive when you consider longevity. They are fairly easy to move and build with. I am beginning to convert all the wood, treated and untreated one of the places I manage to cinder blocks to lower the long term maintenance since the wood is all rotting out after only 5 years. As for anything wood I do keep, I often use cedar fencing. That seems to hold up pretty good too.  No additional treatment necessary.
 
rocket scientist
Posts: 6525
Location: latitude 47 N.W. montana zone 6A
3395
cat pig rocket stoves
  • Likes 1
  • Mark post as helpful
  • send pies
    Number of slices to send:
    Optional 'thank-you' note:
  • Quote
  • Report post to moderator
Interesting post Eric;   That drylock sounds like cool stuff. I'll be waiting to hear how it holds up over the next year.

Scott;  Thank you for sharing the Shou-sugi-ban method. I going to try that out.


My wife the master gardener has always been a raised bed fan.  As we age she is now thinking that box gardening might be a bit easier on her than bending over or sitting on the ground.

I have been kicking around ideas and think I am going to try metal!  Metal fence posts and used metal roofing as sides.  No rot ever … opinions ?    I know the metal is butt ugly and most likely I will side the metal roofing with some kind of non structural wood.

 
Eric Hanson
gardener
Posts: 5540
Location: Southern Illinois
1550
transportation cat dog fungi trees building writing rocket stoves woodworking
  • Mark post as helpful
  • send pies
    Number of slices to send:
    Optional 'thank-you' note:
  • Quote
  • Report post to moderator
Amit,

I did think about cinder blocks and in fact I am still considering them for other beds.  The obvious good part is that they will never ever rot.  I have even thought about using the little holes by filling them with compost mix and planting nasturtiums to repel insects or maybe something to attract predatory insects.  If I go this route I may stain the blocks to look like something other than a cinder block though.  We will see what happens, I still have a lot of garden edging to put into place.

Thanks for the suggestion though,

Eric
 
pollinator
Posts: 3847
Location: Marmora, Ontario
595
4
hugelkultur dog forest garden fungi trees rabbit urban wofati cooking bee homestead
  • Mark post as helpful
  • send pies
    Number of slices to send:
    Optional 'thank-you' note:
  • Quote
  • Report post to moderator
I don't like cinder blocks, but an approach that might work is a moss mix application.

The farmers' market near me has a product sold in what looks like a milk carton. It's dry, and you add buttermilk and spray it on hard surfaces, and voila, moss covered surfaces.

I have been playing with this idea in my head, as well as the idea of a mineral stucco that you could spray on the exterior of a building, onto which a lichen slurry would be sprayed, the species of lichen matched to the mineral composition of the stucco such that it became lichen food.

I know that lichen's job is to break down minerals, but I am sure that a thick enough stucco layer would be impervious to all but the slow but gradual decomposition of the lichen itself, and that, only over time.

This could be applied to any raised bed material.

Thoughts?

-CK
 
Eric Hanson
gardener
Posts: 5540
Location: Southern Illinois
1550
transportation cat dog fungi trees building writing rocket stoves woodworking
  • Mark post as helpful
  • send pies
    Number of slices to send:
    Optional 'thank-you' note:
  • Quote
  • Report post to moderator
CK,

If you are not a fan of cinder blocks because of their appearance, I certainly understand.  That is the reason why I would consider staining them a brown color so they at least did not jump out as being a cinder block.  Is the moss mix that you mentioned something that would be sprayed on as a sort of decorative feature for the potential cinder block?  If so, then this is another intriguing idea.  

I guess I have several options thus far for the remaining garden beds--painted 2x10 lumber, charred 2x10 lumber, cinder blocks with various aesthetic treatments, or (if I can find them) my personal favorite--a plain old hardwood log.

Eric
 
pollinator
Posts: 981
Location: New Brunswick, Canada
244
duck tiny house chicken composting toilet homestead
  • Mark post as helpful
  • send pies
    Number of slices to send:
    Optional 'thank-you' note:
  • Quote
  • Report post to moderator
I built quite a bit of raised bed garden with the cheapest thing I could find, 1'x8' PT lattice.  Now, I really don't like PT stuff, but this lattice was years old and I think most of the leaching had already happened, and it was stupid, stupid cheap.  I just doubled or tripled them up and supported them with stakes, let the hens take out the dirt, dumped in the deep bedding from the coop, added free dirt from around town, top dressed with compost, mulched, then planted with weeper hose on a timer.  My best gardens ever, hands down.

I wouldn't use anything PT that hadn't leeched out most of the crap, but you could in a pinch.  My last garden was on what had been a gravel driveway and parking lot years ago.  It was grass, but only 0.25"-1" topsoil for most of it.  I decided not to use borders, even though I still had hundreds of pieces of lattice and, instead, just laid compost over the soil, used plastic sheeting for mulch with a weeper hose underneath, and planted into the soil, not the compost.  It did surprisingly well, though it's not my first rodeo.  

I'm not sure how I'll build my next gardens, but I'm sure they'll have to be raised beds.  If I do decide to put in a border for some, I think I'll likely just use logs or untreated lumber, whatever's free.  I'm fine with letting that rot in place and then rebuilding the perimeter if I want, with the rotten wood at mulch or amendment.
 
Chris Kott
pollinator
Posts: 3847
Location: Marmora, Ontario
595
4
hugelkultur dog forest garden fungi trees rabbit urban wofati cooking bee homestead
  • Likes 2
  • Mark post as helpful
  • send pies
    Number of slices to send:
    Optional 'thank-you' note:
  • Quote
  • Report post to moderator
I like the log approach. If you use roundwood, the girth of the wood will make it take longer to rot.

I wonder if you cut green logs and sat them cut-end-down, upright in a drum with the borax solution kola RedHawk mentioned, would they wick up the solution and preserve themselves as the top tries to dry out, drawing more solution into itself?

In any case, my long-term strategy will include some kind of easy-pollarding wood, hopefully black locust, that I can grow enough of to pollard at need for up to wrist-thick lengths of post for corner and edge posts, and perhaps using finger-thick whips to weave back-and-forth between those vertical posts. Black locust is some ridiculous percentage by weight of fungicide, something like 10% IIRC.

Ideally, I would love it if I had enough that I could simply lay black locust logs like the base of a log cabin, but easier, as it wouldn't have to have doors or windows.

As to leaching of things you would rather not have leach out of whatever material into the soil, what if the outside of the bed were amended with slightly more coarse fill, such that, while it would still hold moisture, it would lend itself to supporting plants that required better drainage? Water wouldn't be trapped in soil sharing surface area with material that might either leach undesirable substances, or might increase natural decomposition of the building material. Why not just make the perimeter drain better?

-CK
 
Eric Hanson
gardener
Posts: 5540
Location: Southern Illinois
1550
transportation cat dog fungi trees building writing rocket stoves woodworking
  • Mark post as helpful
  • send pies
    Number of slices to send:
    Optional 'thank-you' note:
  • Quote
  • Report post to moderator
CK,

I agree, logs are my favorite for appearances.  When I first started my raised bed, I used logs because of a windstorm that topped lots of trees.  That was 10 years ago and now the logs are rotting away.  I always knew this was going to happen, but I wished I had thought of the wood chips earlier.  I am now curious if I could get borax to wick it’s way up wood.  That would make treating long pieces of lumber a lot easier.

One bed is completely rotted away and thus the reason for my seeking a replacement.  A second bed (the one filled with chips and wine caps) will probably last this year, but one more year is very iffy.  The third bed has 4’-5’ of chips piled up on them but has not been inoculated so we will have to see.

One of my goals for this year is to get all of the chips I chipped up last year spread into their appropriate beds and inoculated with wine caps.  I need to get these beds set up soon so I can inoculate soon.  If I still have chips left, then they will go around trees and shrubs.

Eric
 
Scott Foster
pollinator
Posts: 888
Location: 6a
284
hugelkultur dog forest garden trees cooking woodworking
  • Likes 1
  • Mark post as helpful
  • send pies
    Number of slices to send:
    Optional 'thank-you' note:
  • Quote
  • Report post to moderator
@thomas

This is a pretty cool video of a guy using metal beds in Australia,  He uses them like hugelkultur mounds.

 
Jamin Grey
pollinator
Posts: 225
56
duck forest garden chicken cooking building
  • Mark post as helpful
  • send pies
    Number of slices to send:
    Optional 'thank-you' note:
  • Quote
  • Report post to moderator

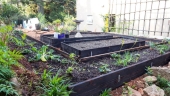
thomas rubino wrote:My wife the master gardener has always been a raised bed fan.  As we age she is now thinking that box gardening might be a bit easier on her than bending over or sitting on the ground.


How high are her garden beds? My mother, who is getting fairly old, finds it easy to work on 2' tall garden beds (2x12" stacked double-high).
I may even try out adding another 6" on some beds, to see if that's even easier - but for now, 2' tall is very easy for everyone.

----------------------------------

Cinderblocks may be a good idea, but I have several concerns about them.
1) First would be thickness - it would make it harder to reach all the way over to the center. Almost all my beds are 4x8 or 4x10 (and everything 2' tall). But four beds, using recycled lumber, are 5x11 (also 2' tall). The simple difference between 4 and 5 foot widths make it hard for my mother to reach the center of the 5' beds, whereas she can reach 4' beds fine (as long as she has access to both sides). And, admittingly, despite being young and tall (6'2") with long arms, it is more annoying for myself to plant in the middle of 5 ft wide beds. My worry with cinderblocks - which I've never personally tried - is that the 8" thickness of the blocks on both sides (1.5 ft total) would make it harder to reach the middle - unless you are shrinking the overall width of the interior, so *including* both cinderblocks, it's not exceeding e.g. 4.5 feet, and you plant your tomatoes or w/e in the cinderblock holes? That's a real possibility.
2) A second fear would be that the cinderblocks absorbing solar warmth might bake the dirt in the holes (but the dirt in the bed itself should be fine). This may just be my summers, where it peaks with about three weeks of 95-105°F. A metal planter box I had (a circular tractor tire rim 3' diameter) baked the dirt fairly seriously.
3) My third fear would be that it'd prevent the sharing of moisture (meaning each hole would need to be individually watered, since moisture from the main area won't soak over and evenly distribute).

Has anyone actually tried it for more than a year? How'd it work out, especially with moisture?
 
Rebecca Norman
gardener
Posts: 2532
Location: Ladakh, Indian Himalayas at 10,500 feet, zone 5
865
trees food preservation solar greening the desert
  • Likes 4
  • Mark post as helpful
  • send pies
    Number of slices to send:
    Optional 'thank-you' note:
  • Quote
  • Report post to moderator
My land is stuffed full of stones so I built my raised beds out of them.
2018Oct-stone-raised-bed-before-greenhouse-was-covered-for-winter.jpg
[Thumbnail for 2018Oct-stone-raised-bed-before-greenhouse-was-covered-for-winter.jpg]
 
pollinator
Posts: 1496
Location: NW California, 1500-1800ft,
457
2
hugelkultur dog forest garden solar wood heat homestead
  • Likes 2
  • Mark post as helpful
  • send pies
    Number of slices to send:
    Optional 'thank-you' note:
  • Quote
  • Report post to moderator
I would reiterate a prior post questioning the need for frames entirely, and even if you do have wood frames rot, isn't that just fungal inoculant and soil buiding? I like frameless beds because you can grow on the sloped sides and these slopes are often ideal for many plants like strawberries.
 
thomas rubino
rocket scientist
Posts: 6525
Location: latitude 47 N.W. montana zone 6A
3395
cat pig rocket stoves
  • Mark post as helpful
  • send pies
    Number of slices to send:
    Optional 'thank-you' note:
  • Quote
  • Report post to moderator
Hi Ben;   That is exactly how we have gardened for 40+ years.  Works great !  Unfortunately getting older sucks and bending that low or just sitting on the ground is hard on a person.
2' raised beds are in our near future.  Might use the metal roofing or may go with the cinderblock design.
 
Eric Hanson
gardener
Posts: 5540
Location: Southern Illinois
1550
transportation cat dog fungi trees building writing rocket stoves woodworking
  • Likes 1
  • Mark post as helpful
  • send pies
    Number of slices to send:
    Optional 'thank-you' note:
  • Quote
  • Report post to moderator
There have been some great answers here so thanks to all.

This post I am about to write includes influence from many posters here, but ultimately is just my own opinion.

I do like the idea of a taller bed.  Presently my beds are only 10”-12” tall or so, but I really see the appeal of a bed 2’ tall or maybe even just a bit taller.  As I am presently trying to make my own super mushroom compost soil and given that I have a ready supply of chips, this is a direction I may work towards in the future.

I also don’t mind a fairly wide bed (this could change in the future).  I am a tall person and I have a good reach.  I typically have a 6’ wide bed and this lets me reach 3’ from each side, though I rarely plant in the middle so I actually only need to reach about 2’-2.5’.

I have a love/hate relationship with cinder blocks.  I really don’t like the way they look, so anything I can do to disguise their industrial look, the better.  I love the fact that they are truly permanent and have nice little holes for planting beneficial plants like nasturtiums or other plants that will attract beneficial insects or repel pests.

I guess we will see how well my coated 2x10’s will work out, though my personal favorite sides are logs.  My logs have almost rotted through at which point they will become part of the bedding material, dug up and tossed into the mix.

Finally, though I have never done so before, I am intrigued by charring the exterior (spell checker is not letting me use the proper term-sorry) and I may try this in the future.  If anyone has done this successfully, I would love to hear from you.

Thanks for all the great suggestions, and if anyone has more to add, please do!

Eric
 
Bryant RedHawk
gardener
Posts: 6814
Location: Arkansas - Zone 7B/8A stoney, sandy loam soil pH 6.5
1654
hugelkultur dog forest garden duck fish fungi hunting books chicken writing homestead
  • Likes 4
  • Mark post as helpful
  • send pies
    Number of slices to send:
    Optional 'thank-you' note:
  • Quote
  • Report post to moderator
[quote=Jamin Grey
I have all my beds made out of 2x12 pressure-treated lumber.
Specifically, I use ACQ - which is available at my local ma and pa lumberstore. ACQ uses copper almost exclusively for its treatment, and while some amount supposedly leaches out, it's not harmful to humans. Baby mice, lizards, spiders, and bugs haven't had any noticeable issue with it either.
My oldest beds have lasted six years now, with no foreseeable need of replacement.

quote]

hau Jamin, are you aware that too much copper in any living thing is a poison? While the new treatments are heads and shoulders above the previous wood treatments, they are still not great for being where you are growing foods.
While they leach less and it takes a year or so more time for the leaching to occur, they do still leach into the soil and the amount of copper plants and humans require is in the 0.005 grams per hundred weight range.
I'm not saying you should change your beds, just be aware that the new treated lumber is not as safe for food growing as the manufacturer's say it is.

Redhawk
 
master steward
Posts: 13038
Location: Pacific Wet Coast
7497
duck books chicken cooking food preservation ungarbage
  • Mark post as helpful
  • send pies
    Number of slices to send:
    Optional 'thank-you' note:
  • Quote
  • Report post to moderator
A couple of quick comments:

Backs - I have two experimental beds that are ~ 30" high (think kitchen table height) which I specifically built when I was having a lot of knee and shoulder trouble. I can reach further at that height than I can kneeling on the ground over a flat bed. There are downsides in keeping them moist and I wouldn't want to rely on them to feed my family, but I can use them to grow myself treats. I have two older friends with health problems who have both drooled over them (not enough to provide a water source though!)

Concrete Blocks - I was given a bunch and decided to build a rectangular bed two blocks high. Its planting area is just less than 4 ft by 8 ft. My theory is that since the blocks are wide, I can actually sit on them to reach the center. I will try to post updates - we've had a late spring, so planting this bed for the first time is still a couple of weeks away. I'm planning a polyculture of tomatoes, peppers, basil and carrots, interspersed with each other. To mis-quote Paul, I'm hoping the tomatoes will eat the carrot poop and vice versa.
 
Posts: 84
Location: Netherlands (moderate maritime climate)
15
  • Likes 1
  • Mark post as helpful
  • send pies
    Number of slices to send:
    Optional 'thank-you' note:
  • Quote
  • Report post to moderator
Last year I read about the non-toxic "LifeTime Wood Treatment" and ordered it from their UK distributor (I am in the Netherlands) to use for my new raised beds.
The website of the manufacturer: http://valhalco.com/why-use-lifetime-wood-stain.php

 
Eric Hanson
gardener
Posts: 5540
Location: Southern Illinois
1550
transportation cat dog fungi trees building writing rocket stoves woodworking
  • Mark post as helpful
  • send pies
    Number of slices to send:
    Optional 'thank-you' note:
  • Quote
  • Report post to moderator
Some very interesting feedback with some very good ideas.  I went ahead and built the bed with 2x10 lumber treated with drylock.  If I try this approach again, I am thinking about using Kilz primer as a coating, but I want to ensure first that this will not cause a problem for my soil microbiology.  Just to be clear, I can not advocate for Kilz at this point, I am only Kilz curious and will discard this idea if I find that it is in fact bad for my soil bedding.  The reason for branching out from the drylock is that the drylock does not really adhere to the wood well and is quite brittle when dry.  as a result, flaking is something of an issue.  Nonetheless, I am attaching pictures to show the bed.  It is a whopping 16'x8'.  I realize that 8' is far too wide for many people, but I am not concerned as I can reach most of the bed, and I don't mind stepping in here and there to get access to the center.  I may even put in a couple of stepping stones to reach the center.

At any rate, thanks for the input, and please let me know what you think,

Eric
IMG_5838.JPG
[Thumbnail for IMG_5838.JPG]
IMG_5839.JPG
[Thumbnail for IMG_5839.JPG]
 
Eric Hanson
gardener
Posts: 5540
Location: Southern Illinois
1550
transportation cat dog fungi trees building writing rocket stoves woodworking
  • Mark post as helpful
  • send pies
    Number of slices to send:
    Optional 'thank-you' note:
  • Quote
  • Report post to moderator
Adriaan,

That stain you mentioned sounds exactly like the type of wood treatment that I was looking for.  I had been wondering if deck treatment would have been appropriate, but the stain sounds perfect.  I have other beds to do and I may well use this product.  Thanks!

Eric
 
Jay Angler
master steward
Posts: 13038
Location: Pacific Wet Coast
7497
duck books chicken cooking food preservation ungarbage
  • Mark post as helpful
  • send pies
    Number of slices to send:
    Optional 'thank-you' note:
  • Quote
  • Report post to moderator
Eric, your new bed is coming along nicely - good job!
I do agree with the idea of stepping stones. If you have a designated place to step you are less likely to step any old place and compress the soil. I was lucky and got some cast iron "frog" stepping stones that I used in a bed which had to be an odd size and shape due to existing trees and rock, but I've also used both flat stones and cut rounds of trees.
 
Eric Hanson
gardener
Posts: 5540
Location: Southern Illinois
1550
transportation cat dog fungi trees building writing rocket stoves woodworking
  • Mark post as helpful
  • send pies
    Number of slices to send:
    Optional 'thank-you' note:
  • Quote
  • Report post to moderator
Jay,

Thanks for the positive thoughts.  This is my second wood chip bed and my technique is still evolving.  I think my next step will be to dig fertile holes for tomatoes (8) and fill in with a topsoil-manure mix, maybe amended with bat guano or a mixture of bone and blood meal.  I will likely add in some chop and drop comfrey just to get things rolling.

Soon I will also buy some stropharia mix and thoroughly inoculate the chips to get some fungal activity going.  This year I will inoculate more thoroughly than last year as I found out that I really spread my inoculate too sparsely before.

Finally, I still have some wood chips left over and I may spread these around my other beds as well.

Thanks again for the feedback and if anyone else has any thoughts, I would love to hear them.

Thanks,

Eric
 
pollinator
Posts: 2618
Location: RRV of da Nort, USA
755
  • Mark post as helpful
  • send pies
    Number of slices to send:
    Optional 'thank-you' note:
  • Quote
  • Report post to moderator
Didn't know where to put this, so am tagging along with a different thread dealing with lumber treatments to resist decay.

I'm interested in building a table top for an outdoor table that will be getting lots of sun, rain, and dust.  The top pieces of wood that make up the surface slats will be one kind of wood, but the supportive layer underneath that will run perpendicular to the surface pieces I was hoping to be standard 1X4 pine board....which naturally will become quite damp each time it rains.  So I'm hoping to treat that bottom layer of boards with something relatively non-toxic and as durable as possible so as to reduce the frequency of re-treatment.  I recall seeing comments about borax but don't know if that would be appropriate for this case?.....Thoughts and recommendations?  Thanks!

(Edit--feel free to move this to a more appropriate section if need be...)
 
Eric Hanson
gardener
Posts: 5540
Location: Southern Illinois
1550
transportation cat dog fungi trees building writing rocket stoves woodworking
  • Mark post as helpful
  • send pies
    Number of slices to send:
    Optional 'thank-you' note:
  • Quote
  • Report post to moderator
John,

There is no shortage of paints, varnishes and oils that will help to waterproof the sides (it is the sides we are talking about right?).

Probably the most eco friendly sealer you could use would be linseed oil.  Consider staining the pine first though.  The stain sort of fills up little pores and soaks into the wood so water can’t.  After applying stain, linseed oil can be applied on top, preferably in a couple of different layers.  The linseed oil is not permanent and will need future coats to maintain peak water protection.

However, since we are talking about the sides and not the top, water simply will not soak in as if it were a horizontal surface facing up and water resting in place for hours to days.

Another alternative is polyurethane which is an excellent sealer, but may not make the “organic or better” status for Permies.  The problem is not so much the poly going on the wood as much the poly left over needing disposal—even if only on a paint brush, so that part is somewhat questionable.

But linseed oil should work quite well, just remember to top it off every couple of years.

Eric
 
John Weiland
pollinator
Posts: 2618
Location: RRV of da Nort, USA
755
  • Mark post as helpful
  • send pies
    Number of slices to send:
    Optional 'thank-you' note:
  • Quote
  • Report post to moderator
Thanks for this response, Eric.  We have linseed oil already so that is the way I will go with the project.
 
Jay Angler
master steward
Posts: 13038
Location: Pacific Wet Coast
7497
duck books chicken cooking food preservation ungarbage
  • Mark post as helpful
  • send pies
    Number of slices to send:
    Optional 'thank-you' note:
  • Quote
  • Report post to moderator
@ John - I just did an indoor project using two coats of linseed oil, followed up with two coats of homemade beeswax/olive oil mix with the first coat ~ 1 part wax to 3 parts oil and the second one more like 50/50. It seemed to do a lovely job, but I don't know how it would do for outdoor. A friend of mine always uses boiled linseed oil on his tool handles.
Do remember that linseed oil rags are *very* flammable. I use a cotton rag and I stick it in my wood-stove when I'm done.
 
John Weiland
pollinator
Posts: 2618
Location: RRV of da Nort, USA
755
  • Mark post as helpful
  • send pies
    Number of slices to send:
    Optional 'thank-you' note:
  • Quote
  • Report post to moderator
Thanks, Jay.  Just out of curiosity, I'll be using this on wood to go into a patio table.  The idea is to treat the supportive pine boards running underneath and perpendicular to some nicer wood making up the table-top surface.  Are there worries about the flammability of the oil if the table is sitting out in the sun?  Does one just let the linseed oil soak in for a few days before deploying it to where it will be used to reduce this risk?  Thanks....
 
Tick check! Okay, I guess that was just an itch. Oh wait! Just a tiny ad:
PDF book: Popular Ornamental Plants, (185 Plants, 135 pages) Get it
https://somegardens.gumroad.com/l/MostPopularOrnamentalPlants
reply
    Bookmark Topic Watch Topic
  • New Topic