• Post Reply Bookmark Topic Watch Topic
  • New Topic
permaculture forums growies critters building homesteading energy monies kitchen purity ungarbage community wilderness fiber arts art permaculture artisans regional education skip experiences global resources cider press projects digital market permies.com pie forums private forums all forums
this forum made possible by our volunteer staff, including ...
master stewards:
  • Carla Burke
  • Nancy Reading
  • r ranson
  • John F Dean
  • Pearl Sutton
  • paul wheaton
stewards:
  • Jay Angler
  • Anne Miller
  • Nicole Alderman
master gardeners:
  • Christopher Weeks
gardeners:
  • Maieshe Ljin
  • Benjamin Dinkel
  • Jeremy VanGelder

The Throne Room - transforming closets into ensuite

 
steward & author
Posts: 40837
Location: Left Coast Canada
14859
8
art trees books chicken cooking fiber arts
  • Likes 2
  • Mark post as helpful
  • send pies
    Number of slices to send:
    Optional 'thank-you' note:
  • Quote
  • Report post to moderator
I'm helping a friend transform a closet into a throne room.

He's getting on in years and wants to have a toilet as an ensuite to his bedroom. The neat thing about this project is that there used to be an ensuite but they took it away to make closets.  The plumbing and the walls are gone, but many of the essentials are already there (like the place where they will enter the main drain).  Since the city believes there's a bathroom in there, we're thinking of basically building it to the old plans but without the additional laundry room.  We need some closet space after all.

The current set up looks something like this:

(not to scale)


and if we use a larger marker, we can transform it into the future (also not to scale)


Rusticator
Posts: 8965
Location: Missouri Ozarks
4802
6
personal care gear foraging hunting rabbit chicken cooking food preservation fiber arts medical herbs homestead
  • Likes 3
  • Mark post as helpful
  • send pies
    Number of slices to send:
    Optional 'thank-you' note:
  • Quote
  • Report post to moderator
I think it looks great! Only one question - will he be able to get in there, on his own, if he ends up - even temporarily - needing a wheelchair, or (more likely) a walker?
 
r ranson
steward & author
Posts: 40837
Location: Left Coast Canada
14859
8
art trees books chicken cooking fiber arts
  • Likes 4
  • Mark post as helpful
  • send pies
    Number of slices to send:
    Optional 'thank-you' note:
  • Quote
  • Report post to moderator

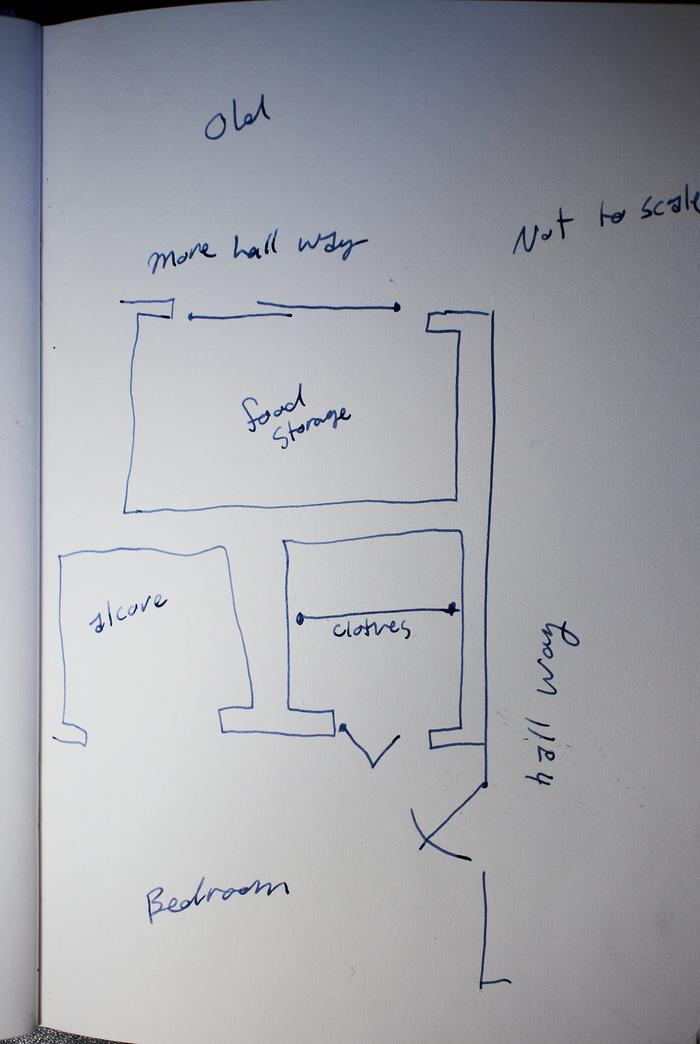
Carla Burke wrote:I think it looks great! Only one question - will he be able to get in there, on his own, if he ends up - even temporarily - needing a wheelchair, or (more likely) a walker?


Great questions.

1. he doesn't live alone, so 99% of the time someone else will be nearby.
2. there is a bathroom down the hall that is wheelchair accessible - but the house isn't wheelchair accessible yet.  

He's like me and has Crohn's so it's not always nice to use the shared toilet.  One bowel movement can take 45 min and leave a stink.  It's better to have a shared toilet for normal bowel people and have a private bathroom for stinky stuff.  

Air filtration is going to be interesting.  We are looking into different options including running a vent to the outside and recirculating filters.  
 
r ranson
steward & author
Posts: 40837
Location: Left Coast Canada
14859
8
art trees books chicken cooking fiber arts
  • Mark post as helpful
  • send pies
    Number of slices to send:
    Optional 'thank-you' note:
  • Quote
  • Report post to moderator
power tools, hammer, prying and other loud noises in a confined space makes me want to ... click here
 
pollinator
Posts: 1234
Location: Chicago/San Francisco
196
  • Likes 3
  • Mark post as helpful
  • send pies
    Number of slices to send:
    Optional 'thank-you' note:
  • Quote
  • Report post to moderator
My first thought as follows:

Rearrange the layout to reduce total space taken, use one single plumbing wall and place the basin next to and w/in reach of the toilet. Turn the toilet to face toward the main room, move the basin onto the wall next to the toilet, adjust walls as needed for good ergonomics and to meet code.  Place TP on the wall beside the toilet and even with or slightly in front of the nose of the toilet bowl and about 24" high. Makes for easy reaching.  Locate door and shelves or cabinet as you find appropriate. (door in front of the basin means one doesn't stare at the toilet when the door is open). Open the walls and install structural blocking to allow strong installation of grab bars.

Perhaps you have reviewed these options. Just my .02.


Cheers,
Rufus
 
r ranson
steward & author
Posts: 40837
Location: Left Coast Canada
14859
8
art trees books chicken cooking fiber arts
  • Mark post as helpful
  • send pies
    Number of slices to send:
    Optional 'thank-you' note:
  • Quote
  • Report post to moderator
Thank you for the two cents!  Do I do a joke about spending a penny?

Now we have the shelves out of the two closets, we can see the design needs to change.  I'm thinking once we have the connecting wall between them out, I can do a to-scale map and then cut out some to-scale toilets and sinks and stuff then play.  

We haven't bought the vanity/sink or toilet yet because we don't know for sure the size.  The sink is going to be tricky as it needs to be big enough he can shave in but small enough not to attack him.  

 
pollinator
Posts: 4095
Location: Kansas Zone 6a
318
  • Likes 1
  • Mark post as helpful
  • send pies
    Number of slices to send:
    Optional 'thank-you' note:
  • Quote
  • Report post to moderator
Probably the most popular tiny house sink is the ikea lillangen https://www.ikea.com/us/en/p/lillangen-sink-white-70207144/

I like this one better, it is a little bit bigger.  Close to regular size sink, just removed the backsplash and space for the faucet behind it.  https://www.ikea.com/us/en/p/hagaviken-sink-white-20324503/

Definitely block the walls for handrails while the studs are open. The other option is to use 3/4 plywood as wainscot to get solid anchor points, but you lose room in an already tight space.

I usually grab a roll of tape, an actual toilet, and a box the size I think I want the sink cabinet and do layouts on the shop floor.
 
gardener
Posts: 5338
Location: Cincinnati, Ohio,Price Hill 45205
1082
forest garden trees urban
  • Likes 1
  • Mark post as helpful
  • send pies
    Number of slices to send:
    Optional 'thank-you' note:
  • Quote
  • Report post to moderator
Careful with Ikea plumbing fixtures.
Last time I checked,  the pipe sizes do not match 'merican sizes.
 
r ranson
steward & author
Posts: 40837
Location: Left Coast Canada
14859
8
art trees books chicken cooking fiber arts
  • Mark post as helpful
  • send pies
    Number of slices to send:
    Optional 'thank-you' note:
  • Quote
  • Report post to moderator
The main plumbing in the house is copper.  I want to use plastic.  How to connect the two?

 
pollinator
Posts: 1782
Location: Victoria BC
317
  • Mark post as helpful
  • send pies
    Number of slices to send:
    Optional 'thank-you' note:
  • Quote
  • Report post to moderator

r ranson wrote:The main plumbing in the house is copper.  I want to use plastic.  How to connect the two?


Assuming sweated copper to pex, you'll need an adapter fitting, something like this:
https://www.homedepot.ca/product/zurn-pex-copper-sweat-female-adapter-1-2-inch-female-sweat-x-1-2-inch-barb-lead-free/1001143819

Note that if pex is the plastic you mean, there are several types. Some are better than others, and it is a good idea not to mix manufacturers..


If you meant pvc, the adapter will look a bit different, but the principle is identical. If using threaded fittings, I try pretty hard to avoid using metal male threaded with plastic female threaded; much less chance of leaks doing it the other way around.


Definitely in favor of at least prepping for handrails while it is easy, or better yet just putting them in now.
 
r ranson
steward & author
Posts: 40837
Location: Left Coast Canada
14859
8
art trees books chicken cooking fiber arts
  • Mark post as helpful
  • send pies
    Number of slices to send:
    Optional 'thank-you' note:
  • Quote
  • Report post to moderator
Did I dream it or is it a real thing?

Toilet like regular western toilet, but above the tank is a handwashing sink with the was water draining into the tank for flushing?

I don't know if he is keen on the idea, partly because neither of us is sure if it's real or something I imagined.

Save a lot of space if real
 
gardener & author
Posts: 2080
Location: Manitoba, Canada
697
2
cattle hugelkultur monies duck forest garden fish fungi earthworks building rocket stoves homestead
  • Mark post as helpful
  • send pies
    Number of slices to send:
    Optional 'thank-you' note:
  • Quote
  • Report post to moderator

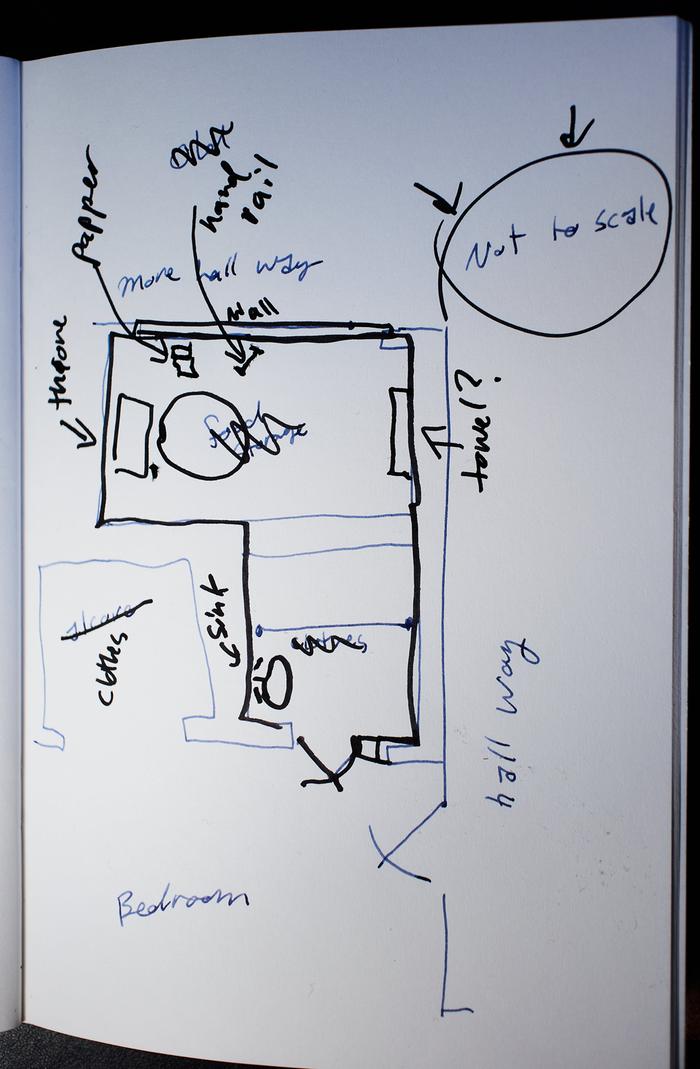
r ranson wrote:Did I dream it or is it a real thing?

Toilet like regular western toilet, but above the tank is a handwashing sink with the was water draining into the tank for flushing?

I don't know if he is keen on the idea, partly because neither of us is sure if it's real or something I imagined.

Save a lot of space if real


I'm pretty sure this is a real thing. Not sure where you can get one though.
 
r ranson
steward & author
Posts: 40837
Location: Left Coast Canada
14859
8
art trees books chicken cooking fiber arts
  • Mark post as helpful
  • send pies
    Number of slices to send:
    Optional 'thank-you' note:
  • Quote
  • Report post to moderator
So glad it's a real thing.  That's going to make life easier... maybe.

But I think there should be room enough to put a small sink in there if we are careful.
 
R Scott
pollinator
Posts: 4095
Location: Kansas Zone 6a
318
  • Mark post as helpful
  • send pies
    Number of slices to send:
    Optional 'thank-you' note:
  • Quote
  • Report post to moderator
It is, or at least was, real.

One version was kind of a drinking fountain spout that hooked to the tank float valve so it only ran when the tank was refilling.  And only cold water. Not good.
 
master pollinator
Posts: 5132
Location: Due to winter mortality, I stubbornly state, zone 7a Tennessee
2173
6
forest garden foraging books food preservation cooking fiber arts bee medical herbs
  • Likes 1
  • Mark post as helpful
  • send pies
    Number of slices to send:
    Optional 'thank-you' note:
  • Quote
  • Report post to moderator
Somebody made thier own. And posted it to (drumroll please) Permies!

I'll find it when I get back on the desktop computer.
 
Joylynn Hardesty
master pollinator
Posts: 5132
Location: Due to winter mortality, I stubbornly state, zone 7a Tennessee
2173
6
forest garden foraging books food preservation cooking fiber arts bee medical herbs
  • Likes 2
  • Mark post as helpful
  • send pies
    Number of slices to send:
    Optional 'thank-you' note:
  • Quote
  • Report post to moderator
https://permies.com/t/96966/toilet-sink


Be impressed! I found it on mobile! Astonishing.
 
Rufus Laggren
pollinator
Posts: 1234
Location: Chicago/San Francisco
196
  • Likes 2
  • Mark post as helpful
  • send pies
    Number of slices to send:
    Optional 'thank-you' note:
  • Quote
  • Report post to moderator
> copper... pex

Snakes around and through w/out cutting, so easier rough install. But. Requires special tool to crimp on fittings. It _may_ be possible to use "SharkBite" (brand name) type push-on fittings if local code says OK. Home Depot sells them, they're about 5+ times more expensive, but work well. Not sure if they come in sizes for the 3/8" pex; probably come for 1/2" pex.

IAC, make all your connections, every single hot or cold water connection, where you can get to them in case of a leak; barring real bad luck, the pex itself won't leak, but the connections are the weak spot. That means "home runs" from the manifold under the house where you can reach it, a single designated pex tube to every fixture in the bathroom, both hot and cold. Leave some extra play at the fixtures for repairs later if needed - if you can pull 12" to 24" of pix out of the wall where it was leaking at the fixture it makes a much easier repair than trying to splice in addition tubing to reach the correct length after cutting off the problem fitting. Strap the pex carefully and/or use special clips where it goes through holes in the studs and floor. Pipes and tubing want to jump around when faucets are turned on and off and it's somewhat disheartening to here a tap dance inside your wall...

A caveat on the recycle toilet: The valves inside the toilet tank generally don't like foreign substances like hair, shampoo, soap scum, etc. It can make for frequent dives under the hood to get things right again for a while.

Almost all toilets are very close in their measurements. Look at the specs for a few and you'll see, I think, that you can make a generic specification w/out choosing any particular toilet. You _will_ want what's known as a 12" rough - center of the toiler drain hole is 12" from the finish wall behind toilet.

Code has something to say about bathroom layout. 15" minium from center of the bowl to nearest object to either side. I think there's some minimum clearance in front the bowl, also; don't recall what it might be. Generally speaking, 15" is kinda too tight; be compassionate to the people who will use the 1/2-bath and allow some room side and front.

Vanities (cabinet on which you set the basin) are hugely useful and also a huge obtrusion in a small 1/2-bath. They just wipe out all visual space in one swell foop. If you can hang the basin (be sure to install good solid structural blocking in the wall for the basin hangers) it will make the room feel much larger than with a vanity; and the room will actually _be_ somewhat larger. Careful installation of a hanging basic can allow much better wheel chair access. IMHO, the standard 30" height for bath basins in too low - YMMV.

A full size medicine cabinet above the basin is worth its weight in gold for convenience and _necessary_ storage.

Towel "loops" or "hoops" don't hold a candle to even the shortest towel _rack_ for convenience and usefulness. A Paul Bunyan sized ceramic hook is better to use than a hoop; but they get knocked off the wall easy.

Lighting. It matters.  First, good light over the basin. Second (maybe optional), good light over the "throne".  Take the time to install a switch at the door - don't go for a pull cord.

(I have included a pdf file at the bottom which enlarges on bathroom fan art and science...)
Fart fan. NOT optional. Spend the $200 or so for a good one that you can't hear when it's running. Panasonic is the standard here. Yes, that's a personal opinion, but I _strongly_ recommend a good fan. Noisy crap appliances just make me feel downtrodden. And the noise gets extremely annoying very quickly. Also, the good ones are spec'd to run 24/7 and can be used to ventilate the house at a whatever small CFM you get for the  small 1/2-bath. Good sites have how-to-select pages with reasonable recommendations. The fan can be switched in the same box as the light with a regular switch, a motion switch, or a fan timer. When the fan gets installed, do NOT use the crinkly aluminum flexible ducting if you can possibly avoid it. Use smooth ducting, either steel vent pipe or aluminum vent pipe. Steel is stronger. Whatever you use, tape _all_ the seams and joints with foil tape - duct tape is no good. Insulate it all the way to the vent terminal on the outside wall; you can use fiberglass batts, wrapped around and taped - cut it in lengths long enough to wrap around the vent pipe fully and perfectly with out crushing. The fan will _push_ moisture laden air from the house through the vent pipe which is in a cooler joist space. You want that pipe to be sloped down from the fan to the terminus at the outside wall to drain any condensate; insulating it will reduce condensate. Putting the terminus on an outside wall, as opposed to the roof, is usually easier and allows proper draining.

Finally, I have found the add-on bidet sprays on a hose which you can install inline above the toilet service stop are a very nice feature. Kinda like the flexible shower sprays; there is a clip which one can velcro to the toilet tank or the wall which holds the spray head conveniently.


Have fun!
Rufus
Filename: bldg_bath_fans_FineHomeBuilding.pdf
File size: 585 Kbytes
 
r ranson
steward & author
Posts: 40837
Location: Left Coast Canada
14859
8
art trees books chicken cooking fiber arts
  • Likes 1
  • Mark post as helpful
  • send pies
    Number of slices to send:
    Optional 'thank-you' note:
  • Quote
  • Report post to moderator
I'm pretty sure we have at least one crimping tool plus more we picked up second hand.

Went to home depot to get some of the supplies to get started.  Got a bunch of the girl treatment but eventually, we got what we needed.  I especially like the little ends we put where the shutoff valves will go so we can test the plumbing before putting the wall on.  That should make life much easier.
 
r ranson
steward & author
Posts: 40837
Location: Left Coast Canada
14859
8
art trees books chicken cooking fiber arts
  • Mark post as helpful
  • send pies
    Number of slices to send:
    Optional 'thank-you' note:
  • Quote
  • Report post to moderator
Let's get this wall out of the way so we can see what we have to work with.

Begin with taking the doors off and all the food off the shelves.


A mallet and the sleeves are done.  


Turns out most of these screws are just into gyprock but are 2 to 2.5 inches long, so that makes up for it (smiles - seriously, it's amazing this stayed up so well.)


Make somewhere for the clothes to hang


test it


Ready to start sawing drywall.
 
r ranson
steward & author
Posts: 40837
Location: Left Coast Canada
14859
8
art trees books chicken cooking fiber arts
  • Mark post as helpful
  • send pies
    Number of slices to send:
    Optional 'thank-you' note:
  • Quote
  • Report post to moderator
We went around home depot the other day for a fistfull of supplies and saw this possible vanity.


It's ugly, but small!  

Before cutting into the wall, we used the stud finder to figure out if we would get shocked.  No signs of electrical or plumbing (which we didn't expect would be there), but for some reason, there was a stud every six inches.  We figured it must be broken, so we started anyway.  


hmm... never seen studs quite like this.  Good thing it's not a load-bearing wall as some of these studs have less than 1/4 inch of wood holding them up.  (oh, by the way, we check that we wouldn't be removing any of those - we're good).
 
Rufus Laggren
pollinator
Posts: 1234
Location: Chicago/San Francisco
196
  • Mark post as helpful
  • send pies
    Number of slices to send:
    Optional 'thank-you' note:
  • Quote
  • Report post to moderator
A quick/dirty/effective way to strengthen that wall, especially if you're going to hang anything from it (though you would still need structural blocking between the studs to catch screws for whatever you put on there that needs strength) is to shearwall it with 3/8-1/2" "rated" plywood. I'm guessing ceiling is less that 8'? If so two pieces would do it; joint is over one of the 2x's or if you use the doubled ones, nail them together with 5-6 16D's first. Nail every 4" along the edges of the sheet, 6" in the center. Hit the studs, of course. That ties the whole wall together and spreads any loads. If you want to consider this, I can verify the nailing schedule, or you can (shouldn't be hard to find in the net) - you don't have to use 16D's for the shearwall. But make sure everything is in the wall that belongs in the wall beforehand!

'Ware the space to open the vanity door.

Rufus
 
r ranson
steward & author
Posts: 40837
Location: Left Coast Canada
14859
8
art trees books chicken cooking fiber arts
  • Mark post as helpful
  • send pies
    Number of slices to send:
    Optional 'thank-you' note:
  • Quote
  • Report post to moderator
There used to be these roll-up doors, especially to old kitchens.  We have something like it for a screen door at home.  
I'm trying to figure out the words to ask google to tell me about this door.   Anyone know what they are called?
 
gardener
Posts: 950
Location: Galicia, Spain zone 9a
249
2
dog duck chicken cooking food preservation fiber arts pig bike bee solar ungarbage
  • Mark post as helpful
  • send pies
    Number of slices to send:
    Optional 'thank-you' note:
  • Quote
  • Report post to moderator
Sliding doors may be more helpful for wheelchair access. We put curtains up instead of a door to our wheelchair access bathroom. The sink./ loo set ups look grest but expensive. On my wish list for smaller ensuites.
 
r ranson
steward & author
Posts: 40837
Location: Left Coast Canada
14859
8
art trees books chicken cooking fiber arts
  • Likes 1
  • Mark post as helpful
  • send pies
    Number of slices to send:
    Optional 'thank-you' note:
  • Quote
  • Report post to moderator
I took the measurements from the inside of the wall.

less than half of the room has ... what do you call it?  Unfinished?  Open?  No ceiling - just joists, in the basement.  So we can see the guts of the house.  That's nearest the long wall.  So the toilet out spout needs to go there for ease of plumbing.  

The 'door' we are keeping is a lot wider than a standard door so we might frame that in later.  For now, we're leaving it.

the dog leg alcove is much smaller than I expected so I'm thinking shelving.

Yes, it's a standard 8" ceiling.  

If you want to have fun drawing up a plan, go for it.
floor-plan.JPG
empty throne room plan
 
r ranson
steward & author
Posts: 40837
Location: Left Coast Canada
14859
8
art trees books chicken cooking fiber arts
  • Mark post as helpful
  • send pies
    Number of slices to send:
    Optional 'thank-you' note:
  • Quote
  • Report post to moderator
Observation - now that we got the adjoining wall off, I'm shocked by how much floor space in a house is dedicated to the closets.  Where I live, it's a lot like my friend's house.  The closets take up one wall and each room has two or three!  I've never owned enough clothes to half-fill a closet.  I often think it would be much more comfortable to get rid of the closets and get one of those old wardrobes to hang clothes in.  That way there would be more open space in the room and we could move things around when the mood strikes.  Also, having closets on one wall, limits where we can put the furniture in the bedroom.

Something to consider for the distant future.
 
Rufus Laggren
pollinator
Posts: 1234
Location: Chicago/San Francisco
196
  • Mark post as helpful
  • send pies
    Number of slices to send:
    Optional 'thank-you' note:
  • Quote
  • Report post to moderator
You have 3'10" clear on the back wall. That will hold a toilet tight to a basin or vanity tight to the rt wall if the basin was less than 16".

OR: Put the door on the left wall and the plumbing on the right wall and you get to have an 18" basin.

The alcove is 2' deep from the 1/2-bath. That is too deep to conveniently use the rear of the shelving for small items, although any storage is good storage. You could move the 1'8" wall of the alcove and make the space 18" deep from the bath (giving you more space in the bedroom); OR, you remove the 24" alcove wall on the bedroom and make the 1'8" deep space accessible from the bedroom as a closet/shelving (but closets need 22" minimum depth for hanger to not touch the walls). Doing the latter _may_ allow you to use the left wall of the main 1/2-bath room (formely open to the alcove) for a sliding door which slides into the space beside the new shelving.

Although it may seem  huge, in my experience, once you open a couple of walls, you may as well open all of them. The work to relocate walls seems huge and sometimes ff there is existing plumbing or too much electrical, it can increase costs too much. However, the carpentry and sheetrock work involved with walls doesn't go up that much once you have to tear open a couple finish walls anyway. Are you  going to be doing the work youself? An air compressor with a couple nail guns makes things possible that were ridiculous foolishness otherwise; such a package would run maybe $250 at the box stores. Big noisy tools but beautiful in their functionality. In this case, for almost any use, you cannot rent as economically as you can buy. Resale value would be about $125 to 150 depending on the tool brand (conservatively).

Moving either the "front" wall or the left wall a few inches can give you the room to use a full size sliding door if the space in the bedroom prohibits a door opening into that way.

Are there sight lines in the bedroom you want to try to preserve (or create)? The space to the left of the 1/2-bath area you drew is probably significant to any plans to make things fit better.

Not sure what it looks like from below, but you need to able to find a large drain (3-4") to connect the toilet. Did you say there used to be a toilet around this area? Then you're probably fine unless somebody got anal about removing all the old pipe.


Regards,
Rufus
 
r ranson
steward & author
Posts: 40837
Location: Left Coast Canada
14859
8
art trees books chicken cooking fiber arts
  • Mark post as helpful
  • send pies
    Number of slices to send:
    Optional 'thank-you' note:
  • Quote
  • Report post to moderator
I'm having trouble visualizing it.  Would you be able to draw a picture?  
 
Rufus Laggren
pollinator
Posts: 1234
Location: Chicago/San Francisco
196
  • Likes 1
  • Mark post as helpful
  • send pies
    Number of slices to send:
    Optional 'thank-you' note:
  • Quote
  • Report post to moderator
> pic

Sure, That would be tonight. I'm out doing laundry and borrowing a PC and don'l have any drawing tools.

I added some clarification to my comment above.


Regards,
Rufus
 
Rufus Laggren
pollinator
Posts: 1234
Location: Chicago/San Francisco
196
  • Likes 2
  • Mark post as helpful
  • send pies
    Number of slices to send:
    Optional 'thank-you' note:
  • Quote
  • Report post to moderator
OK, here's a couple crude example layouts drawn over your dimensioning drawing. My CAD programs didn't survive the last system upgrade so until I fix that, mouse drawing is all I can do.

Wall A and Wall B can both move to gain space here or there, but neither necessarily has to. The door is the most important thing to make fit right, in conjunction with the fixtures. Generally speaking a standard door is somewhat cheaper/easier to install but not so much that it's a reason not to use the pocket door if you want. Depends on the rest of the bedroom, really and whether it can take a door swinging into it. Actually, it looks like the layout with fixtures on the right and walls the same (mostly) will allow a 32" door to swing into the 1/2-bath which would look better and make life easier in the bedroom.

The alcove/shelving can be adjusted depending on where you want to access it, from the bath or the bedroom. With a standard door and fixtures on the right, you can access it from the 1/2-bath and use 12" deep shelves (much neater to not provide space behind the front row of items to lose ancient "stuff" at the back of a deep shelf). The space to the left of that 12" shelving can be redeemed back into the bedroom or that space can host more shelving available from the bedroom. The potential bedroom shelving does not need a cabinet or wall - it can remain open using shelf hangers of one sort or another. That would make the bedroom feel larger at the expense of exposing anything people actually put on those shelves.

The ADA requirements (aimed at wheel chair access) require a minimum 32" door, provided there is straight-on access to that door. The 1/2-bath, however, is not big enough to meet ADA requirements for a 60" clear turning circle for wheel chairs, so while the ADA rules are good for ideas, there is no way you can meet them in this situation. The 1/2-bath _may_ be large enough to allow entry by wheel chair and the person can then transfer themselves to the toilet using grab bars (if they are well attached and can be placed well enough).

If I find time to get the CAD programs running again, I'll clean up the drawings with proper dimensions and such. I have vehicular work to complete, though, before I can move on much. Hope this answers some of your questions and opens up ideas for you.


Regards,
Rufus
Filename: r-ransom_bath_1.pdf
File size: 134 Kbytes
Filename: r-ransom_bath_2.pdf
File size: 158 Kbytes
 
r ranson
steward & author
Posts: 40837
Location: Left Coast Canada
14859
8
art trees books chicken cooking fiber arts
  • Mark post as helpful
  • send pies
    Number of slices to send:
    Optional 'thank-you' note:
  • Quote
  • Report post to moderator
Neat pictures!  That's a great help.

We don't need to worry about wheelchair accessibility yet.  He's still able-bodied and hoping for another 10+ years of full-ish mobility.  Crohn's does mean arthritis is setting in, but if mobility becomes an issue, bigger things would need to change in his living situation.  

Tomorrow I'm hoping to measure where exactly the finished ceiling ends in the basement.  I don't want to disturb the finished ceiling, so it might mean that all the plumbing is going on the long wall.  I'll take the images with me and see what he thinks.  In the end, it's his house.  I'm just doing the donkey work.
 
Rufus Laggren
pollinator
Posts: 1234
Location: Chicago/San Francisco
196
  • Mark post as helpful
  • send pies
    Number of slices to send:
    Optional 'thank-you' note:
  • Quote
  • Report post to moderator
I'll try to fix my PC programs and make better pictures. I know it helps to look over several different layouts visually, and especially if the important information (like dimensions) is displayed

I do believe you should very carefully consider placing good layout and plumbing runs and wall structure far ahead of finished surfaces (like the ceiling below the room) in terms of importance. Marginal layout and hampered convenience and usability which will affect the room over many years will have a much greater effective personal cost than pulling down some sheet rock or plaster and then replacing with new. And there is a really good chance that nearby surfaces will be significantly compromised anyway during the work. To me the situation looks like the proverbial pennies vs. pounds.

Moving walls does add the need to patch both ceiling and floor, so that is a very valid cost consideration. So, to me, the first corner to cut would be leaving all the walls in the same location. But it really depends on how the rest of the bedroom is laid out and finished. What else might be made better in that room during this same remodel?

Then, a good (experienced in repair) electrician may well be able to snake wires to wherever the right place for the light and fan switch turns out to be - with minimal (easily patchable) damage to existing surfaces. When adding the electrical box for the switches, ask, even insist, that, even if the wall has not been fully opened there, the box be screwed directly onto a wall stud, not just inserted in a hole in the finished surface using "repair clamps"; it makes a night/day difference in the solidity and reliability of the install. Yes, this is possible - I have replaced many old boxes and added many new ones (even through lathe and plaster) without needing to patch the wall. It does require some careful measurement after locating the studs around where the door goes - which is why a good experienced anal retentive electrician is worth the cost.


Regards,
Rufus
 
Rufus Laggren
pollinator
Posts: 1234
Location: Chicago/San Francisco
196
  • Likes 2
  • Mark post as helpful
  • send pies
    Number of slices to send:
    Optional 'thank-you' note:
  • Quote
  • Report post to moderator
Sorry for the delay with the pics. Wrestling with computers sometimes takes a while. Hope the diagram with dimensions helps some. Can't get the widgets running right yet, so no swinging doors and such. But with lines and dimensions, I can try different layouts easier. Been meaning to get the thing working anyway, for a while now.

Regards,
Rufus
r-ransom_half-bath.jpg
[Thumbnail for r-ransom_half-bath.jpg]
 
Rufus Laggren
pollinator
Posts: 1234
Location: Chicago/San Francisco
196
  • Mark post as helpful
  • send pies
    Number of slices to send:
    Optional 'thank-you' note:
  • Quote
  • Report post to moderator
edit: Sorry, folks. Not my week for computer bliss. My inet is degraded to dial-up speeds and it's affecting how I can post pics.  The image at the bottom of the post should display an image in my google cloud drive, but apparently the site software doesn't like the link format and it won't embed it. To view the image one needs to right-click and select "View Image". Most browsers have something like that. I'll try to revisit this post when my inet speeds return so I can actually embed the image.


Below is a dimensioned drawing with the fixtures on the back wall. It includes a couple of tweaks: 1) Recessing the toilet into the back stud wall to gain clearance in front of the bowl; 2) splitting the alcove to provide some shelving next to the basin as well as well as some shelving or a cabinet in the bedroom.

This 1/2 bath held within the original walls is very tight, maybe too tight; it does not meet code, but that's not really the issue - basic usability is, It  might be workable depending on the people involved. The most critical dimension is the clearance in front of the toilet. Selecting for the shortest toilet you can find and then recessing it back into the rear wall will almost give sufficient room. Selecting a very small basin and hanging on the back wall will help the room to be only slightly claustrophobic. Inserting skinny shelving above the toilet tank in the wall recess can provide a little more storage or space for decor while also (maybe) making the room look a little larger. If located as in the drawing, the door needs to open out if it's a swing door - hinges to the right, of course - which inhibits the side wall of the bedroom to the right of the door; if the door is located further left, in front of the basin, it can probably be installed to swing in, making it much less intrusive in the bedroom at the cost of a couple inches in front of the toilet. If located in front of the toilet, possibly a bi-fold door would serve provided the fart fan was efficient and either was silent or had a timer switch (otherwise it wouldn't get used and left on for a few minutes required after the occupant leaves the toilet).

I should have drawn in a  medicine cabinet over the basin. I strongly suggest the cabinet be fully recessed into the back wall, plumbing and electrical issues be damned.  That room _needs_ all the space it can get.

The shelves left and above the basin can hold TP and other large items. Shelves below the basin level can hold cleaning items. But I suggest that if shelves are placed below the basin level, they be a separate space, with a bit of wall between the upper shelves and the lower shelves to provide the basin with solid wall on both sides. They can have a curtain (easiest) or maybe a door for the upper shelves; "maybe" the carpenter would need to be careful about how it opened vs. the medicine cabinet. If there is a solid door for the upper shelves, you _really_ want the hinges to be toward the back wall and will need some planning.

When recessing stuff into a 2x4 stud wall to gain space you have the problem of putting a finished surface on the interior of a rough framed wall. You can just paint it and call it done or you can apply smooth surfaces using glue. The two surfaces which I have found excellent are 1) door skin; 2) fiberglass shower walls. The box stores have the fiberglass in 4x8' sheets where they sell show walls. The door skin may require finding a "real" lumber yard, although it used to be sold everywhere. Door skin is 3/32" thick plywood which was originally used to put a face on very cheap interior doors. It makes a wonderful cut/paste material when dealing with holes in the wall, or, like here trying to apply a nice smooth finish without giving up any depth. Fiberglass can be cut with wood working tools. The door skin ditto or, with a strong wrist and repeated careful strokes, it can be cut with a utility knife.

Finally, here is a site showing common toilet measurements.
https://www.dimensions.guide/collection/toilets

Hope this helps and everybody has fun with your project.


Cheers,
Rufus
r-ransom_half-bath_bk-wall-2a.jpg
[Thumbnail for r-ransom_half-bath_bk-wall-2a.jpg]
 
r ranson
steward & author
Posts: 40837
Location: Left Coast Canada
14859
8
art trees books chicken cooking fiber arts
  • Likes 2
  • Mark post as helpful
  • send pies
    Number of slices to send:
    Optional 'thank-you' note:
  • Quote
  • Report post to moderator
After a bit of shopping, we settled on the toilet and vanity.  
taps.JPG
[Thumbnail for taps.JPG]
so many choices
set-up.JPG
[Thumbnail for set-up.JPG]
we put the vanity and toilet in place to make sure we could fit an adult human in there too. There is quite a bit more room than we imagined.
 
r ranson
steward & author
Posts: 40837
Location: Left Coast Canada
14859
8
art trees books chicken cooking fiber arts
  • Mark post as helpful
  • send pies
    Number of slices to send:
    Optional 'thank-you' note:
  • Quote
  • Report post to moderator
quick question: is there a way to uncrimp a PEX connection?  

edit: I'm using the pinch clamps
 
R Scott
pollinator
Posts: 4095
Location: Kansas Zone 6a
318
  • Likes 2
  • Mark post as helpful
  • send pies
    Number of slices to send:
    Optional 'thank-you' note:
  • Quote
  • Report post to moderator
The stainless ones can be cut with a diagonal or side cutter.

There is a special tool for the black/copper crimp rings.  It looks like a bolt cutter but has a smooth jaw on one side you stick inside the fitting. When I don't have one available I have used hacksaw blades, dremel cutoff wheels, and lots of strong language.
 
r ranson
steward & author
Posts: 40837
Location: Left Coast Canada
14859
8
art trees books chicken cooking fiber arts
  • Mark post as helpful
  • send pies
    Number of slices to send:
    Optional 'thank-you' note:
  • Quote
  • Report post to moderator
The pinch clamp looks like it has a tab I could probably bend to undo it.  

Either that or I could just buy another t-junction.  

but first some first aid.  There are really sharp things between the floors.
 
r ranson
steward & author
Posts: 40837
Location: Left Coast Canada
14859
8
art trees books chicken cooking fiber arts
  • Likes 2
  • Mark post as helpful
  • send pies
    Number of slices to send:
    Optional 'thank-you' note:
  • Quote
  • Report post to moderator
it was a bigger project than planned but we've finally got the first coat of paint on today.

In order to speed things up, I've left my camera in the bag.  It's not good lighting anyway.

 
What? What, what, what? What what tiny ad:
build a better world instead of being angry at bad guys
https://greenlivingbook.com
reply
    Bookmark Topic Watch Topic
  • New Topic