|

|

|
.png)
|

|

|
|
|
|
|
|
|
|

|
|

|
.png)
|

|
 4
4


![[Thumbnail for Straw.jpg]](/t/16233/a/5395/Straw.jpg "Filename: Straw.jpg
Description: Straw used")
![[Thumbnail for Sand.jpg]](/t/16233/a/5396/Sand.jpg "Filename: Sand.jpg
Description: Sand used")
![[Thumbnail for DIY-clay-2.jpg]](/t/16233/a/5397/DIY-clay-2.jpg "Filename: DIY-clay-2.jpg
Description: Home made clay")
![[Thumbnail for Finger-test-1.jpg]](/t/16233/a/5398/Finger-test-1.jpg "Filename: Finger-test-1.jpg
Description: Finger test 3")
![[Thumbnail for Finger-test-2.jpg]](/t/16233/a/5399/Finger-test-2.jpg "Filename: Finger-test-2.jpg
Description: Finger test 2")
![[Thumbnail for FInger-test-3.jpg]](/t/16233/a/5400/FInger-test-3.jpg "Filename: FInger-test-3.jpg
Description: Finger test 1")
![[Thumbnail for 1clay-0sand.jpg]](/t/16233/a/5401/1clay-0sand.jpg "Filename: 1clay-0sand.jpg
Description: test brick 1clay-0sand")
![[Thumbnail for 2clay-1sand.jpg]](/t/16233/a/5402/2clay-1sand.jpg "Filename: 2clay-1sand.jpg
Description: test brick 2clay-1sand")
![[Thumbnail for 1clay-1sand.jpg]](/t/16233/a/5403/1clay-1sand.jpg "Filename: 1clay-1sand.jpg
Description: test brick 1clay-1sand")
![[Thumbnail for 1clay-2sand.jpg]](/t/16233/a/5404/1clay-2sand.jpg "Filename: 1clay-2sand.jpg
Description: teats brick 1clay-2sand")
![[Thumbnail for 2clay-3sand.jpg]](/t/16233/a/5405/2clay-3sand.jpg "Filename: 2clay-3sand.jpg
Description: test brick 2clay-3sand")
![[Thumbnail for 1clay-3sand.jpg]](/t/16233/a/5406/1clay-3sand.jpg "Filename: 1clay-3sand.jpg
Description: test brick 1lcay-3sand")
![[Thumbnail for All-test-bricks.jpg]](/t/16233/a/5409/All-test-bricks.jpg "Filename: All-test-bricks.jpg
Description: All test bricks")
![[Thumbnail for Brick-after-30-sec-under-water.jpg]](/t/16233/a/5410/Brick-after-30-sec-under-water.jpg "Filename: Brick-after-30-sec-under-water.jpg
Description: test brick after 30sec underwater")
![[Thumbnail for What-I-believe-cob-does-after-1yr.jpg]](/t/16233/a/5411/What-I-believe-cob-does-after-1yr.jpg "Filename: What-I-believe-cob-does-after-1yr.jpg
Description: what I think cob does after 1yr") 8
8
pierre-olivier corcos wrote:Hi,
so I'm interested in cob and started to read on the subject. After reading on blogs I tried to make my own and did a couple of test bricks. Now I also started to read the "cob builders handbook" which is very helpful. I must be retarded because I still don't get it.
So here is how I created my test brick:
1) Make your own clay (as per http://ceramicartsdaily.org/ceramic-supplies/pottery-clay/going-local-how-to-dig-and-process-your-own-clay/)
2) Get sand from old sand box from childhood
3) Get dry straw from a random field
4) Mix all 3 ingredient with different clay-to-sand ratio and make test bricks
5) Let dry in garage for a week
5) As shown in pictures
Then I realized that I did not understand what cob was at all:
1) Cob is not as hard as concrete (at least not the one I did) since I could easily break my test bricks in 2 by hand. I read somewhere it was as hard...
2) Cob is not at all impermeable to water (as shown in the picture where I wet a test brick underwater for 30sec and broke it in 2 to observe water penetration)
3) In the "cob builders handbook" it is said that plastering exterior can be done, but it is not necessary
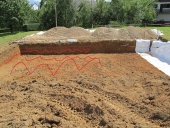
4) I really fear that a non sealed/impermeable/plastered cob wall will disintegrate very fast in time (like in the picture i named "What I believe cob does after 1yr")
5) Finally, I guest that I just don't get it, because I know thousand of people built homes in this material, but as I see it (and what my little experiment showed me) is that cob is a pile of dried earth, maybe able to support a roof and all, but surely not resilient enough to withstand rain and wind. I mean if I rubbed my finger on the test bricks is was crumbling a little and I could easily chip it out with my nails.
6) For example, if I build a cob bench to watch my bonfire, will it not dissolve in rain and snow after a year? And if I drop a fire log on it it will obviously chip?
This is my first post on a forum ever, so that you guys if you take the time to answer!
Thanks
P-O
Build it yourself, make it small, occupy it.
5
2
 Bump
1
1
1
Bump
1
1
1
"...In our language this quality is called dadirri. It is inner, deep listening and quiet, still awareness.
Dadirri recognises the deep spring that is inside us. We call on it and it calls to us. This is the gift that Australia is thirsting for...
When I experience dadirri, I am made whole again."
-Miriam - Rose Ungunmerr- Baumann
1
Dave's SKIP BB's / Welcome to Permies! / Permaculture Resources / Dave's Boot Adventures & Longview Projects

Skill verified by gir bot")

Skill verified by Mike Haasl")

Skill verified by Mike Haasl")

Skill verified by Nicole Alderman")

Skill verified by Nicole Alderman") 1
1
Benson Smith wrote:What is meant by the word “lime”?
As used in mortar ? Chemical name? Sources?
Blazing trails in disabled homesteading
Blazing trails in disabled homesteading
Jill of all and Misses of Targets -JMH
Lady Curley wrote:I am completely new here, and I am new to cob building. I have read a ton of info on the subject, and plan on making some test bricks very soon. My only worry is that I live in Louisiana. But... I don't live in a swamp or in a place that floods. I do have creeks & rivers nearby, but I live on a huge hill that has pretty good drainage. There are a few spots in my yard that tend to puddle up a little but nothing major.
So my question is this, does anyone have any tips for building with cob in Louisiana? I can't seem to find any info anywhere on building with cob in LA. No workshop nearby, etc.
Jill of all and Misses of Targets -JMH

|
Sure, he can talk to fish, but don't ask him what they say. You're better off reading a tiny ad:
Edible Landscaping With A Permaculture Twist/ Second Edition - Kickstarter
https://permies.com/t/369458/Edible-Landscaping-Permaculture-Twist-Edition
|