• Post Reply Bookmark Topic Watch Topic
  • New Topic
permaculture forums growies critters building homesteading energy monies kitchen purity ungarbage community wilderness fiber arts art permaculture artisans regional education skip experiences global resources cider press projects digital market permies.com pie forums private forums all forums
this forum made possible by our volunteer staff, including ...
master stewards:
  • Anne Miller
  • r ranson
  • Pearl Sutton
  • Jules Silverlock
stewards:
  • Nicole Alderman
  • Leigh Tate
  • paul wheaton
master gardeners:
  • Carla Burke
  • Nancy Reading
  • John F Dean
  • Jay Angler
gardeners:
  • Clay Bunch
  • Kristine Keeney
  • Christopher Weeks

Input wanted on the passively heated greenhouse design

 
Posts: 49
Location: New England
19
hunting foraging chicken building wood heat composting
  • Likes 6
  • Mark post as helpful
  • send pies
    Number of slices to send:
    Optional 'thank-you' note:
  • Quote
  • Report post to moderator
Here is a video I made a video about the current status of the greenhouse I'm building and would really appreciate input on it.


The location is very challenging. My land is on the side of a very rocky mountain. The only viable spot for the greenhouse is a narrow spot that required extensive jackhammering to chip out a 16'x20' footprint.

I live in zone 6B.

So far I have installed a ground-air heat transfer system with 100' of socked 4" perforated drainage pipe (all that I could fit) at 6' and 3' deep (200' total).
I will also use thermal mass heated by solar radiation, to keep the raised bed (made of rock) warm.
I intend to use compost to add additional heat.

I will also be considering additional heat like a rocket stove or similar if there is room.

Thoughts?

 
steward
Posts: 14378
Location: Northern WI (zone 4)
4222
6
hunting trees books food preservation solar woodworking
  • Likes 7
  • Mark post as helpful
  • send pies
    Number of slices to send:
    Optional 'thank-you' note:
  • Quote
  • Report post to moderator
Nice video and great work!  I'm glad you have the compost outside, the offgassing from the compost isn't fun inside the greenhouse.

Are you insulating the perimeter foundation of the greenhouse?  That will help keep winter cold from wicking in under the walls.

I like the compost heat circulation idea.  How big is that compost bin?  I hope you're insulating that slab so that the heat can't escape down into the ground.  I'm worried that the pex in the slab (at least as shown) will suck up a lot of cold from the nearby frozen ground and minimize your heat pick up.  Or transfer that cold into the compost.  Or lose compost heat into the frozen concrete (depending on the direction of fluid travel).  Insulating the compost bin and putting a lid on it might also be quite helpful.

The lowest bank of south windows might be covered with snow (if you get snow) for several months of the winter.  So you'd be losing heat from the glass while not getting solar gain.  Perhaps a net loss.  For the same reason I might reduce the number of windows on your west side.  If winter sun is only shining through them for an hour or two a day, and they're bleeding heat for the other 22 hours they may lose you more than they gain.
 
Larry Fletcher
Posts: 49
Location: New England
19
hunting foraging chicken building wood heat composting
  • Likes 3
  • Mark post as helpful
  • send pies
    Number of slices to send:
    Optional 'thank-you' note:
  • Quote
  • Report post to moderator

Mike Haasl wrote:Nice video and great work!  I'm glad you have the compost outside, the offgassing from the compost isn't fun inside the greenhouse.


Thanks! Yeah, I was thinking the smell might be less than ideal.

Mike Haasl wrote:Are you insulating the perimeter foundation of the greenhouse?  That will help keep winter cold from wicking in under the walls.


Yes, as best I can, but as you observed it will be tricky since there are a lot of windows.

Mike Haasl wrote:I like the compost heat circulation idea.  How big is that compost bin?  I hope you're insulating that slab so that the heat can't escape down into the ground.  I'm worried that the pex in the slab (at least as shown) will suck up a lot of cold from the nearby frozen ground and minimize your heat pick up.  Or transfer that cold into the compost.  Or lose compost heat into the frozen concrete (depending on the direction of fluid travel).  Insulating the compost bin and putting a lid on it might also be quite helpful.


Spot on observations. Not sure how big...but as big as possible. I will be insulating it...and probably adding a lid.

Mike Haasl wrote:The lowest bank of south windows might be covered with snow (if you get snow) for several months of the winter.  So you'd be losing heat from the glass while not getting solar gain.  Perhaps a net loss.  For the same reason I might reduce the number of windows on your west side.  If winter sun is only shining through them for an hour or two a day, and they're bleeding heat for the other 22 hours they may lose you more than they gain.


Great thoughts on the lower bank of windows. I will be keeping that in mind on the next iteration of the structural design (I'm sure there will be a few more).
 
pollinator
Posts: 97
39
  • Likes 5
  • Mark post as helpful
  • send pies
    Number of slices to send:
    Optional 'thank-you' note:
  • Quote
  • Report post to moderator
Excellent video.  A couple of questions and a bit of context.  You seem to be in a temperate climate with decent levels of precipitation (moderate density of deciduous trees) .  Watch the base of the rock where you dug into the side hill.  Wet weather springs often form at sudden changes in slope such as you created.  I would suggest a drain to move any such seepage to the side and away from both the greenhouse area and your house downhill.  If it is a decent flow, perhaps you can tap into it for your greenhouse plants.

You did not mention the orientation of the final design with respect to the site.  Which end is north and which is south?  I see good shadows shown in the jackhammer sequence, but without a time of day am clueless.  I have to assume that the vertical wall is a north wall to ensure the sloped glass catches as much solar as possible.  So, from what is shown, the compost pile is placed on the north end of the greenhouse.  I also see what appear to be graphics of a pretty solid set of three walls.  How will you aerate the compost pile?  I always used old pallets with the meeting ends connected with wire so that I could just open the entire pile for turning or removal once complete.  Placing the cast iron radiator in the center to capture heat is interesting, but again, being in the center of a rather small compost pile may create issues for turning or moving the pile.  They do not live forever unless using a different design.  If that is considered necessary to provide heat to your water drums, I believe most of those radiators have the intake and outlet at the normal bottom.  Consider turning the unit upside down and placing quick couplers with the base inside an insulated box that can be removed and then the radiator to make moving the heap in and out easier.  I would not suggest using regular antifreeze in your heat transfer system due to potential for contamination if a leak forms, and it will be just a question of "when" rather than "if".  If you wish to use an antifreeze mix, use drinking quality alcohol.  I see you are growing area 6b, so expect you may be warmer than my location (supposedly 5b but nothing that is supposed to handle growing zone 5b survives the winter on my knob, could be the wind).  Expect that some form of heat will be needed to maintain your heat transfer in a real cold snap.  Consider what I did for my chicken coop water.  I made a heater using an incandescent bulb.  I have used both heat switch plugins and dimmers to control the temp.  Even keeping the water at 32 degrees F will be sufficient as long as it is moving.   I have seen the coop go well below zero and never had full freeze on plastic chicken fountains.  Try that with a commercial heating unit and you will be melting the base.  

I saw some questions regarding perimeter insulation.  In zone 6b, the frost line generally runs from 30" to 40" deep.  That is how deep you should place perimeter insulation to reduce heat loss to the ground.  The fact you have a walkway around the growing bed will help in that regard.

Consider making a plank with casters on each end (at least one on each end should be locking) with a couple of boards to serve as guides.  Then you can run it back and forth easily to access the growing area.  Interesting idea, but not one an old codger such as myself would enjoy - too little yoga in my life.

There are other ways to reduce heat loss.  Use of insulating covers that slide up and down the face come to mind.  I have some experimental designs, but have not been retired long enough to get to those.

Good luck and keep pushing the box.  Fabulous to see such energy and thought going into a project such as this.
 
Larry Fletcher
Posts: 49
Location: New England
19
hunting foraging chicken building wood heat composting
  • Likes 2
  • Mark post as helpful
  • send pies
    Number of slices to send:
    Optional 'thank-you' note:
  • Quote
  • Report post to moderator
First, THANK YOU SO MUCH for taking the time with such great insights.

Richard Henry wrote:Excellent video.  A couple of questions and a bit of context.  You seem to be in a temperate climate with decent levels of precipitation (moderate density of deciduous trees) .  Watch the base of the rock where you dug into the side hill.  Wet weather springs often form at sudden changes in slope such as you created.  I would suggest a drain to move any such seepage to the side and away from both the greenhouse area and your house downhill.  If it is a decent flow, perhaps you can tap into it for your greenhouse plants.


Great observation, I'll check on a good drainage solution for that area today...because you are right it will want to collect water there.

Richard Henry wrote:You did not mention the orientation of the final design with respect to the site.  Which end is north and which is south?  I see good shadows shown in the jackhammer sequence, but without a time of day am clueless.  I have to assume that the vertical wall is a north wall to ensure the sloped glass catches as much solar as possible.


I actually positioned it facing about 16˚ Southeast to make sure I maximize morning light. In this rare case the trees are working to my advantage because they add partial shade in the afternoon (when the leaves are on the trees of course). This means that in the hot afternoons of summer the greenhouse gets a reprieve from the heat, but it gets decent all day sun in winter and early spring.

Richard Henry wrote:So, from what is shown, the compost pile is placed on the north end of the greenhouse.  I also see what appear to be graphics of a pretty solid set of three walls.  How will you aerate the compost pile?  I always used old pallets with the meeting ends connected with wire so that I could just open the entire pile for turning or removal once complete.


I intend to use the left over Gabion baskets for the compost bin, there is a decent amount of air flow through them if stacked correctly. I will probably at least double the size from what's shown in the video.

Richard Henry wrote:Placing the cast iron radiator in the center to capture heat is interesting, but again, being in the center of a rather small compost pile may create issues for turning or moving the pile.  They do not live forever unless using a different design.  If that is considered necessary to provide heat to your water drums, I believe most of those radiators have the intake and outlet at the normal bottom.  Consider turning the unit upside down and placing quick couplers with the base inside an insulated box that can be removed and then the radiator to make moving the heap in and out easier.  I would not suggest using regular antifreeze in your heat transfer system due to potential for contamination if a leak forms, and it will be just a question of "when" rather than "if".  If you wish to use an antifreeze mix, use drinking quality alcohol.


Love it, added to my list. Vodka is probably a good route for liquid heat transfer medium.

Richard Henry wrote:I see you are growing area 6b, so expect you may be warmer than my location (supposedly 5b but nothing that is supposed to handle growing zone 5b survives the winter on my knob, could be the wind).  Expect that some form of heat will be needed to maintain your heat transfer in a real cold snap.  Consider what I did for my chicken coop water.  I made a heater using an incandescent bulb.  I have used both heat switch plugins and dimmers to control the temp.  Even keeping the water at 32 degrees F will be sufficient as long as it is moving.   I have seen the coop go well below zero and never had full freeze on plastic chicken fountains.  Try that with a commercial heating unit and you will be melting the base.


Yeah, I suspect, there is going to be a lot of experimentation on this front once it's build.

Richard Henry wrote:I saw some questions regarding perimeter insulation.  In zone 6b, the frost line generally runs from 30" to 40" deep.  That is how deep you should place perimeter insulation to reduce heat loss to the ground.  The fact you have a walkway around the growing bed will help in that regard.


Yep and the ground freeze is officially here...Iv'e been racing for two months trying to beat it...grrrr.

Richard Henry wrote:Consider making a plank with casters on each end (at least one on each end should be locking) with a couple of boards to serve as guides.  Then you can run it back and forth easily to access the growing area.  Interesting idea, but not one an old codger such as myself would enjoy - too little yoga in my life.


I have no idea how the plank is going to work out...definitely a work in progress.

Richard Henry wrote:There are other ways to reduce heat loss.  Use of insulating covers that slide up and down the face come to mind.  I have some experimental designs, but have not been retired long enough to get to those.


Keep me posted.

Richard Henry wrote:Good luck and keep pushing the box.  Fabulous to see such energy and thought going into a project such as this.


Super nice of you to say, and thank you, feedback like this really keeps me motivated. Now I'm off to carry soil up the hill to fill the bed the rest of the way up.
 
Mike Haasl
steward
Posts: 14378
Location: Northern WI (zone 4)
4222
6
hunting trees books food preservation solar woodworking
  • Likes 2
  • Mark post as helpful
  • send pies
    Number of slices to send:
    Optional 'thank-you' note:
  • Quote
  • Report post to moderator
An alternative to going 3' deep with frost protection is to go 3' out horizontally.  Or 1' down and 2' out.  I think it's called a Swedish Skirt insulation system.  With your rocks it might be an easier option.
 
Larry Fletcher
Posts: 49
Location: New England
19
hunting foraging chicken building wood heat composting
  • Likes 1
  • Mark post as helpful
  • send pies
    Number of slices to send:
    Optional 'thank-you' note:
  • Quote
  • Report post to moderator

Mike Haasl wrote:An alternative to going 3' deep with frost protection is to go 3' out horizontally.  Or 1' down and 2' out.  I think it's called a Swedish Skirt insulation system.  With your rocks it might be an easier option.


Thanks Mike, Do you think it's enough to do a Swedish Skirt in the walkway area around the bed on the inside of the structure?
 
Mike Haasl
steward
Posts: 14378
Location: Northern WI (zone 4)
4222
6
hunting trees books food preservation solar woodworking
  • Likes 1
  • Mark post as helpful
  • send pies
    Number of slices to send:
    Optional 'thank-you' note:
  • Quote
  • Report post to moderator
It's better than nothing.  If you aren't growing anything on the floor it shouldn't be too cold down there.  It's a bit tricky since your bedrock might be helping keep you warm if it transfers ground heat up to you.  

I'd say to go for it.  Outside would be better since you'd have more square feet exposed to the warmish deep earth temps but at least you'd keep the frozen ground just outside the greenhouse from freezing the soil in the greenhouse.

Maybe I missed it but where is the GHAT system?  Under the grow bed?
 
Richard Henry
pollinator
Posts: 97
39
  • Likes 2
  • Mark post as helpful
  • send pies
    Number of slices to send:
    Optional 'thank-you' note:
  • Quote
  • Report post to moderator
One potential way to increase winter heat acquisition would be to drive multiple holes at least 10 feet down and hopefully more. Take pipes and partially fill with water. Drop internal pressure as much as possible without boiling the water. Ground temperatures ten feet down generally are the opposite of surface temperatures. Warmest in January coolest in July. Low pressure in pipes allows water to pick up heat, boil and rise up heat pipes to warm inside of floor of greenhouse. Lots of thermal mass in your bedrock.
 
Larry Fletcher
Posts: 49
Location: New England
19
hunting foraging chicken building wood heat composting
  • Likes 1
  • Mark post as helpful
  • send pies
    Number of slices to send:
    Optional 'thank-you' note:
  • Quote
  • Report post to moderator

Mike Haasl wrote: Maybe I missed it but where is the GHAT system?  Under the grow bed?


Yeah, the GHAT is under the bed.

 
Larry Fletcher
Posts: 49
Location: New England
19
hunting foraging chicken building wood heat composting
  • Likes 1
  • Mark post as helpful
  • send pies
    Number of slices to send:
    Optional 'thank-you' note:
  • Quote
  • Report post to moderator

Richard Henry wrote:One potential way to increase winter heat acquisition would be to drive multiple holes at least 10 feet down and hopefully more. Take pipes and partially fill with water. Drop internal pressure as much as possible without boiling the water. Ground temperatures ten feet down generally are the opposite of surface temperatures. Warmest in January coolest in July. Low pressure in pipes allows water to pick up heat, boil and rise up heat pipes to warm inside of floor of greenhouse. Lots of thermal mass in your bedrock.


I'm not sure that would be possible, with as much solid rock as I have under a big chunk of the structure, but behind the Northwest wall there may be enough space.
 
Posts: 29
Location: Zone 5A New Hampshire
5
trees building homestead
  • Likes 5
  • Mark post as helpful
  • send pies
    Number of slices to send:
    Optional 'thank-you' note:
  • Quote
  • Report post to moderator
Larry,    Hey! I built the greenhouse/conservatory in this video.   My zone was 5A.   Without even properly air-sealing this structure I achieved a Zone 9b/10a with zero heat inputs.   *Very* minimal input to achieve zone 11.   (though I suspect simply properly air-sealing and draft hunting may have done it.   This is without adding any additional layers.  Which also would have probably gotten to zone 11.

I am hoping to build a even better version of this, this year in zone 5a New hampshire.

I'll try to answer any questions!


My immediate thoughts about your setup,  I think some type of 'foundation' insulation for those baskets is a good idea.  It will protect your day-time gains.  You can just clad over the insulation with wood, etc, (or use strawbales?)

Also, Could you reduce heat loss by reducing your total amount of glazing?   You'll see in my setup, I was afraid of over heating in summer.  But also, with lower winter sun angles, I think there maybe dimishing returns (net heat loss) from too much glazing in winter.

**Edit after second watch

I would drop the top most window on roof and all the lower windows on the knee wall possibly.   I question if you would notice any loss of growth/sun input to the plants, But you will prevent, tremendous heat loss.  Just a suggestion!

Looks great though,  very clean!
 
Larry Fletcher
Posts: 49
Location: New England
19
hunting foraging chicken building wood heat composting
  • Likes 1
  • Mark post as helpful
  • send pies
    Number of slices to send:
    Optional 'thank-you' note:
  • Quote
  • Report post to moderator

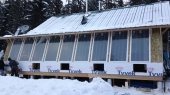
joe fish wrote:Larry,    Hey! I built the greenhouse/conservatory in this video.   My zone was 5A.   Without even properly air-sealing this structure I achieved a Zone 9b/10a with zero heat inputs.   *Very* minimal input to achieve zone 11.   (though I suspect simply properly air-sealing and draft hunting may have done it.   This is without adding any additional layers.  Which also would have probably gotten to zone 11.


I’m so impressed, and encouraged by your build!

joe fish wrote:My immediate thoughts about your setup,  I think some type of 'foundation' insulation for those baskets is a good idea.  It will protect your day-time gains.  You can just clad over the insulation with wood, etc, (or use strawbales?)


Yep, agreed…I’ll be working on improving this for sure!

joe fish wrote:Also, Could you reduce heat loss by reducing your total amount of glazing?   You'll see in my setup, I was afraid of over heating in summer.  But also, with lower winter sun angles, I think there maybe dimishing returns (net heat loss) from too much glazing in winter.

I would drop the top most window on roof and all the lower windows on the knee wall possibly.   I question if you would notice any loss of growth/sun input to the plants, But you will prevent, tremendous heat loss.  Just a suggestion!


I am reevaluating the window arrangement. Thanks again for taking the time to give me your thoughts…super valuable and appreciated!
 
joe fish
Posts: 29
Location: Zone 5A New Hampshire
5
trees building homestead
  • Likes 1
  • Mark post as helpful
  • send pies
    Number of slices to send:
    Optional 'thank-you' note:
  • Quote
  • Report post to moderator
I want to point out though that I think your House as designed will work really well!   I was in such a rush when I built my last one (in the video) I didn't have time consult the hivemind.   I just started from my budget (pretty low!) and worked backward trying to follow old-school best practices.   What I came up with exceeded my expectations.   Because your house is smaller you can really go crazy with being innovative.   I am not against the buried air tubes,  or any of the heat retention methods.  It just all boiled down to a pretty brutal cost vs benefit analysis for me.  

"Is,  saving 1 month of build time plus 8,000$  A worthwhile trade off to loose 1 whole growing zone of performance?"
If Yes then
         Lets take cheap/free fill material and make a 20" thick thermal battery ontop of R10 recycled insulation.  Etc etc

My fall back if performance was poor, was to simply to add a additional layer of plastic to the inside of the house on the bottom, of the bottom chord of the trusses.    It would take a few hours but I was confident that would put me back up above freezing worst case.   Surprisingly though even with many Sub 0F (even -15 once) nights, 33F was the coldest recorded air temp I ever had.   You can see the passion fruit, That is three years growth.  It never had any light frost damage.

I love this stuff please keep us informed!

 
Larry Fletcher
Posts: 49
Location: New England
19
hunting foraging chicken building wood heat composting
  • Mark post as helpful
  • send pies
    Number of slices to send:
    Optional 'thank-you' note:
  • Quote
  • Report post to moderator

joe fish wrote:I want to point out though that I think your House as designed will work really well!   I was in such a rush when I built my last one (in the video) I didn't have time consult the hivemind.   I just started from my budget (pretty low!) and worked backward trying to follow old-school best practices.   What I came up with exceeded my expectations.   Because your house is smaller you can really go crazy with being innovative.   I am not against the buried air tubes,  or any of the heat retention methods.  It just all boiled down to a pretty brutal cost vs benefit analysis for me.  

"Is,  saving 1 month of build time plus 8,000$  A worthwhile trade off to loose 1 whole growing zone of performance?"
If Yes then lets take cheap/free fill material and make a 20" thick thermal battery ontop of R10 recycled insulation.  Etc etc

My fall back if performance was poor, was to simply to add a additional layer of plastic to the inside of the house on the bottom, of the bottom chord of the trusses.    It would take a few hours but I was confident that would put me back up above freezing worst case.   Surprisingly though even with many Sub 0F (even -15 once) nights, 33F was the coldest recorded air temp I ever had.   You can see the passion fruit, That is three years growth.  It never had any light frost damage.

I love this stuff please keep us informed!


Yeah, same here, super small budget, which is why your setup is very encouraging!
 
Larry Fletcher
Posts: 49
Location: New England
19
hunting foraging chicken building wood heat composting
  • Likes 3
  • Mark post as helpful
  • send pies
    Number of slices to send:
    Optional 'thank-you' note:
  • Quote
  • Report post to moderator
Hey Everyone,

Here is the latest update:


As always I'd love to get your feedback!
 
Mike Haasl
steward
Posts: 14378
Location: Northern WI (zone 4)
4222
6
hunting trees books food preservation solar woodworking
  • Likes 1
  • Mark post as helpful
  • send pies
    Number of slices to send:
    Optional 'thank-you' note:
  • Quote
  • Report post to moderator
Very nice and great job working through the winter!  Do you have a ventilation plan in case the ground heat capture system can't take it all?  The afternoon sun in the summer will blast though those windows something fierce.
 
Larry Fletcher
Posts: 49
Location: New England
19
hunting foraging chicken building wood heat composting
  • Mark post as helpful
  • send pies
    Number of slices to send:
    Optional 'thank-you' note:
  • Quote
  • Report post to moderator

Mike Haasl wrote:Very nice and great job working through the winter!  Do you have a ventilation plan in case the ground heat capture system can't take it all?  The afternoon sun in the summer will blast though those windows something fierce.


Hi Mike,

Yeah I also have exhaust fans on the back wall. I might even have a shade cloth if need be.
 
Posts: 34
Location: Winslow, AR zone 7a
16
  • Likes 1
  • Mark post as helpful
  • send pies
    Number of slices to send:
    Optional 'thank-you' note:
  • Quote
  • Report post to moderator
Down here in zone 7a, I have a small greenhouse with a massive north wall of rock and cob. I did not take care with sealing/insulation at build, and definately wish I had seen more ideas like yours. I did, however, know about rocket mass heaters, so I incorporated a little 6" system in the cob wall.  I usually only light it when nights are under 20⁰F, which has been a dozen or so nights so far this winter. After about an hour of fire, the ambient air temp will start to creep higher, and the wall will feel very warm along the line of the built-in flu. I usually run the rocket from about 5pm to 8pm, after which the cob wall will be uncomfortably hot in parts. The next morning, before sunrise, the wall will still be 100⁰F and the air temp above freezing. I certainly admire the potential for a more passive system, but I can say a rocket mass heater will keep the citrus trees alive. On the topic of overheating, down here in 7a, that is a year-around concern. I have Solexx brand insulated polycarbonate panels and some glass, and I open the panels on all but the most cloudy, cold days.
 
Mike Haasl
steward
Posts: 14378
Location: Northern WI (zone 4)
4222
6
hunting trees books food preservation solar woodworking
  • Likes 1
  • Mark post as helpful
  • send pies
    Number of slices to send:
    Optional 'thank-you' note:
  • Quote
  • Report post to moderator
Unpowered automatic vent openers also work well if you have them up high and have additional vents down low.  You can leave the lower ones open all summer and the upper ones automatically open if it gets warm.  Then the chimney effect moves the air through easily.
 
pollinator
Posts: 1228
Location: NW California, 1500-1800ft,
351
2
hugelkultur dog forest garden solar wood heat homestead
  • Mark post as helpful
  • send pies
    Number of slices to send:
    Optional 'thank-you' note:
  • Quote
  • Report post to moderator
Well done so far, its been informative, and I have also learned from the other responses. I am planning a house-attached passive solar greenhouse for my zone 8 spot.

I am working with an existing deck attached to the south and east sides of the house, which is on a concrete wall foundation atop bedrock. So I am thinking a ferro-cement framed raised bed as the base of the south and east wall, with heat absorbing (and drainage facilitating) 4” perforated pipe embedded therein.

I am also considering cutting holes in the deck for a couple ferrocement framed tree planters. It’ll be about 20’x12 ft in each leg of the L-shape.

I also see a potential benefit if I can acquire military surplus water bladders that could be filled with roof runoff under the deck for thermal mass and emergency storage (mainly for irrigation of newly planted trees and wildfire).

I don’t have too much to add to your design in your context. I do wonder why composting inside the greenhouse would be a problem if done at a moderate scale? The Co2 would be beneficial to and absorbed by actively growing plants, and any offputting smells are a sign somethings going amiss. Good luck, and thanks for your posts and videos.
 
Posts: 15
Location: Helena, Montana, Zone 4B, semi-arid, cold, mountainous
forest garden trees bee
  • Likes 1
  • Mark post as helpful
  • send pies
    Number of slices to send:
    Optional 'thank-you' note:
  • Quote
  • Report post to moderator
Great work! I was amazed at the similarities in our overall designs, even though your structure is much more permanent in concept than mine. I used a harbor freight carport which originally measured @ 10'x 20'. I reconfigured it to look almost identical to yours, but measuring @ 18'x 17'. I mounted the tubular frame of the unit on charred 4"x 4" skids recovered from pallets. The individual pieces of the tubular frame were screwed together with self tapping screws and I used tensioning wire in a triangular fashion to increase the frame's strength. Double greenhouse poly on wiggle wire channel covers the front and sloped roof of the greenhouse. The sides and back use metal siding with 2" of reflective foam board as insulation. It is anchored in position and when inflated it is very taut and wind resistant. I did have to add 3 support poles under the sloped portion for snow load. The perimeter has a Swedish skirt made up of a tarp, hay, tarp sandwich about a foot thick which extends four feet from the building. Next winter I'm adding a large compost heap (8x8x6) for supplemental heat on the west end and I will connect this to the passive solar water barrels located on the north wall.  
The inside layout consists of two 4'x16' raised beds and a 30" wide platform along the entire north wall, on top of the water barrels. Perforated 6" flexible drain tile was installed in both raised beds and during the day the hot air collected from the top of the greenhouse through a perforated PVC septic pipe and it's forced down with a small 24VDC blower powered by a solar panel. This is always on while the sun shines. I've found the neatest thing about my set-up is the roll-up thermal cover placed at the junction of the front wall and sloping roof... on the inside. The thermal cover is made from floating row cover and weighted at the bottom. It is connected to a 2" PVC pipe running the east-west length in a manner that lets the front section hang to the floor while weights on ropes and two ceiling mounted pulleys keep the upper portion almost slack-free. In the future I'd like to add a better insulated cover as this is the biggest area of thermal loss.
I'm located in Helena, Montana, zone 4B, semi-arid and mountainous climate.
 
Larry Fletcher
Posts: 49
Location: New England
19
hunting foraging chicken building wood heat composting
  • Mark post as helpful
  • send pies
    Number of slices to send:
    Optional 'thank-you' note:
  • Quote
  • Report post to moderator

Ben Zumeta wrote:I do wonder why composting inside the greenhouse would be a problem if done at a moderate scale? The Co2 would be beneficial to and absorbed by actively growing plants, and any offputting smells are a sign somethings going amiss. Good luck, and thanks for your posts and videos.


Hi Ben,

It isn't a hard NO on compost inside the greenhouse. But I suspect from an "ease of use" perspective (i.e. wheelbarrow access etc), it will be easier to have outside. I want to see pictures of your project...I'm always on the hunt for new ideas and details.
 
Larry Fletcher
Posts: 49
Location: New England
19
hunting foraging chicken building wood heat composting
  • Likes 1
  • Mark post as helpful
  • send pies
    Number of slices to send:
    Optional 'thank-you' note:
  • Quote
  • Report post to moderator

Mark Roeder wrote:Great work!


Thanks!, like I said to Ben, I would love to see some pics...I'm always looking for ways to improve or tweak my design/ideas.
 
Mark Roeder
Posts: 15
Location: Helena, Montana, Zone 4B, semi-arid, cold, mountainous
forest garden trees bee
  • Likes 1
  • Mark post as helpful
  • send pies
    Number of slices to send:
    Optional 'thank-you' note:
  • Quote
  • Report post to moderator
I would have loved to see you incorporate the hillside into your design. Imagine the entire back wall at 45-50 degrees year round and used as a passive climate battery while freeing up more floor space.
I agree with you that an external compost pile seems to be the most efficient way to go. Why waste internal space on compost? You can get hot water and hot CO2 laden air from a short run to the heap.
I'll get pics up soon, but I'll probably start another post so as not to infringe upon yours. Keep up the good work. Don't forget to get some kind of insulative cover figured out!
 
Larry Fletcher
Posts: 49
Location: New England
19
hunting foraging chicken building wood heat composting
  • Likes 2
  • Mark post as helpful
  • send pies
    Number of slices to send:
    Optional 'thank-you' note:
  • Quote
  • Report post to moderator
Hey Everybody!

Here is a quick update on the progress of the greenhouse:
 
Mike Haasl
steward
Posts: 14378
Location: Northern WI (zone 4)
4222
6
hunting trees books food preservation solar woodworking
  • Mark post as helpful
  • send pies
    Number of slices to send:
    Optional 'thank-you' note:
  • Quote
  • Report post to moderator
Wow, you've been busy!  Great job!
 
Larry Fletcher
Posts: 49
Location: New England
19
hunting foraging chicken building wood heat composting
  • Mark post as helpful
  • send pies
    Number of slices to send:
    Optional 'thank-you' note:
  • Quote
  • Report post to moderator

Mike Haasl wrote:Wow, you've been busy!  Great job!


Thanks!
 
The moth suit and wings road is much more exciting than taxes. Or this tiny ad:
A cooperative way to get to our dream farm.
https://permies.com/t/218305/cooperative-dream-permaculture-farm
reply
    Bookmark Topic Watch Topic
  • New Topic