|

|
|
|
|

|

|

|

|

|
 2
2


![[Thumbnail for IMAG0448.jpg]](/t/18822/a/6891/IMAG0448.jpg "Filename: IMAG0448.jpg
Description: finished and installed with new chimney")
![[Thumbnail for IMAG0443.jpg]](/t/18822/a/6892/IMAG0443.jpg "Filename: IMAG0443.jpg
Description: three hour test burn thismorning")
![[Thumbnail for IMAG0444.jpg]](/t/18822/a/6893/IMAG0444.jpg "Filename: IMAG0444.jpg
Description: fire box about 20 minutes into the test burn")
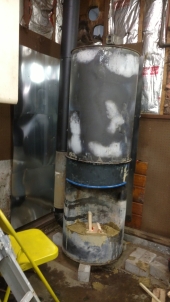
![[Thumbnail for IMAG0403.jpg]](/t/18822/a/6894/IMAG0403.jpg "Filename: IMAG0403.jpg
Description: looking down into the body at the riser and fire box")
![[Thumbnail for IMAG0399.jpg]](/t/18822/a/6895/IMAG0399.jpg "Filename: IMAG0399.jpg
Description: fire box riser tube and air intake, back is still open")
![[Thumbnail for IMAG0416.jpg]](/t/18822/a/6896/IMAG0416.jpg "Filename: IMAG0416.jpg
Description: door")
![[Thumbnail for IMAG0445.jpg]](/t/18822/a/6897/IMAG0445.jpg "Filename: IMAG0445.jpg
Description: temp on the top of heater after about 35 minutes")
![[Thumbnail for IMAG0423.jpg]](/t/18822/a/6898/IMAG0423.jpg "Filename: IMAG0423.jpg
Description: temp on the first test burn on the top of the heater")
![[Thumbnail for IMAG0398.jpg]](/t/18822/a/6899/IMAG0398.jpg "Filename: IMAG0398.jpg
Description: the tube I started with, I had to jack it back into round")
![[Thumbnail for IMAG0432.jpg]](/t/18822/a/6903/IMAG0432.jpg "Filename: IMAG0432.jpg
Description: the grate with legs")
![[Thumbnail for IMAG0431.jpg]](/t/18822/a/6904/IMAG0431.jpg "Filename: IMAG0431.jpg
Description: legs are nuts welded to the corners of the expanded steel with bolts in them")
![[Thumbnail for IMAG0451.jpg]](/t/18822/a/6905/IMAG0451.jpg "Filename: IMAG0451.jpg
Description: first time operating in the garage")
![[Thumbnail for IMAG0453.jpg]](/t/18822/a/6922/IMAG0453.jpg "Filename: IMAG0453.jpg
Description: fire without the grate is now burning the length of the fire box")


Success has a Thousand Fathers , Failure is an Orphan
LOOK AT THE " SIMILAR THREADS " BELOW !
frank kralik wrote:Good job Cliff. What is temperature reading of your exhaust pipe, starting from the barrel?
I wonder if I could cut an opening in the front of the body of the stove near the top and weld in an oven box out of some 14 ga steel and put a door on the front or would this make the air flow not work very well insode?
 and the temperature gauge.
![[Thumbnail for IMAG0475.jpg]](/t/18822/a/7155/IMAG0475.jpg "Filename: IMAG0475.jpg
Description:")
![[Thumbnail for IMAG0481.jpg]](/t/18822/a/7156/IMAG0481.jpg "Filename: IMAG0481.jpg
Description:")
![[Thumbnail for IMAG0483.jpg]](/t/18822/a/7157/IMAG0483.jpg "Filename: IMAG0483.jpg
Description:")
Rion Mather wrote:Thanks for the advice, Clifford. Heck, you could place pots on top to cook with your heater. Or to go with your previous idea, maybe even add an extended top and create an oven. But hey, if the toaster oven is working great, then why bother.
I do love the look of your heater. It looks a lot like a regular wood stove. It is by far my favorite design that I have seen yet. Is there anything behind it?
Success has a Thousand Fathers , Failure is an Orphan
LOOK AT THE " SIMILAR THREADS " BELOW !
Rion Mather wrote:From a sales standpoint, the stove seems to be a great idea because you could switch it out easily with a regular woodstove, which are really popular in this region. Like I said, I am not familiar with rocket stoves but if you could get that to pass code, then you would have a great replacement for conventional wood stoves. You definitely need a surround, at least in my area, for free standing stoves and fireplaces.
Both of my jobs are in sales, so I tend to think that way.
1
Xisca - pics! Dry subtropical Mediterranean - My project
However loud I tell it, this is never a truth, only my experience...
Xisca Nicolas wrote:Hi Clifford
Is it possible to have any idea about what it cost you ?
(of course I know it will in the end depend on what one can get for free or second hand, but just to get an idea...)
And also: how heavy is it?
Xisca - pics! Dry subtropical Mediterranean - My project
However loud I tell it, this is never a truth, only my experience...
Xisca Nicolas wrote:Thanks for all the details!
As I saw it outside (on your pics) before you put it in your garage, I thought it would have been somehow lighter to carry...
Some pocket rocket (I do not mean the tiny camping ones!) are certainly lighter, and not so strong.
1
![[Thumbnail for image.jpg]](/t/18822/a/13597/image.jpg "Filename: image.jpg
Description:")

| I agree. Here's the link: http://stoves2.com |