• Post Reply Bookmark Topic Watch Topic
  • New Topic
permaculture forums growies critters building homesteading energy monies kitchen purity ungarbage community wilderness fiber arts art permaculture artisans regional education skip experiences global resources cider press projects digital market permies.com pie forums private forums all forums
this forum made possible by our volunteer staff, including ...
master stewards:
  • r ranson
  • Nancy Reading
  • Carla Burke
  • John F Dean
  • Jay Angler
  • paul wheaton
stewards:
  • Nicole Alderman
  • Pearl Sutton
  • Anne Miller
master gardeners:
  • Christopher Weeks
  • Timothy Norton
gardeners:
  • Nina Surya
  • Matt McSpadden
  • thomas rubino

Rocket Thermal mass heater using cinder blocks for tubes

 
Posts: 43
12
  • Likes 7
  • Mark post as helpful
  • send pies
    Number of slices to send:
    Optional 'thank-you' note:
  • Quote
  • Report post to moderator
I experimented today building a quick and easy makeshift thermal mass rocket heater using only a few cinder blocks. It actually worked very well even though its far from being optimized. It drafted ok and didn't leak even though I just put the blocks together and just sealed the seams with a little wet dirt.

I just stacked the blocks to effectively make two square tubes through them and removed the center dividing section inside the last block on the end and capped it off so that the exhaust could make a 180 deg bend and continue to flow through the upper tube and finaly out the end.

It was a little smokey due to the cold inefficient burn inside the front of the bottom tube, but it worked and got the blocks very hot with just a small branch fire for about 20 min or so. With a better designed insulated burn chamber it would work amazing. The blocks absorbed most of the heat to where I was able to just use a PVC pipe for the chimney without it getting hot or melting.

Next, I'm going to improve the burn chamber, and I'm also going to make a rammed earth version by making CEB blocks with a 6" hole in the middle and then just stack them like I did here with the cinder blocks. To make CEB for this all you would need is something round like a short section of PVC or even just a section of a log, and 4 flat pieces of something to construct a box. Put the round object in the middle of the box, then fill around the tube with layers of moist dirt with high clay content, ram to compress with stick, take apart the box, remove the center round object and you have a section of your RMH! It's exciting to me to know that I can make a super efficient RMH about anywhere if needed and this would work awesome inside a winter tent, especially if I had some sort of wheeled cart to build it on.

IMG_20221023_161913.jpg
[Thumbnail for IMG_20221023_161913.jpg]
IMG_20221023_164927.jpg
[Thumbnail for IMG_20221023_164927.jpg]
IMG_20221023_164936.jpg
[Thumbnail for IMG_20221023_164936.jpg]
 
Nate Nute
Posts: 43
12
  • Mark post as helpful
  • send pies
    Number of slices to send:
    Optional 'thank-you' note:
  • Quote
  • Report post to moderator
Heres a pic with a pink arrow line showing the airflow through the blocks
IMG_20221023_175051.jpg
[Thumbnail for IMG_20221023_175051.jpg]
 
Nate Nute
Posts: 43
12
  • Mark post as helpful
  • send pies
    Number of slices to send:
    Optional 'thank-you' note:
  • Quote
  • Report post to moderator
I'm thinking for a more permanent installation, one could simply make a wood box form around the cinder block assembly with a gap of a couple or few inches, and then fill with rammed earth, and possibly even reinforce with a couple lengths of rebar. Not sure if cracks would develop in the rammed earth from expansion and contraction.
 
gardener
Posts: 5263
Location: Cincinnati, Ohio,Price Hill 45205
1053
forest garden trees urban
  • Likes 3
  • Mark post as helpful
  • send pies
    Number of slices to send:
    Optional 'thank-you' note:
  • Quote
  • Report post to moderator
I  really like what you have done here!
I'm not sure if it would last long term, due to the heat possibly breaking down the concrete, but that possibility might be mitigated by the dissipation of the heat.
Nice work!
 
steward
Posts: 15693
Location: Northern WI (zone 4)
4922
7
hunting trees books food preservation solar woodworking
  • Likes 6
  • Mark post as helpful
  • send pies
    Number of slices to send:
    Optional 'thank-you' note:
  • Quote
  • Report post to moderator
I've used cinderblocks as crude chimneys while syrup making.  They last a few hours with flames going through them (very hot).  If they're just exposed to fire on one side they tend to last several burns to a whole syrup season.  If the heat is down under 300F I'm guessing they'd last a very long time.  
 
Nate Nute
Posts: 43
12
  • Likes 4
  • Mark post as helpful
  • send pies
    Number of slices to send:
    Optional 'thank-you' note:
  • Quote
  • Report post to moderator
Interesting, yeah I don't think these  blocks would last long with high heat blasting through them, but with just a small inefficient stick fire, I think it would last a while maybe. But there would be creosote buildup that would need to be cleaned out from time to time. I think making compressed earth blocks from fire clay would be a long lasting solution. At some point I'll jist build a proper RMH but this was just a fun little experiment to do some horizontal thermal mass drafting and get a taste of this. I'm sold on the RMH design.
 
William Bronson
gardener
Posts: 5263
Location: Cincinnati, Ohio,Price Hill 45205
1053
forest garden trees urban
  • Likes 1
  • Mark post as helpful
  • send pies
    Number of slices to send:
    Optional 'thank-you' note:
  • Quote
  • Report post to moderator
This makes me want to experiment.
I picture waxed cardboard and/or pallet wood as inner forms for a bench or bell, with pallet wood as the outer forms and tamped soil in between.
Install your rocket or TLUD to charge the mass with heat.
Anything that get hot enough can burn out, whatever is left is fine.
 
pioneer
Posts: 337
34
chicken wood heat rocket stoves
  • Likes 4
  • Mark post as helpful
  • send pies
    Number of slices to send:
    Optional 'thank-you' note:
  • Quote
  • Report post to moderator
I see what you did there.
I have considered using these type of block for a kind of bell in which hot flue gasses would be able to flow through the cavities while supporting a bench or sleeping area on top.  As others have mentioned, portland cement based products will not long survive exposure to flame, certainly not RMH temperatures, so the combustion zone needs to be made of better refractory, but after the riser downflow they are said to do just fine.
 
pollinator
Posts: 616
Location: South East Kansas
208
7
forest garden trees books cooking bike bee
  • Likes 2
  • Mark post as helpful
  • send pies
    Number of slices to send:
    Optional 'thank-you' note:
  • Quote
  • Report post to moderator
I was thinking that if you had cinder blocks that could take the heat. Could one build a mass in the shape of a wall?  
 
William Bronson
gardener
Posts: 5263
Location: Cincinnati, Ohio,Price Hill 45205
1053
forest garden trees urban
  • Likes 1
  • Mark post as helpful
  • send pies
    Number of slices to send:
    Optional 'thank-you' note:
  • Quote
  • Report post to moderator
A wall should work!

Black paint on the south side, insulation on the northern side, surface bonding cement on both sides.
Built next to a tree, a wall like this could be used to passively and actively shift the growing zone southward.
It could also  be a good rear wall in a greenhouse.


As to destruction from heat, I wonder if that could be slowed or stopped by keeping the concrete moist?

Also, a lining of adobe or strait clay could be applied to the 5 to 10 feet of the run, as a sacrificial hot face might work.

 
pollinator
Posts: 2619
Location: RRV of da Nort, USA
757
  • Likes 1
  • Mark post as helpful
  • send pies
    Number of slices to send:
    Optional 'thank-you' note:
  • Quote
  • Report post to moderator
Really liking this vision!  If heating the bricks is not a problem, would it be possible to lay the design that you presented on its side so that you could add a second layer off bricks to serve in heat dissipation?  In this scenario, the flow of exhaust would be side-to-side, similar to many builds that are put into a gravely matrix.  With perhaps a high temperature flexible exhaust tube, it could be snaked through the cells of the cinder block to help bring the exhaust to its destination without having to worry about sealing the gaps between the bricks.  With two layers of bricks oriented as shown below, the bench would be wide and sturdy enough to be sat on without tipping.  Just some musings....
Brickworks.JPG
[Thumbnail for Brickworks.JPG]
 
William Bronson
gardener
Posts: 5263
Location: Cincinnati, Ohio,Price Hill 45205
1053
forest garden trees urban
  • Likes 1
  • Mark post as helpful
  • send pies
    Number of slices to send:
    Optional 'thank-you' note:
  • Quote
  • Report post to moderator
I Iike the bench, but if we need to use a liner, the advantages of the hollow block are largely lost.
 
Nate Nute
Posts: 43
12
  • Likes 1
  • Mark post as helpful
  • send pies
    Number of slices to send:
    Optional 'thank-you' note:
  • Quote
  • Report post to moderator

William Bronson wrote:This makes me want to experiment.
I picture waxed cardboard and/or pallet wood as inner forms for a bench or bell, with pallet wood as the outer forms and tamped soil in between.
Install your rocket or TLUD to charge the mass with heat.
Anything that get hot enough can burn out, whatever is left is fine.


Yep! We're on the same page. I'm all about rammed earth using forms/molds. I love it. It's free and the most enjoyable form of exercise, even though some like to call it hard work. It's my gym.
 
Nate Nute
Posts: 43
12
  • Likes 1
  • Mark post as helpful
  • send pies
    Number of slices to send:
    Optional 'thank-you' note:
  • Quote
  • Report post to moderator

T Blankinship wrote:I was thinking that if you had cinder blocks that could take the heat. Could one build a mass in the shape of a wall?  


Definitely. Cinder blocks are just a quick easy way to get a functioning format for low heat, or inefficient burn chamber use. I think the ticket is to just make your own rammed earth blocks with fire clay( any light colored dirt with high clay content). DIY fireclay rammed earth blocks with an 8" hole in the middle for exhaust tube will take any amount of heat and last long. If the heat gets high enough in the burn chamber it'll just turn into fire bricks. As far as for the bell or walls further down the system, solid CEB will be an excellent solution and free.
 
Mike Haasl
steward
Posts: 15693
Location: Northern WI (zone 4)
4922
7
hunting trees books food preservation solar woodworking
  • Likes 2
  • Mark post as helpful
  • send pies
    Number of slices to send:
    Optional 'thank-you' note:
  • Quote
  • Report post to moderator
The blocks wouldn't leak as much if cob is smeared over the joints.
 
Thomas Tipton
pioneer
Posts: 337
34
chicken wood heat rocket stoves
  • Likes 3
  • Mark post as helpful
  • send pies
    Number of slices to send:
    Optional 'thank-you' note:
  • Quote
  • Report post to moderator

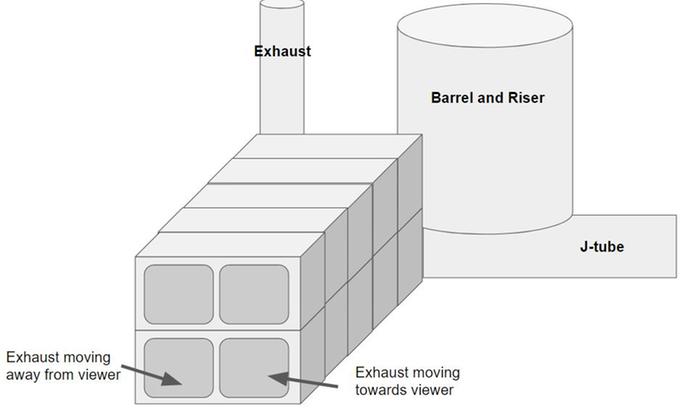
John Weiland wrote:Really liking this vision!  If heating the bricks is not a problem, would it be possible to lay the design that you presented on its side so that you could add a second layer off bricks to serve in heat dissipation?  In this scenario, the flow of exhaust would be side-to-side, similar to many builds that are put into a gravely matrix.  With perhaps a high temperature flexible exhaust tube, it could be snaked through the cells of the cinder block to help bring the exhaust to its destination without having to worry about sealing the gaps between the bricks.  With two layers of bricks oriented as shown below, the bench would be wide and sturdy enough to be sat on without tipping.  Just some musings....


Regarding the need to seal the gaps between the block.  In my vision of the bench, there is little need to mortar the gaps because I would cover everything with a layer of clay soaked burlap and then add more mass in the form of cob/decorative stone.  Also, I wouldn't bother with tubes of any sort in the cavities.  Free flow through the cavities is what makes bells work as well as they do.  depending on the type of block you have to work with, and there are many, you might want to consider standing them on end.  There are many possibilities to be explored here.  I know concrete is frowned upon by some, but these blocks are relatively inexpensive, easy to work with and very durable.
 
Rocket Scientist
Posts: 4587
Location: Upstate NY, zone 5
600
5
  • Likes 3
  • Mark post as helpful
  • send pies
    Number of slices to send:
    Optional 'thank-you' note:
  • Quote
  • Report post to moderator
Burlap soaked in clay slip would be such a thin layer that it would be irrelevant, though I don't think it would be necessary either as long as there was cob covering everything. You want some straw in the cob, especially the outer couple of inches, to stop drying cracks from widening. You would want as many rocks as you can fit inside the mass, and the cob serves to fill the gaps between stones for continuous conduction. Obviously the denser the rocks you can find, the better.

Minimizing storage in your heat transfer medium means that you will have very hot radiating surfaces which you will not want to touch. Conduction is the most efficient form of heating; radiation to remote surfaces works but is not as efficient. The hotter the radiating surface, the stronger the convective plume of hot air will be, rising to the ceiling where it does little good.

If you are starting with rammed earth, thermal cob (with no straw) is practically the same thing. Structural cob with straw reinforcement is not much different as long as you don't go overboard with the straw.
 
Nate Nute
Posts: 43
12
  • Likes 2
  • Mark post as helpful
  • send pies
    Number of slices to send:
    Optional 'thank-you' note:
  • Quote
  • Report post to moderator

Glenn Herbert wrote:Burlap soaked in clay slip would be such a thin layer that it would be irrelevant, though I don't think it would be necessary either as long as there was cob covering everything. You want some straw in the cob, especially the outer couple of inches, to stop drying cracks from widening. You would want as many rocks as you can fit inside the mass, and the cob serves to fill the gaps between stones for continuous conduction. Obviously the denser the rocks you can find, the better.

Minimizing storage in your heat transfer medium means that you will have very hot radiating surfaces which you will not want to touch. Conduction is the most efficient form of heating; radiation to remote surfaces works but is not as efficient. The hotter the radiating surface, the stronger the convective plume of hot air will be, rising to the ceiling where it does little good.

If you are starting with rammed earth, thermal cob (with no straw) is practically the same thing. Structural cob with straw reinforcement is not much different as long as you don't go overboard with the straw.


Rammed earth done properly doesnt get cracks like cob due to the extremely low moisture content and high compression from ramming. Straw is irrelevant and unnecessary with rammed earth. Dense rocks will definitely conduct better than rammed earth, but rocks interfere somewhat with the process and with high compression ramming be pretty dense in itself. I have about 12" of rammed earth around my current Vogelzang Box wood stove, and running it at full blast dor a few hours, the outside of the rammed earth thermal mass is barely warm, while the inside against the stove is extremely hot! It transfers heat through it alot better than cob would, but not fast enough to cause the exterior to be  hot enough to be a concern. This has just been my experience thus far though.
 
Posts: 90
Location: Texas
117
ancestral skills forest garden food preservation writing composting
  • Likes 1
  • Mark post as helpful
  • send pies
    Number of slices to send:
    Optional 'thank-you' note:
  • Quote
  • Report post to moderator
My biggest concern for a design like this (zig-zagging pipes) in a permanent structure is: How do you clean it out?

Chimneys are supposed to be cleaned out 1x per year.
This is because Creosote builds up in the chimney flue during use.
Creosote being the various tars and charcoals from burning plant materials like wood.  If smoke exiting a chimney is cools to below 250 degrees Fahrenheit, the gasses liquefy, combine, and solidify to form that tar compound.

While /theoretically/ A properly functioning RMH won't create much Creosote, there are a thousand little ways that dimensions can be off, or someone uses wood that isn't completely dry, they let the embers smoulder as they go out instead of extinguishing it right away, or just the trace amounts that happen during the normal start-up period before the 'rocket' part kicks in fully. There's a bunch of other what-if scenarios that would result in Creosote forming inside the RMH and pipes despite our best efforts, during habitual use.  

Creosote, even only 1/8th of an inch (0.3 cm) of buildup  can ignite at temps as low as 451 degrees F (232 C) and burn at temperatures in excess of 2,000 degrees F (1093 C) those high temps can melt mortar and damage even firebrick, which is only meant to withstand temps up to 1,700 degrees F. (926 C)

The primary Anti-creosote / creosote-removing product that I know of uses acetic acid (you can dehydrate it out from vinegar), which is highly corrosive to metal, including stainless steel. It's fine for brick, but would not be friendly to rocket-mass heaters which use metal components. Additionally, its use requires the user to reach in and manually scrub the Creosote to remove it, after treatment. Having tight elbows & long channels would make cleaning very difficult.

So: great idea for something with only 1 bend, where each length of tunnel can be accessed from either the entrance port or the exit chimney, but more bends which are inaccessible to clean /when necessary/ would make me leery.
Short-term use structures would also be fine, but I wouldn't want to make a wall of my house out of a bunch of zig-zagging no-access tunnels.

Edit to add:
From Peter van den Berg's posts about using a batchrocket heater, he had a chimney sweep come and clean it one time after 7 winters of using it. He reported the chimney sweep said the amount of creosote that was cleaned out was "not much for a whole burning season"
So, cleaning would still be necessary for these systems, even if it's very infrequent. (once every 5-10 years).
This is an excellent maintenance timeframe for a home heater, but a wall of multiple zig-zags would still have to be dismantled somehow to properly clean it.

I see the claim "There is no creosote deposits from rocket stoves" - but this is demonstrably not accurate.
There is a much smaller amount of creosote buildup compared to a regular wood stove / fireplace, but it is not 'nothing'. It still requires routine cleaning to prevent an internal fire, when the creosote actually does ignite & starts melting things.

Kinda like how the ductwork in your home HVAC system needs to be cleaned every 3-5 years or so, even if you have good filters. No system is perfect.
It is low-maintenance, but not 'No Maintenance'
So, accessibility to clean is something to take into consideration when installing.
 
rocket scientist
Posts: 6529
Location: latitude 47 N.W. montana zone 6A
3398
cat pig rocket stoves
  • Likes 3
  • Mark post as helpful
  • send pies
    Number of slices to send:
    Optional 'thank-you' note:
  • Quote
  • Report post to moderator
Hi Toko;
Good points.
You have a few numbers a bit off such as,  most firebrick is rated for 2500F not 1700F although some insulated firebrick are rated at 1700F
The original poster is just experimenting and trying different ideas.
The following posters are just elaborating on his thoughts.  Brainstorming so to speak.
I mean, a plastic pipe as a riser would make a spectacular candle if it ever got hot!
If you want to see terrible ideas, cruise "youtube" and check out the things some people try...
We call them flaming units of death!  Rarely do you see follow-up videos of how great their new design RMH is doing.
My thought is they are too busy cleaning up the mess...

An RMH that is built even close to specifications will always burn hot enough in the riser to incinerate volatiles like creosote.
What can collect in the pipes of an RMH, is very light nonflammable fly ash.  
A poorly built RMH  can plug your horizontal pipes up in just a few months with fly ash but not creosote. (ask me how I know this)
Creating a piped system of any design without cleanout access is a very poor idea.
I have used a leaf blower to blow out a system in the past.  Other than the new mess you create outdoors it will work. (see the previous statement)
Typical horizontal pipe temps run at 250F or less.
The bottom line is plugging your horizontal with ash is the biggest concern, as it prompts the fire to exit the feed tube rather than the riser.


Toko Aakster
Posts: 90
Location: Texas
117
ancestral skills forest garden food preservation writing composting
  • Likes 3
  • Mark post as helpful
  • send pies
    Number of slices to send:
    Optional 'thank-you' note:
  • Quote
  • Report post to moderator
Hey thomas!
I edited my post to add a few more thoughts about long-term maintenance of a heating system & the cleaning requirements for it.  

I don't mean to be excessively critical, I understand this thread is just brainstorming & troubleshooting  =)

When I'm trying to design my own builds, I usually start with "How are all the ways that this could go terribly wrong?" - reflect on them, and then figure out ways to mitigate those things. (Thus, the initial dump & then coming back after a while of reflection & further research to add final thoughts)

So, batch-dumping criticism in this instance really was done in good faith, I promise!

I do love the idea of a thermal mass heater somehow taking up a whole wall!
Especially a bedroom wall, or somehow make the entire home's ground-level flooring into a big mass heater - that sounds so cozy.

My brain has been chewing over the idea of building a cob home for the last few months, so the suggestion "install a rocket mass heater in a wall" immediately launched me into *handwave to prior post* - all that.


"Creating a piped system of any design without cleanout access is a very poor idea."
Yes, agreed - that was my conclusion as well.
I'm really curious about how we COULD make a whole wall, or a whole flooring area into a mass heater. Heated floors are usually done with electricity, but if our goal with the RMH is to heat the house ANYWAY....
 
Toko Aakster
Posts: 90
Location: Texas
117
ancestral skills forest garden food preservation writing composting
  • Likes 2
  • Mark post as helpful
  • send pies
    Number of slices to send:
    Optional 'thank-you' note:
  • Quote
  • Report post to moderator
Continuing off the idea of a 'flooring or whole wall as a RMH':

Since the outputs are Heat, Steam & CO2... and the mass is supposed to be absorbing the heat, water can condense out from steam at around 212 F (100 C)

So, with that in mind, could we design the mass in such a way that the further-along, cooler areas would have some sort of method to collect the steam?
Like, terminating the outgoing chimney with a purposeful water-condensing (a la water distillation) setup.
Collect the steam, let the CO2 escape, funnel the water drips somewhere that won't degrade the cob, or produce mold.

If you did that, you could even keep an eye on the water condensed out, and test it for impurities to see if you're having above-average creosote formation, or if everything's burning properly.  
 
thomas rubino
rocket scientist
Posts: 6529
Location: latitude 47 N.W. montana zone 6A
3398
cat pig rocket stoves
  • Likes 3
  • Mark post as helpful
  • send pies
    Number of slices to send:
    Optional 'thank-you' note:
  • Quote
  • Report post to moderator
Ahh Toko;
Now you sound like a rocket scientist!   Experiment, experiment, But Don't burn the house down!
Heated floors and heated walls are worthy things to try for.
I know heated walls have been done with pipes and cob mass.
Heated floors were done long ago (with a few slaves helping of course).

Heated walls are easy now. We call them stratification bells, often built with brick. They stratify the heat with the coolest sinking to the bottom and leaving up the chimney.
Heated floors are currently being experimented with by another poster.
I just now viewed your most recent post about floors.
Steam is produced during start-up or if adding wood for a short period afterward. Then it should be just heat shimmers.
Wet wood of course changes everything.  
A newly built RMH particularly if using bricks with a clay mortar will "leak" water/ steam until everything is heated up and dried out.
Any water that collected on the floor of a bell would quickly evaporate as the bell comes up to working temperatures.
The 7" batch with brick bell in my shop can have 200-300f  external brick temps near the top and 150F near the floor.
Internal temps are much higher.

 
William Bronson
gardener
Posts: 5263
Location: Cincinnati, Ohio,Price Hill 45205
1053
forest garden trees urban
  • Likes 1
  • Mark post as helpful
  • send pies
    Number of slices to send:
    Optional 'thank-you' note:
  • Quote
  • Report post to moderator
Well , we could add water into the exhaust stream, if we wanted to.
We could keep a full pan of water in the bell, replenishing it with a float valve.
We could even heat  water into steam atop the barrel and inject the steam into the system, if we had a reason to.
The best reason to I've found to add water directly into the exhaust stream is filtering particulates.

I have thought that dripping water on concrete in the exhaust path  could keep the heat from completely destroying it.
I built a J tube that had  a water jacket around the terracotta feed tube and it was held together with Portland cement, and sealed with regular silicone because I knew temperatures wouldn't exceed 212 degrees.

Using some of the heat to distill water could be a way to retain more heat in the structure , or move heat around.
Going from water to steam takes a huge amount of heat energy that can be deposited wherever the steam condenses back into water.

Instead of heating a floor or wall with exhaust directly, we could use a heat exchanger.
This would remove the danger of any kind of deposits.
It could run on air or water, and might not need a fan, working off of draft instead.
A wall could have a condensing coil built into it , and the floor , an uninsulated water tank.
Evaporate the water with the heat of the stove, transfer the heat to the walls and store the pure , still hot water in the floor.


Nate Nute
Posts: 43
12
  • Likes 1
  • Mark post as helpful
  • send pies
    Number of slices to send:
    Optional 'thank-you' note:
  • Quote
  • Report post to moderator

Toko Aakster wrote:My biggest concern for a design like this (zig-zagging pipes) in a permanent structure is: How do you clean it out?

Chimneys are supposed to be cleaned out 1x per year.
This is because Creosote builds up in the chimney flue during use.
Creosote being the various tars and charcoals from burning plant materials like wood.  If smoke exiting a chimney is cools to below 250 degrees Fahrenheit, the gasses liquefy, combine, and solidify to form that tar compound.

While /theoretically/ A properly functioning RMH won't create much Creosote, there are a thousand little ways that dimensions can be off, or someone uses wood that isn't completely dry, they let the embers smoulder as they go out instead of extinguishing it right away, or just the trace amounts that happen during the normal start-up period before the 'rocket' part kicks in fully. There's a bunch of other what-if scenarios that would result in Creosote forming inside the RMH and pipes despite our best efforts, during habitual use.  

Creosote, even only 1/8th of an inch (0.3 cm) of buildup  can ignite at temps as low as 451 degrees F (232 C) and burn at temperatures in excess of 2,000 degrees F (1093 C) those high temps can melt mortar and damage even firebrick, which is only meant to withstand temps up to 1,700 degrees F. (926 C)

The primary Anti-creosote / creosote-removing product that I know of uses acetic acid (you can dehydrate it out from vinegar), which is highly corrosive to metal, including stainless steel. It's fine for brick, but would not be friendly to rocket-mass heaters which use metal components. Additionally, its use requires the user to reach in and manually scrub the Creosote to remove it, after treatment. Having tight elbows & long channels would make cleaning very difficult.

So: great idea for something with only 1 bend, where each length of tunnel can be accessed from either the entrance port or the exit chimney, but more bends which are inaccessible to clean /when necessary/ would make me leery.
Short-term use structures would also be fine, but I wouldn't want to make a wall of my house out of a bunch of zig-zagging no-access tunnels.

Edit to add:
From Peter van den Berg's posts about using a batchrocket heater, he had a chimney sweep come and clean it one time after 7 winters of using it. He reported the chimney sweep said the amount of creosote that was cleaned out was "not much for a whole burning season"
So, cleaning would still be necessary for these systems, even if it's very infrequent. (once every 5-10 years).
This is an excellent maintenance timeframe for a home heater, but a wall of multiple zig-zags would still have to be dismantled somehow to properly clean it.

I see the claim "There is no creosote deposits from rocket stoves" - but this is demonstrably not accurate.
There is a much smaller amount of creosote buildup compared to a regular wood stove / fireplace, but it is not 'nothing'. It still requires routine cleaning to prevent an internal fire, when the creosote actually does ignite & starts melting things.

Kinda like how the ductwork in your home HVAC system needs to be cleaned every 3-5 years or so, even if you have good filters. No system is perfect.
It is low-maintenance, but not 'No Maintenance'
So, accessibility to clean is something to take into consideration when installing.


Excellent concern, but If you notice in the pic I'm just using a wood board to cover the end. When this board is removed you have complete access to both upper and lower tubes to easily clean out any creosote the entire length. So just using a concrete paver as the end cap would allow cleaning anytime its needed.
 
Nate Nute
Posts: 43
12
  • Likes 2
  • Mark post as helpful
  • send pies
    Number of slices to send:
    Optional 'thank-you' note:
  • Quote
  • Report post to moderator

thomas rubino wrote:Hi Toko;
Good points.
You have a few numbers a bit off such as,  most firebrick is rated for 2500F not 1700F although some insulated firebrick are rated at 1700F
The original poster is just experimenting and trying different ideas.
The following posters are just elaborating on his thoughts.  Brainstorming so to speak.
I mean, a plastic pipe as a riser would make a spectacular candle if it ever got hot!
If you want to see terrible ideas, cruise "youtube" and check out the things some people try...
We call them flaming units of death!  Rarely do you see follow-up videos of how great their new design RMH is doing.
My thought is they are too busy cleaning up the mess...

An RMH that is built even close to specifications will always burn hot enough in the riser to incinerate volatiles like creosote.
What can collect in the pipes of an RMH, is very light nonflammable fly ash.  
A poorly built RMH  can plug your horizontal pipes up in just a few months with fly ash but not creosote. (ask me how I know this)
Creating a piped system of any design without cleanout access is a very poor idea.
I have used a leaf blower to blow out a system in the past.  Other than the new mess you create outdoors it will work. (see the previous statement)
Typical horizontal pipe temps run at 250F or less.
The bottom line is plugging your horizontal with ash is the biggest concern, as it prompts the fire to exit the feed tube rather than the riser.


Heheh, yeah the pvc riser was just the closest thing laying near to use for this experiment! A sort of humor using it too. But I knew it would be fine for this short burn outdoors experiment since the initial fire in the bottom tube was not a proper Rocket fire and the temps coming out the end of the blocks was barely warm aftet burning for quite a while.
 
Posts: 4
  • Likes 6
  • Mark post as helpful
  • send pies
    Number of slices to send:
    Optional 'thank-you' note:
  • Quote
  • Report post to moderator
Hey there, I just had this exact same idea as a cheap, easy way to make a somewhat temporary heated bench. Particularly the double-stacked version.

Did anyone try this out? If not, I may be the guinea pig. Cinder blocks are ubiquitous where I live (Guatemala) though there's two varieties - ones made with solid/heavy stones and others made with volcanic pumice rock. The pumice are much lighter and cheaper, but also are somewhat insulative (they work well for a cheap L shaped rocket cookstove) so they may not heat up all that fast/efficiently.
 
thomas rubino
rocket scientist
Posts: 6529
Location: latitude 47 N.W. montana zone 6A
3398
cat pig rocket stoves
  • Likes 6
  • Mark post as helpful
  • send pies
    Number of slices to send:
    Optional 'thank-you' note:
  • Quote
  • Report post to moderator
Hey Nick;
Those light pumice bricks are true cinder blocks, the others are concrete blocks.
The concrete blocks will work as a tunnel through the mass.
You could forego the tunnels altogether and create a bell/bench instead.
As you are in Guatemala rather than Montana or Alaska you can experiment much easier than us folks up in the snow country.
 
master steward
Posts: 7232
Location: southern Illinois, USA
2628
goat cat dog chicken composting toilet food preservation pig bee solar wood heat homestead
  • Likes 3
  • Mark post as helpful
  • send pies
    Number of slices to send:
    Optional 'thank-you' note:
  • Quote
  • Report post to moderator
Hi Nick,

Welcome to Permies.
 
Nick Chomey
Posts: 4
  • Likes 2
  • Mark post as helpful
  • send pies
    Number of slices to send:
    Optional 'thank-you' note:
  • Quote
  • Report post to moderator

thomas rubino wrote:Hey Nick;
Those light pumice bricks are true cinder blocks, the others are concrete blocks.
The concrete blocks will work as a tunnel through the mass.
You could forego the tunnels altogether and create a bell/bench instead.
As you are in Guatemala rather than Montana or Alaska you can experiment much easier than us folks up in the snow country.


Thanks for the ideas Thomas!

I'm familiar with the stratification bell/bench concept where the hot air fills a large cavity and the coldest air vents out of the bottom. Is that what you mean? If so, how would you go about making it with blocks (no big slabs on top)? I'd like to keep the build as simple and cheap as possible, both for my own somewhat temporary use but moreso so that I can share the design with people here who have very limited resources and skills. Ideally I can just cover the seams in the blocks with some clay mud so that gas doesn't escape into the room.

Also, i doesn't need to be all that large given that it doesn't get THAT cold here (though it has been approaching freezing in the past few nights, but is quite comfortable during the day). I just want to have a decently warm bench to sit at while on my computer or eating, which will also hold some heat til the morning

Thanks!
 
thomas rubino
rocket scientist
Posts: 6529
Location: latitude 47 N.W. montana zone 6A
3398
cat pig rocket stoves
  • Likes 3
  • Mark post as helpful
  • send pies
    Number of slices to send:
    Optional 'thank-you' note:
  • Quote
  • Report post to moderator
Hey Nick;
Yes, clay mud will seal up any leaks.
As far as bridging the top of the bench you will need to find something.
Large flat rocks come to mind.
55-gallon barrels split in two length-wise and then covered by cob.
A sheet of tin would bridge it and cob could cover that.
You might need to put a block support to keep the tin from moving as you sit on it.
It just depends on what you have locally available.
 
Nick Chomey
Posts: 4
  • Likes 3
  • Mark post as helpful
  • send pies
    Number of slices to send:
    Optional 'thank-you' note:
  • Quote
  • Report post to moderator
Thanks, good ideas. The split drum with blocks in the middle for support could work. I'll give it all a good think and report back with whatever I end up making. I suspect I'll end up just trying the double stacked block bench like was suggested earlier in this thread. Seems dead-simple, cheap and sturdy

 
thomas rubino
rocket scientist
Posts: 6529
Location: latitude 47 N.W. montana zone 6A
3398
cat pig rocket stoves
  • Likes 2
  • Mark post as helpful
  • send pies
    Number of slices to send:
    Optional 'thank-you' note:
  • Quote
  • Report post to moderator
Sounds good Nick, keep us posted.
The split barrels do not need extra support only sheet roofing.
 
Posts: 31
Location: Kenai & Nikiski Alaska, Zone 4B
22
  • Likes 2
  • Mark post as helpful
  • send pies
    Number of slices to send:
    Optional 'thank-you' note:
  • Quote
  • Report post to moderator
Here's how I set up my stratification chamber utilizing cinder blocks and solid CMU blocks. I was very happy with the results. That being said it wasn't a bench, but a raised garden bed.

IMG_20230314_143818_403.jpg
[Thumbnail for IMG_20230314_143818_403.jpg]
 
Nick Chomey
Posts: 4
  • Mark post as helpful
  • send pies
    Number of slices to send:
    Optional 'thank-you' note:
  • Quote
  • Report post to moderator
I'm thinking of doing something like this with U-blocks (obviously many more). The hollow channel should somewhat simulate a stratification chamber. I can seal the top with blocks lying on their side - there's some than are thinner than the ones shown. And on the "ledge" on the sides I can just put bricks or whatever. Maybe plywood on top of it all. I can make a small gap somewhere at the bottom to let the colder air exhaust out.
IMG_20231222_154410717.jpg
[Thumbnail for IMG_20231222_154410717.jpg]
IMG_20231222_154432294.jpg
[Thumbnail for IMG_20231222_154432294.jpg]
 
He's my best friend. Not yours. Mine. You can have this tiny ad:
A PDC for cold climate homesteaders
http://permaculture-design-course.com
reply
    Bookmark Topic Watch Topic
  • New Topic