• Post Reply Bookmark Topic Watch Topic
  • New Topic
permaculture forums growies critters building homesteading energy monies kitchen purity ungarbage community wilderness fiber arts art permaculture artisans regional education skip experiences global resources cider press projects digital market permies.com pie forums private forums all forums
this forum made possible by our volunteer staff, including ...
master stewards:
  • Carla Burke
  • John F Dean
  • Timothy Norton
  • Nancy Reading
  • r ranson
  • Jay Angler
  • Pearl Sutton
stewards:
  • paul wheaton
  • Tereza Okava
  • Andrés Bernal
master gardeners:
  • Christopher Weeks
gardeners:
  • Jeremy VanGelder
  • M Ljin
  • Matt McSpadden

my first go at making pemmican

 
author & steward
Posts: 5619
Location: Southeastern U.S. - Zone 7b
3307
6
goat cat forest garden foraging food preservation fiber arts medical herbs writing solar wood heat homestead
  • Likes 15
  • Mark post as helpful
  • send pies
    Number of slices to send:
    Optional 'thank-you' note:
  • Quote
  • Report post to moderator
So far, my meat preservation methods have been canning and freezing. But I'm always on the look-out for off-grid preservation and storage techniques, and so thought I'd give pemmican a try. I spent a lot of time researching first, and discovered that there are two ways to think about pemmican: the modern concept as a survival food, and the historical concept of meat preservation. These are neither right nor wrong, but I lean more toward the preservation idea and using pemmican as an ingredient in my cooking. Anyway, here's what I did.

The ingredient list is simple: lean meat (bison, venison, beef, duck, etc.), suet or tallow, and optional dried fruit. If suet is used, it needs to be rendered to tallow.

I started with a lean, 2.45-pound top round beef roast.


Sliced thinly across the grain.


The slices are thin to facilitate thorough drying. Slicing across the grain (rather than with) makes it easier to grind into powder. Traditional methods of drying it are sun drying or near a campfire. For my first time, I used my electric dehydrator. A good alternative for me would be drying it near my wood stove.

It took about 12 hours in the dehydrator to become crispy dry. Dried weight was 0.75 pound.


Historically, a mortar and pestle or rocks were used to pulverize the dried meat. I opted to use my blender.

The crispy slices broke easily into smaller pieces.


Meat powder


Except it wasn't exactly powder. It was actually very fine shreds.

I used my goat tallow, so all I had to do was melt it to mix with the meat shreds. The estimated amount is roughly the same weight as the meat. Also, I should mention that I opted to make this batch plain, just meat and tallow without fruit.

Tallow is poured in gradually, mixing as you go.


It needs to have enough tallow to hold it together without the end product becoming overly greasy. I wasn't exactly sure how much that was, so this first time was an experiment.

Gloves are optional but recommended for hand mixing and easier hand clean-up.


Historically, pemmican was stored in skins, but nowadays, most people us a mold.

I used a bread pan for a mold.


I put it in my unheated pantry overnight until it cooled to solid.

Unmolded the next day.


Mine was crumbly when I cut it, suggesting I need more tallow next time.


Then came the taste test! Based on peoples' reactions in the videos, I expected a tasteless, somewhat greasy product; not something anyone was willing to eat unless they had to. But my husband and I thought it tasted like beef. Only bland because it has no salt, but otherwise fine.

I saved some for an upcoming cooking experiment, and packed the rest of it into wide-mouth pint jars, which I vacuum sealed (because I vacuum seal everything in my pantry that isn't wet canned.)

Vacuum sealing the jars with my pump-n-seal


For future batches, I'll just pack it directly into the jars and skip the mold. And I think the addition of salt would be fine. I'd also like to experiment with adding dried fruit, although since I plan to use it for cooking, I'll probably continue to make it plain.

So that's my first go at it. I'd be interested in methods, techniques, tips, and recipes from those of you who make and use pemmican. Do you have a favorite? Do you find it truly does have an excellent shelf life?

I'll do an update after I use it to make Rubaboo.
 
gardener
Posts: 1416
Location: Tennessee
925
homeschooling kids urban books writing homestead
  • Likes 6
  • Mark post as helpful
  • send pies
    Number of slices to send:
    Optional 'thank-you' note:
  • Quote
  • Report post to moderator
Wow! That's really impressive! And I thought pemmican was merely a specially-seasoned jerky. There's way more to the process than strips on a dehydrator--thanks for sharing your insights and process! (If only we could do a taste-test through the internet...)
 
Leigh Tate
author & steward
Posts: 5619
Location: Southeastern U.S. - Zone 7b
3307
6
goat cat forest garden foraging food preservation fiber arts medical herbs writing solar wood heat homestead
  • Likes 7
  • Mark post as helpful
  • send pies
    Number of slices to send:
    Optional 'thank-you' note:
  • Quote
  • Report post to moderator
It's soup season here, so the first recipe I wanted to try with my pemmican was rubaboo, or pemmican soup. It's described on two videos, The Townsends and Tasting History with Max Miller. It's basically pemmican, water, flour, salt, and whatever vegetables one has at hand, all cooked together. I made mine with potatoes, carrots, turnips, onions, and kale. We really liked it!

It would probably be more traditional to serve it with hardtack, but for the first time, plain soda crackers had to do.
rubaboo3.JPG
[Thumbnail for rubaboo3.JPG]
 
pollinator
Posts: 197
Location: Oh-Hi-Oh to New Mexico (soon)
52
  • Likes 5
  • Mark post as helpful
  • send pies
    Number of slices to send:
    Optional 'thank-you' note:
  • Quote
  • Report post to moderator
Hey, thanks for sharing, did you ever try making it with dried fruit?
 
Leigh Tate
author & steward
Posts: 5619
Location: Southeastern U.S. - Zone 7b
3307
6
goat cat forest garden foraging food preservation fiber arts medical herbs writing solar wood heat homestead
  • Likes 8
  • Mark post as helpful
  • send pies
    Number of slices to send:
    Optional 'thank-you' note:
  • Quote
  • Report post to moderator
Kyle, so far I haven't, but next time I make a batch I'll have to add some dried fruit.

When I read about Roald Amundsen's exploration of the South Pole, they mentioned a type of pemmican developed by the Norwegian army. Apparently it contained grain and vegetables too. Sort of a complete meal. I wouldn't mind finding a recipe for that one too.
 
Kyle Hayward
pollinator
Posts: 197
Location: Oh-Hi-Oh to New Mexico (soon)
52
  • Likes 9
  • Mark post as helpful
  • send pies
    Number of slices to send:
    Optional 'thank-you' note:
  • Quote
  • Report post to moderator
Well AI found this:

Pemmican and Norwegian expeditions
Norwegian polar explorer Roald Amundsen, known for his expedition to the South Pole, famously relied on pemmican. The rations used by his team and sled dogs were specifically formulated for the high-energy demands of polar travel.
For humans: Amundsen's pemmican included oatmeal and peas to add more fiber and nutrients.
For sled dogs: The dogs were given a special pemmican made with fishmeal and extra fat.
Modern Norwegian rations
Instead of traditional pemmican, contemporary Norwegian military rations (known as "Arctic Field Rations") feature a wide array of freeze-dried meals and high-calorie snacks. These rations are designed for cold-weather operations and have a long shelf life. Common items include:
Freeze-dried entrees like Chicken Tikka Masala
Snacks such as dark chocolate, peanuts, and protein bars
Energy drinks and instant coffee
Homemade pemmican (Amundsen-style)
For those interested in making a version of pemmican inspired by Norwegian polar explorers, you can adapt Amundsen's approach.
Ingredients
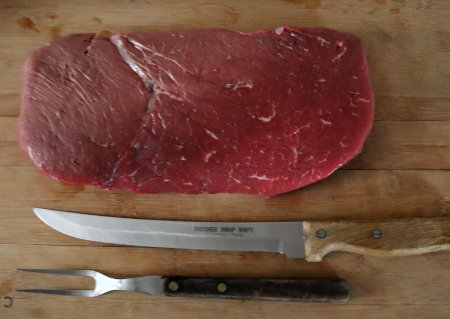
4 cups lean meat (venison, beef, or bison), dried and ground into a powder
2 cups rendered beef or bison suet
3 cups dried fruit, ground into a powder (e.g., cranberries or blueberries)
Oatmeal and peas, dried and ground into a powder (optional, for extra fiber)
Instructions
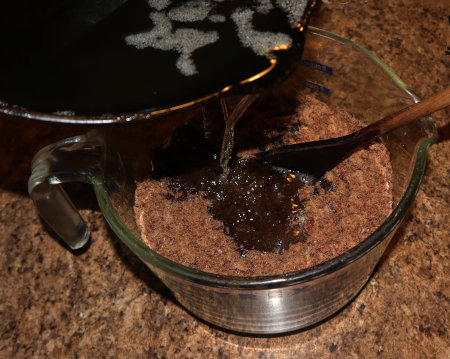
Render the fat: Melt the suet over low heat until it turns to liquid. You can strain it to remove impurities.
Combine ingredients: In a large bowl, mix the ground meat, fruit, oatmeal, and pea powders.
Mix with fat: Pour the warm, liquid fat over the dry mixture. Stir thoroughly until everything is well combined and has a packable consistency.
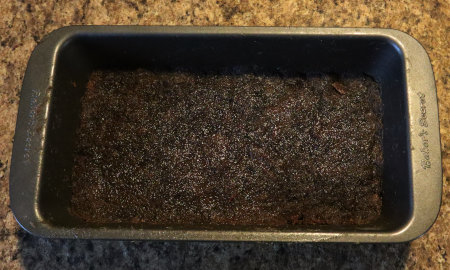
Form and store: Press the mixture into a pan or mold and refrigerate until firm. Cut the pemmican into bars and wrap them individually in wax paper.
How to use pemmican
Pemmican can be eaten cold as an energy bar or rehydrated in hot water to create a nutritious, warm stew.  

 
Frankly, my dear, I don't give a damn. But if you read my tiny ad, I might change my mind.
Learn Permaculture through a little hard work
https://wheaton-labs.com/bootcamp
reply
    Bookmark Topic Watch Topic
  • New Topic