|

|

|

|

|

|
|
|
|
|
|
|
|

|

|

|

|

|
 13
13


~Permies FAQ ~ Dragons, Fairies and even a Mini-Paul! ~ You Know You're a Permie When...~ All About Permies, including tutorials ~Herbal Hugel Spiral of Randomness!~Tricks to Keep the Dirt from Sliding off a Hugel~List of Cascadia Bloggers and Facebook Pages!~

Skill verified by gir bot")

Skill verified by Mike Haasl")

Skill verified by paul wheaton")

Skill verified by Mike Haasl")

Skill verified by r ransom")

Skill verified by Mike Haasl")

Skill verified by Mike Haasl")

Skill verified by Mike Haasl") 5
5


~Permies FAQ ~ Dragons, Fairies and even a Mini-Paul! ~ You Know You're a Permie When...~ All About Permies, including tutorials ~Herbal Hugel Spiral of Randomness!~Tricks to Keep the Dirt from Sliding off a Hugel~List of Cascadia Bloggers and Facebook Pages!~
6


~Permies FAQ ~ Dragons, Fairies and even a Mini-Paul! ~ You Know You're a Permie When...~ All About Permies, including tutorials ~Herbal Hugel Spiral of Randomness!~Tricks to Keep the Dirt from Sliding off a Hugel~List of Cascadia Bloggers and Facebook Pages!~
7


~Permies FAQ ~ Dragons, Fairies and even a Mini-Paul! ~ You Know You're a Permie When...~ All About Permies, including tutorials ~Herbal Hugel Spiral of Randomness!~Tricks to Keep the Dirt from Sliding off a Hugel~List of Cascadia Bloggers and Facebook Pages!~
6
2
~Permies FAQ ~ Dragons, Fairies and even a Mini-Paul! ~ You Know You're a Permie When...~ All About Permies, including tutorials ~Herbal Hugel Spiral of Randomness!~Tricks to Keep the Dirt from Sliding off a Hugel~List of Cascadia Bloggers and Facebook Pages!~
5

Skill verified by gir bot")

Skill verified by Mike Haasl")

Skill verified by Ash Jackson") 3
4
3
4
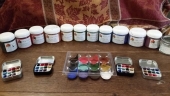
r ranson wrote:I wonder if mixed milk paint could be stored in a tube?
~Permies FAQ ~ Dragons, Fairies and even a Mini-Paul! ~ You Know You're a Permie When...~ All About Permies, including tutorials ~Herbal Hugel Spiral of Randomness!~Tricks to Keep the Dirt from Sliding off a Hugel~List of Cascadia Bloggers and Facebook Pages!~
3
6


~Permies FAQ ~ Dragons, Fairies and even a Mini-Paul! ~ You Know You're a Permie When...~ All About Permies, including tutorials ~Herbal Hugel Spiral of Randomness!~Tricks to Keep the Dirt from Sliding off a Hugel~List of Cascadia Bloggers and Facebook Pages!~
3

|
There is no greater crime than stealing somebody's best friend. I miss you tiny ad:
building a permaculture community with hands on gardening and natural building
https://wheaton-labs.com/bootcamp
|