• Post Reply Bookmark Topic Watch Topic
  • New Topic
permaculture forums growies critters building homesteading energy monies kitchen purity ungarbage community wilderness fiber arts art permaculture artisans regional education skip experiences global resources cider press projects digital market permies.com pie forums private forums all forums
this forum made possible by our volunteer staff, including ...
master stewards:
  • Carla Burke
  • Anne Miller
  • Nancy Reading
  • John F Dean
  • r ransom
  • paul wheaton
  • Timothy Norton
stewards:
  • Jay Angler
  • Pearl Sutton
  • Andrés Bernal
master gardeners:
  • Christopher Weeks
gardeners:
  • M Ljin
  • Thekla McDaniels
  • May Lotito

Making ink from alder cones and black walnuts

 
steward
Posts: 22970
Location: Pacific Northwest
13872
13
homeschooling hugelkultur kids art duck forest garden foraging fiber arts sheep wood heat homestead
  • Likes 27
  • Mark post as helpful
  • send pies
    Number of slices to send:
    Optional 'thank-you' note:
  • Quote
  • Report post to moderator
My kids are learning about the medieval times, and since we have tons of goose feathers from our geese, it inspired me to make quills. Of course, then I had to take it one step further and make ink!

I found quite a few different videos on making ink. The basics seem to be:

(1) Put tannin-rich plant material into a pot
(2) Bring it to a simmer
(3) Let it simmer a while (I found I didn't get much more color out of them after an hour of simmering, even if I left it in the pot on the woodstove for a day)
(4) Pour it through a strainer
(5) Pour it through a finer strainer (paint strainer or cheese cloth. I used an old flat diaper)
(6) Add gum arabic until it's thick enough that it doesn't bleed on your paper.
(7) Have fun!

Step 1: Find Tannin-Rich Material!

I have a lot of red alders on my property, so we went hunting! Some we pulled green off the tree, and others we found on the ground. The easiest to spot were hanging from branches, where they'd got caught as they fell (my daughter spotted these!)

Collecting alder cones in the blackberry/maple basket I made


For the walnuts, I really lucked out!  We were at my parent's place to press cider, and my nieces found a squirrel stash of black walnuts! As all the little ones were having blast smashing them (and my daughter's white dress was being stained brown and their hands were turning brown), my brain went, "TANNINS!" So, after the kids had fun smashing them, I took them (and some more from the stash) and froze them until I was ready to boil them. I didn't need a bunch of moldy green walnut husks!

Steps 2 & 3: Simmer the Tannin-Rich Material in water

First, I boiled the alder cones in my dye pot on the stove.

The kids and I found a lot of alder cones outside!


Aldercones in water to make brown ink
Boiling away


Water turned brown from simmering alder cone tannins
The water is brown now. I mashed it for good measure, but I didn't really need to


A lot of videos said that I should boil it for hours. I did that, but the color didn't get much darker. So, I'd say you really only need to boil it for an hour.

I did the same thing with the frozen walnuts. All parts of the walnut were thrown in the pot and covered with water. Some instructions said to take them out and break them, but the water was already rather dark.

frozen walnuts in the pot


turning walnuts into walnut ink
It's turning brown!


Very dark now. I let the alder ink evaporate in a jar on top of the stove


Steps 4 & 5: Strain it and then strain it again!

I didn't get pictures of this. But, I strained them first through a big tea strainer, and then I put an old cloth diaper over the strainer and poured it through again. This worked well!

Step 6: Add Gum Arabic to thicken

Apparently, you can also use wild cherry sap in the same way. I wish I'd known that earlier, because the kids had noticed that we have a wild cherry that's constantly dripping sap. Anyway, I just bought raw gum arabic. I could have bought it as a powder or a liquid, which would be easier to add. But, I really wanted to show the kids how it's acacia sap and let them hold it in their hands. They really enjoyed that!

picture from Amazon of the gum arabic I bought


To make the gum arabic useable, I simmered it in a small amount of the  ink, because I didn't want to dilute it more.  Thinking back, it would have worked MUCH better to just hydrate the gum arabic in water and then add it to the ink. You can always simmer the ink down to make it a darker color.

hydrating the gum arabic in water. I just used a small metal measuring cup for ease of pouring and so I wouldn't lose a lot stuck to the edge of a larger pot


As I rehydrated the gum arabic and added it to the ink, I kept testing it to see if the line was clean. If the ink was feathering out, it needed more gum arabic. You can see the lighter, more golden brown is from the alder ink. The darker, desaturated brown is from the walnut ink.

Finished alder and walnut inks! Between them is my test paper where I tested out the color and thickness of the ink.


Step 7: Enjoy!

Not only did I enjoy playing with quill and ink, so too did my kids! I also took everything to their school, and taught their fellow classmates about making ink and let them write with pen and quill.

The kids enjoying writing and drawing with my geese's quills and the alder and walnut inks!
 
gardener
Posts: 644
Location: Southern Manitoba...bald(ish) prairie, zone 3ish
374
3
transportation hugelkultur monies forest garden urban books food preservation cooking writing woodworking
  • Likes 8
  • Mark post as helpful
  • send pies
    Number of slices to send:
    Optional 'thank-you' note:
  • Quote
  • Report post to moderator
What an incredible learning experience, for both you (and indirectly us) and your children and their classmates.

It's easy to see why the value proposition of some things have changed considering the amount of labour or specialized knowledge to create things.

Without having ever looked into this as a project, I wonder if something like a pine / spruce / fir sap would work as an alternative thickener.

Thanks for sharing!
 
Nicole Alderman
steward
Posts: 22970
Location: Pacific Northwest
13872
13
homeschooling hugelkultur kids art duck forest garden foraging fiber arts sheep wood heat homestead
  • Likes 10
  • Mark post as helpful
  • send pies
    Number of slices to send:
    Optional 'thank-you' note:
  • Quote
  • Report post to moderator
I think maybe the pine/spruce/fire sap might be too resinous? I know we differentiate e between pine/spruce/etc saps from deciduous saps. We call the pine ones "pitch." Resins seem to be even more sticky, and maybe they don't mix the same as acacia sap or cherry sap. From this reddit

I did find this article: Pine gum to replace other gums. But, the process to isolate the Galactoglucomannan gum out of pine sap is intensive

Galactoglucomannan is a hemicellulose of pine. Previously no effective method existed to extract hemicellulose from trees, and the processes were very difficult to carry out. Company BLN Woods has developed a method which enables separating all different ingredients for converting.

The method uses underpressure in order to keep the structure of hemicellulose in order to avoid chopping or polymerizing it. Costs of the process are low and there are plenty of usages for the end product.


I've gone down a longer rabbit hole and found this: The Difference between Resins and Gums for Aromatherapy Use


What is a Resin?

A resin is the sticky ooze exuding from the tree, predominantly those of the Pinaceae family.  Resins are formed as an oxidation by-product of essential oils, and expelled out of a tree’s bark, hardening with exposure to air.1 Trees are typically tapped to acquire enough amounts of resins for commercial use.

Resin is insoluble in water, but dissolves in alcohol and other solvents.1 It is used in industry to make glues, waterproof varnishes, and in aromatic/medicinal products.

Types of Resins

There are three groups of resins: Hard resins, oleoresins, and gum resins.

Hard resins contain very little essential oil and are used to make varnishes and adhesives.1 Amber is an unusual hard aromatic fossil resin, typically originating from a pine tree. Sometimes ancient remains of plants and animals can be found in amber resin.2

Oleoresins are typically liquid and contain significant amounts of essential oil. Oleoresins include turpentine, balsam, benzoin, elemi, and copaiba.1

Turpentine comes mainly from coniferous trees, which exude a substance called pitch, tapped for commercial harvest. Trees of the Pinaceae family include cedar, pine, fir, spruce, and hemlock.3 Note that multiple essential oils come from trees of the Pinaceae family, but may come from other plant material, such as the needles or cones, and not necessarily from the resin.
Examples include:

Pine (Pinus sylvestris)
Fir (Abies balsamea)
Black spruce (Picea nigra).
Balsams are aromatic oleoresins containing benzole or cinnamic acid. Essential oils can be extracted via distillation. Contradictory to what the general name might apply, balsams do not actually include Canada balsam (Abies balsamea) or copaiba balsam (Copaifera officinalis).1 Balsams do include the following trees, belonging to the Fabaceae family:
Balsam of Peru (Myroxylon pereirae)
Balsam of Tolu (Myroxylon balsamum).
Benzoin is a thick gooey substance with a fixative quality and vanilla aroma. It comes from plants of the Styrax family, including:
Sumatra benzoin (Styrax benzoin).
Siam benzoin (Styrax tonkinensis)
Elemi (Canarium luzonicum) differs from other oleoresins in that the substance is not liquid. It hardens with air exposure.1
Copaiba includes aromatic oleoresin mostly from the Copaifera species of the Fabaceae family of South America. Copaiba is obtained by boring holes into the heartwood.1
What is a Gum?

Gums are made by plants when internal tissue decomposes. This process, called gummosis, creates a product high in sugar. Gum typically oozes from stems or branches in response to a wound. It is created by the plant to prevent fungal infection. Plant examples include:

Gum acacia (Acacia senegal)
Gum tragacanth milkvetch (Astragalus gummifer)
Indian tragacanth (Sterculia urens)
Prunus ssp.1  

What is Sap?

Note that resins and gums are different from sap. Sap runs through the xylem and phloem of trees to provide water and nutrients in a process called transpiration.4 Resin, found in the resin ducts of a tree’s bark, protects the tree from injury, water loss, microbial pathogens, and insects.5

A Mix: Gum Resins

Gum resins are a mix of gum and resin and can also include essential oils. This substance is typically collected by tapping into a tree. Gum resins typically come from trees of a dry climate, such as those of the Burseraceae family. Examples include:

Frankincense (Boswellia ssp.)
Myrrh (Commiphora myrrha, Commiphora erythraea).
Table Summarizing Resin, Gum, and Gum Resin


 ResinGumGum Resin
DefinitionUsually oozes out of barkUsually oozes out of stems.Combination of gum and resin.
Water SolubleNo.Yes.Partially.
Alcohol SolubleYes.No.Mostly.
ExamplesPine, fir, spruce, true balsams, benzoin, copaiba, elemi.Gum acacia, Gum tragacanth milkvetch, Indian tragacanth, Prunus ssp.Frankincense, myrrh.


So, a sap is different from a gum (like from acacia or prune/cherry/plum/peach trees) or a resin (like pine/spruce/fir/etc). They have different uses and properties and are not equally water-soluble. But, knowing that prunus species (like peach, cherry, apricot, plum) are gums, means there's probably some gum producing tree that can grow in most areas (and might even be growing there naturally). Very cool!
 
pollinator
Posts: 262
57
  • Likes 3
  • Mark post as helpful
  • send pies
    Number of slices to send:
    Optional 'thank-you' note:
  • Quote
  • Report post to moderator
Thanks, Nicole. Great tutorial. I learned a lot from it!
 
pollinator
Posts: 3628
Location: Meppel (Drenthe, the Netherlands)
1291
dog forest garden urban cooking bike fiber arts
  • Likes 8
  • Mark post as helpful
  • send pies
    Number of slices to send:
    Optional 'thank-you' note:
  • Quote
  • Report post to moderator
Some years ago I made walnut ink. I did not add any kind of gum, so it's fairly watery. It's best to use it on watercolour paper.

I keep it in the fridge (in a glass bottle). As far as I know it's still usable.
 
Nicole Alderman
steward
Posts: 22970
Location: Pacific Northwest
13872
13
homeschooling hugelkultur kids art duck forest garden foraging fiber arts sheep wood heat homestead
  • Likes 11
  • Mark post as helpful
  • send pies
    Number of slices to send:
    Optional 'thank-you' note:
  • Quote
  • Report post to moderator
If anyone is wondering, these are big, fat, very healthy non-native grey squirrels. There was a bunch of horse chestnuts in their stash that we left there, and a horse chestnut tree just 20 feet from their stash. The walnut tree they were getting the walnuts from was just across the street, and still had hundreds of walnuts. My mom also has been feeding birds on her property for 30+ years, and so these squirrels have all year buffet of spilled bird seeds to rely on through the winter. I took all of these things into consideration before taking the handfuls of walnuts my nieces had found and already smashed to bits. I find it important to sustainably harvest for my projects, and try to be as low impact as possible.

While ink can be made with any tannin rich material, I really wanted to show the students the different things medieval people used to make ink. I sadly don't have access to any oak trees, as oak galls are one of the most tannin-rich and common sources of ink. I'm also not sure how to harvest them without killing a bunch of larval wasps. Additionally, I don't have access to any oak trees, and would have had to drive long distances in search of a tree, which would likely be less sustainable than harvesting what was local and in abundance.

I'd love to see inks made with other tannin-rich material and if they differ in color. If anyone has access to ink galls, that would be super fun to see!
 
Derek Thille
gardener
Posts: 644
Location: Southern Manitoba...bald(ish) prairie, zone 3ish
374
3
transportation hugelkultur monies forest garden urban books food preservation cooking writing woodworking
  • Likes 4
  • Mark post as helpful
  • send pies
    Number of slices to send:
    Optional 'thank-you' note:
  • Quote
  • Report post to moderator
Thanks for the response Nicole.  I didn't realize how much variation there is in tree chemistry.  I was effectively wondering aloud based on what might work that was locally available.  

That also brings to mind the question of how ink was composed centuries ago...it would seem tannin-rich materials are fairly widespread, but gum may be more challenging to come by.  If they used gum a millennia ago, it's amazing to think how these things were figured out without the more modern chemical analysis and body of knowledge.  It helps understanding why the written word would have been relatively exclusive, more available to the wealthy and how revolutionary the Gutenberg press was in terms of making the written word more universal and potentially decreasing the impact / relevance of oral traditions.
 
Posts: 3
1
  • Likes 6
  • Mark post as helpful
  • send pies
    Number of slices to send:
    Optional 'thank-you' note:
  • Quote
  • Report post to moderator
This was fabulous! I have never made ink in all my years of dyeing with plants. You broke it down into steps that are clear and easy to understand and follow. Thank you!

And I appreciate the tutorial on resins, gums, etc. I am about to go into that with a student and was looking for information, this makes it so much easier.

Thanks!!!
 
Nicole Alderman
steward
Posts: 22970
Location: Pacific Northwest
13872
13
homeschooling hugelkultur kids art duck forest garden foraging fiber arts sheep wood heat homestead
  • Likes 8
  • Mark post as helpful
  • send pies
    Number of slices to send:
    Optional 'thank-you' note:
  • Quote
  • Report post to moderator
I learned something new today: You can add iron pills to your ink to get a blacker ink! I thought it was just oak galls that this worked with. But, according to this site you can just pour an open iron pill into walnut ink to get a blacker ink. And, lo-and-behold, it works!

I'll try to get pictures of the ink in action tomorrow!
 
Nicole Alderman
steward
Posts: 22970
Location: Pacific Northwest
13872
13
homeschooling hugelkultur kids art duck forest garden foraging fiber arts sheep wood heat homestead
  • Likes 9
  • Mark post as helpful
  • send pies
    Number of slices to send:
    Optional 'thank-you' note:
  • Quote
  • Report post to moderator
More on ferrous ink (from: https://www.irongallink.org/iron-gall-ink-chemistry.html):

By mixing tannin with iron sulfate, a water soluble ferrous tannate complex is formed. Because of its solubility, the ink is able to penetrate the paper surface, making it difficult to erase. When exposed to oxygen a ferric tannate pigment is formed. This complex is not water-soluble, contributing to its indelibility as a writing ink.


There's some more interesting tidbits here, about the color changing as it oxidizes:

In general, the color of a freshly made iron gall ink solution is rather pale. The oxygen present in water reacts to produce a light gray color in the initial ink. When applied to paper, the ink does not turn black for a couple of seconds, and preceding marks were somewhat illegible due to the initial paleness of the ink. One method to improve visibility of the ink during application is to expose the ink to air for a longer period of time before use. However, because this produces a precipitate, solid particles collect at the bottom of the holder. This is the inherent irony of iron gall ink: Making the ink more visible initially results in poorer writing properties.


It also mentions some stuff about gallic acid, which makes me wonder if walnuts have that. https://agresearchmag.ars.usda.gov/2005/mar/walnut/

While I don't really care for black ink, it'll be fun to experiment with this! The only iron pills I have are ferrous gluconate, instead of sulfate, but they do still seem to change the color!
 
steward & author
Posts: 48913
Location: Left Coast Canada
20682
10
art trees books chicken cooking fiber arts
  • Likes 5
  • Mark post as helpful
  • send pies
    Number of slices to send:
    Optional 'thank-you' note:
  • Quote
  • Report post to moderator
I wonder if cherry sap will work? If so, how do i use it?  I might try with some coffee.

I have run out of gum arabic.
 
Nicole Alderman
steward
Posts: 22970
Location: Pacific Northwest
13872
13
homeschooling hugelkultur kids art duck forest garden foraging fiber arts sheep wood heat homestead
  • Likes 5
  • Mark post as helpful
  • send pies
    Number of slices to send:
    Optional 'thank-you' note:
  • Quote
  • Report post to moderator
I would assume cherry sap would work. From what I recall, it's not as strong as gum arabic, and it's generally darker. BUT! It doesn't matter if it's dark in ink! And, you should be able to just add more if it's not thick enough. You're really just trying to thicken the ink up enough that it doesn't just instantly drip off your pen (from what I understand).

A lot of people don't even use gum arabic, because they don't have it. But, the ink is very runny!
 
r ransom
steward & author
Posts: 48913
Location: Left Coast Canada
20682
10
art trees books chicken cooking fiber arts
  • Likes 4
  • Mark post as helpful
  • send pies
    Number of slices to send:
    Optional 'thank-you' note:
  • Quote
  • Report post to moderator
I tried some fountain pen ink in my dip pen lsst night and it was better than I remember, but not as nice a result as pigment based ink specific for dip pens.  The fountain pen ink is s a bit runny.  I think it would take some skill greater than my current skill.

 
r ransom
steward & author
Posts: 48913
Location: Left Coast Canada
20682
10
art trees books chicken cooking fiber arts
  • Likes 4
  • Mark post as helpful
  • send pies
    Number of slices to send:
    Optional 'thank-you' note:
  • Quote
  • Report post to moderator
I have two pockets full worth of alder female cones, mostly green.
 
r ransom
steward & author
Posts: 48913
Location: Left Coast Canada
20682
10
art trees books chicken cooking fiber arts
  • Likes 3
  • Mark post as helpful
  • send pies
    Number of slices to send:
    Optional 'thank-you' note:
  • Quote
  • Report post to moderator

r ransom wrote:I have two pockets full worth of alder female cones, mostly green.


If I was making dye out of tough organic matter like this, my method would be to put in a pan, just cover with boiling water from the kettle, let sit overnight, then boil for an hour and see where we get to from there.  

I'm going to leave my cones in a bowl for now and learn more about ink making and how and if I need to reanimate my cherry sap first.  

And do the cones need to be brown first or would mostly green do the trick?
 
gardener
Posts: 880
Location: Semi-nomadic, main place coastal mid-Norway, latitude 64 north
635
  • Likes 5
  • Mark post as helpful
  • send pies
    Number of slices to send:
    Optional 'thank-you' note:
  • Quote
  • Report post to moderator
As a side note, it doesn't have to be iron sulphate. Almost any iron salt should work, including rust.

This is actually a consideration when making bark-tanned leather. If it comes into contact with rusty iron while wet, it gets black marks. You can use this to make nice patterns on the leather, for instance by making a shape from rusty steel wire and laying it on the leather surface while wet. It might need to be weighed down to get a solid-enough contact with the surface. I've only seen this done right as the leather comes out of the tanning bath, i.e. before softening and oiling. I don't know if it'd work the same on finished leather that you re-wet. Also, from what I remember, it's hard to get the iron-blackened leather quite as soft as you would without the iron. It might also weaken it a bit, I think?

If you make unintentional marks, they can be erased with oxalic acid. Apparently, it "steals" the iron ions from the ferrous tannate complex to form a complex of its own, which is colourless. This might work on paper as well. One could try with rhubarb juice, or maybe sorrel. Though I guess any plant material would leave its own marks on paper...
 
Nicole Alderman
steward
Posts: 22970
Location: Pacific Northwest
13872
13
homeschooling hugelkultur kids art duck forest garden foraging fiber arts sheep wood heat homestead
  • Likes 7
  • Mark post as helpful
  • send pies
    Number of slices to send:
    Optional 'thank-you' note:
  • Quote
  • Report post to moderator

r ransom wrote:
And do the cones need to be brown first or would mostly green do the trick?


Honestly, I'm not sure. I had about 4-6 cups of alder cones, many of which were green. I was busy when I harvested them, so I hung them in a paper bag from the ceiling and hoped for the best. A few weeks later (which was three days ago), I dumped them out of the bag and into a pot. The green ones were still kind of green, but not bright green. They also weren't moldy, which was nice!

I brought them to a boil and let them simmer for a few hours, then sit over night. Many cones were still green, which surprised me (the walnuts had turned black with cooking). Then I poured off the ink and added more water, hoping to get more ink out of the cones. I got a lighter hue on the cooking. Poured that into the other batch and then simmered it down to get about 1 cup of ink that's a warm, golden brown.
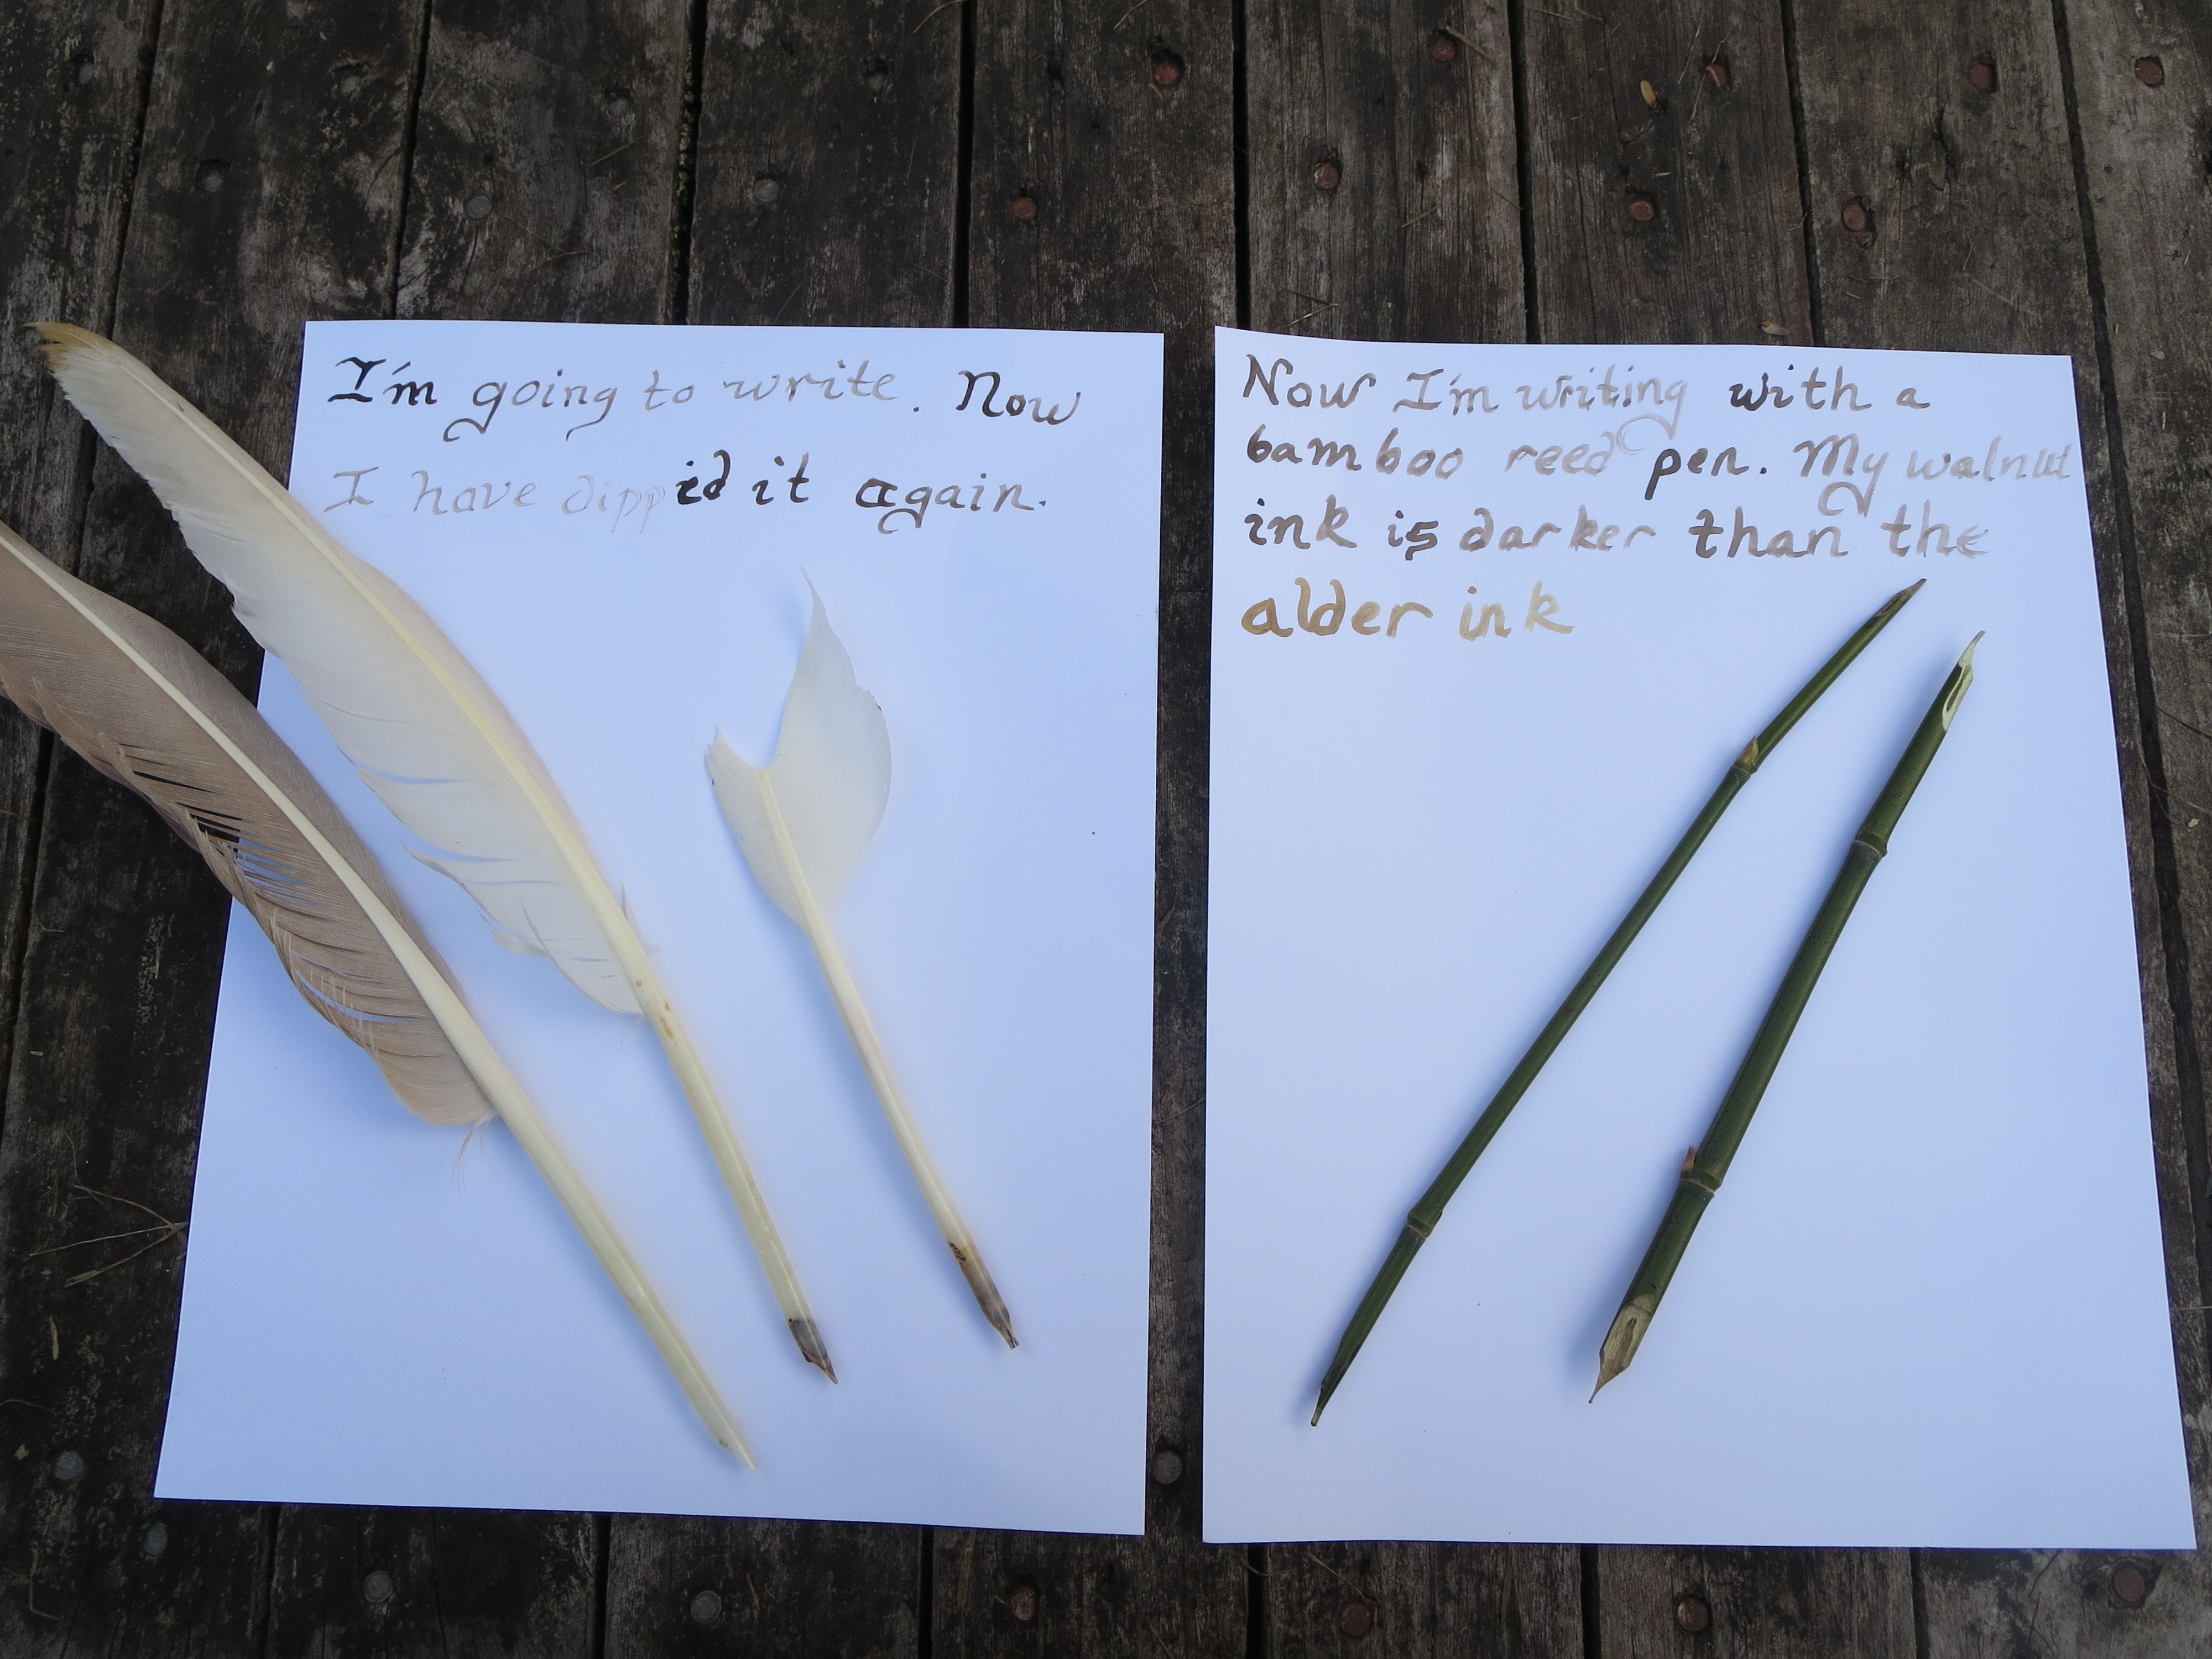
IMG_2981.JPG
The right paper compares walnut and alder ink (the alder ink is the last two words)
 
pollinator
Posts: 141
Location: Minnesota
170
homeschooling kids purity trees books cooking
  • Likes 9
  • Mark post as helpful
  • send pies
    Number of slices to send:
    Optional 'thank-you' note:
  • Quote
  • Report post to moderator
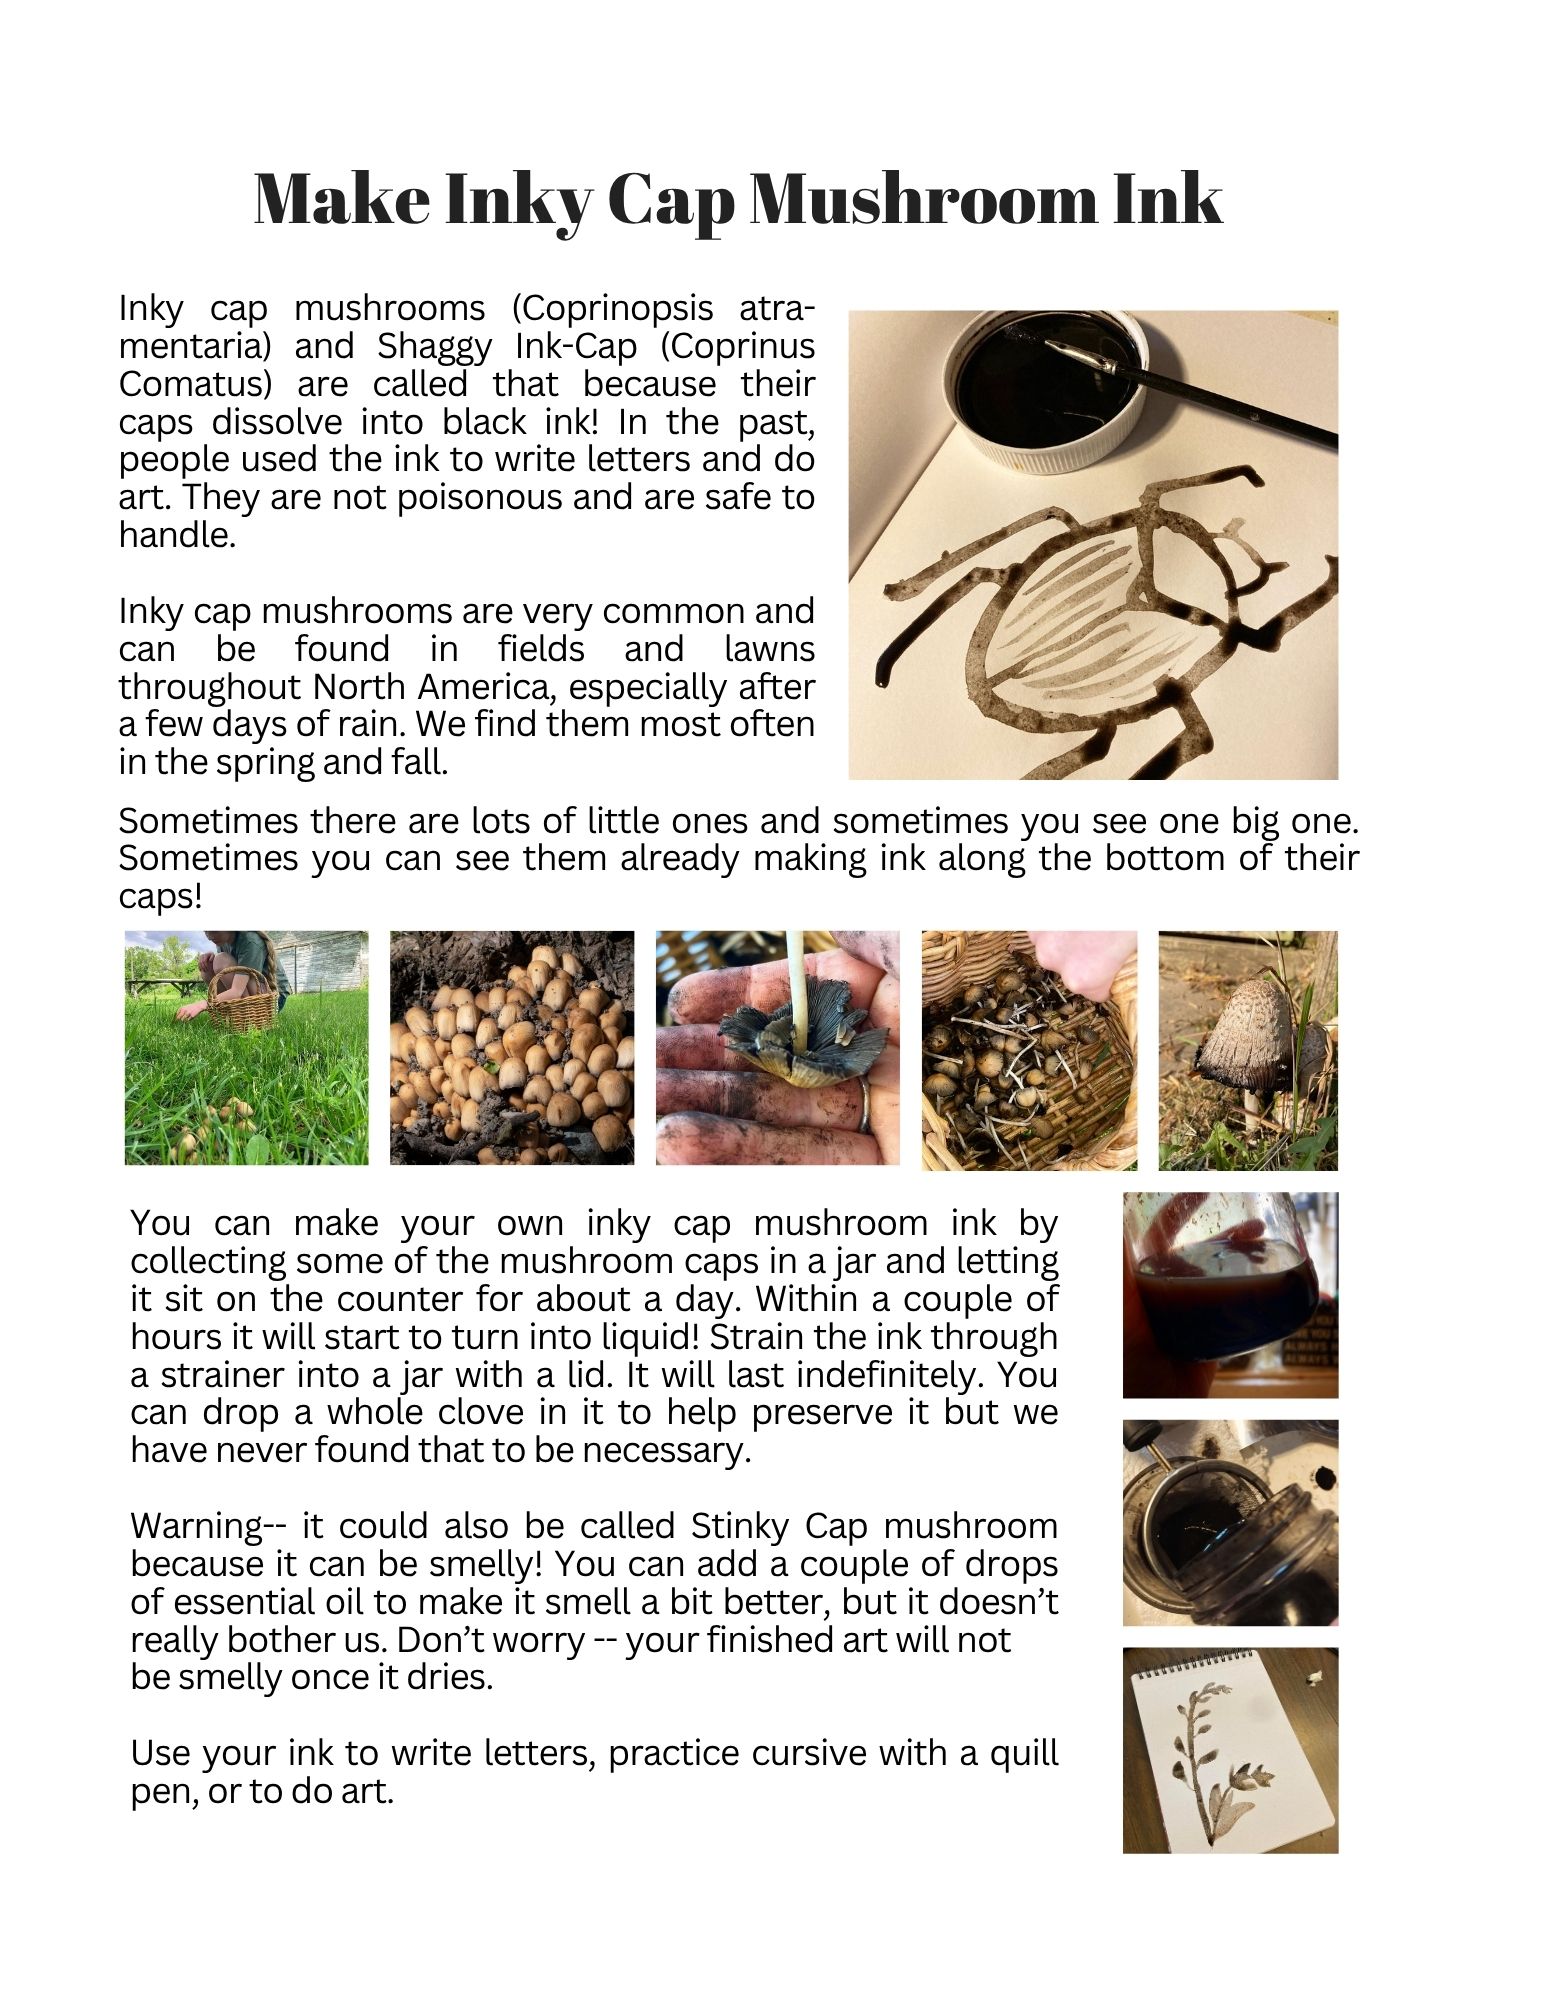
You can also make very dark brown/black ink almost magically, using very common inky cap and shaggy inkcap mushrooms.  They are incredibly common in much of the world.  You'll see them pop up in lawns and such after rainy spells, especially in the spring and fall.  You just gather them in a jar, leave them on the counter for a few hours, and they basically melt into ink.  Strain out the stems and bottle. I have some inky cap ink that is 3 years old now and doesn't have any preservative in it, and we used it recently at a wild ink making community workshop I did and it was still great.  It does smell mildly when it's in the bottle, but there's nothing after it dries.

They are also edible (though we've never eaten them) so you don't have to worry about dealing with poisonous substances.  Some chefs have even used them to make black pasta.  :)

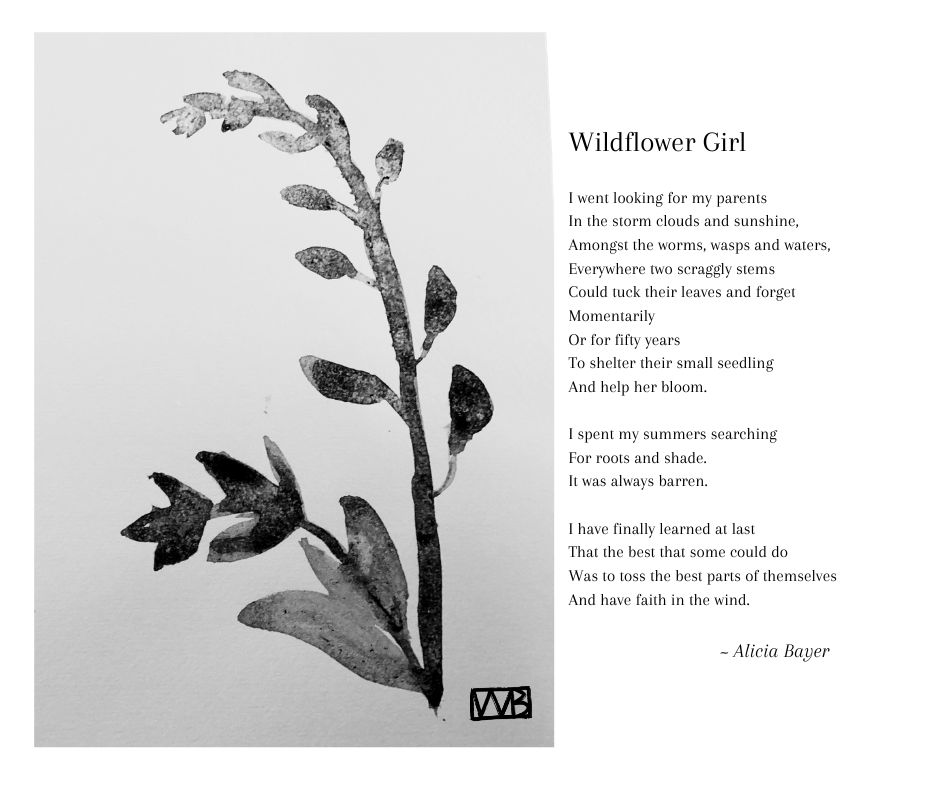
Here's a page from my children's nature art book, Wild Art (aff link) about it if you'd like to try it, and an art piece my daughter Victoria did with some of ours and a feather paintbrush for a poetry book I wrote called Flower Girls (aff link).

inky-cap-mushroom-ink.jpg
[Thumbnail for inky-cap-mushroom-ink.jpg]
wildflower-girl-x.jpg
[Thumbnail for wildflower-girl-x.jpg]
 
r ransom
steward & author
Posts: 48913
Location: Left Coast Canada
20682
10
art trees books chicken cooking fiber arts
  • Likes 5
  • Mark post as helpful
  • send pies
    Number of slices to send:
    Optional 'thank-you' note:
  • Quote
  • Report post to moderator
The alder cones have a pleasant smell when simmering.  Somewhere between mulled wine and pre industrial cough syrup before they started adding all that sugar.

Ink strength not strong yet.  Can't tell if the water is evaporating or getting sucked into the cones.  Maybe I could have soaked them prior to cooking.
 
Posts: 40
Location: East Tennessee, zone 7A-ish
16
foraging chicken cooking medical herbs homestead
  • Likes 5
  • Mark post as helpful
  • send pies
    Number of slices to send:
    Optional 'thank-you' note:
  • Quote
  • Report post to moderator
I'm not familiar with alder cones, so this may be impossible, but... Can you chop them up before you boil them?

When I make herbal extracts, I break the plant material down to help extract as much as I can. Another thing I do with plantain salve is a double extraction. Infuse olive oil with dry wilted plantain for about a month; strain, and then infuse with a fresh batch of plantain.

The first infusion gives me a light green oil. The second infusion is so dark that it almost looks black.

I have never made ink, but maybe it would work similarly?
 
r ransom
steward & author
Posts: 48913
Location: Left Coast Canada
20682
10
art trees books chicken cooking fiber arts
  • Likes 5
  • Mark post as helpful
  • send pies
    Number of slices to send:
    Optional 'thank-you' note:
  • Quote
  • Report post to moderator

Tammy Farraway wrote:I'm not familiar with alder cones, so this may be impossible, but... Can you chop them up before you boil them?

When I make herbal extracts, I break the plant material down to help extract as much as I can. Another thing I do with plantain salve is a double extraction. Infuse olive oil with dry wilted plantain for about a month; strain, and then infuse with a fresh batch of plantain.

The first infusion gives me a light green oil. The second infusion is so dark that it almost looks black.

I have never made ink, but maybe it would work similarly?


I was contemplating that.  They are very dense, woody cones so not with a knife.  Too small for a saw.  The secateurs had potential but would take forever because the cones are too small.  Because mine are so fresh, they have too much sticky to use the mortar and pestle.

I'm going to let mine sit a while, maybe strain and add water and try again tomorrow.  Failing that, some rusty metal will make a colour.  

I'm also thinking of adding vinegar to see if that changes anything.
 
Nicole Alderman
steward
Posts: 22970
Location: Pacific Northwest
13872
13
homeschooling hugelkultur kids art duck forest garden foraging fiber arts sheep wood heat homestead
  • Likes 4
  • Mark post as helpful
  • send pies
    Number of slices to send:
    Optional 'thank-you' note:
  • Quote
  • Report post to moderator
My aldercone ink is always quite a bit lighter than the walnut ink, even after simmering it down a lot. I remember my first pot of aldercone ink simmered down to about a quart of ink, and it was still a lot lighter than the walnut ink:

the alder ink was evaporating in the jar while I made the walnut ink.


R ransom wrote:I'm going to let mine sit a while, maybe strain and add water and try again tomorrow.


That's what I did with mine this year. I actually simmered the aldercones a second time and then evaporated everything. I still only ended up with about a pint of golden brown ink.

Failing that, some rusty metal will make a colour.  


You can also try cracking up an iron pill and using that! This worked surprisingly well on my walnut ink (I didn't try it on the alder, because I like the alder.) The iron pills I used were Ferochell, Ferrous Bisglycinate Chelate, but I'm assuming most iron pills would work.


r ransom wrote:The alder cones have a pleasant smell when simmering.  Somewhere between mulled wine and pre industrial cough syrup before they started adding all that sugar.


That will keep smelling nice for at least a week!

Walnut ink starts molding within a week (found mold in mine that I made last week, so I boiled it again and added clove oil. The class really liked the scent!)

I also found an old bottle of alder ink from about a year ago. I hadn't added clove oil, nor did I refrigerate it. It, surprisingly, had not gone moldy, but it did smell of vinegar/fermentation. So, I boiled that again, added clove oil, and added it to my pint of alder cone ink.
 
r ransom
steward & author
Posts: 48913
Location: Left Coast Canada
20682
10
art trees books chicken cooking fiber arts
  • Likes 5
  • Mark post as helpful
  • send pies
    Number of slices to send:
    Optional 'thank-you' note:
  • Quote
  • Report post to moderator
Still pretty weak colour.  

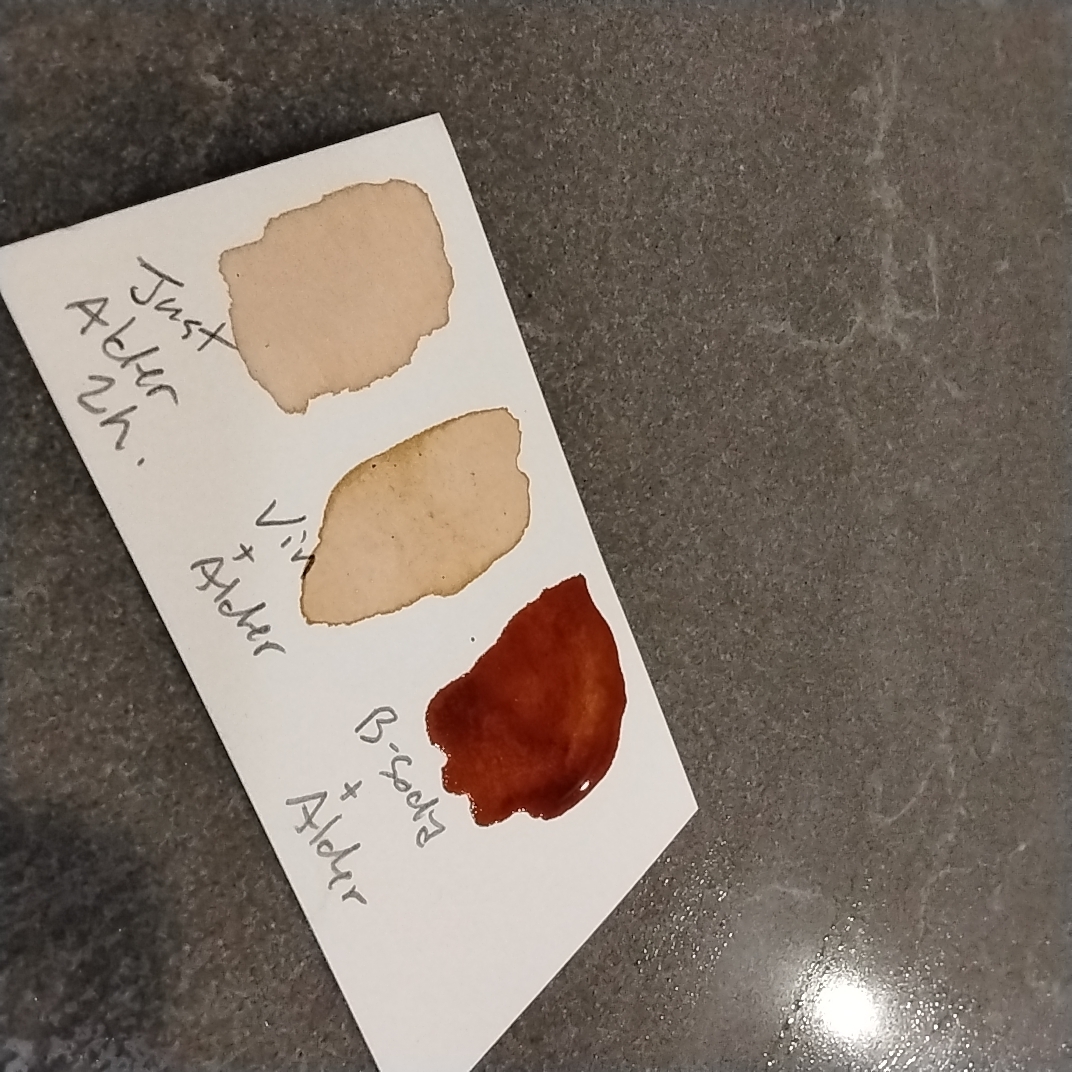
So i did a test as ph can change the way a dye bath reacts

A few drops of dye in a lid and add a drop of vinegar.   Not much difference.

A few drops of dye in a different lid, but adding baking soda this time.  Frothy!  As froth subsided, ink sample was darker.
Changing-ph-to-change-colour-of-alder-ink.jpg
Changing ph to change colour of alder ink
 
r ransom
steward & author
Posts: 48913
Location: Left Coast Canada
20682
10
art trees books chicken cooking fiber arts
  • Likes 5
  • Mark post as helpful
  • send pies
    Number of slices to send:
    Optional 'thank-you' note:
  • Quote
  • Report post to moderator


The video is about dye, but the colour extraction method is more or less the same.  Dye wants lots of water vs ink where we boil it down.

I'm impressed with how much more colour she got compared to mine.  But she's using old cones gathered in the spring vs mine gathered in the autumn, while mostly green.
 
r ransom
steward & author
Posts: 48913
Location: Left Coast Canada
20682
10
art trees books chicken cooking fiber arts
  • Likes 3
  • Mark post as helpful
  • send pies
    Number of slices to send:
    Optional 'thank-you' note:
  • Quote
  • Report post to moderator
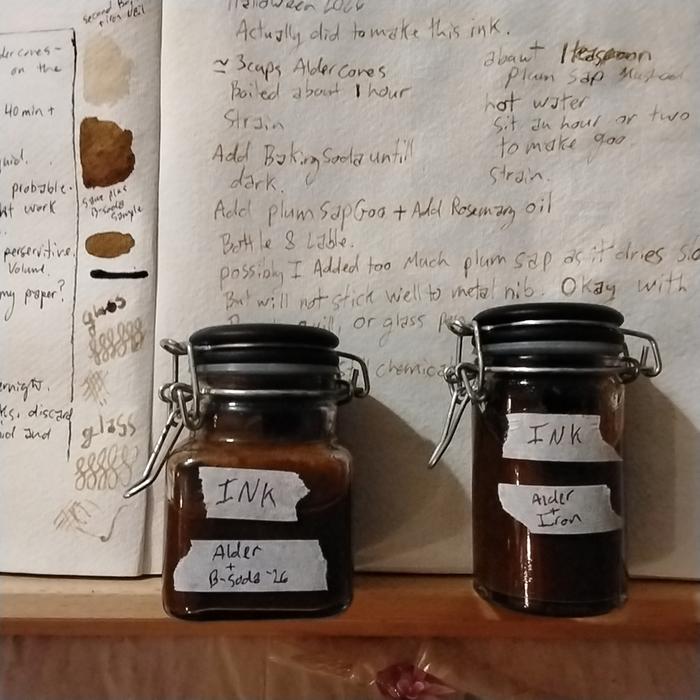
I'm having trouble getting my final batch as dark as my sample.  But to be fair, my sample dried gritty due to a high ratio of baking soda.

If I had laundry soda, this might be easier, but I'm trying to stick to food safe ingredients.

I didn't add enough water to my plum sap so it started to melt then somehow turned into solid jelly so I put some more boiling water in there and will have to wait for it to be usable.
 
r ransom
steward & author
Posts: 48913
Location: Left Coast Canada
20682
10
art trees books chicken cooking fiber arts
  • Likes 4
  • Mark post as helpful
  • send pies
    Number of slices to send:
    Optional 'thank-you' note:
  • Quote
  • Report post to moderator
Note to self for the future.  Keep an eye out for arbutus bark as this is high in tannins and gives a strong dye colour.  It might work for ink too.
 
r ransom
steward & author
Posts: 48913
Location: Left Coast Canada
20682
10
art trees books chicken cooking fiber arts
  • Likes 6
  • Mark post as helpful
  • send pies
    Number of slices to send:
    Optional 'thank-you' note:
  • Quote
  • Report post to moderator
Hmmm... the more plum sap (gum Arabic substitute) i add, the less it soaks into the paper and slower it is to dry. 20 min for moderate application.  Longer for wet spots.  

The sap is a very thick gelly and needs convincing to go through the sieve.

The ink still won't hold onto the steel nib, but seems to be okay with a feather, so I think I will call it done and decide if it's worth adding new water to the cones and a rusty nail.  Somehow, I don't know if this will be a everyday use kind of ink, but it sure is pretty and darkens as it dries.
 
Posts: 3
1
  • Mark post as helpful
  • send pies
    Number of slices to send:
    Optional 'thank-you' note:
  • Quote
  • Report post to moderator
I've always thought there would be a good use for that indelible black stuff. Has anyone tried it as a dye? How about pokeweed berries for dye? When my cashmere goats get in it, it dyes the wool a bright magenta and seems to be water repellent.
 
Derek Thille
gardener
Posts: 644
Location: Southern Manitoba...bald(ish) prairie, zone 3ish
374
3
transportation hugelkultur monies forest garden urban books food preservation cooking writing woodworking
  • Likes 3
  • Mark post as helpful
  • send pies
    Number of slices to send:
    Optional 'thank-you' note:
  • Quote
  • Report post to moderator

r ransom wrote:I was contemplating that.  They are very dense, woody cones so not with a knife.  Too small for a saw.  The secateurs had potential but would take forever because the cones are too small.  Because mine are so fresh, they have too much sticky to use the mortar and pestle.

I'm going to let mine sit a while, maybe strain and add water and try again tomorrow.  Failing that, some rusty metal will make a colour.  

I'm also thinking of adding vinegar to see if that changes anything.


Could "mincing" with a hatchet work?  My brain went to mincing onions, but on a different scale.  I'd imagine green cones could have some stickiness that might adhere to the hatchet, but that might be acceptable.

Just a thought.
 
r ransom
steward & author
Posts: 48913
Location: Left Coast Canada
20682
10
art trees books chicken cooking fiber arts
  • Likes 5
  • Mark post as helpful
  • send pies
    Number of slices to send:
    Optional 'thank-you' note:
  • Quote
  • Report post to moderator
Might be worth trying.  Something to try next time perhaps?  

I think I can get two dark batches of ink out of this with the cones whole, so I might be too lazy to try it.  I hope someone can try it and report back how it goes.  
 
Eino Kenttä
gardener
Posts: 880
Location: Semi-nomadic, main place coastal mid-Norway, latitude 64 north
635
  • Likes 4
  • Mark post as helpful
  • send pies
    Number of slices to send:
    Optional 'thank-you' note:
  • Quote
  • Report post to moderator

Derek Thille wrote:
Could "mincing" with a hatchet work?  My brain went to mincing onions, but on a different scale.  I'd imagine green cones could have some stickiness that might adhere to the hatchet, but that might be acceptable.

Just a thought.


...Or maybe put them on a solid surface and whack them with a hammer until everything is as finely divided as you like? I imagine for this the stickiness might be an advantage - rather than having pieces flying off every which way, you'd get a wad of sticky pulp stuck to the hammer and/or the bottom surface.

Edit to add: when I took a tanning course, the tannin material we used most was bark of Norway spruce (Picea abies), since that's the single most common tree in the area and the bark contains a lot of tannin. We'd boil strips of bark, that we got from a sawmill, for quite a while, this was a bunch of years ago but I seem to remember about one hour boiling and one hour of the bark steeping in the liquid while it was cooling off. The colour of the liquid was very dark brown, way darker than any other species we used. I'm wondering if spruce bark might be a good candidate for ink making?
 
Derek Thille
gardener
Posts: 644
Location: Southern Manitoba...bald(ish) prairie, zone 3ish
374
3
transportation hugelkultur monies forest garden urban books food preservation cooking writing woodworking
  • Likes 4
  • Mark post as helpful
  • send pies
    Number of slices to send:
    Optional 'thank-you' note:
  • Quote
  • Report post to moderator

Eino Kenttä wrote:

Derek Thille wrote:
Could "mincing" with a hatchet work?  My brain went to mincing onions, but on a different scale.  I'd imagine green cones could have some stickiness that might adhere to the hatchet, but that might be acceptable.

Just a thought.


...Or maybe put them on a solid surface and whack them with a hammer until everything is as finely divided as you like? I imagine for this the stickiness might be an advantage - rather than having pieces flying off every which way, you'd get a wad of sticky pulp stuck to the hammer and/or the bottom surface.

Edit to add: when I took a tanning course, the tannin material we used most was bark of Norway spruce (Picea abies), since that's the single most common tree in the area and the bark contains a lot of tannin. We'd boil strips of bark, that we got from a sawmill, for quite a while, this was a bunch of years ago but I seem to remember about one hour boiling and one hour of the bark steeping in the liquid while it was cooling off. The colour of the liquid was very dark brown, way darker than any other species we used. I'm wondering if spruce bark might be a good candidate for ink making?


Having them inside a bag or folding a cloth/canvas over them could contain stuff flying around.  That's an extension of what I do to crush cereal for toppings of a dish sometimes.  Of course, with green buds with stickiness, removal could be a challenge.
 
Nicole Alderman
steward
Posts: 22970
Location: Pacific Northwest
13872
13
homeschooling hugelkultur kids art duck forest garden foraging fiber arts sheep wood heat homestead
  • Likes 5
  • Mark post as helpful
  • send pies
    Number of slices to send:
    Optional 'thank-you' note:
  • Quote
  • Report post to moderator
Since R's are in water, they're already pretty mushy and hard to break up. I used a potato masher when I made my first batch of aldercone ink. I honestly don't know if it helped that much, but it was satisfying.

I think adding water and boiling again and then reducing is probably the most effective way to get more tannins out of them.
 
r ransom
steward & author
Posts: 48913
Location: Left Coast Canada
20682
10
art trees books chicken cooking fiber arts
  • Likes 4
  • Mark post as helpful
  • send pies
    Number of slices to send:
    Optional 'thank-you' note:
  • Quote
  • Report post to moderator


The second batch turned out very much like the first but looking at the nail i tossed in with the cones now, I suspect it didn't have much iron in it. Just enough to rust a bit.  Not enough to extract the iron.  For the future, a splash of vinegar at the start would have helped.

Speaking about chemical reaction, it's still interacting with the baking soda, so I will need to let off the gass each day until it's finished.

Anyway, it writes okay with a glass pen.  Not great, but that could be a reflection of my cheap glass pen with the chipped tip.
 
r ransom
steward & author
Posts: 48913
Location: Left Coast Canada
20682
10
art trees books chicken cooking fiber arts
  • Likes 4
  • Mark post as helpful
  • send pies
    Number of slices to send:
    Optional 'thank-you' note:
  • Quote
  • Report post to moderator


In the video, they are taking an ink making workshop.  I enjoy the parts where they play with additives and modifiers.  The different ways of mark making is very interesting.
gift
 
Unofficial Companion Guide to the Rocket Oven DVD
will be released to subscribers in: soon!
reply
    Bookmark Topic Watch Topic
  • New Topic