• Post Reply Bookmark Topic Watch Topic
  • New Topic
permaculture forums growies critters building homesteading energy monies kitchen purity ungarbage community wilderness fiber arts art permaculture artisans regional education skip experiences global resources cider press projects digital market permies.com pie forums private forums all forums
this forum made possible by our volunteer staff, including ...
master stewards:
  • Carla Burke
  • Nancy Reading
  • John F Dean
  • r ranson
  • Jay Angler
  • paul wheaton
stewards:
  • Pearl Sutton
  • Leigh Tate
  • Devaka Cooray
master gardeners:
  • Christopher Weeks
  • Timothy Norton
gardeners:
  • thomas rubino
  • Matt McSpadden
  • Jeremy VanGelder

DIY temperature logging with raspberry pi

 
pollinator
Posts: 95
Location: Cascadian lowlands (8b, sunset zone 5)
31
  • Likes 10
  • Mark post as helpful
  • send pies
    Number of slices to send:
    Optional 'thank-you' note:
  • Quote
  • Report post to moderator
This topic came up in the avocados in europe thread, but in lieu of pulling that thread off-topic, I am creating a new one.  I wasn't sure what section of the forums would be best for this topic, but it has obvious utility in greenhouses (and that's my own primary use), so I figured this was as good as anywhere. If there's a better place that I missed, please feel free to move it!

I will start with all the caveats:
  • This setup generally requires a source of electricity (but see the "variations" at the end)
  • This setup generally requires a wifi signal (but see the "variations" again)
  • You will need to be comfortable with a bit of simple coding in python, PHP, and Javascript (copy/paste/tweak, not writing from scratch)
  • This setup generally requires that you have a website with a MySQL database (but see the "variations" for a workaround)


  • In other words, there are absolutely easier ways to log temperature using off-the-shelf products, such as by purchasing a "weather station" with wireless temperature probes. However, this system has a few benefits:
  • Relatively cheap
  • You have complete control over the data
  • Temperature data can be stored indefinitely for long-term analysis
  • Once you set everything up, adding additional sensors is straightforward


  • Hardware setup

    So, let's dive in.  I'm including links to the Adafruit store below, because that's where I've purchased my hardware, but you could likely find all of these via other sources. I'm also including the current price in USD for each of these, though of course that could change.  So here's the hardware list:
  • a raspberry pi computer with GPIO headers (I prefer the zero W for this project, adafruit listing, $16.00)
  • a microSD card, I recommend at least 16gb capacity, and higher-quality cards will definitely last longer (cheap ones are the main source of RPi hardware failure)
  • ADT7410 temperature sensor with STEMMA QT headers (adafruit listing, $5.95)
  • STEMMA QT cable with female jumper cables (adafruit listing, $0.95)
  • a micro USB power supply (you likely have one shoved in a drawer somewhere already, but if not, adafruit has this one with a nice long cord for $8.25)
  • some type of enclosure (you can purchase a real one, or just reuse a takeout container like I suggest below)


  • I did not include a link to a microSD card above, mostly because there are so many options and the technology changes pretty quickly, but in general any card should work.

    The STEMMA QT connector plugs into the temperature chip, and the color-coded jumper cables go into your GPIO headers like this diagram shows (this shows a normal raspberry pi rather than a Zero W, but the GPIO header is the same):


    My go-to for a cheap (basically free) waterproof enclosure is this type of take-out container:


    For a more permanent installation, I recommend placing the temperature probe inside a PVC pipe lined with mylar (scrap of emergency blanket), to ensure accurate readings. Here are what those look like in my greenhouse (which uses a full-sized raspberry pi because I had a spare one), and outside (which has the pi zero W mounted on the other side of the greenhouse wall):


    Software setup

    Each of my sensors uses a python script to collect a sensor reading once per minute, and then sends that to a website PHP script, which loads the reading into an SQL database.  To view the data, I have another PHP script that pulls data from the SQL database (depending on what time series is requested) and uses the Chart.js Javascript library to display a line chart. I'll break down the software setup into the following steps:

  • installing prerequisite software on the raspberry pi
  • the website script (PHP) to receive and store the data
  • the pi script (python) to read the sensor and upload data
  • the website script (PHP and Javascript) to retrieve and display the data


  • Setting up the Raspberry Pi

    The first step is to install the operating system for your raspberry pi, following the steps detailed on their website here, and I recommend the "Lite" version of the operating system which is under the "Other" category in the wizard. Make sure that you follow the steps detailed in their guide for providing the wireless network credentials and enabling SSH access, because you will need those in order to connect to your pi and finish the setup. That will also be a lot easier if you use a custom hostname, so that you do not need to figure out what the IP address of your pi is in order to log in. I will use the hostname greenhouse in my examples below.

    Once you do that, insert the microSD card into the pi and plug in the power cable, and attempt to connect via SSH from your desktop computer (replacing "pi" with the username you selected during setup unless you kept the default):

    ssh pi@greenhouse.local
    or
    ssh pi@greenhouse.lan

    It should prompt you for your password, but if not, then you'll need to troubleshoot the issue, which is probably one of these three (all three of which are beyond the scope of this, but your favorite search engine may find an answer):

  • you don't have any program installed for SSH (I use Debian linux and have not used Windows or MacOS in many years, so cannot help troubleshoot that!)
  • the pi failed to connect to the wifi (i.e., bring it closer to the router or create a new microSD card and try to do something differently in the setup wizard)
  • your computer's DNS settings do not allow you to use .local or .lan addresses (e.g., install an app that lets you see a list of all devices on your network, like Port Authority, and use the IP address instead of a hostname)


  • Once you are logged into the SSH session on the pi, probably worth starting with a system update before you install anything:
    $ sudo apt-get update && sudo apt-get upgrade && sudo apt-get dist-upgrade


    Then, I recommend following the installation instructions outlined here on the Adafruit website for their python library for accessing this temperature chip. Once you have that installed, you can run the test script shown at the end of the tutorial to confirm that things are working:


    Setting up a website to receive the data

    Once you know the pi is able to take temperature readings, you need somewhere to store those.  You could do this locally on the pi itself, but what has worked best for me is uploading it to our avocado project website, allowing me to view the temperatures when I'm away from home, or share them with comrades in the project (or with you!).  If you just want to save the temperatures on the pi itself and log in to download them periodically, you can skip down to the next section.

    Here's the CREATE TABLE statement for adding the relevant MySQL table:


    The PHP script that receives a reading from the raspberry pi and adds it to the database looks like this:


    Once you have the table created and the script above on your web server, you are ready to start uploading temperatures.

    Uploading the temperature reading

    The script that I use to upload each reading is a modified version of the example script at the end of the installation tutorial for the sensor chip, and looks like this (which has many possible areas of improvement, but works well enough for me):


    You can execute the script once to make sure that it does not write an error into the log (mine is named gh.py, feel free to use that):


    $ ./gh.py


    Next, you need to sure that script runs when the pi boots up, and runs every minute (or less often if you want). The easiest way to do that is to add a crontab entry:


    $ crontab -e


    Adding the following line (change the first * to a number of minutes if you want it to run less often, and the path to point at where you saved your python script):


    * * * * * /home/pi/gh/gh.py


    I usually give the pi a reboot at this point using $ sudo reboot, and then log into my website's SQL dashboard (i.e., phpMyAdmin) and refresh the table a few times for a few minutes, just to make sure new temperature readings are in fact being uploaded.  If not... well, something went wrong!  But they should be.

    Setting up a webpage that displays the data

    Now that you have a table of temperature data being compiled, the only question is: what to do with it?  I have a few different scripts on the website that run different types of analysis on the data (e.g., how many chilling hours did I get so far this winter? how many days had a freezing low this winter?, etc.), but the main page for viewing the data is this one:

    https://www.drymifolia.org/data.php

    It would be beyond the scope of this tutorial to explain all the functions and features of that page, but what I will do instead is just pare it down to the very simplest version (with a brief discussion of ways to make it more robust).

    After trying a few options for generating charts using PHP and/or JavaScript, I settled on the Chart.js JavaScript library, which is a pretty sophisticated tool for producing many different types of charts in an interactive <canvas> element. Be warned, there's a lot of code below, but mostly this does not need to be altered much.  

    There are two functions defined in my code.  The first one fetches the data from the SQL database and formats it into the format desired by Chart.js:


    The second function actually takes that data and generates the JavaScript code to produce the chart (this uses random colors, but you could instead assign specific colors to specific sensor names):


    And here's the final script that calls those two functions:


    And that's it!  

    Variations

    Some other variations you might want to consider:

  • storing the readings in an SQL database on the pi itself, or at least doing so when wifi is not available


  • running a web server on a desktop computer on the same network, rather than a public-facing website


  • adding other types of sensors (humidity, lux, etc.)


  • adding a USB battery pack for a few days of power in a temporary location without available A/C power


  • adding a solar panel for a (more) permanent option where no power is available


  •  
    pollinator
    Posts: 147
    Location: Northern British Columbia Zone 3
    75
    gear hunting foraging books food preservation cooking
    • Likes 2
    • Mark post as helpful
    • send pies
      Number of slices to send:
      Optional 'thank-you' note:
    • Quote
    • Report post to moderator
    Thanks for detailed instructions.  Looks like something I could handle and it would be fun and useful. Looking forward to any additional instructions.

     
    master gardener
    Posts: 4353
    Location: Upstate NY, Zone 5, 43 inch Avg. Rainfall
    1769
    monies home care dog fungi trees chicken food preservation cooking building composting homestead
    • Likes 1
    • Mark post as helpful
    • send pies
      Number of slices to send:
      Optional 'thank-you' note:
    • Quote
    • Report post to moderator
    Excellent write-up. Thank you!
     
    pollinator
    Posts: 423
    Location: zone 5-5
    148
    • Likes 2
    • Mark post as helpful
    • send pies
      Number of slices to send:
      Optional 'thank-you' note:
    • Quote
    • Report post to moderator
    These microprocessors are nice tools.
    I built a temp logger using an arduino but it isn't wireless, it communicates through a USB cable, and doesn't store the data in or use an SD card.
    I wanted to learn how to sketch/program an arduino so I chose this project.
    It shows the temp in my solar heat box on the south side of the house. It gets up past 150F.
    Also set up to turn a fan off/on at a set temp. To pump hot air into the house.

    I use a one-wire temp sensor that is accurate to .1 degrees F.
    Overkill  but they are addressable, which allows me to put several sensors on the same wires.
    Not sure why I picked it because I only have one on the string, probably because it doesn't need calibrated.
    Mine is set up to graph the temp in excel.

    Glad you were able to figure it out. There is quite a learning curve to these. But this can be part of the fun.
    They can be frustrating. But it feels great when they actually run.
     
    pollinator
    Posts: 3827
    Location: Massachusetts, Zone:6/7 AHS:4 GDD:3000 Rainfall:48in even Soil:SandyLoam pH6 Flat
    555
    2
    forest garden solar
    • Likes 4
    • Mark post as helpful
    • send pies
      Number of slices to send:
      Optional 'thank-you' note:
    • Quote
    • Report post to moderator
    What about multiple temperature probes:
    Inside Temp
    Outside temp
    Inside Ceiling temp (if temp high then open window, else if temp low then close window)
    Inside Ground/Soil/Water/Thermal Battery Temp
    Check Water Level (if level is low then add 1gallon of water)

    I wonder if javaScript(node.js) could be used for the entire stack vs .py and .php and .js.
    Install docker and supabase-docker + node.js

    read sensor temp and send to console https://www.npmjs.com/package/i2c-bus or https://www.npmjs.com/package/i2c-adt7420
    send temp to database/txtfile
    create temp/sensor UI
    grab and display temp data in UI


    // import library for i2c pins on raspberry pi
    const i2c = require('i2c-bus');
    // import library to write to filesystem
    var fs = require('fs');
    // import library to connect to database/supabase
    import { createClient } from '@supabase/supabase-js'

    // declare sensor setting
    const PORT_ADDR = 1;
    const SENSOR_ADDR = 0x48; //0x49 or 0x4A or 0x4B also configurable via jumper on sensor
    const TEMP_REG = 0x05;

    // declare database/supabase settings
    const dbURL = https://xyzcompany.supabase.co;
    const dbKEY = ycyvbyvu2bbmn22nm;
    //connect to database/supabase
    const supabase = createClient(dbURL, dbKey);

    // open connection to sensor/port using synchronous method
    const i2c1 = i2c.openSync(PORT_ADDR);
    // read the raw sensor data after connecting to the sensor address/etc
    const rawData = i2c1.readWordSync(SENSOR_ADDR, TEMP_REG);
    // print the sensor data after converting it to celsius
    console.log(toCelsius(rawData));
    // add data to file
    fs.appendFile('myfile1.txt', toCelsius(rawData));
    // add data to database/supabase
    const { error } = await supabase.from('temperaturetable').insert({tempfield: toCelsius(rawData)});
    // close out the connection to the sensor
    i2c1.closeSync();

    // or open connection to sensor/port using promise method
    i2c.openPromisified(PORT_ADDR).
    then(i2c1 => i2c1.readWord(SENSOR_ADDR, TEMP_REG).
     then(rawData => console.log(toCelsius(rawData))).
     then(rawData => fs.appendFile('myfile1.txt', toCelsius(rawData))).
     then(rawData => const { error } = await supabase.from('temperaturetable').insert({tempfield: toCelsius(rawData)}).
     then(_ => i2c1.close())
    ).catch(console.log);

    // declare function to convert raw sensor data to celsius
    const toCelsius = rawData => {
     rawData = (rawData >> 8) + ((rawData & 0xff) << 8);
     let celsius = rawData;
     if (celsius < 0x8000) {
         // Positive temperature
         celsius = celsius / 128;
       } else {
         // Negative temperature; convert from 16-bit two's complement
         celsius = (celsius - 0x10000) / 128;
       }
     return celsius;
    };


    master pollinator
    Posts: 1760
    Location: Ashhurst New Zealand (Cfb - oceanic temperate)
    537
    duck trees chicken cooking wood heat woodworking homestead
    • Likes 1
    • Mark post as helpful
    • send pies
      Number of slices to send:
      Optional 'thank-you' note:
    • Quote
    • Report post to moderator
    Nice solution for gathering temp data!

    This thread is timely - my main work task for today (aside from reinforcing fences against some errant lambs) is refactoring a bit of code to detect DS18B20 digital temperature probes on an ESP32-based board. I really like these sensors, as they can be ordered in a waterproof form factor and you can put as many of them onto a daisy-chain line as you want thanks to the UID that's encoded in each one:

    DS18B20 at Adafruit

    You can get them cheaper in bulk via Digikey, Mouser, or many vendors at Alibaba.

     
    pollinator
    Posts: 5015
    Location: Canadian Prairies - Zone 3b
    1359
    • Mark post as helpful
    • send pies
      Number of slices to send:
      Optional 'thank-you' note:
    • Quote
    • Report post to moderator
    I have a friend who was once seriously into brewing good beer from scratch. Wow, that was good stuff. Part of the key was maximum control of variables such as temperature.

    He knew I did some work for process industries, and asked me about PID controllers. These are essentially smart thermostats driven by software that anticipates trends and compensates before the setpoint is reached.

    I wonder, could a Raspberry Pi do this? Is there off the rack PID software now?
     
    S Bengi
    pollinator
    Posts: 3827
    Location: Massachusetts, Zone:6/7 AHS:4 GDD:3000 Rainfall:48in even Soil:SandyLoam pH6 Flat
    555
    2
    forest garden solar
    • Likes 2
    • Mark post as helpful
    • send pies
      Number of slices to send:
      Optional 'thank-you' note:
    • Quote
    • Report post to moderator
    @Douglas a raspberry pi could easily check the temp of the beer/wort and then compare it to some temp-time variable and then turn on a heater, then turn off the heater once the desire temp is reached.

    https://discourse.nodered.org/t/aquarium-controller-raspberry-pi-4b-node-red-atlas-scientific-i2c-devices-ncd-i2c-relay-board/25839
     
    Winn Sawyer
    pollinator
    Posts: 95
    Location: Cascadian lowlands (8b, sunset zone 5)
    31
    • Mark post as helpful
    • send pies
      Number of slices to send:
      Optional 'thank-you' note:
    • Quote
    • Report post to moderator
    Well, I added a bunch more stuff, but still not done! Maybe tomorrow....

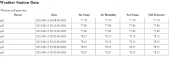
    S Bengi wrote:What about multiple temperature probes:
    Inside Temp
    Outside temp
    Inside Ceiling temp (if temp high then open window, else if temp low then close window)
    Inside Ground/Soil/Water/Thermal Battery Temp
    Check Water Level (if level is low then add 1gallon of water)


    Yes! I just added the code sections above that I hadn't been able to get to earlier today, and you can see there's a place for adding a sensor name.  You could (in theory) connect multiple sensors to a single pi and make the script change the name for each one, but instead I find it easier to just use multiple pi's, one for each location, with each one having a different sensor name in the SQL table.

    However, I don't really recommend doing too much automation using the raspberry pi, especially not "system critical" stuff like heating and cooling.  For those in my greenhouse, I use the relatively affordable solid state option that basically cannot fail (although isn't calibrated the best), Thermo Cubes:

    https://www.thermocube.com/#thermocube

    I use the TC-3 for my heater and the TC-21 for my exhaust fan.  I don't have to worry about my microSD card getting fried one day and killing some plants! Worst that happens is I lose some temperature data.


    I wonder if javaScript(node.js) could be used for the entire stack vs .py and .php and .js.


    Maybe, but since the chip came with a python library, and since my website is already coded in PHP, this was the combination that worked best for me. I'm not really a big fan of JavaScript, but I am forced to use it to some degree in many cases, such as this one.
     
    Winn Sawyer
    pollinator
    Posts: 95
    Location: Cascadian lowlands (8b, sunset zone 5)
    31
    • Likes 1
    • Mark post as helpful
    • send pies
      Number of slices to send:
      Optional 'thank-you' note:
    • Quote
    • Report post to moderator
    Alright, I just submitted more edits, but for some reason they require staff review now? (I guess if a post is more than a few days old?) My apologies to staff for all the edits! I think that should be it unless anyone else finds any bugs... (please let me know if you do!)

    Hopefully those are accepted, and then the final code should all be listed above.  I apologize for it being lots of code, but really mostly you would just need to copy/paste! Unless you're a better programmer than me, in which case you can definitely improve upon it .
     
    Posts: 14
    Location: NW England, UK (Zone 9a)
    • Likes 1
    • Mark post as helpful
    • send pies
      Number of slices to send:
      Optional 'thank-you' note:
    • Quote
    • Report post to moderator
    Thanks for the detailed tutorial, Winn. This will be very useful for me when I look into setting up some sensors in my garden!
     
    pollinator
    Posts: 992
    270
    5
    tiny house food preservation cooking rocket stoves homestead
    • Likes 3
    • Mark post as helpful
    • send pies
      Number of slices to send:
      Optional 'thank-you' note:
    • Quote
    • Report post to moderator
    I do much the same thing I use  raspberry pi for my main data server, and I use esp 32    connected to my temp probes..

    I use open source software for the SQL server / web interface. ->

    https://www.domoticz.com


    For the esp32  I flash them with ESP easy ->

    https://espeasy.readthedocs.io/en/latest/


    I have 3 thermometers  and a thermocoupler hooked up for higher temp gathering.


    With the price of a raspberry pi, I would not buy one unless I found one cheap, rather I would go with other options...

    For instance something like this ->


    temperature-last-7-days.png
    temperature graph
     
    pollinator
    Posts: 975
    Location: Greybull WY north central WY zone 4 bordering on 3
    286
    hugelkultur trees solar woodworking composting homestead
    • Likes 3
    • Mark post as helpful
    • send pies
      Number of slices to send:
      Optional 'thank-you' note:
    • Quote
    • Report post to moderator
    I am working towards my own although I went with an ardino mega base system.   I am adding 3 shields(expansion boards) part of which would not be needed with the raspberry pi.  As I wanted a clock/data storage and blue tooth I had to add a shield each where the raspberry pi has those functions built in.  My third shield is for other electronic components with a lot of screw terminals for wiring in.  Primary immediate goal is controlling air air based solar collector and 2 banks of fans.  So 4 temperature sensors and 3 FETs to switch the power supply on and off and drive 2 banks of fans together drawing 70 watts total power and moving 1100 CFM and 2 motor controllers to open and close 2 vent doors along with limit switches for fully open and fully closed for both doors.   Have about a dozen functions I wish to add to that eventually.(part of it will likely require a 2nd aurdino.)

    Some things you might want to mention.

    I2C bus stuff has a very limited distance to send and receive. So while you can do multiple sensors easily they must be close.  That, size and cost is what caused me to choose to go with an analog sensor in a TO-92 package instead.  I will need more wire over all than an I2C bus sensor set because each of sensor needs power, ground and wire signal clear back to its A2D but I can get the 20+ feet from the sensors I am doing without a problem whereas without boosters, lowered baud rate etc. I2C is limited to 10 or 12 feet total wire length with most suggesting it not be more that 3 to 5 feet total for all the sensors in a given string.  The sensor I went with  was something like $0.43 each and each needs a ceramic filter capacitor that was something like $0.90 each so cost is less and I can pull the sensor up a way smaller conduit to make replacement easier.  One big advantage to I2C stuff(works with a number of computers so fairly universal(both aurdino and raspberry support it)) is that almost any common sensor you could want is readily available.  Gas, CO2, CO, temperature, barometric pressure, humidity as well as drivers for a number of motors.

    Another option for power is simply an old tower case power supply.  The reason someone might want to choose this if you want to do something with the data as in control motors or fans as this gives you fairly strong 3.3v, 5V and 12V power sources without need for additional regulators etc.  I chose an ATX style supply with 24 pin output as I have those on hand.(no cost) and really common so future replacement should be easy.  My strongest one on hand will supply 35 amps of 12V power giving me a lot of things I can power directly from it.  Another neat thing with the ATX power supplies is that it comes with a fairly small always on if plugged in 5V supply(500 milli amps?)  So when I am doing basically nothing but running the loop it will power the aurdino and a few sensors.  If action is needed then the aurdino will turn the power supply on by pulling the switch line to ground.(green wire in that supply)  Wait a few seconds and then I can run the fans, pumps and motors planned for this.  But at night  if the controller isn't doing anything it can then turn the power supply off so only the 5V always on leg is powered.

    If looking to control motion, limit switches will likely be necessary.  Suggest looking up hall effect sensors.  I got my mechanical micro switches first and found the hall effect stuff after.  Hall effect sensors trip on magnetic field.  With a sealed sensor better weather/climate resistance and what should be way longer life.  A the sensors themselves were cheaper than the micro switches.  Still need to get the magnets but the cost will be only slightly more over all than switches for what should be far more durable.

    Then a quick question.  Why checking the temperature that often?  Probably won't change significantly in less than 5 minutes and maybe every 10 or 15 minutes would be sufficient.  

     
    Winn Sawyer
    pollinator
    Posts: 95
    Location: Cascadian lowlands (8b, sunset zone 5)
    31
    • Likes 1
    • Mark post as helpful
    • send pies
      Number of slices to send:
      Optional 'thank-you' note:
    • Quote
    • Report post to moderator

    C. Letellier wrote:
    I2C bus stuff has a very limited distance to send and receive. So while you can do multiple sensors easily they must be close.  


    I suggest each raspberry pi zero be a standalone sensor device for a single location, perhaps with a few types of sensors, but all in a single compact unit without trying to use a single pi to take readings from multiple locations. Just use another pi for each separate location. That avoids the distance limitation on I2C.

    I have a total of four "temperature pi" devices: two permanent ones (for outside and greenhouse) and two in takeout containers with battery packs that I can temporarily hang anywhere around my yard, house, or greenhouse. I have mostly used them to test the effectiveness of different types of frost protection for outdoor trees. As an example, this chart shows my data from the bad freeze we had in January, and you can see the floater 1 was in a specific place the whole time (a covered avocado tree without a heat source) while floater 2 was switching among different locations:


    If looking to control motion, limit switches will likely be necessary.


    I really don't recommend using anything like Arduino or RPi for any critical stuff like greenhouse ventilation or heating. Solid state (thermo cube) is the safe choice, because the electronics will inevitably fail when you need it most, and you don't want it killing the greenhouse trees when that happens.


    Then a quick question.  Why checking the temperature that often?  Probably won't change significantly in less than 5 minutes and maybe every 10 or 15 minutes would be sufficient.  


    That's certainly an option. I don't really have any reason not to do it every minute, though. Even many years of every-minute readings from multiple sensors are hardly a blip in the available storage on my web hosting plan. The "excess" data gets "decimated" when displayed in chart.js, using a min-max algorithm, so the chart ends up looking pretty readable even when viewing an entire year of data, which is over a million data points between the two main sensors.

    And I should add that I generally like the pi platform because I'm already accustomed to using Debian on my main desktop computer, and I generally like how "computer-like" the pi is. I find it much more challenging to get my head around all the more "electronics" focused platforms like Arduino. One downside of the pi is it doesn't play well with analog stuff, you need to get a hat to make most analog stuff work, many of which cost more than a few of the highest end pi models combined. Stuff like these, which seem to defeat the whole point of using a single board computer in the first place:

    https://sequentmicrosystems.com/collections/all-io-cards

    So, I like I2C stuff because it feels like a computer peripheral to me, fitting into my comfort zone more readily than the Arduino stuff.
     
    Winn Sawyer
    pollinator
    Posts: 95
    Location: Cascadian lowlands (8b, sunset zone 5)
    31
    • Likes 1
    • Mark post as helpful
    • send pies
      Number of slices to send:
      Optional 'thank-you' note:
    • Quote
    • Report post to moderator

    Mart Hale wrote:
    With the price of a raspberry pi, I would not buy one unless I found one cheap, rather I would go with other options...


    The pi zero W is $15 ($16 if you want the header soldered on), I think that is a pretty decent price for this kind of usage. I would not get a full sized pi for this task, but I already had one from a previous project that I had given up on.
     
    Mart Hale
    pollinator
    Posts: 992
    270
    5
    tiny house food preservation cooking rocket stoves homestead
    • Likes 2
    • Mark post as helpful
    • send pies
      Number of slices to send:
      Optional 'thank-you' note:
    • Quote
    • Report post to moderator

    Winn Sawyer wrote:

    Mart Hale wrote:
    With the price of a raspberry pi, I would not buy one unless I found one cheap, rather I would go with other options...


    The pi zero W is $15 ($16 if you want the header soldered on), I think that is a pretty decent price for this kind of usage. I would not get a full sized pi for this task, but I already had one from a previous project that I had given up on.


    Well the Pi was the right price at the time I built my system.    It was $35.00   way back then....

    The PI is perfect for a server for me as I am off grid and it pulls like 5 watts when it is idle.....  but for my needs I run the pi 24/7 as it controls power strips for me for running my aquaponics system.

    As for cheap unit like the pi zero,   I adore the ESP 32  which is even cheaper than the pi zero...

    For 15$  I could pick up a few of these ->


    https://www.ebay.com/itm/395119916562?itmmeta=01HQTQ0KZZ5NM9S7APN4RREB8D&hash=item5bfefb7612:g:I4wAAOSwHEhi~FXB&itmprp=enc%3AAQAIAAAA4Kuvpzzl2BcKIa8z0kyw9VvOzGfD6SdpG0%2FDZXceUAXBl1ILpATpvM5TJ9nGyr87bU%2BtaY3jZctwsV%2BdOPydx5jqtX7vp%2BXijdrh38T8Rw5qu8Xy0sL5e0VUilFRX%2B44W8yH%2FKmsMgSuAwqh7LrNuqOsdFuYzTYR6kLpnYR61Q%2B1hvsCUs5rDYSRzYbG5N1KUN%2BW%2B4iCXG2vDIoFLsOd%2BJ7g3OQ3xjZBi%2FC1wsNNWTjT%2FJwT3O0D0by15pDue2clVCucubAsUXJECKkh%2BdXS6St%2FX1Kx0KCfIB5TjtTPCiEN%7Ctkp%3ABk9SR5DAgte-Yw

     
    Mart Hale
    pollinator
    Posts: 992
    270
    5
    tiny house food preservation cooking rocket stoves homestead
    • Likes 2
    • Mark post as helpful
    • send pies
      Number of slices to send:
      Optional 'thank-you' note:
    • Quote
    • Report post to moderator


    I have always loved this channel as he compares all options....
     
    Mart Hale
    pollinator
    Posts: 992
    270
    5
    tiny house food preservation cooking rocket stoves homestead
    • Likes 2
    • Mark post as helpful
    • send pies
      Number of slices to send:
      Optional 'thank-you' note:
    • Quote
    • Report post to moderator
    https://espeasy.readthedocs.io/en/latest/Plugin/P004.html


    This is the documentation I followed with the espeasy to get my temp sensors.        The esp 32 at $5.00    was the direction I went.      The first one took a couple days to figure out, but the next one took only a few minutes to program and get setup...

    I really love the thermocopler  as I am able to check very high temps.
     
    Winn Sawyer
    pollinator
    Posts: 95
    Location: Cascadian lowlands (8b, sunset zone 5)
    31
    • Mark post as helpful
    • send pies
      Number of slices to send:
      Optional 'thank-you' note:
    • Quote
    • Report post to moderator

    Mart Hale wrote:https://espeasy.readthedocs.io/en/latest/Plugin/P004.html


    This is the documentation I followed with the espeasy to get my temp sensors.        The esp 32 at $5.00    was the direction I went.      The first one took a couple days to figure out, but the next one took only a few minutes to program and get setup...


    I just spent quite awhile browsing that website and the espessif website trying to understand just the very basic question of what operating system runs on the ESP devices, but couldn't find an answer. Do they run some version of linux with a shell you can log into? Do you need to have special software on another computer to control and program the device?

    I think this kind of issue is always my barrier to most alternatives to raspberry pi, such as Arduino. I like that the pi is just a little fully functional computer that runs a version of an operating system I already know how to use (Debian). I don't have to figure out the basic "how to use it," I just need to figure out new ways to use it.
     
    Mart Hale
    pollinator
    Posts: 992
    270
    5
    tiny house food preservation cooking rocket stoves homestead
    • Likes 2
    • Mark post as helpful
    • send pies
      Number of slices to send:
      Optional 'thank-you' note:
    • Quote
    • Report post to moderator

    Winn Sawyer wrote:

    Mart Hale wrote:https://espeasy.readthedocs.io/en/latest/Plugin/P004.html


    This is the documentation I followed with the espeasy to get my temp sensors.        The esp 32 at $5.00    was the direction I went.      The first one took a couple days to figure out, but the next one took only a few minutes to program and get setup...


    I just spent quite awhile browsing that website and the espessif website trying to understand just the very basic question of what operating system runs on the ESP devices, but couldn't find an answer. Do they run some version of linux with a shell you can log into? Do you need to have special software on another computer to control and program the device?

    I think this kind of issue is always my barrier to most alternatives to raspberry pi, such as Arduino. I like that the pi is just a little fully functional computer that runs a version of an operating system I already know how to use (Debian). I don't have to figure out the basic "how to use it," I just need to figure out new ways to use it.


    Yeah,   when I get an esp 32,   I flash it with the firmware "espeasy"  for my device  being sure to match the memory my esp32 has to the espeasy.     After that point I go in and I configure the esp via web interface to report to my domoticz server,  and I tell the esp32 what devices are connected to it on what pins.       After that is configured and I have setup the domoticz server on my raspberry pi,  ( I have used an old laptop as well to do this and laptop works great  as a raspbarry pi )   It gets the data and stores it in the sql database....        So the esp32 acts like a slave device to the domoticz server.

    This single ESP is now running  3 temp probes...

    I can see the current data straight from the web interface.

    As to the OS the espeasy runs  I have no clue, I just flash the rom and use the interface....    You can write up your own code on the esp32,    but I have not ventured that far yet...


    7days.jpeg
    screenshot
     
    I was born with webbed fish toes. This tiny ad is my only friend:
    Freaky Cheap Heat - 2 hour movie - HD streaming
    https://permies.com/wiki/238453/Freaky-Cheap-Heat-hour-movie
    reply
      Bookmark Topic Watch Topic
    • New Topic