• Post Reply Bookmark Topic Watch Topic
  • New Topic
permaculture forums growies critters building homesteading energy monies kitchen purity ungarbage community wilderness fiber arts art permaculture artisans regional education skip experiences global resources cider press projects digital market permies.com pie forums private forums all forums
this forum made possible by our volunteer staff, including ...
master stewards:
  • Nancy Reading
  • Carla Burke
  • r ranson
  • John F Dean
  • paul wheaton
  • Pearl Sutton
stewards:
  • Jay Angler
  • Liv Smith
  • Leigh Tate
master gardeners:
  • Christopher Weeks
  • Timothy Norton
gardeners:
  • thomas rubino
  • Jeremy VanGelder
  • Maieshe Ljin

A new Polytunnel - oh my!

 
steward and tree herder
Posts: 8375
Location: Isle of Skye, Scotland. Nearly 70 inches rain a year
3972
4
transportation dog forest garden foraging trees books food preservation woodworking wood heat rocket stoves ungarbage
  • Likes 19
  • Mark post as helpful
  • send pies
    Number of slices to send:
    Optional 'thank-you' note:
  • Quote
  • Report post to moderator
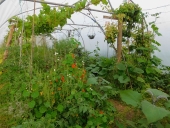
I love my high hoop polytunnel - in a wet climate the indoor gardening means I can get out in all weathers. A tunnel extends my season so I can grow more as the days get cooler and also makes a warm microclimate for plants that really would prefer a warmer summer than I have in my Northern location. I can also start off plants from seeds earlier in the tunnel before planting them out. A hoop house is tall enough to walk around in and I can even grow small trees and grape vines! I love my tunnel!
The downside is the plastic cover. You can expect to replace it every 10 years or so depending on your climate, how good the quality of the cover is and how well it was fitted. To me the ability to grow tomatoes here, and the other good things mentioned above, make it worth it. I reused my last cover as a roof for my simple pallet-yurt shed .
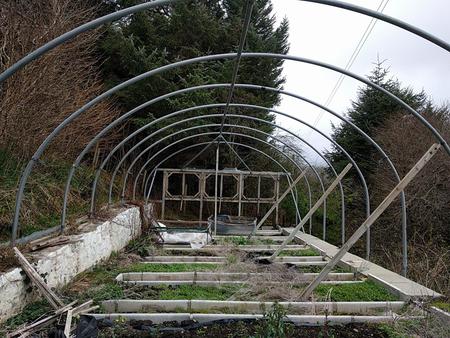
I was going to recover my old tunnel (I already have the plastic for it) but now I have been gifted a larger tunnel. A neighbour who used to grow organic certified salad has retired and no longer needs her multiple commercial grade tunnels. My husband has done her a favour once or twice on her transport, or maybe she just likes us. I know she doesn't want strangers coming onto her property either. I did have a think about it and went to see it before deciding, but it is just so gorgeous I can't resist.
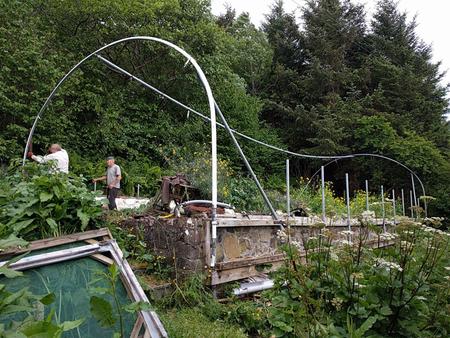
relocating hoop tunnel built on hill
view along the tunnel

So this thread is to discuss how to get the best out of my new structure and share some of the challenges in installing it.
 
pollinator
Posts: 335
Location: Central Texas
90
  • Likes 2
  • Mark post as helpful
  • send pies
    Number of slices to send:
    Optional 'thank-you' note:
  • Quote
  • Report post to moderator
Nice score! All these new greenhouses making me jealous.
 
gardener
Posts: 1029
Location: France, Burgundy, parc naturel Morvan
448
forest garden fish fungi trees food preservation cooking solar wood heat woodworking homestead
  • Likes 6
  • Mark post as helpful
  • send pies
    Number of slices to send:
    Optional 'thank-you' note:
  • Quote
  • Report post to moderator
Brilliant Nancy!Are you going to install gutters or connect the soil to a source? Situate it in half shade?
The one i use of the farmer he has put it in afternoon shade so it doesn't stay hot all day.
It's old and has holes, which i don't really mind because rain can come in and plants pop up at the drip. Or i can put a watering can there to fill up.
I've made a wooden frame on both ends with primitive doors and wind can blow through large holes. In summer i open it up.
Very low tech solution, but no catastrophies so far, and good air flow, so lettuce don't rot away in winter.
 
gardener
Posts: 653
Location: Poland
332
forest garden tiny house books cooking fiber arts ungarbage
  • Likes 5
  • Mark post as helpful
  • send pies
    Number of slices to send:
    Optional 'thank-you' note:
  • Quote
  • Report post to moderator
Oh wow, you got a nice big polytunnel!
I'm seriously contemplating one too... my neighbours have two already. They made their newer one more pretty with some wooden frames. The plastic doesn't look pretty but it seems more practical... and definitely cheaper than other solutions.
It also gives you some privacy in a dense neighbourhood and a storage space for when you're not growing anything...
I would put a compost bin in mine to heat it, and maybe use it for quail too... and because of that I'm thinking of putting a mesh flat on the ground, and maybe on the floor around the tunnel too. To keep mice, rats and dogs out (we have one dog who is a digger...).
What I don't like about it is that you just have to water it... I'm not a fan of watering plants daily ;) so I wonder if people collect rainwater from polytunnels somehow, and maybe have it redirected inside or collect it in a barrel next to the tunnel?
 
Nancy Reading
steward and tree herder
Posts: 8375
Location: Isle of Skye, Scotland. Nearly 70 inches rain a year
3972
4
transportation dog forest garden foraging trees books food preservation woodworking wood heat rocket stoves ungarbage
  • Likes 7
  • Mark post as helpful
  • send pies
    Number of slices to send:
    Optional 'thank-you' note:
  • Quote
  • Report post to moderator

Hugo Morvan wrote:Brilliant Nancy!Are you going to install gutters or connect the soil to a source? Situate it in half shade?
The one i use of the farmer he has put it in afternoon shade so it doesn't stay hot all day.


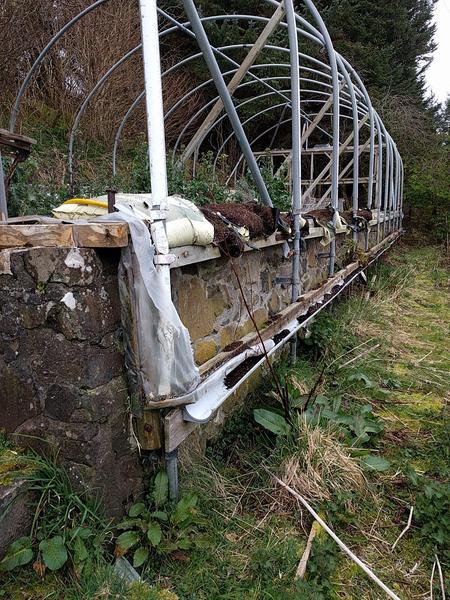
Thanks Hugo, I'd really like to install gutters. The new tunnel at the moment is installed on a steep side slope so that it has a retaining wall at the back and the front.

installing rainfall collection
lower retaining wall and gutter on new tunnel

At the moment I'm thinking of locating it somewhere other than where my tunnel is at the moment. Having to water the garden was the biggest mind obstacle to getting the previous tunnel really healthy and productive, so I'm keen on getting this one set up well from the word go. The new location has a side slope so one side will still be higher than the other, probably with a retaining wall on the upper side depending on what rock we find once we start digging. It won't need a lower retaining wall, since the slope is not as extreme as it's current location. I'll put a post below with the site layout and why I'm choosing that location in more detail.
I'm hoping that I can reuse the old gutter on the uphill side at the top of my retaining wall, and have it feed into tanks (or possibly trickle irrigiation as well) inside the tunnel. Wicking beds are something I'd like to investigate as another interesting possibility. I'll start a new thread or find an existing thread on that.

As regards shade, I probably won't shade it deliberately. Our ambient temperature in summer rarely gets above 20 Celsius (68F) and more often is about 15 C. Because my land faces East, I lose the afternoon sun after a while anyway. I'll get a bit of shade due the the tunnel being partly buried, and some due to the proximity of wind reducing trees (more details to follow). Ventilation in sunny weather is a definite necessity for plant growing. Making that part of my routine is the one downside of the location I have chosen, as it isn't on my existing morning route, however the dogs won't mind a new patrol route :).
 
pollinator
Posts: 187
Location: Northern UK
87
  • Likes 5
  • Mark post as helpful
  • send pies
    Number of slices to send:
    Optional 'thank-you' note:
  • Quote
  • Report post to moderator
Nancy, I am envious of your new polytunnel. It reminds me of the one we had at our old place. As well as vegetable beds we made space for relaxing in ours with hanging hammock chairs. It was useful at times to have somewhere to shelter from the rain. Mr Ara also created a pond which had a solar powered fountain. We were lucky in that our water supply to the polytunnel came from the original spring that fed the house. We were also unlucky in that it dried up in very dry summers so sometimes we had to carry water from the nearest IBC. We put in hanging shelves for some plants e.g.peas, otherwise the mice ate them all if they were planted directly into the ground. Unfortunately, I can't find the photos as I have some lovely ones of abundant growth filling the space. Sadly, now I only have a greenhouse which is already almost full. (Note to self, some people would love even that, so be thankful.) I will have to build myself a potting shed as well as I currently use a corner of the greenhouse for sowing and potting on my plants.
Enjoy!
 
Nancy Reading
steward and tree herder
Posts: 8375
Location: Isle of Skye, Scotland. Nearly 70 inches rain a year
3972
4
transportation dog forest garden foraging trees books food preservation woodworking wood heat rocket stoves ungarbage
  • Likes 8
  • Mark post as helpful
  • send pies
    Number of slices to send:
    Optional 'thank-you' note:
  • Quote
  • Report post to moderator
Location, location, location....

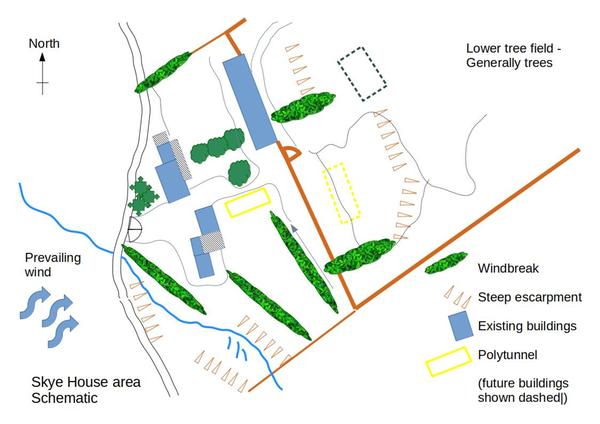
This is a plan of the top part of my holding showing the buildings area.

hoop house location plan
polytunnel location plans

The land generally slopes down to the river off-plan to the East, and up to the top of the hill to the West. I've marked the steeper escarpments as well. The water for the tunnel currently is from a pipe just at the lower end of the existing tunnel. It is fed from above the road so has adequate pressure to water the whole tunnel. I've marked on the current paths and tracks to go down the hill. One of them goes through the location for the new tunnel, so will need to move slightly. I'll probably want an additional door in the South end of the new tunnel (it only has the one door at present).

There are few reasons to not have the new tunnel where the old one was, and a few reasons why the old location was good.

Reasons to have in the old location:
1) It is nearer the house and on the morning/afternoon dog patrol, therefore easier to keep a routine eye on and open/close doors.
2) The water supply is already organised in the old tunnel therefore would be simple to set up again
3) I could leave all the plants from the old tunnel in situ and just build around them.
4) The new site means I wouldn't be able to site a natural swimming pond there (this was technically challenging anyhow- maybe a in-polytunnel plunge pool instead? :) )

Reasons to put the new tunnel through in the tree field:
1) The new tunnel is built on a slope side/side so will need significant different underpinnings where the old tunnel was
2) The old tunnel is sloped up/down along the length, which makes putting the cover on tightly more difficult.
3) I don't need to feel bad about losing some of the bigger plants which are not doing so well in the old tunnel.
4) The old tunnel is in my view line from the front of the house to the mountains, and it is not the most beautiful object, the other location is more hidden from the house.
5) On a fresh site any soil borne diseases are less likely to be an issue. I know there are corky root diseases on my tomatoes for example, one reason why I try and rotate the planting locations in the old tunnel.

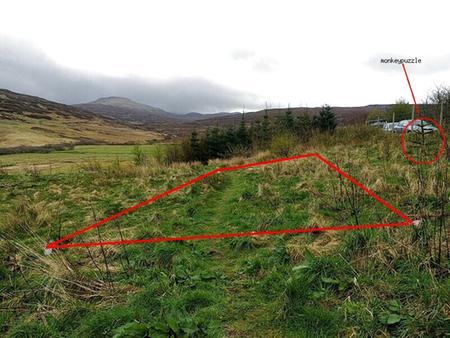
relocating an old polytunnel
Proposed tunnel location from North

It's a bit difficult to see from this photo, but the ground to the right is slightly higher than the left, so the new tunnel will sit there quite nicely with a retaining wall on the right, and at ground level (or thereabouts) on the left. The prevailing winds come over from where the cars are and are mitigated a bit by the trees we have planted, which should improve over time. The one thing I need to check is the relationship to the young monkey puzzle tree highlighted on the right. They grow to about 30 feet diameter spread, so as long as the tunnel is more than about 16 feet away that should be fine. They do have a reputation for shedding branches, although all mine are too young. I'm hoping in 20-30 years this one could be fruiting, and the cones if they drop will be enough to damage the tunnel plastic. There are a couple of tiny ones to the South and South East that I should just check on at the same time (those are small enough to move easily if I wish).

So I don't suppose the dogs will mind a slightly different patrol to take in the new tunnel location - that will enable opening/closing doors and any significant routines like watering seedlings.
The water supply will probably need to be extended to the new location - all downhill, so quite feasible. I'm hoping, as mentioned above, to collect water from off the tunnel itself as well. The wet weather normally comes from the SW, so a gutter on the uphill side will collect significant amounts of water.
The new orientation will be nearly North-South along the length of the tunnel (as it is in it's existing location) so shading consideration of the planting will be quite different to my current set up.
 
Ara Murray
pollinator
Posts: 187
Location: Northern UK
87
  • Likes 2
  • Mark post as helpful
  • send pies
    Number of slices to send:
    Optional 'thank-you' note:
  • Quote
  • Report post to moderator
Yes to the in-polytunnel plunge pool! Makes our old polytunnel pond seem a bit sad.
 
pollinator
Posts: 717
Location: Clackamas Oregon, USA zone 8b
76
  • Likes 3
  • Mark post as helpful
  • send pies
    Number of slices to send:
    Optional 'thank-you' note:
  • Quote
  • Report post to moderator
This will be a bigger project if you put it in a new location, at the old location there are some drawbacks but set up and irrigation might be easier in some ways?  I'm just happy you're getting to expand your growing!
 
Nancy Reading
steward and tree herder
Posts: 8375
Location: Isle of Skye, Scotland. Nearly 70 inches rain a year
3972
4
transportation dog forest garden foraging trees books food preservation woodworking wood heat rocket stoves ungarbage
  • Likes 6
  • Mark post as helpful
  • send pies
    Number of slices to send:
    Optional 'thank-you' note:
  • Quote
  • Report post to moderator
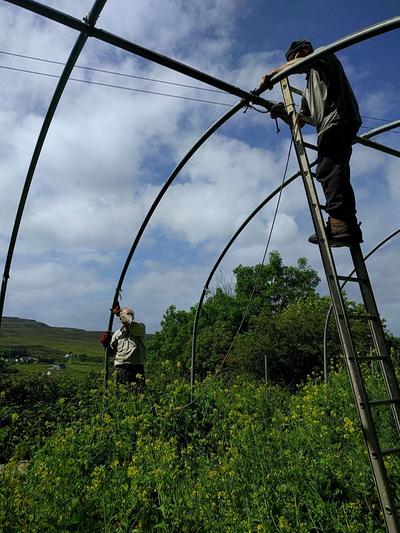
So we've spent a couple of afternoons dismantling the old polytunnel frame. Luckily we were able to get help from someone skilled in the art of climbing - a former oil rig worker.

dismantling the hoop tunnel
polytunnel with a view


We had a couple of exciting moments as there was some stresses locked into the structure, but by strategically tying off the ladder and frame bars everything is safely down on the ground now.

relocating an old polytunnel
taking down the ridge


The metalwork is fairly easy to move, but getting access when we have free time is a bit tricky. There's a fair amount of dismantling of the anchor poles still to do. Since it is set into a wall at the top side I may have to buy some more anchor poles or I may be able to cut the lower ones in half - they are pretty long. I will probably want to get some crop bars, since these haven't been used on the tunnel previously. It does have the brackets for them - I think that wires were used before, which would be a cheaper option.

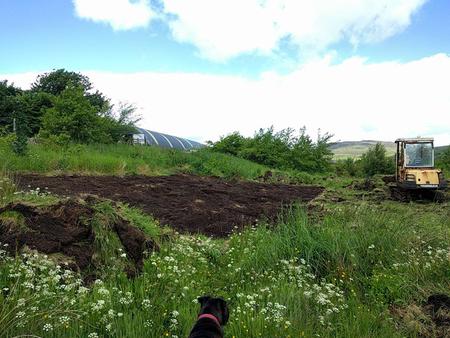
I've also firmed up where the polytunnel is to go. The orientation is slightly more SE-NW than I had at first expected so broadside onto the wind, but reasonably sheltered by the hill and the trees. It will be partly earth sheltered too, which will help. My husband has started clearing the turf and soil off the site. There is a good 6 to 8 inches of black top soil, which is nice to see. Under that there is rock at the top of the slope and a red layer on top of the rock at the bottom. There is a slight rise below the tunnel and I think the rock has been holding the water back so making an orange anaerobic layer. It isn't really clay although it looks that way at first glance. Rather silty. We're going to try and take the good soil off before levelling the rock. At the moment it appears to be 'rotten rock' which is easily broken up basalt. This will make good paths inside and down to the polytunnel. I'm contemplating shortening the polytunnel slightly to improve the slope to the near door, but we'll decide when the site is levelled whether that will be needed.

putting up a polytunnel
clearing the turf off the site

 
Posts: 484
130
  • Likes 4
  • Mark post as helpful
  • send pies
    Number of slices to send:
    Optional 'thank-you' note:
  • Quote
  • Report post to moderator
Nancy, I'm seriously bewildered, not sure, I thinkkkkkkkk I'm envious, no that is not it, I'm jealous!.  Noooo, it may be that I'm hungry.  I do know that I'm very happy for you!!!  I've wanted a greenhouse for such a long time.  Maybe one day soon.

Yowza,I'm so happy for you!  Doing my happy dance, if I had a tail, it would be wagging big time.

As always,

Peace
 
Deane Adams
Posts: 484
130
  • Likes 5
  • Mark post as helpful
  • send pies
    Number of slices to send:
    Optional 'thank-you' note:
  • Quote
  • Report post to moderator
Nancy, I had a good laugh this morning about what you wrote in reference to summer high temps, 68F !!!.  I checked on the way out the door to feed the crows and it was 65F here at 6am.  If I should ever make it to Skye, I'll be sure to pack at least one bag with nothing but, I think you call them jumpers!

That's life while on two blood thinners, I often get cold if the ac is set too low!!!  The long range forecast, has a high of 98F for Thursday this coming week.


Peace

 
Nancy Reading
steward and tree herder
Posts: 8375
Location: Isle of Skye, Scotland. Nearly 70 inches rain a year
3972
4
transportation dog forest garden foraging trees books food preservation woodworking wood heat rocket stoves ungarbage
  • Likes 6
  • Mark post as helpful
  • send pies
    Number of slices to send:
    Optional 'thank-you' note:
  • Quote
  • Report post to moderator

Deane Adams wrote:Nancy, I had a good laugh this morning about what you wrote in reference to summer high temps, 68F !!!.


60 F is perhaps more typical, but we're not even reaching that just now. Hence the polytunnel is more than just a ego-project! I know it will make growing a wider range of summer crops possible for me, and other crops year round out of the driving rain.

Jumpers (Sweaters/cardigans) are a good idea. You'd maybe not be surprised how many woolly hats I sell in my shop even in midsummer
 
Nancy Reading
steward and tree herder
Posts: 8375
Location: Isle of Skye, Scotland. Nearly 70 inches rain a year
3972
4
transportation dog forest garden foraging trees books food preservation woodworking wood heat rocket stoves ungarbage
  • Likes 5
  • Mark post as helpful
  • send pies
    Number of slices to send:
    Optional 'thank-you' note:
  • Quote
  • Report post to moderator
Slow progress - both dismantling the tunnel and preparing  the site.

The lower wooden rails were fixed to the clamps with coach bolts, and of course these are now spinning in the wood rather than letting the nuts unscrew nicely. We're going to have to cut through all the wood work, since the heads of the bolts are flush. A pity, since not all of the wood was rotten.

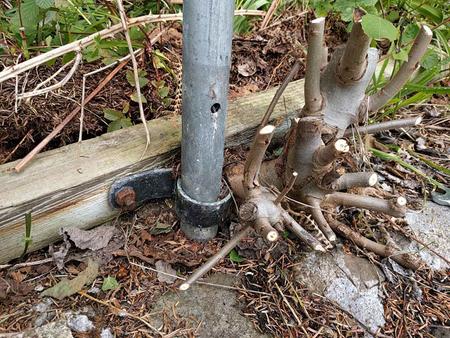
tree growing where I don't want it
nature reclaims the polytunel site

Also at least one of the upper anchorages looks like it may stay there - there is a small tree (an aspen I believe)  that has enveloped the clamp...

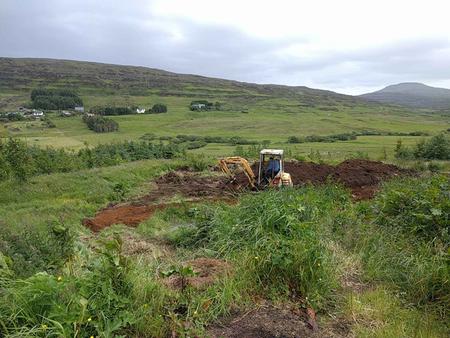
My husband is hogging the digger (won't let me play) and is starting to make a ramp down to the corner of the new site. There is a fair amount of orange subsoil - mostly silt, but a little clay, which he is relocating to start forming the ramp. Now the digger is down there, it is tricky getting it back up until the ramp is made. You can't really tell the slope from this photo, but it is steep enough to be tricky.

preparing the polytunnel site
site access improvement on going


I'm fairly hopeful of getting good support from the original tunnel supplier Northern Polytunnels as they offer a polytunnel refurbishment service. I'll wait till I know exactly what I'm missing before I contact them though. Hopefully there will be no problem getting extra brackets if required.
 
Nancy Reading
steward and tree herder
Posts: 8375
Location: Isle of Skye, Scotland. Nearly 70 inches rain a year
3972
4
transportation dog forest garden foraging trees books food preservation woodworking wood heat rocket stoves ungarbage
  • Likes 5
  • Mark post as helpful
  • send pies
    Number of slices to send:
    Optional 'thank-you' note:
  • Quote
  • Report post to moderator
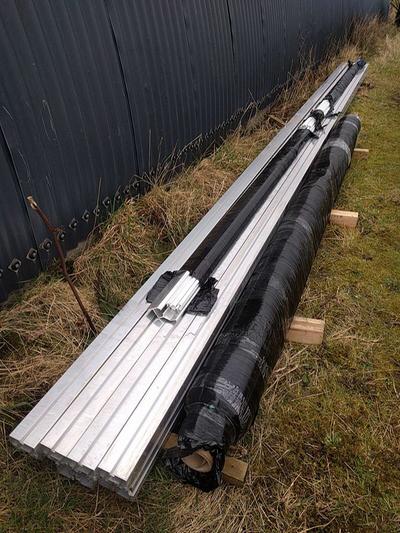
Slow progress, but the majority of the frame is now moved on site! We still need to assess whether the upper anchor poles will come out without demolishing the retaining wall. I've been contemplating whether to splash out and get an aluminium baserail/wiggle wire system, or just stick with wooden beams.
the frame arrives

It looks like the site is pretty level across the length, at least at the down hill side, as illustrated by this photo of the puddles recently. They don't appear to be surface springs, just run off, which will make life simpler.
finding a level

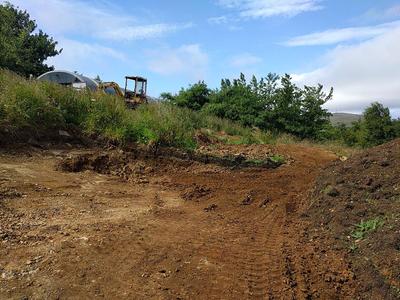
The access ramp is starting to take shape. Some of the 'rotten rock' we dig out levelling the site will make a lovely surface to the ramp and improve the gradient a bit. Hopefully we will have enough extra rock to improve some of our parking areas too.
starting to dig out rock

Thinking ahead, I have obtained four bags stuffed full of reject fleece from our local weavers. That I'm hoping to use in a wicking bed system, but there are lots of other possiblities for it too!
wool fleece for wicking bed lining
 
Nancy Reading
steward and tree herder
Posts: 8375
Location: Isle of Skye, Scotland. Nearly 70 inches rain a year
3972
4
transportation dog forest garden foraging trees books food preservation woodworking wood heat rocket stoves ungarbage
  • Likes 8
  • Mark post as helpful
  • send pies
    Number of slices to send:
    Optional 'thank-you' note:
  • Quote
  • Report post to moderator
I lost a fair amount of the summer due to personal and professional issues, so I don't know whether getting the tunnel up before winter is going to be doable, but I'm still hoping for that.
I've been playing detective on the tunnel frame - trying to work out how big the footprint ought to be. The tunnel chassis plate appears to predate the records kept by Northern Polytunnels, so they haven't been able to help very much so far. The main puzzle was that the tunnel was 19 1/2 feet wide, whereas the nearest size tunnels made are 18 feet or 21 feet. It appears that the tunnel had been 'made to fit' a smaller footprint than it was designed for. There was a previous tunnel on the site that had been replaced by this one, and I guess the steepness of the slope and access meant they didn't fancy re doing the foundations. We did find a considerable amount of spring when dismantling the tunnel and I suppose this is why.
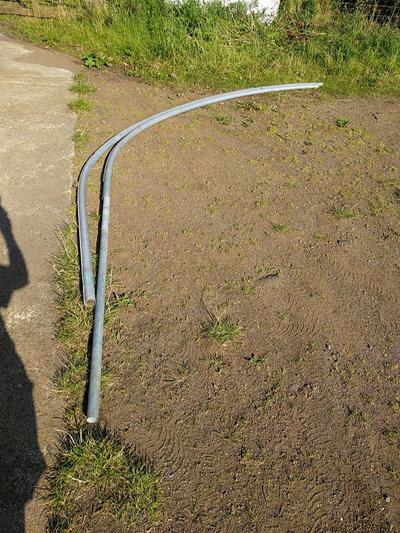
When I put the shortened arch fitted with a straight base pole, against the full hoop (upper side and lower side of the hoop respectively) I found that the arches did not match. Also the legs were not parallel to each other - resulting in feet that would splay out in the normal position. It looks like as well as shortening the legs on the uphill side, they also bent them to fit. It has been done quite nicely, the curvature of the shortened hoops all seem very similar.
reusing a polytunnel frame
altered curvature of uphill legs (inner pole)

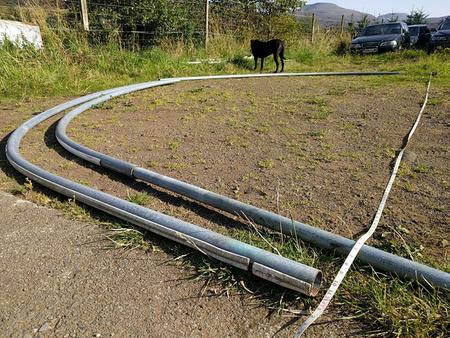
I reasoned that putting two lower side hoops together would give me an arch equivalent to the original tunnel before alteration. When I laid them out it was obvious that the tunnel frame was originally a 21 foot tunnel.
checking high tunnel hoops
measuring free fit unaltered legs

The way that the hoops have been altered mean that it isn't feasible to re-erect it as a 21 foot tunnel, but it doesn't naturally fit a 19 1/2 foot tunnel either, so I'm thinking at the moment of aiming for 20 foot wide, which hopefully will be easier to slot together than the 19 1/2 foot seems to have been. The alternative is to try and overbend the poles a bit more so that the feet become properly parallel again, but a) I'm not confident of achieving a good result and b) don't think it ought to be neccessary.

So I think I can start putting together a shopping list for the new tunnel - I'd like to get some crop bars. I think these will need to be between 11 and 15 feet long, but I need to check whether the ones designed for the 21 foot tunnel will be too long for the altered arch.

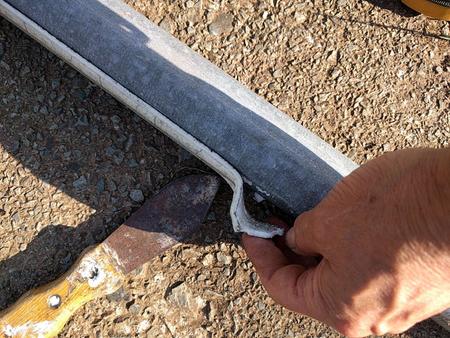
In the meantime I can usefully clean the old foam strips off the hoops. Although some of it is in reasonable condition, it does degrade in the heat. My experience with my previous tunnel suggests this is not something to skimp on.
cleaning off hot spot tape
a long job

 
master pollinator
Posts: 1012
Location: East of England/ Northeast Bulgaria
378
5
cat forest garden trees tiny house books writing
  • Likes 2
  • Mark post as helpful
  • send pies
    Number of slices to send:
    Optional 'thank-you' note:
  • Quote
  • Report post to moderator
Wow, it's a big job, Nancy! I hope you get some lovely autumn weather and time to get plenty of work on the project done.
 
Nancy Reading
steward and tree herder
Posts: 8375
Location: Isle of Skye, Scotland. Nearly 70 inches rain a year
3972
4
transportation dog forest garden foraging trees books food preservation woodworking wood heat rocket stoves ungarbage
  • Likes 4
  • Mark post as helpful
  • send pies
    Number of slices to send:
    Optional 'thank-you' note:
  • Quote
  • Report post to moderator
Thanks Jane, The forecast for the next few days is pretty good, a nice little bonus at the end of the season. Really what I need to do at the moment is encourage my husband to get the site levelling done, send off a shopping list (adjusted for budgetary constraints) and get on with the tape removal. I also need to follow up on the possibility of borrowing a post hole drill to make holes for the pole anchors. A neat hole, refilled with just a little concrete, should work pretty well to hold the feet I think.
 
steward
Posts: 12418
Location: Pacific Wet Coast
6990
duck books chicken cooking food preservation ungarbage
  • Likes 9
  • Mark post as helpful
  • send pies
    Number of slices to send:
    Optional 'thank-you' note:
  • Quote
  • Report post to moderator
Nancy Reading wrote:

The lower wooden rails were fixed to the clamps with coach bolts, and of course these are now spinning in the wood rather than letting the nuts unscrew nicely. We're going to have to cut through all the wood work, since the heads of the bolts are flush.  

A fellow who was helping me recently with a door to the brooder run, looked at the hardware I brought for him to use and said, "that's way too classy for this job".

I replied that if I ever need to take it apart, stainless Robertson head screws with fender washers will make that super easy.

He didn't take any more convincing! So much waste can come because hardware has rusted into place. Your environment is a wet as mine, if not more so, and not cold enough that rust doesn't happen year round. I can't suggest strongly enough that you use the best hardware you can and grease it *really* well when installing it.

Deane's not the only one who's jealous! Good luck on finishing the build, and I hope it's at least ready by the time you need to start spring seeds. Some tree seed germination does well in a greenhouse over winter also.
 
Nancy Reading
steward and tree herder
Posts: 8375
Location: Isle of Skye, Scotland. Nearly 70 inches rain a year
3972
4
transportation dog forest garden foraging trees books food preservation woodworking wood heat rocket stoves ungarbage
  • Likes 3
  • Mark post as helpful
  • send pies
    Number of slices to send:
    Optional 'thank-you' note:
  • Quote
  • Report post to moderator
I totally agree with you Jay, on the need for good quality fastenings, Actually most of the fixings are fine, it was the wood that had given up, and the coach bolts having no external head were then impossible to remove in situ.

The rest of this post will be pretty boring - geometry stuff, but I want to record it here so I have the information in one place.

I got some information back from Northern Polytunnels about the crops bars they fit to the larger tunnels. Apparently they are made in two pieces, with a swaged joint.
widthswaged end lengthstraight end lengthcalculated total length (ft)
18 ft2170mm2170mm14'3"
21ft2910mm2170mm16'8"

So it looks like I was ancipating putting the crop bars slightly higher up on the hoops than they do, or maybe overestimating how long the joining brackets are. Either way I think the 18ft crop bars ought to be perfect for me.
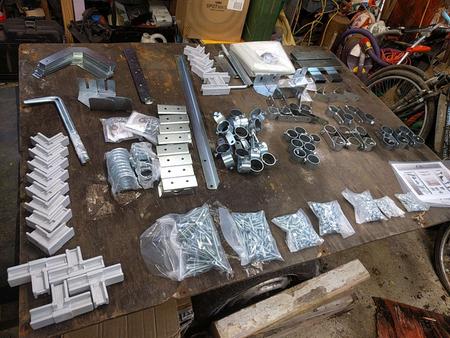
I need to go and collect up all the brackets and fixings and see what else I need to make up a complete kit of bits.
 
Nancy Reading
steward and tree herder
Posts: 8375
Location: Isle of Skye, Scotland. Nearly 70 inches rain a year
3972
4
transportation dog forest garden foraging trees books food preservation woodworking wood heat rocket stoves ungarbage
  • Likes 6
  • Mark post as helpful
  • send pies
    Number of slices to send:
    Optional 'thank-you' note:
  • Quote
  • Report post to moderator
We still haven't collected the last of the brackets, but have made some more progress. Since this is a facility I hope will last me decades I'm putting a lot of thought into what I want in terms of design too.
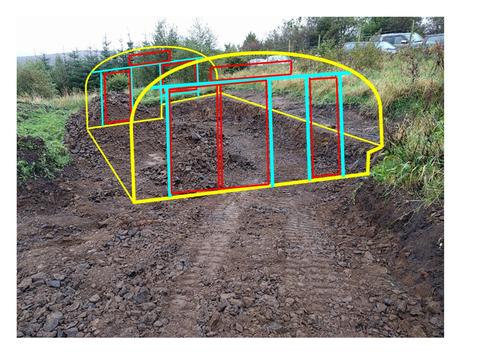
A burst hydraulic pipe put a bit of a delay in getting the site levelled (at least it wasn't me digging!). We still have the final levelling and earth moving to do, but the basic footprint is now clear and the ramp down is starting to look a bit more feasible. I have now sketched up a proposal of how I'm imagining the framework to be. The yellow represents the baserail and the end hoops, the red represent potential openers - slding doors and tilting windows.

refurbishment of high tunnel on side slope
polytunnel frame proposal

I'm serioiusly considering buying an Aluminium (US=Aluminum) frame for the cover retention and doors. With the price of timber the way it is in the last few years, I'm thinking that it may not be actually that much more expensive than buying the timber frame and battens, and will presumably last a whole lot longer (TBC in my salt wind environment!). The cover woudl be retained by "wiggle wire" into a slot in the rails, which makes it possible to have several sheets of plastic secured at the same place, and also makes them more easy to remove and replace.

wiggle wire

image source

It is possible that the ground rail retaining brackets are the same for wood and aluminium which would save some extra expense. I also need to find out how feasible having the rails at an angle other than 90 degrees will be. I have drawn it as if it roughly followed the slope of the rock at the side on the right and at the South end, but it might need to have a retaining/infill wall on these sides to bring the rails to horizontal. I'd like to have the high level vents, which I have seen in some of the Northern Polytunnel images


here for example shown on an aluminum frame tunnel with a louvre vent fitted. I think I would prefer a tilting window though...

So I'm going to send my sketch to the polytunnel manufacturers and see what they say!
 
That which doesn't kill us makes us stronger. I think a piece of pie wouldn't kill me. Tiny ad:
Freaky Cheap Heat - 2 hour movie - HD streaming
https://permies.com/wiki/238453/Freaky-Cheap-Heat-hour-movie
reply
    Bookmark Topic Watch Topic
  • New Topic