• Post Reply Bookmark Topic Watch Topic
  • New Topic
permaculture forums growies critters building homesteading energy monies kitchen purity ungarbage community wilderness fiber arts art permaculture artisans regional education skip experiences global resources cider press projects digital market permies.com pie forums private forums all forums
this forum made possible by our volunteer staff, including ...
master stewards:
  • Carla Burke
  • Nancy Reading
  • r ranson
  • John F Dean
  • Pearl Sutton
  • paul wheaton
stewards:
  • Jay Angler
  • Anne Miller
  • Nicole Alderman
master gardeners:
  • Christopher Weeks
gardeners:
  • Maieshe Ljin
  • Benjamin Dinkel
  • Jeremy VanGelder

Rocket Evaporator?

 
Posts: 107
Location: Merrickville, Ontario
12
  • Likes 2
  • Mark post as helpful
  • send pies
    Number of slices to send:
    Optional 'thank-you' note:
  • Quote
  • Report post to moderator
Hi Ernie & Erica. Thanks for sharing your knowledge. I hope I'm not too late to ask a question, although this one is not specifically addressed to you.

When I found sugar maples on my land, the first thought that came to my head was "rocket stove evaporator". A Google search quickly turned up a Permies thread from 2010 which Erica contribute to: https://permies.com/t/5958/wood-burning-stoves/Rocket-Evaporator. I tried resuscitating it a couple of weeks ago, but didn't get any reaction.

I thought perhaps this was because the rocket stove and RMH folks all hang out here. So I'm cross-posting here to reach a wider audience. I'd just like to know if anyone here has experimented with rocket stoves as a heat source for maple syrup making in the three years since this discussion took place. If so, what successes have you had?

As I say at the end of that old thread, this strikes me as the perfect application of rocket stove technology. It is very energy intensive, wood is the natural and traditional energy source, and code compliance is probably not an issue in most cases. Furthermore, efforts to make the process more energy efficient seem to have ignored combustion efficiency and exhaust gas heat recovery completely. Have a look at this information on evaporator designs from the Cornell Sugar Maple Research & Extension Program.

I've sniffed around for signs that someone has been working to fill this gap, but all I smell is opportunity.

Staff note (Glenn Herbert) :

The Cornell link above is dead, but current (2024) information from them is here: https://blogs.cornell.edu/cornellmaple/

They no longer appear to have any info on evaporator designs, though.

 
Posts: 28
Location: Columbia, Missouri
1
4
  • Mark post as helpful
  • send pies
    Number of slices to send:
    Optional 'thank-you' note:
  • Quote
  • Report post to moderator
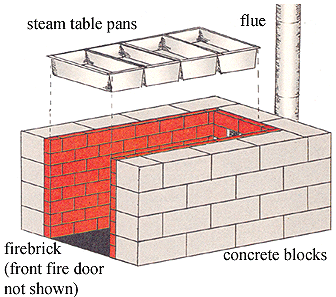
I'm also very interested in this area too. I was using something similar to this:


It is too smoky and inefficient. I've been interested in putting a rocket stove at the front and exhaust out the back and hopefully get an even enough spread of the flames to heat the pans well. I'm also considering using a Top Lit Updraft cookstove because it doesn't have to be fed so continuously.

I'm looking for a design that can be put into a small sugar shack so I can do several things in that one place:
1. Evaporate maple syrup.
2. Water bath canning
3. Boiling scald water for chicken butchering
4. Clean fish in a screened building (a counter top could be placed on top of the cooker for fish cleaning or cleaning veggies from the garden)
5. Summer kitchen to cook large batches of food.
6. Grilling on a rocket stove?

Other things that this little building could include would be solar dehydrator, a sauna?, storing fishing gear and some garden tools, etc..
So, the key is the cooker, and this could be a building used year round (Zone 1) but not in the house. If the cooker could incorporate three or more granite ware water bath canners then those could function for all of the above tasks. Maybe it would take three or more separate cookers like the ones built for the turkey fryer challenge? Hmmm?
Is there a different kind of design I should consider?
 
pollinator
Posts: 4154
Location: Northern New York Zone4-5 the OUTER 'RONDACs percip 36''
67
hugelkultur fungi books wofati solar woodworking
  • Mark post as helpful
  • send pies
    Number of slices to send:
    Optional 'thank-you' note:
  • Quote
  • Report post to moderator
Greg Harvey : Thanks for your posting the pictures, The best of similar working designs I have seen usually taper uphill in the back !

If our goal is to not completely re-invent the wheel- There are several good builds by the Good people at the Aprovecho Research Station !!

Outside of their using a horizontal wood fuel feed- which is an easy fix they are a natural adaptation to Evaporation Workings ! Big Al !
 
Micky Ewing
Posts: 107
Location: Merrickville, Ontario
12
  • Mark post as helpful
  • send pies
    Number of slices to send:
    Optional 'thank-you' note:
  • Quote
  • Report post to moderator
After more researching, I still don't see anybody offering equipment for combustion gas heat recovery beyond the standard flue pans. Does anybody know the expected temperature range for combustion gases after they have passed under one or two flue pans? Maybe they already do an adequate job, and all I really need to think about is replacing the standard firebox with a rocket stove. I think the main worry in making such a substitution is ending up with a setup that is way too hot and burns the sap. A heavy metal plate above the heat riser will, I hope, moderate the temperatures in the finishing tray.
 
Greg Harvey
Posts: 28
Location: Columbia, Missouri
1
4
  • Mark post as helpful
  • send pies
    Number of slices to send:
    Optional 'thank-you' note:
  • Quote
  • Report post to moderator
Maybe a means to controlling the amount of heat would be having three small rockets side by side, like 4" units and only light up as many as you need. When the pans are full of cold sap you could crank up the heat but if you just want to simmer you might want to use just one or two rockets. I take out the sap for the last 10% and finish it inside where I can see it better. The ability to stop a rocket stove quickly is an advantage when you want to empty the pans. Unlike that drawing, with the chimney at the back, maybe the rockets would go side-by-side on the long side and maybe some pre-heating pans on the left and right. I think having a self-feeder would help since these evaporators run for many hours and I don't want to baby sitting it that constantly.
 
Micky Ewing
Posts: 107
Location: Merrickville, Ontario
12
  • Mark post as helpful
  • send pies
    Number of slices to send:
    Optional 'thank-you' note:
  • Quote
  • Report post to moderator

Greg Harvey wrote:Maybe a means to controlling the amount of heat would be having three small rockets side by side, like 4" units and only light up as many as you need. ... I think having a self-feeder would help since these evaporators run for many hours and I don't want to baby sitting it that constantly.


My main reservation about using a rocket stove heating unit is the amount of time required to tend the flame (collecting or splitting the appropriately sized fuel is my second biggest). Multiply that by three if we are talking about three units. Typically a rocket mass heater only requires one or two short burns per day to heat a space. That's probably prevented this problem from gaining much attention from the community, but I'll have to have a good solution before it will be practical for multiple full-day burns as maple syrup production would require.

I'm glad to see that there are a few people who have been experimenting with solutions to this problem. http://www.youtube.com/watch?v=vtR6nu2pqE0]Here's[/youtube] one that seems to work quite well, but has the disadvantage of requiring commercial wood pellets. I like this one better. It can burn wood chips and twigs. The downside is that the feed tube is a bit ungainly and according to this thread a full tube still only gives a 30 minute burn.

More research required.
 
allen lumley
pollinator
Posts: 4154
Location: Northern New York Zone4-5 the OUTER 'RONDACs percip 36''
67
hugelkultur fungi books wofati solar woodworking
  • Mark post as helpful
  • send pies
    Number of slices to send:
    Optional 'thank-you' note:
  • Quote
  • Report post to moderator
Micky and ALL : One of the things that is most exciting about Forum Topics is the way virtually everyone is capable of thinking outside of the box ! We are getting a little carried
away here, There are many reasonably priced 2nd hand Maple Syrup Evaporators here in the northeast, and I live within 10 miles of dozens of people who combine several
''Sugar Bushes"" into single operations for Maple Syrup production.

Divvying up the end result is carefully calculated according to number of trees/taps Fuel wood supplied, and Hours of time collecting and time in the 'Sugar House', payment can
be in Syrup, Hay bales, young stock or settled by time sharing on a tractor or combine !

Three points, I have seen a lot of good ideas posted here but generally we have gotten away from what works! I would suggest Googleing Maple syrup Evaporation Pans and
Arches ! 2nd there has been some comments made about needing to feed the rocket mass heaters near constantly, and being tied up there by, My Experience is several years
old but , after the 1st ~ 40 minutes ~ give or take you NEED someone in near constant attention and you can judge how much attention a R.M.H. needs by ear ! 3rd, counter
intuitively we dont need several smaller R.M.H.s to radiate their heat to the evaporating pans but larger ones with smaller barrels! The smaller barrels HAVE to radiate just as
much heat as the larger barrels to produce the R.M.H. magic and they do it by radiating that heat at a higher temp which is what we want !
 
Posts: 7
  • Mark post as helpful
  • send pies
    Number of slices to send:
    Optional 'thank-you' note:
  • Quote
  • Report post to moderator
I'm gathering materials (fire brick, vermiculit board and such) at this time and have an idea that is a cross between the Aprovecho design with a refractory burn chamber/tunnel/stack like Zerofosselfuel's. I hope after a vacation of thinking about this way toooo much that I can start assembling something that might actually boil water and then Sap next spring.

 
Greg Harvey
Posts: 28
Location: Columbia, Missouri
1
4
  • Mark post as helpful
  • send pies
    Number of slices to send:
    Optional 'thank-you' note:
  • Quote
  • Report post to moderator
I was looking at the TLUD's for the evaporators since a 5 gallon version can burn for hours. I can also hoard wood chips to use in it and start it with some wood pellets on top. I can also stop the fire easily when I want to go to bed. It would also be light enough to store off season easily and portable enough I could set it up on my front porch for an accessible sugar shack right out my front door.

The downside seems that it would have to be pretty tall with even only a 24" chimney on top so the pans might be pretty high up. I also might need multiple TLUD's, one for each pan maybe. I think this has a lot of promise to meet all the goals I had listed earlier. I believe I'll have to make a strong stand to hold the steam pans using iron pipe and have skirting to hold the heat next to the pans and keep the TLUD's out of the wind and elements.
 
allen lumley
pollinator
Posts: 4154
Location: Northern New York Zone4-5 the OUTER 'RONDACs percip 36''
67
hugelkultur fungi books wofati solar woodworking
  • Mark post as helpful
  • send pies
    Number of slices to send:
    Optional 'thank-you' note:
  • Quote
  • Report post to moderator
Permies Cloud : I am certain that the people who noticed my willingness to build rocket stoves hot enough to do a wonderful job of producing scorched Maple Syrup
(comment of Aug 4th) which can easily happen as the 'sugar' content goes up in the presence of sugar sands, or old scorch marks were just too kind to point that out !

Come-on ! I can take it, and we can use this as a teaching point, you can't always just snatch a batch of 15 gal off of the fire in a second ! Again the idea that any person
is in a sugar house with nothing to do, but wait for it to be time to tend a Rocket stove fire is more than a little forgetful of what actually goes on in a 'sugar house' BIG AL
 
Posts: 9002
Location: Victoria British Columbia-Canada
708
  • Mark post as helpful
  • send pies
    Number of slices to send:
    Optional 'thank-you' note:
  • Quote
  • Report post to moderator
I've boiled down about 2 gallons of sap in my life, and all of it was when I was about 12 years old. Then we moved to the city.

I could see this process becoming more efficient if instead of boiling massive amounts of water away, the sap were placed in stacked trays inside a dehydrator as is done with fruit and vegetables. Hot, dry air from the RMH could flow through the evaporator. A heater room could be set up where a cold, dry air inlet is placed near the base of a wall and hot air would flow up through the evaporator and out a chimney.

The RMH could be built in a standard fashion. The RMH would have it's own exhaust that has nothing to do with the chimney on the evaporator. The whole room would work as an evaporator for trays that are set on the bench or on racks. Air leaving the chimney would be quite moist, and it could run in the 100 - 150F range. There would be no chance of burning the syrup, so it could be left unattended. If plenty of thermal mass were included, the unit could be left to work all night on it's own. It's possible that sugar could be made overnight, when syrup is desired, but that can be fixed with the addition of some fresh sap.

It may still be desirable to finish the process over flame in order to achieve a desired color or flavor, but most of the water could be removed by this much less labor intensive method.
 
gardener
Posts: 1292
Location: Okanogan Highlands, Washington
398
4
hugelkultur cat dog books food preservation
  • Mark post as helpful
  • send pies
    Number of slices to send:
    Optional 'thank-you' note:
  • Quote
  • Report post to moderator

Dale Hodgins wrote:I've boiled down about 2 gallons of sap in my life, and all of it was when I was about 12 years old. Then we moved to the city.

I could see this process becoming more efficient if instead of boiling massive amounts of water away, the sap were placed in stacked trays inside a dehydrator as is done with fruit and vegetables. Hot, dry air from the RMH could flow through the evaporator. A heater room could be set up where a cold, dry air inlet is placed near the base of a wall and hot air would flow up through the evaporator and out a chimney.

The RMH could be built in a standard fashion. The RMH would have it's own exhaust that has nothing to do with the chimney on the evaporator. The whole room would work as an evaporator for trays that are set on the bench or on racks. Air leaving the chimney would be quite moist, and it could run in the 100 - 150F range. There would be no chance of burning the syrup, so it could be left unattended. If plenty of thermal mass were included, the unit could be left to work all night on it's own. It's possible that sugar could be made overnight, when syrup is desired, but that can be fixed with the addition of some fresh sap.

It may still be desirable to finish the process over flame in order to achieve a desired color or flavor, but most of the water could be removed by this much less labor intensive method.


Had to read carefully to realize you weren't talking about pumping rocket exhaust into the dehydrator!

We have built channels under and through a few of our regular rocket mass heaters, and it's not difficult to establish a passive flow of warm air.
You could also combine a rocket dehydrator with a conventional solar dehydrator, for example have a glass-covered black tray at the air inlet, then the warm air goes through the room air channels in the rocket heater (always separate from the exhaust heat-exchange channels, but possibly in close proximity). Then up through the dehydrator's "chimney" with maybe some baffles to encourage flow across each tray.

You should be able to pull a substantial draft without fans. Maybe you'd want the rocket exhaust chimney right up the back of the dehydrator, to keep all that steam hot and rising. Condensed steam becomes a heavy, dewy fog, and might slow the draft down if it got too dense.

I still think that conventional syrup cookery probably heats the syrup directly for good reason. You can pump a lot of heat into sugar before it loses enough water. But maybe you could combine the two, with a kettle on top of the barrel to do the initial reduction, and then tap the kettle into dehydrator trays to finish the sugaring with less risk of overheating.

-Erica
 
Posts: 9
  • Mark post as helpful
  • send pies
    Number of slices to send:
    Optional 'thank-you' note:
  • Quote
  • Report post to moderator
Hi folks,
New to the forum but I have been experimenting with the rocket stove for maple sap evaporation and I thought I would share. Evaporation is a function of heat and surface area. About one gallon per hour per square foot of surface area if you have a good boil. More heat will give you the ability to boil a larger surface area.

So far I am on my 4th generation rocket stove. I have a pan that is two square feet of surface area and I am attempting to get a rolling boil in the entire pan. (Stainless steel 8" deep)

I have built the current manifestation with 6" square tubing and I built it into a two drawer filing cabinet filled with perlite. I angled the feed tube and added an air intake directly into the bottom. (Will try to post pic)

I have had good success with a restaurant pan at a good boil but I still need to build the shroud that will go around the correct pan.

My large evaporator is 24" by 60" and would require several stoves to get the necessary boil but we continue to experiment.

Spring is coming!

Have to run. Be back soon!
 
Mike Schmatz
Posts: 9
  • Mark post as helpful
  • send pies
    Number of slices to send:
    Optional 'thank-you' note:
  • Quote
  • Report post to moderator
Hi. I'm back!

I have some photos to add.

Mod one was a basic j tube construction out of fire brick. This did not produce sufficient heat at the exit of the riser to boil large amounts of water.

Mod 2 would boil a pot but not the steam pan.

Mod 3 would boil the steam pan with a shroud around it but the real breakthrough was packing it in perlite. The temp at the exit point was a significant increase and the 1/4 inch steel plate will glow bright red during operation in the combustion area. I believe the higher temps help contribute to complete combustion leaving only small amounts of ash.


The cap on the loading chamber is not required for proper draft but forcing the air input through the bottom causes the flame to shoot out the top onto the pan base very efficiently.

One other option would be to use the j tube construction method but build the evaporator pan into the base of the j where the horizontal burn area produces the maximum output of heat.
image.jpg
[Thumbnail for image.jpg]
2nd mod
image.jpg
[Thumbnail for image.jpg]
3rd mod
image.jpg
[Thumbnail for image.jpg]
Insulated base
 
Posts: 13
  • Mark post as helpful
  • send pies
    Number of slices to send:
    Optional 'thank-you' note:
  • Quote
  • Report post to moderator
Hi Mike,

Very much appreciate the pictures and description. Where did you source the tubing? Welding supply shop? How thick is it?

What sort of grate did you use?

You just notched it to make the top "burner, where the pan sits? The filing cabinet steel is holding up to the heat? The 2" note of your drawing signifies the distance above the cabinet top that the tubing rises?
 
Mike Schmatz
Posts: 9
  • Mark post as helpful
  • send pies
    Number of slices to send:
    Optional 'thank-you' note:
  • Quote
  • Report post to moderator
Good morning,

The tubing came from a steel supply outlet. It was a scrap from a much larger piece and it is 1/4" thick. I thought that should last a while.

For a grate I just use a 1/16" thick piece of steel with 1/2" holes drilled in it the full area of the 6" X 6" tubing.

The notches on each side of the top of the tube were to hold the pan 2" above the riser giving room for gases to escape in all 4 directions.

The perlite keeps the cabinet from getting warm at all. The only area subject to heat is the very top where the riser outlet enters the shroud around the pan.

Since it is still too cold for sap here in NY it has not had a long term test only short burns for experimenting. I am ready for some warmth though. The tank is ready the tubing is ready I am ready but Mother Nature has her own ideas.

Thanks for looking
Mike

I will post updates once it is producing and let everyone know how it worked.
 
Po White
Posts: 13
  • Mark post as helpful
  • send pies
    Number of slices to send:
    Optional 'thank-you' note:
  • Quote
  • Report post to moderator
My only other thought is that the relatively small volume area below the grate may clog with ashes after a bit, reducing airflow. What do you think?
 
Mike Schmatz
Posts: 9
  • Mark post as helpful
  • send pies
    Number of slices to send:
    Optional 'thank-you' note:
  • Quote
  • Report post to moderator
I agree especially at the very bottom where the grate drops into the bottom tube. The longest I have run it is about 2 hours and the ash wouldn't fill a serving spoon. During the season it will run about 12 hours in a day next to my conventional arch so that will be a test. It will also get fed a wider variety of fuel so some may produce higher ash amounts. The nice thing about the ash is that you can scoop it right out of the bottom while it is running if I need to. It just drops through the grate into the bottom tube.
I have some heavier stainless to make a new grate, I was thinking of 1/4" to 1/2" slats instead of holes but we will see.

10 day forecast still has no tapping weather in it.
 
Mike Schmatz
Posts: 9
  • Mark post as helpful
  • send pies
    Number of slices to send:
    Optional 'thank-you' note:
  • Quote
  • Report post to moderator
Here is a pic of it running with the shroud around the pan. Thought I already had it on here.
Just water though, still no sap!
image.jpg
[Thumbnail for image.jpg]
image.jpg
[Thumbnail for image.jpg]
 
Posts: 5
Location: Goshen, IN
5
  • Mark post as helpful
  • send pies
    Number of slices to send:
    Optional 'thank-you' note:
  • Quote
  • Report post to moderator
I'm late to this post, but I'd like to let you know about my rocket burner maple syrup boiler. I use 5 stainless cafeteria pans, the deep ones, side by side. Each is suspended over a rocket chimney, inside a well insulated concrete box. The chimneys are 8" ID and the fire boxes are 8" w x 10" h x 24" l. I can easily boil 12 gph if I use thoroughly dried wood and keep the fires well tended. The temperature at the top of the chimney is 1620 degrees F, no baffle under the pan. No caramelization ever, and the syrup is nice and light. I ladle the sap from pan to pan, collecting the concentrated sap in the bottom pan to finish inside. I designed the pans so that each one is 3/4" lower than the previous so that I could siphon from level to level but the boiling action seems to mess with the siphons. The rig burns virtually smoke free unless I over-fire it, at which point I can get a 2' tongue of fire coming out the smoke stack. I've used it two seasons now, and I'm only seeing minor cracking in the insulated castable refractory (ICF) chimneys, but this is because the ICF shrinks on curing, and cracks formed in the molds.

It hardly needs saying that rocket burners are THE way to go because they burn clean and efficient. My first boiler had the pans hanging over an insulated fire box. The fire could never burn hot and clean, and pans got coated with creosote, LOTS of smoke. This year I'd like to try some smoke stack heat recovery, although I'm mot sure how well that will work. The hot stack is necessary to get a good draft. I'd also like to try putting air- water heat exchangers over the pans to use the steam to preheat the sap. We'll see how that goes.

Here is a video if you are interested:


I hope this is helpful.
 
allen lumley
pollinator
Posts: 4154
Location: Northern New York Zone4-5 the OUTER 'RONDACs percip 36''
67
hugelkultur fungi books wofati solar woodworking
  • Likes 1
  • Mark post as helpful
  • send pies
    Number of slices to send:
    Optional 'thank-you' note:
  • Quote
  • Report post to moderator
Steve Shantz :Welcome to Permies.com and our sister site Richsoil.com; and a Big Welcome to the Rocket and Wood Stoves Forum Threads. With ~35,000~ Fellow Members

located World-wide You should be able to come here 24 / 7 and talk to someone who wants to talk about what you want to Talk about !


Every time you post to an old thread, even a very old thread it is instantly shared with all previous members who posted to that Thread ! Add in the ability to use the Permies

Search Engine to search and review tens of thousands of Threads/Thread extensions. Hours of research directly at your fingertips, and a chance to talk to them whats do-ing !

Finally, every time you make a new post the Permies computer looks for key words and phrases and compiles a listing of ''Similar Topics'' and posts that list to the bottom of

this page !

I am including links to a few threads that will help make your searches and future posts even more useful and powerful ////// See Link Below :


https://permies.com/t/43625/introductions/Universal

https://permies.com/t/34193/tnk/permies-works-links-threads

Looking forward to reading more about your project, and any future plans ! For the Good of the Crafts ! Big AL

Late note you can use the Similar topics section as a link to Paul W's past podcasts too !
 
She's out of the country right now, toppling an unauthorized dictatorship. Please leave a message with this tiny ad:
Learn Permaculture through a little hard work
https://wheaton-labs.com/bootcamp
reply
    Bookmark Topic Watch Topic
  • New Topic