• Post Reply Bookmark Topic Watch Topic
  • New Topic
permaculture forums growies critters building homesteading energy monies kitchen purity ungarbage community wilderness fiber arts art permaculture artisans regional education skip experiences global resources cider press projects digital market permies.com pie forums private forums all forums
this forum made possible by our volunteer staff, including ...
master stewards:
  • r ranson
  • Nancy Reading
  • Carla Burke
  • John F Dean
  • Jay Angler
  • paul wheaton
stewards:
  • Nicole Alderman
  • Pearl Sutton
  • Anne Miller
master gardeners:
  • Christopher Weeks
  • Timothy Norton
gardeners:
  • Nina Surya
  • Matt McSpadden
  • thomas rubino

Brick or cob

 
pollinator
Posts: 96
Location: South Central Alaska Zone 4a/b
31
  • Likes 7
  • Mark post as helpful
  • send pies
    Number of slices to send:
    Optional 'thank-you' note:
  • Quote
  • Report post to moderator
Hello,

I have long dreamt of an RMH, and did a fair bit of research some years ago. Most of that has been forgotten. But I plan to actually build one this spring/summer in a guest cabin we are building. I have Matt’s cook stove plans. I have always preferred the look of brick to cob and never really learned anything about cob in my previous research. But bricks have proven hard to acquire. I was able to pick up a bunch of brick shaped cement pavers last year and I think they would work, but I don’t love their look, and so have been thinking of plastering over the stove. Then I thought, if I’m going to plaster over it, maybe I should just use cob and plaster over that? But most of the use of cob I have seen in RMH builds involves a run of flue pipe versus an open bell. I like the cook stove design and am wondering if it’s possible to build a rectangular bell from cob instead? And place a cooktop on top? What are the pros and cons here? Is cob lighter? Will I be reducing the mass of the stove? How thick would the walls need to be to stand up? What do I need to know/think about?
 
Eloise Rock
pollinator
Posts: 96
Location: South Central Alaska Zone 4a/b
31
  • Likes 8
  • Mark post as helpful
  • send pies
    Number of slices to send:
    Optional 'thank-you' note:
  • Quote
  • Report post to moderator
I found this video of slip formed cob. It seems like that could work for stove walls? Also could create a lot of other possibilities!

https://youtu.be/djebf7YtxbI?si=XCT4ADtD1EfoSKCU
 
rocket scientist
Posts: 6525
Location: latitude 47 N.W. montana zone 6A
3394
cat pig rocket stoves
  • Likes 11
  • Mark post as helpful
  • send pies
    Number of slices to send:
    Optional 'thank-you' note:
  • Quote
  • Report post to moderator
Hi Eloise;
Great video!  That is going to be a really nice cob house when it is finished.

4" of cob is enough for walls.
Split 55-gallon barrels are often used to bridge between walls and covered in cob.
Cattle panels and hardware cloth can also be used.
A large sheet metal box can be made into a bell, covered in whatever material you find attractive.
Cob walls bridged with stone.
Cob walls covered with wood.
Away from the core, all materials are acceptable to be used.


Were you thinking of using Matt's riser-less core plan for this build?
 
Eloise Rock
pollinator
Posts: 96
Location: South Central Alaska Zone 4a/b
31
  • Likes 6
  • Mark post as helpful
  • send pies
    Number of slices to send:
    Optional 'thank-you' note:
  • Quote
  • Report post to moderator
Thomas,
Thanks for such a quick and helpful resopnse. So theoretically a person could make froms like in the video 4" wide and build the stove walls that way? That would potentially give me a little bit of flexibilty with the design too - with out having to cut bricks...

Yes I have plans for the brick, or ceramic fiber board riserless core from Matt. Do you have any input on one or the other? Or recommend something else?
 
thomas rubino
rocket scientist
Posts: 6525
Location: latitude 47 N.W. montana zone 6A
3394
cat pig rocket stoves
  • Likes 9
  • Mark post as helpful
  • send pies
    Number of slices to send:
    Optional 'thank-you' note:
  • Quote
  • Report post to moderator
You can use cob for the walls as long as you have either firebricks or CFB for the core.
What were you thinking of using for a top?  Salvaged oven glass, perhaps?  Or an old cast iron wood cook stove top?

I do have a preference for construction.
Unlike Matt, I am a fan of using the heavy firebricks. They do take time to warm up.
CFB is easily abraded while loading wood but has no warm-up time when starting.
Matt uses an expensive RA330 high-heat sheet metal liner to protect his.

With firebricks, you will always need to use the bypass to start a cold stove.
Small fires near the secondary riser tube are used to start the draft; it often wants to smoke back into the room until heated. (you quickly learn to deal with this)
Once heated, Matt's stoves live up to the RMH name, and the heavy bricks will hold heat for quite a while.

A CFB core is easy to start and comes up to cooking temperatures rapidly.
A bypass is still used to warm the outside chimney but is closed off quickly.
A CFB core will lose any heat rapidly once the fire is out.

Cutting bricks is way easier than it might seem.
https://permies.com/t/261066/cut-Brick-RMH


Rocket Scientist
Posts: 4575
Location: Upstate NY, zone 5
599
5
  • Likes 10
  • Mark post as helpful
  • send pies
    Number of slices to send:
    Optional 'thank-you' note:
  • Quote
  • Report post to moderator
I bought Matt's tiny house cookstove core plan for CFB, though if I build that core I will make the firebox at least from firebrick.

The firebox of that core is quite small, and unless you are always gentle and careful in loading, the CFB walls could be damaged pretty quickly.

You could use the concrete bricks to build the lower third to half of a bell that encloses the core (the top should be firebrick for longevity); a bell that follows after the first core enclosure will never get hot enough to damage concrete and could be completely lined with concrete. You can cover a brick structure with 2 or 3 inches of cob and plaster to make it look organic and give a double skin for more safety.

Slipforming cob walls should work. It might take longer to stiffen up than cob built onto the outside of a box form... there are plenty of ways that could work. One 4" layer of cob risks shrinkage cracks that go all the way through. Plastering after the cob is dry would guard against that. The drier and stiffer cob is when you apply it (as long as it bonds with the previous batch), the less it will shrink. Plenty of coarse sand and small rough gravel will also reduce shrinkage.
 
Eloise Rock
pollinator
Posts: 96
Location: South Central Alaska Zone 4a/b
31
  • Likes 6
  • Mark post as helpful
  • send pies
    Number of slices to send:
    Optional 'thank-you' note:
  • Quote
  • Report post to moderator
Thanks so much for your input Thomas and Glenn!

If I can get my hands on a cast iron stove top I will definitely use it! But I’m not holding my breath. I called the local appliance shop and they routinely pull out electric stoves to be repaired or trashed and they said I could have a glass top. So that’s what I’m planning on but would love a cast iron one.

I was leaning toward using brick for the core, and can see how hard brick may be longer lasting. I don’t mind using a bypass for start up.
Regarding cutting bricks- the only ones I have are concrete- does your method work for cutting concrete? I haven’t done any brick cutting so it’s all new to me.

Also, Glenn commented on the small size of the fire box in Matt’s stove.do you find this to be a nuisance?  I have thought about that and wondered if it has to be that small? If I wanted to change the fire box size to I basically need to redesign the whole core? Maybe it doesn’t need to be bigger. I know these stoves don’t use much wood and burn hot and fast rather than all day. But it looks like Matt’s fire box is smaller than some others? Maybe I’m wrong. Let me know!

Regarding the cob- it’s great to know that plastering will help reduce cracking. I was wondering if that would be an issue. I’ve  never worked with cob but have a bit of pottery experience/ experiments. Drying and shrinking rates can be finicky things. So plaster is to be applied before the cob is fully dry, but after it’s set up a bit? I imagine it like applying slip on a piece of not quite dry green ware that is to be burnished. If that analogy makes any sense to either of you, let me know if I’m close. There is probably a thread on that somewhere. I’ll look for one tomorrow.


Would you guys say that switching to cob would affect the overall heating capacity of the stove in a significant way? If I were to do basically the same dimensions as Matt’s plans but with cob? This is going in a single story 540sqft house, on an interior wall. Id really like it to be the primary heat but we will have a back up of some kind installed. But I would like it to have enough power and mass  to do the job on its own. Matt’s plans said 1200sqft so I figured I was in the clear. Would switching to cob make any significant difference?
Thanks again!
 
thomas rubino
rocket scientist
Posts: 6525
Location: latitude 47 N.W. montana zone 6A
3394
cat pig rocket stoves
  • Likes 7
  • Mark post as helpful
  • send pies
    Number of slices to send:
    Optional 'thank-you' note:
  • Quote
  • Report post to moderator
Hi Eloise;
Please do not make any changes to Matt's core design.
Also, please do not change one of Peter's batchboxes.
These designs are optimized to be ultra-efficient, any changes you were to make could have a substantial detrimental effect.
Without the high-dollar testing equipment, you cannot know what your changes may have done or what is coming from your chimney.

The firebox on the tiny cookstove is very small, and since you are in Alaska, I suggest building one of Peter's Batchbox designs.
It is a much larger firebox with a substantially longer burn time. Your guests will like it very much.
It is much simpler to build than the tiny cookstove.
The core assembly either sits flush with the bell or partially extends from the bell, giving you a nice hot flat spot for heating a kettle or even stovetop cooking.
The bell can be any shape that fits in your home.
We can help guide you online.
I also offer hard-copy books or PDF files on constructing Peter's design. These will help you to better understand the steps required to build a batchbox.
( https://dragontechrmh.com/)

Yes, you can safely make accurate cuts by first soaking any brick (clay or cement) and using a 10" diamond masonry blade.
An abrasive masonry blade can also be used on a hand-held side grinder for quick cuts.

Can you buy 2500F + rated firebricks in your area?


Eloise Rock
pollinator
Posts: 96
Location: South Central Alaska Zone 4a/b
31
  • Likes 6
  • Mark post as helpful
  • send pies
    Number of slices to send:
    Optional 'thank-you' note:
  • Quote
  • Report post to moderator
Thanks for the straight forward answer Thomas! So helpful.
I figured manipulating cores is not a great idea. But thought I’d ask. So you say the batch box core is simpler to build? That’s curious. My husband likes the Walker plans because… well it’s a plan. No guess work. But also may not be the right thing for our project. If the batch box is actually simpler to build, maybe I can sell it to him. In reality I’ll probably be the one building it, as he’ll be both working and building the house. So it’s most imperative that I understand it. But we both need to be bought in.

In reference to being in Alaska- yes it’s cold here but honestly not that cold. It’s just a long heating season. We don’t get the brutally cold temps that come to the plains areas in the lower 48. But we don’t have a hot (70 here feels very warm) or a dry season so the heating season is drawn out. I don’t want to build a stove in this small house that will blow us out of there. We will be living in the guest house until we build something bigger. And I just can’t sleep when it’s hot. So I don’t want to over size it.

I’ll do a bit more reading on the batch boxes and check out the books.

We should be able to get fire bricks. I need to double check the ratings on what the supplier has but I know that had 2300’s. Hopefully they have 2500s. Those are much easier to find here than clay bricks, so I should be able to get something.

Thanks again for the help!
 
Eloise Rock
pollinator
Posts: 96
Location: South Central Alaska Zone 4a/b
31
  • Likes 5
  • Mark post as helpful
  • send pies
    Number of slices to send:
    Optional 'thank-you' note:
  • Quote
  • Report post to moderator
Back to the cob- for areas where the cob needs to be supported during construction- like the top of a bell or a port through the wall for a chimney- does the supporting material need to be fire resistant and remain? Or is the cob self supporting once it’s dried? Does it continue to harden when heated? Is it okay for that material to burn out of the stove? I’m sure this depends on the distance being bridged. Also, if constructing a bench bell, is cob strong enough to be sat on with a bridge of that distance, or do you need a different material for the top of the bench?
 
thomas rubino
rocket scientist
Posts: 6525
Location: latitude 47 N.W. montana zone 6A
3394
cat pig rocket stoves
  • Likes 8
  • Mark post as helpful
  • send pies
    Number of slices to send:
    Optional 'thank-you' note:
  • Quote
  • Report post to moderator
Hi Eloise;
2300F Fire Bricks will work if they do not offer a higher rating.

Here are some enlightening threads that you might like.
This one explains what a bell is,   https://permies.com/t/270559/Stratification-chambers-Bells-explained
This is my outdoor kitchen using Matt's core, the same size core used in the tiny cook stoves.
https://permies.com/t/164923/rocket-ovens/Build-Black-White-Rocket-Oven
This build might be an option for you as it holds heat for quite a while.
This is the Masonry stove I built in our home this fall.
https://permies.com/t/267527/Shorty-Core-bell
This one has good feedback from my rant.  https://permies.com/t/271647/build-RMH
https://permies.com/t/270178/Montana-Masonry-Dragon-Living-Room
https://permies.com/t/273010/Early-Morning-coffee-Shorty
https://permies.com/t/273139/Building-bench-heat-transfer-adjacent
This last one is an incredible build from a first-time builder; Glenn did an outstanding job of building and documenting his build.
https://permies.com/t/238503/Batch-Rocket-Build

Well, that should keep you busy for a while.
 
Glenn Herbert
Rocket Scientist
Posts: 4575
Location: Upstate NY, zone 5
599
5
  • Likes 9
  • Mark post as helpful
  • send pies
    Number of slices to send:
    Optional 'thank-you' note:
  • Quote
  • Report post to moderator
Regarding cob:
Structural cob (with some straw as "rebar") is self-supporting when dry. There are limits to how large a flat expanse is stable; for a 4" thickness, I wouldn't go more than a couple of feet between angles or corners. Cob will not get any stronger with heat, until it gets to 1500 F or so and starts to become pottery. Parts of a core could reach that, but not a bell. If making a bell from just cob, I would go with 5 or 6 inches thick for safety. That would resist any reasonable accidental impact without crumbling. Also, that thickness would leave the straw in the outer half-ish intact and still reinforcing the cob. The straw near the hot face will eventually char.

Using a metal box or shell for an internal form with cob outside of it will give two layers for best fume resistance. A half-barrel bell bench covered with cob will be strong, but I would not try to make a bench from cob without some support under the horizontal surface. Cob thick enough to be safe by itself will take a long time to transmit heat to the outside. Combustible formwork can be allowed to burn out, as long as it does not interfere with finishing or first firing of the heater.
 
Eloise Rock
pollinator
Posts: 96
Location: South Central Alaska Zone 4a/b
31
  • Likes 6
  • Mark post as helpful
  • send pies
    Number of slices to send:
    Optional 'thank-you' note:
  • Quote
  • Report post to moderator
Alright Thomas, you've convinced me to dive into the batch box research... I spent a bit of time over on batchrocket.eu, donkey forum, and exploring your links. You are probably right- it wouldnt be any more complicated to build a batch box than Matt's stove. So I'm considering it... Here are some questions.

https://batchrocket.eu/en/building#size includes info on stove sizing, which I'm sure you are familiar with. I was a bit alarmed when I put in my information to the calculator. The house we are building is 30x18 (540ft2), with a loft. I calculated the volume to be 166m3. Coldest temp we would see is -34C(-30F), (This is rare, but we'll stick with it for the moment). Since this is a new build, with 6" walls and rockwool, I put it at a 1.0 insulation factor (more insulated than the 10cm polystyren, but less than 37cm insulating clay brick). Result is 9kW loss, requiring a 230mm(9") or 250mm(10") diameter riser, with 2+ firings per day. Since a -30F day is pretty rare, only a couple days per year, I tried it with 0F to see the difference (This is still a cold day, but we have many more of them than -30). Result is 6.2kW, requiring 8 or 9" riser (or a 10" for fewer firings). This makes me wonder if the Walker Full Masonry Cook Stove would be way under powered for this build? His plans said it could heat 1200sqft so I figured I was in the clear... But maybe thats using much different values for temp differential and insulation?

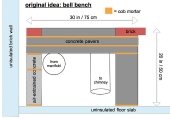
That leads to the ISA for the bell. The published numbers here https://batchrocket.eu/en/building#bellsizing appear to be maximums. So I assume its alright if the ISA is less than that? We have a limited footprint for this stove. A quick calculation says I could go 57"x32" (this is about what we were planning for the walker stove) by 6ft tall and be just shy of the 101sqft ISA max for an 8" system. Thats about 2x as tall as the walker stove, and a big increase in mass. Which will keep our house warmer. But that leads to the foundation question.

With the walker stove in mind when we were planning the house, (The plans said to plan on around 2400lbs) my husband planned in floor reinforcements, but we did not dig a footer for the stove. If we need to increase the overall mass to make this thing really keep the house warm... We might have a problem here. The foundation is in (helical piles), but not the floor yet, so techincally we could still dig a footer when the ground thaws, but I think the septic line runs right through where it would need to go... I need to double check that but it could be a problem. Any suggestions?

And finally, my aesthetic question. About 50% of the joy of wood heat is seeing the fire. I am wondering if there are any places in the core of a batch box where a viewing window can be installed, besides the door. I am not sure how I would orient the new stove if we change course. But there is a chance the door won't be able to face the sitting area, which would make me very sad. I know Matt put a viewing window in the back of the core of the full masonry cook stove, and I sware I saw a video of his a few years ago with a window in the side of the fire box. Is this possible with a regular batch box?

Thanks so much for your help on this. I am glad I am digging a little deeper to really determine what the best build will be.
 
Eloise Rock
pollinator
Posts: 96
Location: South Central Alaska Zone 4a/b
31
  • Likes 4
  • Mark post as helpful
  • send pies
    Number of slices to send:
    Optional 'thank-you' note:
  • Quote
  • Report post to moderator
Glenn - Thanks so much for the cob info. That is exactly what I need to know to invision this thing and make a plan!
 
Eloise Rock
pollinator
Posts: 96
Location: South Central Alaska Zone 4a/b
31
  • Likes 6
  • Mark post as helpful
  • send pies
    Number of slices to send:
    Optional 'thank-you' note:
  • Quote
  • Report post to moderator
This is the floor plan, showing the floor beams (brown), floor joists (white, 2x10's). You can see that the walker stove is positioned over 2 floor joists that are trippled in width, and will also be doubled vertically. So a total of 12 2x10s under the stove. Does this look sufficient for the Walker stove? How about for something bigger, maybe 1.5x the mass?

Thanks again!

Screenshot-from-2025-03-20-21-35-58.png
Floor Plan Guest House
 
Glenn Herbert
Rocket Scientist
Posts: 4575
Location: Upstate NY, zone 5
599
5
  • Likes 6
  • Mark post as helpful
  • send pies
    Number of slices to send:
    Optional 'thank-you' note:
  • Quote
  • Report post to moderator
Unfortunately, that heater location is just about the worst case for the floor framing depicted: centered on the joist spans, and close to centered on the beam spans. If you added another helical pile under the stove location and tied it to the joists, that would probably be okay. This would give the same kind of foundation support to the whole house, which in a probably deep frost zone should be beneficial to stability.
 
thomas rubino
rocket scientist
Posts: 6525
Location: latitude 47 N.W. montana zone 6A
3394
cat pig rocket stoves
  • Likes 7
  • Mark post as helpful
  • send pies
    Number of slices to send:
    Optional 'thank-you' note:
  • Quote
  • Report post to moderator
Hi Eloise;
After a lifetime of heating with a metal box stove, it is tough to envision heating with a brick/ cob mass.
My wife resisted for three years before relenting and allowing me to remove the old steel stove and build a Batchbox Masonry stove in "her " house.
Now she is their biggest fan!

Your home will be equally warm throughout. It is truly amazing to have 500-900 brick/ cob bell sitting in the living room at 80F—200+F.

The most significant difference between a 6" and an 8" is the size of the firebox.
ISA numbers are the maximum bell each size can heat without using a bypass.
Every build should include a bypass, even if undersized on the ISA.
You can burn more than one load in a Batchbox if conditions warrant it.

As far as having a window.
Look into building a sidewinder version of the Batchbox.
The entire core is turned 90 degrees, and the entrance to the riser is in the side wall rather than the end wall.
This should allow the door to face the sitting area.


My single wall 6" Shorty core weighs apx #2500
An 8" double wall could go over #6000
Your floor is already built extra stout.
You might add a few extra concrete pier blocks that could "catch" any sag that might occur; I doubt any will.


Eloise Rock
pollinator
Posts: 96
Location: South Central Alaska Zone 4a/b
31
  • Likes 6
  • Mark post as helpful
  • send pies
    Number of slices to send:
    Optional 'thank-you' note:
  • Quote
  • Report post to moderator
Thanks guys! Although your input on the floor was contradictory I'm glad to have your input. Good to have multiple perspectives!

So based on the heat loss numbers in my previous post, would you guys say that the Walker stove is in fact under sized for this house? Or am I missing something? I am planning to email Matt on that question too, but I’d like your thoughts as well.

If I went with a batch box what size core would you recommend? The numbers seem to indicate that a 6” is really too small, since everything says to over size rather than under size. Even an 8” appears to be on the small end. Maybe a 9” is what I need? But bigger is harder to fit.

I looked at the sidewinder core and that would definitely relieve the space issue. I’m just not clear on how to size it up if I need to do that? Mostly with the turn through the port. The fire box and heat riser should size up just like the batch box right? But since the fire has to turn to go through the port, and a 9” fire box is wider than a 6”, is that turn lengthening the distance to the port? I’m guessing I’m over thinking it.

If we do add mass, I’m thinking of putting a couple of the concrete piles with adjustable brackets on the ground under the stove. As Thomas said, they can catch any sag, and be easily re-leveled if there is any frost heaving since they are not dug below frost line.

On the topic of mass, I’m wondering where I can find info on the effect of adding mass (as opposed to increasing ISA). Maybe they don’t exist but I’d love some numbers on this. I thought I read somewhere that a single skin bell has about a 4hr lag time, but I can’t find it. If anyone has data on this topic id love to see it.

That’s all for now. Thank you so much guys!

 
Eloise Rock
pollinator
Posts: 96
Location: South Central Alaska Zone 4a/b
31
  • Likes 5
  • Mark post as helpful
  • send pies
    Number of slices to send:
    Optional 'thank-you' note:
  • Quote
  • Report post to moderator
One more thing-
Thomas shorty is beautiful. I’m wondering what is supporting the ceramic tiles on top? Is that surface designed to be thinner and radiate more? How do you like it?
 
master pollinator
Posts: 1839
Location: Ashhurst New Zealand (Cfb - oceanic temperate)
565
duck trees chicken cooking wood heat woodworking homestead
  • Likes 2
  • Mark post as helpful
  • send pies
    Number of slices to send:
    Optional 'thank-you' note:
  • Quote
  • Report post to moderator
Just chiming in here to support Glenn's advice for a pile or pier under the heater location. Without it I think you're asking for trouble.
 
thomas rubino
rocket scientist
Posts: 6525
Location: latitude 47 N.W. montana zone 6A
3394
cat pig rocket stoves
  • Likes 10
  • Mark post as helpful
  • send pies
    Number of slices to send:
    Optional 'thank-you' note:
  • Quote
  • Report post to moderator
Hi Eloise;
I would not go any larger than an 8"
Stove pipe is easily acquired in 6 or 8"
I would build a 6" or a 7" batch in your guest house using an 8" exit chimney.
Once you warm your bell for the season, it will never cool down completely until spring.
With a similar climate here in N.W. Montana, we almost constantly have windows cracked open, even overnight; the masonry is that warm!
Remember, you can add a second load or even a third in a 6" if it is nasty cold outside.
Most of the time, I believe a 6" would keep you very happy.

Once warmed up, the big Walker cookstove would do the job, but you would have to add wood more often.

No worries about a sidewinder, they work every bit as well as the traditional rear exit.

Thank You, we are very proud of and very happy with Shorty.
The tiles are on a split firebrick roof that is supported by superwool-wrapped angle iron tees.


Eloise Rock
pollinator
Posts: 96
Location: South Central Alaska Zone 4a/b
31
  • Likes 2
  • Mark post as helpful
  • send pies
    Number of slices to send:
    Optional 'thank-you' note:
  • Quote
  • Report post to moderator
Thomas,
Thanks so much for your response. I am working on some designs, I'll post them for feedback when I'm finished with them. In the mean time the ground is thawing and I've gotten a little distracted with gardening things. But I will circle back around to the stove when I get that dealt with. Thanks so much for your input!
 
Royal Flush Bitches! Pay up tiny ad:
Binge on 17 Seasons of Permaculture Design Monkeys!
http://permaculture-design-course.com
reply
    Bookmark Topic Watch Topic
  • New Topic