|

|
|
|
|

|

|

|

|

|
 12
12


"We carry a new world here, in our hearts..." --Buenaventura Durruti
"Don't wish it were easier. Instead, wish you were better." --Jim Rohn

Skill verified by gir bot") 20
18
20
18
Nails are sold by the pound, that makes sense.
12
10
10
“The most important decision we make is whether we believe we live in a friendly or hostile universe.”― Albert Einstein
3
14
9
12
9
7
10
John Daley Bendigo, Australia The Enemy of progress is the hope of a perfect plan
Benefits of rainfall collection https://permies.com/t/88043/benefits-rainfall-collection
GOOD DEBT/ BAD DEBT https://permies.com/t/179218/mortgages-good-debt-bad-debt
6
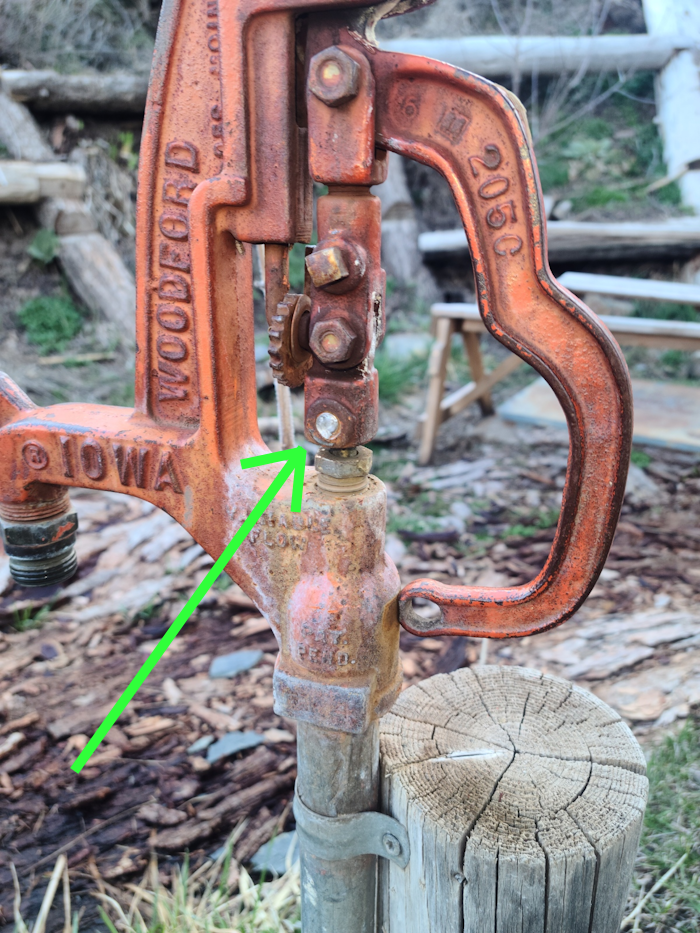
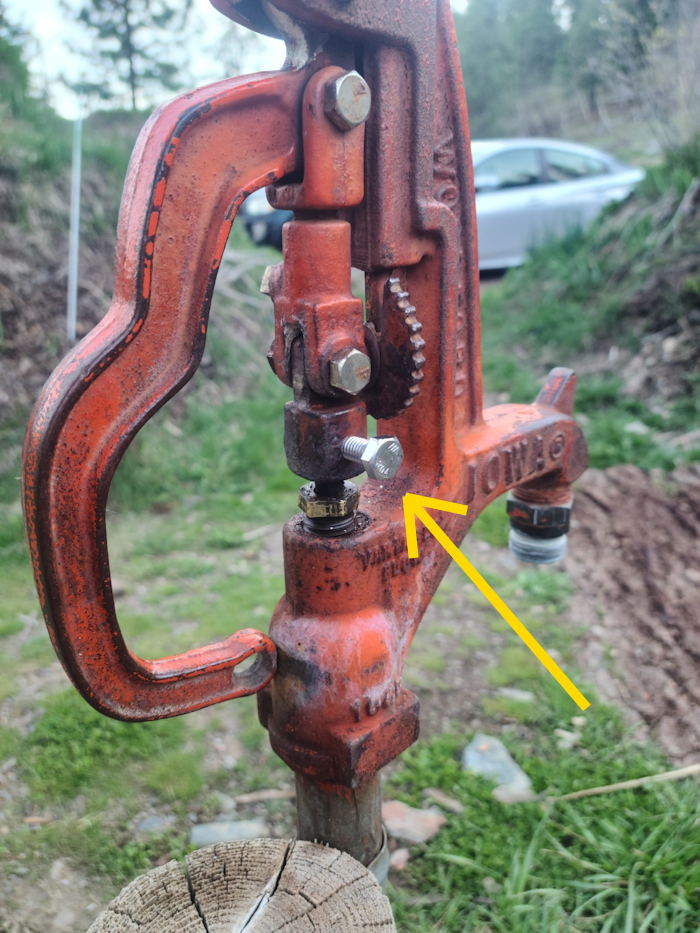
Jr Hill wrote:After all the above just get your shovel out at the ready with a replacement hydrant. The head of the bolt twisted off because it was seized. So other than drilling it out and peeling the threaded remains out - and you'd better be pretty good to go right down the center of the broken fastener, best fortune to you. So many times someone doesn't go down the center of the broken bolt but goes to one side or goes crooked. Maybe even breaking the bit. Reread the first sentence. Oh yeah, and your water will be shut down or a geyser spouting if you fail.
Can you spot the center of a broken fastener. Most can't. Fewer can drill it out successfully.
9
"We carry a new world here, in our hearts..." --Buenaventura Durruti
"Don't wish it were easier. Instead, wish you were better." --Jim Rohn
8

Skill verified by Nicole Alderman")

Skill verified by Mike Haasl")

Skill verified by Ash Jackson") 6
6
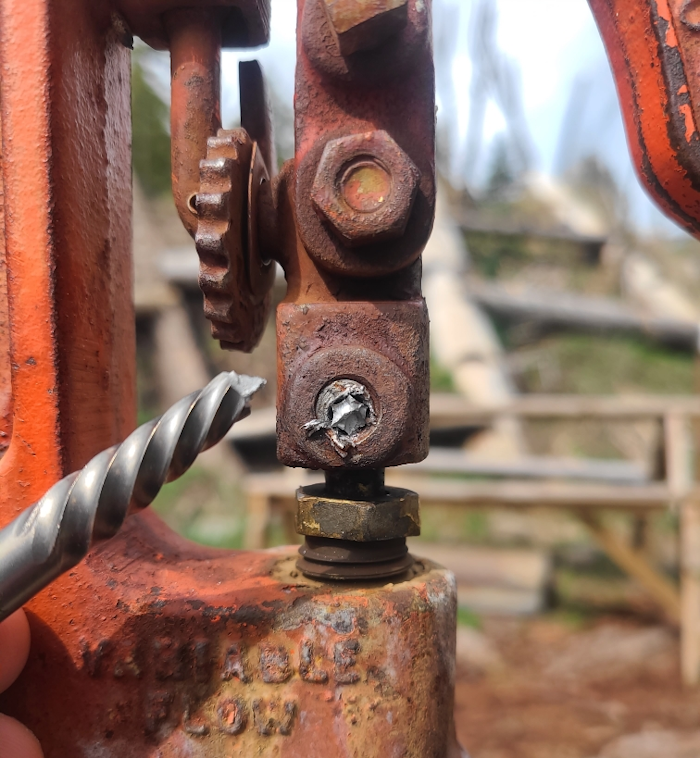
Stephen B. Thomas wrote:Well, I broke off a screw extractor in the hole I drilled in my first attempt.
6
8
David Wieland wrote:
Stephen B. Thomas wrote:Well, I broke off a screw extractor in the hole I drilled in my first attempt.
I'd say that with a broken screw extracter in the way, the welding techniques are the only options left. I can't see any other way to get the necessary grip on the bolt.
7
Douglas Alpenstock wrote:
David Wieland wrote:
Stephen B. Thomas wrote:Well, I broke off a screw extractor in the hole I drilled in my first attempt.
I'd say that with a broken screw extracter in the way, the welding techniques are the only options left. I can't see any other way to get the necessary grip on the bolt.
It would be helpful to have a photo of the current situation.
If there is a protruding, embedded item, sometimes you can take a Dremel and carve in a solid purchase for Mr. 10 Inch Vise Grip, the chairman of the board.
10
"We carry a new world here, in our hearts..." --Buenaventura Durruti
"Don't wish it were easier. Instead, wish you were better." --Jim Rohn
7
Douglas Alpenstock wrote:
Jr Hill wrote:After all the above just get your shovel out at the ready with a replacement hydrant. The head of the bolt twisted off because it was seized. So other than drilling it out and peeling the threaded remains out - and you'd better be pretty good to go right down the center of the broken fastener, best fortune to you. So many times someone doesn't go down the center of the broken bolt but goes to one side or goes crooked. Maybe even breaking the bit. Reread the first sentence. Oh yeah, and your water will be shut down or a geyser spouting if you fail.
Can you spot the center of a broken fastener. Most can't. Fewer can drill it out successfully.
Well you may ultimately be right. But I think it's more interesting to try to repair things. Even if I fail I will have expanded my knowledge a little.
10
Stephen B. Thomas wrote:
I think I have to do something about this, this week. I suspect I'll be suggesting we replace the hydrant.
“The most important decision we make is whether we believe we live in a friendly or hostile universe.”― Albert Einstein
10
"Ah, but a man's reach should exceed his grasp,
Or what's a heaven for?"
Andrea del Sarto by Robert Browning
6

"Ah, but a man's reach should exceed his grasp,
Or what's a heaven for?"
Andrea del Sarto by Robert Browning
5
John Weiland wrote:We have a Merrill AnyFlow [...]
"We carry a new world here, in our hearts..." --Buenaventura Durruti
"Don't wish it were easier. Instead, wish you were better." --Jim Rohn
6
"We carry a new world here, in our hearts..." --Buenaventura Durruti
"Don't wish it were easier. Instead, wish you were better." --Jim Rohn
10

"We carry a new world here, in our hearts..." --Buenaventura Durruti
"Don't wish it were easier. Instead, wish you were better." --Jim Rohn
9
Stephen B. Thomas wrote:Thanks for your patience, everyone. Here's a photo of the hydrant's current state.
I think I have to do something about this, this week. I suspect I'll be suggesting we replace the hydrant.
16
"We carry a new world here, in our hearts..." --Buenaventura Durruti
"Don't wish it were easier. Instead, wish you were better." --Jim Rohn

|
So then I told Joseph Stalin to piss off! Remember that tiny ad?
building a permaculture community with hands on gardening and natural building
https://wheaton-labs.com/bootcamp
|


![[Download p18AnyFlo.pdf]](https://permies.com/templates/default/betaview/images/download-attachment.gif)