posted 12 years ago
Ok, I'm writing this as a 65 year old, handicapped woman with very little energy and lots of pain. If I can do it, pretty nearly anyone can.
I was first introduced to the idea of rocket mass heaters from Clif High of the webbot project, and just sort of mildly clicked on a link to find out what he was talking about. I got the ramifications pretty fast. I'm 65, my husband is 70, we live off the grid in the Colorado mountain wilderness and have no intention of ever leaving to warmer climes. But using 5 cords of firewood a winter to heat our little cabin is getting to be a really serious burden of cutting, hauling, splitting, ad nauseum. So, a stove that would take a fraction of that amount seemed like a really good idea.
First problem - lack of space for mass heat storage. Ok, after fighting that one for awhile, I accepted it and turned toward a bell concept.
Second problem - lack of space for another 55 gal. drum for a bell and lack of money for other alternatives.
Ok, maybe those weren't the first two problems. One really big problem was my husband who didn't believe the whole principle was real, so he refused to have anything to do with it. I could never have managed it without my brother doing the cuts on the two barrels to go around the inner core. But I did the rest by myself. My husband has since eaten his words. (BIG grin.)
I'm writing this as a person who had not a clue as to the engineering concepts, what makes a draft, how to mortar something - nada. First I decided I could not do anything with cob. I just can't stomp on clay and grass to turn it into mortar. So, I found out about "heat stop" which is a high heat mortar and used that as my mortar mix. I would like to find out about fire clay for the next step - I have built the stove part but have not yet tackled the bell. I just decided that I had to put the stove together and plan to figure out materials that I could afford and could build next spring. Even without the bell, this stove is astonishing in its efficiency. The ashes are practically nonexistent and the temperature on the stove pipe doesn't get higher than 150 degrees.
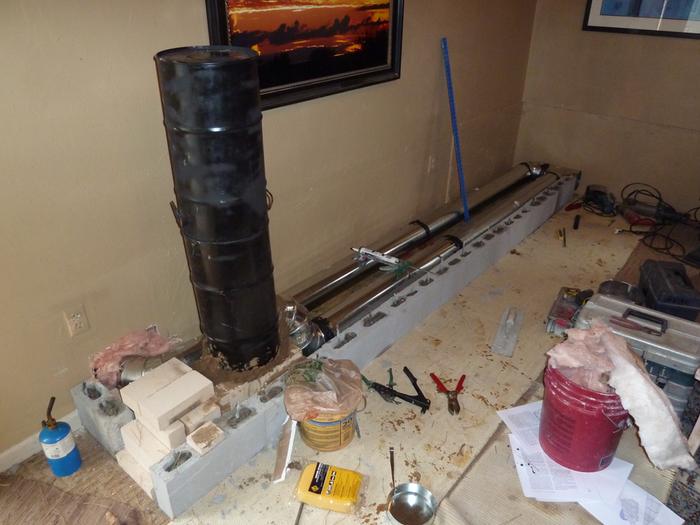
I learned that there are three basic critical measurements: burn tunnel, heat riser square inch ratio to external pipe ratio, and distance from the top of the heat riser to the top of the barrel.
The heater core consists of a firebox, a burn tunnel, and a heat riser. The opening in the burn tunnel has to be the smallest opening. The square inches of the opening of the heat riser has to be either the same size or slightly smaller than the stove pipe leaving the stove. I bought a ceramic furnace flue for the heat riser because it was so much cheaper than fire bricks. That was a mistake because it made the opening big enough that the stove pipe had to be 8 inches instead of the standard 6 inches. That was ok for me, because the stove pipe going out the roof (already there) was 8 inches. We really don't live with alot of money, so when we built the cabin in the first place, our chimney from the roof up is actually three single wall stove pipes, 8, 10, and 12 inches, to give us the protection we needed in a chimney without the cost of a commercially made "box." We had been running a 6 inch pipe up the center of that, but it's ok to have this massively reduced temperature going out directly through the 8 inch. So, anyway, the opening in the burn tunnel is 7X4=28 sq.inches, the opening on the heat riser is 49 square inches and the opening in the pipe is 50+ square inches. So, that worked. I designed for 1.5 inches from the heat riser to the barrel top, but somehow it ended up 2.5 inches, so it's not as good a surface for cooking. That's ok - I have a cook stove. And since the top of the barrel can be opened, I figured out that I could get in there sometime and add some height to the heat riser and insulation to solve that problem - someday.
I used an old water heater tank to go around the heat riser, as an insulation surround instead of a cob and insulation mix. I filled it with perlite and then used some of the heat stop mortar to cover it at the top, making it level with the top edge of the heat riser. The firebox, burn tunnel, and base of the heat riser is made out of one inch firebricks. That is sitting on top of a row of two inch firebricks, with two layers (four inches) directly under the stove itself while there's one row under the whole barrel, which is sitting on top of a piece of cement board. I had to shore up the firebox with another layer of firebricks after I'd built it, so the firebox is now 3 inches thick. My brother cut off the water heater ends and the bottom of the barrel, then cut the square cuts out of the side to go over the burn tunnel.
The draw on this stove is simply fabulous. I finally figured out that I needed to start a fire in the thing with my crumpled up paper on TOP of the kindling instead of underneath it, because the draw is so completely down the burn tunnel that it was burning up the paper sideways without touching the kindling. By putting the paper on the top of the kindling, it burns DOWN to be pulled through the tunnel. Crazy. But it works. We've also learned now that after the fire gets going well, we can put a larger log in it as long as we keep a couple of smaller sticks burning alongside it. So, it takes a little longer between having to load the thing.
I also finally figured out how to build a bell next spring out of something I can afford. I'll be gathering a bunch of flattish granite rocks (well - grandkids will gather them) and build a big box out of them. A rectangle shape will fit in the space better than another barrel. I hope I can use fire clay. That would be a lot cheaper than heat stop mortar.
But, the single most wonderful aspect of the whole thing is spiritual. I feel like I'm sitting next to an outdoor fire pit when I sit in a chair next to my OPEN fire inside my house. Lovely. Simply lovely. It brings the outside in.
Just thought I'd share results since I had written in trying to figure out how to solve problems last summer. I DID it!
Living today because no other time exists.


 8
8