• Post Reply Bookmark Topic Watch Topic
  • New Topic
permaculture forums growies critters building homesteading energy monies kitchen purity ungarbage community wilderness fiber arts art permaculture artisans regional education skip experiences global resources cider press projects digital market permies.com pie forums private forums all forums
this forum made possible by our volunteer staff, including ...
master stewards:
  • r ranson
  • Nancy Reading
  • Carla Burke
  • John F Dean
  • Jay Angler
  • paul wheaton
stewards:
  • Nicole Alderman
  • Pearl Sutton
  • Anne Miller
master gardeners:
  • Christopher Weeks
  • Timothy Norton
gardeners:
  • Nina Surya
  • Matt McSpadden
  • thomas rubino

what's wrong with my rocket stove (aka smoke machine)

 
Posts: 12
  • Mark post as helpful
  • send pies
    Number of slices to send:
    Optional 'thank-you' note:
  • Quote
  • Report post to moderator
Hello all and thanks for any help you can provide. I (and the Mudgirls of BC) built a cob/cordwood/slipstraw studio on my property this summer. About 300 square feet. One of the MGs built a rocket stove mass heater (cob bench). While the cob was drying, it wasn't very efficient for holding heat, but it seemed to have pretty good draw. the barrel would get quite warm even if the bench wasn't. Now - no draw, no smoke into the horizontal area (we can open the ash clean out area and used to see horizontal smoke). No vapour coming out of the chimney. I make good small fires with dry wood, so that's not it. It's been about 6 months of frustration, and bringing in other sources of heat so that we're not doing cold yoga….
I will put up lots of pictures and videos. I don't have the exact dimensions, but I can tell you that the builder (Meli) did a LOT of math, was very specific about the measurements, and did a couple of practice builds and test runs before cobbling it up.
Hopefully I can attach enough photos and videos to give you an idea of what's going on.
oops, just notices a max of 3 allowed…. I might have to post twice….

2013-09-05-11.22.51.jpg
[Thumbnail for 2013-09-05-11.22.51.jpg]
pre cobbing
photo-5.JPG
[Thumbnail for photo-5.JPG]
almost finished studio
2013-09-05-13.18.21.jpg
[Thumbnail for 2013-09-05-13.18.21.jpg]
view from above
 
Yvette Menard
Posts: 12
  • Mark post as helpful
  • send pies
    Number of slices to send:
    Optional 'thank-you' note:
  • Quote
  • Report post to moderator
I'm not sure how to post more pictures in a reply, but hopefully everyone gets the idea!
 
                    
Posts: 238
Location: AR ~ozark mountain range~zone7a
9
  • Mark post as helpful
  • send pies
    Number of slices to send:
    Optional 'thank-you' note:
  • Quote
  • Report post to moderator
Hey Yvette & MGs, beautiful studio & stove. Looks first rate construction wise, to me.

What would happen if you had a small piece of newspaper (on fire) if you placed it at the ash clean out area? I would normally expect your duct/exhaust to draw the piece of newspaper/smoke/fire down stream, to exit the house. If it still won't draw well from a flaming paper at the ash clean out, look for an obstruction, possibly outside. I can see during construction from the one picture, that the duct pipe is not connected properly yet...surely you gals fixed that, right?

From the outside, your exhaust pipe,-- does it lay horizontally & exit, or do you have a vertical chimney? Anyway something got clogged up somewhere, possibly in the mass bench...could it be that the duct pipe became crushed & restricted, probably while being constructed. As you know those duct pipes are easily crushed during construction, and can be successfully reshaped...if you catch the problem at the time...but usually once the mass has set-up & hardened it becomes structurally sound with whatever shape, being deformed or true.

Sometimes a digital camera is easy to stick in a COLD stove, and take pictures in various directions inside the unit plumbing.

james beam
2013-09-05-11.22.51.jpg
[Thumbnail for 2013-09-05-11.22.51.jpg]
 
Yvette Menard
Posts: 12
  • Mark post as helpful
  • send pies
    Number of slices to send:
    Optional 'thank-you' note:
  • Quote
  • Report post to moderator
Thanks for the reply James. I did use a camera (on a cold stove!) to look from the ash clean out toward the heat riser, but I'll try the other way too. Hopefully it's not a collapse at the point where you circled (I am also certain is was well connected before cobbing.)
The exhaust is horizontal to the outside, and then it used to have a high vertical J chimney. I disconnected the J part - I was advised that the cold air was pushing back into the chimney. With just a short horizontal, it seemed to work for a while. I'm hoping that if there is a block, it's something that can be cleaned out and not a collapse.
Do you (or anyone!) have any opinion/information on a small air tube in the feeding chamber? There is one there, but I read on here somewhere that it wasn't necessary and would cause backdraft, so I closed it up - easy enough to reopen though.
Thanks again,
Y
photo-2.JPG
[Thumbnail for photo-2.JPG]
air tube in feed chamber
photo-1.JPG
[Thumbnail for photo-1.JPG]
air tube (outside)
 
                    
Posts: 238
Location: AR ~ozark mountain range~zone7a
9
  • Likes 1
  • Mark post as helpful
  • send pies
    Number of slices to send:
    Optional 'thank-you' note:
  • Quote
  • Report post to moderator
Hey Yvette & MGs Well that is the fun part of building your own stove, becoming well acquainted with it, & then fixing it. LOL Generally I prefer the J chimney, because the draft seems to be stronger above ground level, the higher above ground level...generally the better draft. I think this is the main reason nearly all wood stoves have a chimney that rises above the roof peak, to gain that upper air current draft that pass over the house. I have found that true on RMH set-ups also.

I tried an RMH at my house, with the horizontal ground level exhaust, sad but true the natural air currents rising up the hill to my house pretty much stopped any exhaust flow I was hoping to obtain, I put a vertical duct on the same RMH & it worked much better. Hopefully you didn't reduce your duct work diameter, which is another mistake I did...try to leave the ductwork the same size all the way to the exit point.

I would find the blockage first if at all possible, then change your chimney later if you think necessary, then later again, reopen your air channel on the wood feed. Don't try to change everything at once, it seems better if you concentrate on one 'change' at a time.

Your 'air channel' does that bring in outside air to the wood feed area?~~~just curious~~~ if YES, could please describe & post a pix of the channel.

You might try a golf ball glued onto a stout string, throw the golf ball down the duct to see if it makes it out the exit port outside. It looks like you got electricity, you might try a hand held hair dryer stuffed in the ash clean out (blow upstream & downstream) and then leave the motor running and go outside and see if there is much air at all, also check the otherway (upstream) and see if air is coming out the fuel feed area...listen to the air, maybe you can figure out something like that.

james beam
 
Yvette Menard
Posts: 12
  • Mark post as helpful
  • send pies
    Number of slices to send:
    Optional 'thank-you' note:
  • Quote
  • Report post to moderator
So the good news is - I stuck a leaf blower into the feed chamber, and I felt (and heard on the outside of the building) air all the way out the chimney. The bad news - I followed your suggestion of burning a piece of paper in the ash clean out, and the smoke did not got toward the chimney, but back drafted toward the heat riser. And then it went out!
I posted pictures of the air tube in my previous post. It's about 1" diameter, and on the inside picture you can barely see it on the left
 
gardener
Posts: 3471
Location: Southern alps, on the French side of the french /italian border 5000ft elevation
194
  • Mark post as helpful
  • send pies
    Number of slices to send:
    Optional 'thank-you' note:
  • Quote
  • Report post to moderator
Ivette, one thing, please block that air intake first of all. It might cause more trouble than it is worth for the moment. Open a window or door, and put an incence stick in the ash cleanout and see where the smoke is going.

One big question, how tall is your building? How air tight is the roof? How air tight are the windows and doors? What is the lenght of the horizontal part of the bench? What is system size? width x lenght of the feed tube, to give CSA (cross sectional area) Is your chimney insulated? What are your outside temps?


Do you have access to methylated spirit or denatured alcohol?
 
Yvette Menard
Posts: 12
  • Mark post as helpful
  • send pies
    Number of slices to send:
    Optional 'thank-you' note:
  • Quote
  • Report post to moderator


I tried an RMH at my house, with the horizontal ground level exhaust, sad but true the natural air currents rising up the hill to my house pretty much stopped any exhaust flow I was hoping to obtain, I put a vertical duct on the same RMH & it worked much better. Hopefully you didn't reduce your duct work diameter, which is another mistake I did..
james beam

So I put the vertical chimney back up, and it's working better. Like before actually. The duct work diameter is the same the length of the bench. I reopened the air tube (even though you suggested not to!) only because it was open when it was working before.

So I seem to have a pretty good fire going, the barrel is smokin' hot (okay, not actually smoking… but water does steam off of it in about 0.04 second). There does happen to be a crack behind the barrel, where Meli thought the cob was kind of thin, so there's a little air coming from there. Hopefully that will not require a full reconstruction…..

I do have two final questions:

1) should I be able to place the lid on the feed chamber and have the fire keep going (like closing a wood stove) or will I always need to keep it at least a bit open?

2) How long does it take for a 18 foot bench to warm up? I think it's getting warm about 12" from the barrel, but that could be from the barrel itself.

thanks all

 
Satamax Antone
gardener
Posts: 3471
Location: Southern alps, on the French side of the french /italian border 5000ft elevation
194
  • Likes 1
  • Mark post as helpful
  • send pies
    Number of slices to send:
    Optional 'thank-you' note:
  • Quote
  • Report post to moderator
I think you can't close the feed tube completely. Don't know how much you can close it either. Make a P channel for it, that would be good.

Your bench should be fully charged after 3 to 4 hours of burning, if fired everyday.
 
                    
Posts: 238
Location: AR ~ozark mountain range~zone7a
9
  • Mark post as helpful
  • send pies
    Number of slices to send:
    Optional 'thank-you' note:
  • Quote
  • Report post to moderator
Hey Yvette & MGs, ya the chimney helps a bunch, make sure you buy a rain cap to fit on the top of it (because rusted chimney pipes are not your friend).

Fix that developing crack right away.

OUTSIDE your house, I would probably pierce a small 'weep hole' (1/8" diameter) right in the bottom of the "J" of your chimney...yanno near where it hooks onto your horizontal duct from the bench. Pierce that weep hole so that water or condensation can get out of the pipe (lowest point of the duct work) whenever it accumulates. If you drill the hole, finish the hole with a pair of needle nose pliers and bend the edges around the hole to make it look like a funnel or a little down spout. This should be just big enough to let a drop of water drain out, no larger.

Also while you have your "J" connector loose to pierce & bend the weep hole, you might think about installing a wad of fiberglass or an old shirt in the horizontal pipe. This wad will block off cold air being siphoned back into the house, via the RMH,... to be used when the thing is NOT in use. I would be careful to allow the stove to naturally cool down, some, before installing such a plug, in order to allow all the deadly carbon monoxide to run out of the system first, then plug it. Your leaf blower would come in handy to completely & quickly 'clear' the system of smoke & invisible gasses before plugging it. Then it is just a matter for the quiet heat already stored in the mass...to do it's job.

If you haven't already run your heater hard, for several days, then do it now, as time allows. The main thing is to drive off as much moisture that might still be in the mass/bench by running the thing hard. You don't have to 'absolutely run it continuous', but it would help, to season the RMH stove, it won't really begin to perform until burned hard for a good amount of time. I would be concerned of how hot your wall will become especially next to the burn barrel, you might think about a temporary sheet metal deflector or something (maybe some aluminum foil sheets tacked over the wall) to protect your wall, in the event that the thing is run hard. I'm also concerned of the decorative wood slices you have embedded in the wall, near the burn barrel, I think those could possibly catch on fire, some thin cut bricks or thin rocks should be safer than wood slices near the burn barrel.

Did the thing burn easier when you had the door or window slightly open?

When you burn the sticks, generally I use a spare brick atop the mouth of the fuel feed to regulate the amount of air to the fire, allowing as much air in... you watch the fire, as the fire rises up the sticks toward your hand push the brick up against the sticks to kind of hold them in place & regulate the rate of combustion. As for the fresh air inlet pipe that goes thru the wall somewhere, (I never could see how it was placed, or constructed from your pix, it just looks like a pipe sticking out of the wall...LOL) Ideally I would want that fresh air pipe to provide air in the fuel feed area very close to the bottom of the burn tunnel. This is because fire always wants to lick or travel toward the air supply, that is why the fire almost always wants to travel up the sticks toward the mouth of the fuel feed where the combustion air comes in at. If the fresh air pipe was plumbed down in the LOWER fuel feed area, toward the bottom of the fuel feed/burn tunnel, this will cause all the action to take place in the bottom of the burn tunnel instead of at the top edge of the fuel feed area, a brick is still used at the mouth of fuel feed area, to regulate air, & help support the fuel sticks.

If you feel like experimenting a little further, try finding some schedule 40 steel pipe to connect to the 'outside air inlet' and plumb the pipe from the wall, make a 90 degree bend at the mouth of the fuel feed port, and continue the pipe to 2" from the bottom of the burn tunnel floor. You may have to make a special cover to compensate for the pipe interfering with the mouth of the fuel feed port. This type air inlet arrangement should reduce 'smoke back' somewhat like the 'P-Channel' Satamax suggested.

Are you using the room for Yoga classes for only an hour or two per day?, if YES then you might want to get the house warmed up 4 hours before the appointment time, and see how it goes.

james beam
 
Yvette Menard
Posts: 12
  • Mark post as helpful
  • send pies
    Number of slices to send:
    Optional 'thank-you' note:
  • Quote
  • Report post to moderator

james beam wrote:

Fix that developing crack right away.

and then I took this video…..

http://www.youtube.com/watch?v=AAUP2D4jRp4&feature=youtu.be

I'm guessing this is a near catastrophic fail…….

 
Yvette Menard
Posts: 12
  • Mark post as helpful
  • send pies
    Number of slices to send:
    Optional 'thank-you' note:
  • Quote
  • Report post to moderator

james beam wrote:
I would be concerned of how hot your wall will become especially next to the burn barrel, you might think about a temporary sheet metal deflector or something (maybe some aluminum foil sheets tacked over the wall) to protect your wall, in the event that the thing is run hard. I'm also concerned of the decorative wood slices you have embedded in the wall, near the burn barrel, I think those could possibly catch on fire, some thin cut bricks or thin rocks should be safer than wood slices near the burn barrel.

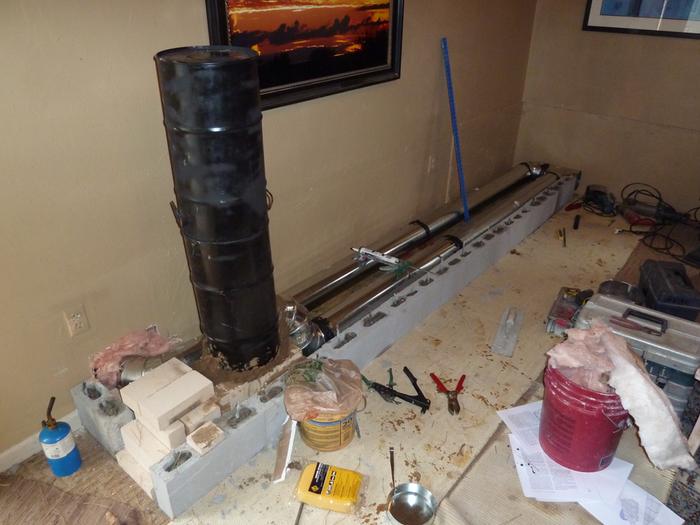
The wood pieces are part of the cordwood wall - they are 14" long and go through and through. There is a metal deflector (permanently) installed behind the barrel though, and no cordwood behind it. And a fire extinguisher in the room.

Did the thing burn easier when you had the door or window slightly open?

When you burn the sticks, generally I use a spare brick atop the mouth of the fuel feed to regulate the amount of air to the fire, allowing as much air in... you watch the fire, as the fire rises up the sticks toward your hand push the brick up against the sticks to kind of hold them in place & regulate the rate of combustion. As for the fresh air inlet pipe that goes thru the wall somewhere, (I never could see how it was placed, or constructed from your pix, it just looks like a pipe sticking out of the wall...LOL) Ideally I would want that fresh air pipe to provide air in the fuel feed area very close to the bottom of the burn tunnel.

The feed tube has a sliding cast iron door (it says Victoria Foundries, pretty cool) so I can leave it open a bit if there's a good fire going and I just want a little air. With a really good fire, I can actually close it sometimes and let it slow burn!

( Yep, it's close to the bottom, and closer to the horizontal area not the mouth of the feed tube)

This is because fire always wants to lick or travel toward the air supply, that is why the fire almost always wants to travel up the sticks toward the mouth of the fuel feed where the combustion air comes in at. If the fresh air pipe was plumbed down in the LOWER fuel feed area, toward the bottom of the fuel feed/burn tunnel, this will cause all the action to take place in the bottom of the burn tunnel instead of at the top edge of the fuel feed area, a brick is still used at the mouth of fuel feed area, to regulate air, & help support the fuel sticks.

If you feel like experimenting a little further, try finding some schedule 40 steel pipe to connect to the 'outside air inlet' and plumb the pipe from the wall, make a 90 degree bend at the mouth of the fuel feed port, and continue the pipe to 2" from the bottom of the burn tunnel floor. You may have to make a special cover to compensate for the pipe interfering with the mouth of the fuel feed port. This type air inlet arrangement should reduce 'smoke back' somewhat like the 'P-Channel' Satamax suggested.

Are you using the room for Yoga classes for only an hour or two per day?, if YES then you might want to get the house warmed up 4 hours before the appointment time, and see how it goes. (yes!)

james beam

 
Satamax Antone
gardener
Posts: 3471
Location: Southern alps, on the French side of the french /italian border 5000ft elevation
194
  • Mark post as helpful
  • send pies
    Number of slices to send:
    Optional 'thank-you' note:
  • Quote
  • Report post to moderator
Yvette, rockets are not made for slow burn. That creates soot and will soon enough plug the horizontal pipe.
 
Yvette Menard
Posts: 12
  • Mark post as helpful
  • send pies
    Number of slices to send:
    Optional 'thank-you' note:
  • Quote
  • Report post to moderator
Thanks, Satamax - I only meant as the coals were burning low, not a recurring or long slow burn. Really more concerned about the crumbling cob at the back of the stove - were you able to see the video?
 
                    
Posts: 238
Location: AR ~ozark mountain range~zone7a
9
  • Mark post as helpful
  • send pies
    Number of slices to send:
    Optional 'thank-you' note:
  • Quote
  • Report post to moderator
Hey Yvette & MGs, Ohhhhhhhhhh O.K. I simply didn't realize your building is cord wood, (I've never seen an actual cord wood wall as nice as this one before) I did notice how thick your window sill was, and I thought ~wow you should be able to heat that place with only a candle or two, hahaha~. Now I'm not so worried about you catching the cord wood on fire, as it seems you have already allowed for the stove heat during construction.

That crack looks pretty sever from your awful video LOL, could you take a simple picture to show where the crack is located, and comment on whether smoke is passing thru the crack (I thought I saw traces of soot within the crack, but I'm not positive...could you please verify there is soot present anywhere within the crack) & how wide & total length of the crack. Did this crack just develop all of the sudden, recently? This expansion crack might be a huge part of WHY your RMH has become a smoke machine, and may have everything to do with your bench not warming up properly, or is the crack simply where the RMH stove & bench separated from one another, or has the stove & bench separated from the cord wood wall?

james beam
 
Yvette Menard
Posts: 12
  • Mark post as helpful
  • send pies
    Number of slices to send:
    Optional 'thank-you' note:
  • Quote
  • Report post to moderator
Hi James (and all!) Thank you for the nice compliment of the cord wood wall!
Here is a picture of the full front/side of the RMH - I just painted (BioLime) last week, and a small crack that was on the front of the barrel has since expanded into the painted area. The cracks are almost exactly opposite each other, one on the front, one on the back (which is why is so hard to take even an awful video!! LOL! The crack is NOT where the bench and RMH meet (I have a feeling that would be easier to fix?) but directly behind the barrel, heat riser, etc.
Smoke was definitely passing through the crack at least a little, and yes, that's soot.
Now that it's cold (and when it's light out, it's only 6 am here!) I'm going to see if I can tell how big the crack is - I have a feeling pretty big…..

I really appreciate all the help I'm getting here!!

Y
photo-9.JPG
[Thumbnail for photo-9.JPG]
front/side of stove
photo-1-2.JPG
[Thumbnail for photo-1-2.JPG]
front crack
photo-2-2.JPG
[Thumbnail for photo-2-2.JPG]
start of crack at back of barrel
 
  • Mark post as helpful
  • send pies
    Number of slices to send:
    Optional 'thank-you' note:
  • Quote
  • Report post to moderator
Hi Everyone
I just joined this forum having found these rocket heaters a while back- having a general interest in wood heating and living in a cold climate- Sweden. There are similarities to these cob heaters and our old tile covered fireplaces used here since the 18th century -small fire and a large mass to store the energy. I have two of these old heaters in my house and a cast iron stove and a water mantled wood stove in the kitchen
Ive also run a glass studio for a long time so I know a bit about combustion and high temperature materials and systems.
Im not entirely sure of the terminology and all design features of these cob heaters but reading about Yvette's problems begs for some comments and questions-
All fireplaces have a vertical chimney- thats to create a draft and get the combustion gasses out- the higher it is, the better draft you get because hot air is lighter than cold air and thus rises- going above the roof apex has nothing to do about catching a draft- its all about achieving height and draft and also a fire safety thing- fireplaces can have sparks coming out of the chimney and its not a good idea to have coals or sparks blowing onto your roof.
Im just generalizing here but off the top of my head you need a minimum of about 15 feet of chimney to create the draft for a normal wood stove
The draft is governed by a adjustable damper on the stove pipe or the chimney itself so you don't create a blast furnace in your wood stove.
For best results if using pipe as a chimney it should be insulated as not to be cooled and defeat the whole idea of more height giving more draft.
So what is the idea of just having a horizontal hole out of the wall at more or less ground level? It will not create a draft.
On a cold day and/or if a chimney has not been used in a while, even the best of chimneys might need help by lighting a newspaper in a place where the heat can rise unrestricted out the chimney and get the draft started
So by design the chamber in the cob heater restricts the draft by having the gasses go first up then down into the long chamber- hot gas does not want to travel down unless something is pulling on them from the other end.
The idea of the cob heater is also to save as much as possible of the generated heat- that means that the you would want to keep the flue gas flow as low as possible and still maintain a draft- even bigger reason to go high with the chimney. (and then damper it to perfect draft)
It is essential to restrict the exit rather than your air supply to regulate the draft- you can oxygen starve the combustion and thereby not get the complete burn you want to achieve.
EDIT- got the J part worked out
I cant tell by your description and movie where your crack is but I doubt very much it is “catastrophic”- just fill it with a furnace cement
A wild guess would be that the material was heated too quickly and/or too hot before it was dry
I just saw the new pictures and I could add that its probably a matter of your stonework drying and shrinking and the metal barrel does not- there is also different movement in the different materials- the metal expands in the heat more than the stonework and something will give.
I wouldn't even bother with all the fine points of the air supply until there is a proper draft in the cob heater- a vent of 10 sq. inches will do in the room.
 
                    
Posts: 238
Location: AR ~ozark mountain range~zone7a
9
  • Mark post as helpful
  • send pies
    Number of slices to send:
    Optional 'thank-you' note:
  • Quote
  • Report post to moderator
Hey Yvette & MGs, I modified your picture, this what I was suggesting for the additional air end up in the burn tunnel/bottom of the fuel feed area. (I'm guessing that is the air pipe thru the wall that I connected to the burn tunnel... hahaha( well~~~it looks like that might be the pipe thru the wall, I really don't know what that is but it probably needs a pipe connected to it just the same~~~)

About that crack, that is now (2) cracks, did you all have a party and someone was dancing around and gave the old stove an old fashioned bump? That is what I think might have happened. LOL

Michael Ahlefeldt mentioned using a damper valve on the chimney, which would probably be wayyyyyyyyy easier than disconnecting the pipe everytime & stuffing an old shirt in the pipe, yanno to keep the stove from siphoning cold air back into the house. Although your tricky Victoria Foundries feed door looks like it will stop most drafts all by itself without an old shirt or a damper valve. I thought Michael's suggestion of fixing the crack seems like a good idea to me, although if you want to go deeper into the repair, I made a few suggestions in the picture with notes.

james beam
photo-9.JPG
[Thumbnail for photo-9.JPG]
I guess that is an air pipe in the wall LOL
2013-09-05-13.18.21.jpg
[Thumbnail for 2013-09-05-13.18.21.jpg]
a few suggestions
 
Yvette Menard
Posts: 12
  • Mark post as helpful
  • send pies
    Number of slices to send:
    Optional 'thank-you' note:
  • Quote
  • Report post to moderator

Michael Ahlefeldt wrote:Hi Everyone

All fireplaces have a vertical chimney- thats to create a draft and get the combustion gasses out- the higher it is, the better draft you get because hot air is lighter than cold air and thus rises- going above the roof apex has nothing to do about catching a draft- its all about achieving height and draft and also a fire safety thing- fireplaces can have sparks coming out of the chimney and its not a good idea to have coals or sparks blowing onto your roof.

There is a vertical chimney there - it doesn't go quite to the roof, but there is only almost cold vapour coming out. The burn is efficient enough that there is nothing else left to come out!

Im just generalizing here but off the top of my head you need a minimum of about 15 feet of chimney to create the draft for a normal wood stove

There's about 18 feet of chimney (horizontal) and then about 5 feet of vertical. The chimney issue seems to be resolved now.


EDIT- got the J part worked out

I cant tell by your description and movie where your crack is but I doubt very much it is “catastrophic”- just fill it with a furnace cement

I did this today! (Well, regular cement). The area underneath the hole in the cob was firebrick - there was no obvious entry into the area where the heat riser is. I'll check it tomorrow to see how it's holding up.

A wild guess would be that the material was heated too quickly and/or too hot before it was dry

That could be it - and that it was too thin to begin with. We really let it dry as much as needed in order to get a fire, and then tried some small fires to heat the cob from the inside out. I think (fingers crossed) the lenght of the bench is okay, and that has very large masses of cob. It makes me think the thinness of the back wall was a bigger issue….

I just saw the new pictures and I could add that its probably a matter of your stonework drying and shrinking and the metal barrel does not- there is also different movement in the different materials- the metal expands in the heat more than the stonework and something will give.


I wouldn't even bother with all the fine points of the air supply until there is a proper draft in the cob heater- a vent of 10 sq. inches will do in the room.

 
Yvette Menard
Posts: 12
  • Mark post as helpful
  • send pies
    Number of slices to send:
    Optional 'thank-you' note:
  • Quote
  • Report post to moderator

james beam wrote:Hey Yvette & MGs, I modified your picture, this what I was suggesting for the additional air end up in the burn tunnel/bottom of the fuel feed area. (I'm guessing that is the air pipe thru the wall that I connected to the burn tunnel... hahaha( well~~~it looks like that might be the pipe thru the wall, I really don't know what that is but it probably needs a pipe connected to it just the same~~~)

Ha ha! fooled you! that's a decorative wine bottle in the wall! The air tube is inside the feed chamber. If I knew how to do those cool drawings on my photo, I'd be able to show you….

About that crack, that is now (2) cracks, did you all have a party and someone was dancing around and gave the old stove an old fashioned bump? That is what I think might have happened. LOL

Yup. Plus I live on the BC coast - who knows how many micro earthquakes we have in a year. (answer: over 300…..)

Michael Ahlefeldt mentioned using a damper valve on the chimney, which would probably be wayyyyyyyyy easier than disconnecting the pipe everytime & stuffing an old shirt in the pipe, yanno to keep the stove from siphoning cold air back into the house. Although your tricky Victoria Foundries feed door looks like it will stop most drafts all by itself without an old shirt or a damper valve.

Yes, it's pretty draft proof in there…..

I thought Michael's suggestion of fixing the crack seems like a good idea to me, although if you want to go deeper into the repair, I made a few suggestions in the picture with notes.

I'm hoping the repairs today will suffice and there won't be a need to remove the barrel and do it all over again. If that ends up being required, I can see me ending up with a very expensive bench….. As well as cementing the hole behind/below the barrel, I replastered some of the smaller cracks. I knew that would happen with the expansion/contraction issues, and even added a little extra plaster to a small gap forming around the entire barrel.

james beam


Posts: 238
Location: AR ~ozark mountain range~zone7a
9
  • Mark post as helpful
  • send pies
    Number of slices to send:
    Optional 'thank-you' note:
  • Quote
  • Report post to moderator

Yvette Menard wrote:I'm hoping the repairs today will suffice and there won't be a need to remove the barrel and do it all over again. If that ends up being required, I can see me ending up with a very expensive bench…..


The expense to remove the burn barrel shouldn't be much, most cob recipes are reusable, just get it wet & rework it, albeit I would definitely expect more cob is required to build up the mass around the inside base of the barrel and especially over the burn tunnel area (within the barrel), the burn tunnel roof is the hottest part of the system, and needs a lot of mass to handle the thermal shock. And by building up that area (within the barrel, over the burn tunnel, at indicated in the picture {or even more cob than indicated}thickly build it up will not affect your exhaust flow. Your exhaust area into the duct pipe looks real good already!

The expense to remove the burn barrel shouldn't be much, if nothing else to see if your stainless steel heat riser cover has been expanding terribly. SS is well known for it's large expansion rate, I only suspect that expansion could cause flow problems within the unit. But I'm keeping my fingers crossed that this unit has no such problem!

Some people get a bad reputation around here at Permies, I guess I shall now be known as the guy that tried to connect a wine bottle to the RMH...expecting high performance! hahaha

james beam
 
Michael Ahlefeldt
Posts: 2
  • Mark post as helpful
  • send pies
    Number of slices to send:
    Optional 'thank-you' note:
  • Quote
  • Report post to moderator
Glad to hear you got it working after all -seemed such a waste not to be able to use it.
Again being a newbie here and not having gone through all the extensive discussions yet, I may be kicking in open doors, but I downloaded Ernie and Erica's plans and I don't see that issue of the joint between the metal barrel and cob/plasterwork being addressed plainly- there is a vermiculite expansion but it is further down if I got it right.
That barrel is going to expand and contract constantly and you're fighting a losing battle to try to fix the gap between the materials with plaster or other “hard” materials. Its probably not even be a great idea to fill the gap because it needs that space to expand when hot.
It wouldn't be a big job to remove a couple of inches of the- Ill call it stone work- and then wrap a strip of say foam rubber (or plastic) ¼ or ⅜” thick around the part of the barrel below the stonework and then fill the stonework back against the foam. After it has set you pull the foam out leaving a open joint between the materials that you fill with a high temperature fiber caulk- like this for example-

http://www.unifrax.com/web/UnifraxHome3.nsf/HTMLNews/A383A07E194B305C852569420055BCB2?OpenDocument

Its a lot of a over kill but its a great material- it resembles papier mache when its dry- but it stands up to very high temperatures. It also has the ability to be applied on a hot surface- like a repair on a running smelter etc
You fill that space with that caulk and it will seal it and take up the movements of the materials and if you slick it before its dry it will have the same appearance as plaster- dull white surface.
If you do lift the barrel you can deal with cracks inside with the same stuff.
Whats inside the stainless rising tube? Any pictures?
I do realize in reading here that there are various different schools of thought, concerning using “natural” materials vs man made (in lack of better words) and I respect the reasoning behind it, but Ive seen some less than great solutions to normal issues in dealing with high temperature applications. On the other hand Im learning a lot of things I haven't run into before- great fun!
James- What does one do you get a bad reputation here? Not read all the threads before posting???
 
                    
Posts: 238
Location: AR ~ozark mountain range~zone7a
9
  • Mark post as helpful
  • send pies
    Number of slices to send:
    Optional 'thank-you' note:
  • Quote
  • Report post to moderator

Michael Ahlefeldt wrote: On the other hand Im learning a lot of things I haven't run into before- great fun!
James- What does one do you get a bad reputation here?


Glad to hear your learning some stuff & having fun Michael, welcome to Permies and I'm sure we are all interested in your Svedish point of view!

I don't think you can have a bad reputation, I was just joking around, poking fun at myself & my new claim to fame. But you might watch your step if your posting on some of the threads here & there those Hatfields & McCoys are kind of a rough bunch... I'm joking, I'm joking again.

james beam
reply
    Bookmark Topic Watch Topic
  • New Topic