• Post Reply Bookmark Topic Watch Topic
  • New Topic
permaculture forums growies critters building homesteading energy monies kitchen purity ungarbage community wilderness fiber arts art permaculture artisans regional education skip experiences global resources cider press projects digital market permies.com pie forums private forums all forums
this forum made possible by our volunteer staff, including ...
master stewards:
  • Nancy Reading
  • Carla Burke
  • r ranson
  • John F Dean
  • paul wheaton
  • Pearl Sutton
stewards:
  • Jay Angler
  • Liv Smith
  • Leigh Tate
master gardeners:
  • Christopher Weeks
  • Timothy Norton
gardeners:
  • thomas rubino
  • Jeremy VanGelder
  • Maieshe Ljin

Creative watering techniques?


Posts: 16
Location: Conway, MA
  • Mark post as helpful
  • send pies
    Number of slices to send:
    Optional 'thank-you' note:
  • Quote
  • Report post to moderator
    I don't know that this fits here, as it seems most responses have been regarding outdoor, in-ground applications, but I'll post it nevertheless.  As with many things I do, it is a miniaturization of large-scale commercial methods; in this case, the system used by a local greenhouse.  And as with some of the things I do, there have been happy accidents.  I welcome suggestions for improvements, and I apologize for the lack of pictures in advance.

    First, a bit of context:  I'm currently growing vegetables way back in the woods with no power and no well.  There is a seasonal stream, however.  We have a greenhouse, which is wood-heated. 

    I bought food grade blue 55-gallon drums, arranged them in a line down the center of the greenhouse about 4' apart and made sure the tops were all level.  Then I wrapped a 3/4" sheet of plywood in 6 mil poly and screwed on 2x4 sides.  That is placed atop/spans three barrels, leaving the openings (there is a 3" threaded plastic cap in my barrels) of barrels 1 and 3 open.  Into that opening I drop a plastic hand-pump that is ordinarily used for moving fuel from drums to vehicles and which I use to flood the tables with the water in the barrels.

      In the winter, when we're lighting fires to keep the seedlings from freezing, I keep water in the barrels to store heat.  The mass of the water has the additional benefit of making the barrels extremely good support pillars for the watering table.  Now that it's warming up and the weather is becoming more microbially friendly, I don't store as much, and make sure to thoroughly empty a barrel before I recharge it.  Water is gravity fed - through a sand filter - from the stream via 2" lay-flat.  This time of year, I just tuck the lay-flat into the corner of a table and let 'er rip.

      I start seeds in soil blocks in trays with fairly open bottoms.  The benefits of bottom-watering and soil blocks have been enumerated elsewhere, so I won't go into them here.  One caution, from the greenhouse owner, regards fertigation: you should use an EC meter (I know, it's fancy-schmancy) to check the build-up of fertilizer salts (I know, you all don't use such and neither do I, but still...) in your plugs/blocks, as this system lacks the  flushing action of overhead watering. 

      So you flood the table, wait fifteen minutes at most, or until it seems that your plants have what they need.
The depth to which you flood depends on the size of your blocks/plugs - the larger they are, the deeper the water needs to be to wick up through the block in the time limit.  Then you pull the drain-plug and the water exits the system.  Where it goes is up to you, and fertile ground for creativity.

      I mentioned before that the tops of the barrels were leveled.  I shim to create just enough slope to drain the table when I pull the plug.  In the commercial greenhouse these tables are 20' long with one end 1/4" higher than the other.

      There are problems with this system on a philosophical level for me.  I hate using so much plastic, and having it all bake in the sun day after day.  I am aware of the extremely inefficient use of wood when used to heat the air in a stand-alone greenhouse without so much as an inflater fan.  Practical hurdles are getting three barrels to stand in the same plane so that the watering table is supported on each end and in the middle.  If it isn't, there is a surprising amount of deflection under the weight of the flats, and that results in uneven water distribution and hence, rate of uptake.

      But: if the tables could be stiffened enough, and if they could be properly (read:evenly) supported, and if the various plastic components could be replaced with wooden/bamboo/glass counterparts, and if this all took place in a structure attached to it that could share some of that heat we're throwing off from the stove, and if the water exited to somewhere that could use it well, I'd feel pretty good about the whole thing.

      Some other ideas include the creative reuse of pick-up bedliners, but I don't know that it would be worth it.
 
Posts: 2134
18
  • Mark post as helpful
  • send pies
    Number of slices to send:
    Optional 'thank-you' note:
  • Quote
  • Report post to moderator
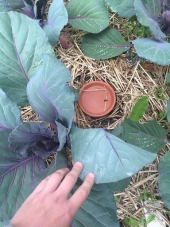
Ozark lady it is interesting that the plants roots all grew ito the fertilised water boottle ends. it is why doing it is important, you learn what plants  can do and what they like.
  i read this thread, i must have done i wrote somtihng here and yet i don't remember reading about using flower pots to water with, i do remember a woman on you tube who put pots in her beds but ones with a smal neck and fat belly which woudl be evpensiiiiiive. However i put pots next to the plants i planted this winter so some bit of me remembered.
          Sometimes it seems to me people think that if you write about something they have written about then they think that you stole it off them and you got it from another source their is a lot of material out their. Somtimes i have thought something up myyself and then found it out there  o ht eweb not in a sight like tihis that i know but in some place i have never seen before and if you read about scientists that two of them are working on the same idea at once is normal . In this case i can't remember reading about using flower pots but i did it this year in my garden, i thought i did it  because of the fat beelied pots i had read about but it seems i read of the use of flower pots too, so may be you don't even remember if you have borrowed an idea and i try to keep myself straight on these things.
I have  a photo of a pot i put in beside a tree i planted but after reading this i don't think a photo is necessary. It makes me sick when i hav ean idea long before i meet another person and they think i hav estolen it off them. agri rose macaskei .
 
                        
Posts: 16
Location: Conway, MA
  • Mark post as helpful
  • send pies
    Number of slices to send:
    Optional 'thank-you' note:
  • Quote
  • Report post to moderator
And might I add:

http://www.restorationfarm.org/Restoration_Farm/Home/Entries/2010/4/26_Peters_Lawtons_Rocket_Pot_and_Rocket_Rack_System.html

The professional version of the system described previously, with Powerpoint slideshow to boot.
 
Posts: 71
2
  • Mark post as helpful
  • send pies
    Number of slices to send:
    Optional 'thank-you' note:
  • Quote
  • Report post to moderator

Son of Levin wrote:    I don't know that this fits here, as it seems most responses have been regarding outdoor, in-ground applications, but I'll post it nevertheless.  As with many things I do, it is a miniaturization of large-scale commercial methods; in this case, the system used by a local greenhouse.  And as with some of the things I do, there have been happy accidents.  I welcome suggestions for improvements, and I apologize for the lack of pictures in advance.

    First, a bit of context:  I'm currently growing vegetables way back in the woods with no power and no well.  There is a seasonal stream, however.  We have a greenhouse, which is wood-heated. 

    I bought food grade blue 55-gallon drums, arranged them in a line down the center of the greenhouse about 4' apart and made sure the tops were all level.  Then I wrapped a 3/4" sheet of plywood in 6 mil poly and screwed on 2x4 sides.  That is placed atop/spans three barrels, leaving the openings (there is a 3" threaded plastic cap in my barrels) of barrels 1 and 3 open.  Into that opening I drop a plastic hand-pump that is ordinarily used for moving fuel from drums to vehicles and which I use to flood the tables with the water in the barrels.

      In the winter, when we're lighting fires to keep the seedlings from freezing, I keep water in the barrels to store heat.  The mass of the water has the additional benefit of making the barrels extremely good support pillars for the watering table.  Now that it's warming up and the weather is becoming more microbially friendly, I don't store as much, and make sure to thoroughly empty a barrel before I recharge it.  Water is gravity fed - through a sand filter - from the stream via 2" lay-flat.  This time of year, I just tuck the lay-flat into the corner of a table and let 'er rip.

      I start seeds in soil blocks in trays with fairly open bottoms.  The benefits of bottom-watering and soil blocks have been enumerated elsewhere, so I won't go into them here.  One caution, from the greenhouse owner, regards fertigation: you should use an EC meter (I know, it's fancy-schmancy) to check the build-up of fertilizer salts (I know, you all don't use such and neither do I, but still...) in your plugs/blocks, as this system lacks the  flushing action of overhead watering. 

      So you flood the table, wait fifteen minutes at most, or until it seems that your plants have what they need.
The depth to which you flood depends on the size of your blocks/plugs - the larger they are, the deeper the water needs to be to wick up through the block in the time limit.  Then you pull the drain-plug and the water exits the system.  Where it goes is up to you, and fertile ground for creativity.

      I mentioned before that the tops of the barrels were leveled.  I shim to create just enough slope to drain the table when I pull the plug.  In the commercial greenhouse these tables are 20' long with one end 1/4" higher than the other.

      There are problems with this system on a philosophical level for me.  I hate using so much plastic, and having it all bake in the sun day after day.  I am aware of the extremely inefficient use of wood when used to heat the air in a stand-alone greenhouse without so much as an inflater fan.  Practical hurdles are getting three barrels to stand in the same plane so that the watering table is supported on each end and in the middle.  If it isn't, there is a surprising amount of deflection under the weight of the flats, and that results in uneven water distribution and hence, rate of uptake.

      But: if the tables could be stiffened enough, and if they could be properly (read:evenly) supported, and if the various plastic components could be replaced with wooden/bamboo/glass counterparts, and if this all took place in a structure attached to it that could share some of that heat we're throwing off from the stove, and if the water exited to somewhere that could use it well, I'd feel pretty good about the whole thing.

      Some other ideas include the creative reuse of pick-up bedliners, but I don't know that it would be worth it.


Why cant you fill the water table just a bit and leave the water there? wouldnt the soil continue to bring the water up with osmosis to dampen the rest of the soil until all the water was used up? you might have some "fertilizer" left, but just dont use as much next time. and there would be no water to drain. you might not even have to water less. I might not fully understand your system though.
 
Rachell Koenig
Posts: 71
2
  • Mark post as helpful
  • send pies
    Number of slices to send:
    Optional 'thank-you' note:
  • Quote
  • Report post to moderator
-might not have to water less
*might be able to water less
 
Posts: 112
Location: Mountain West of USA, Salt Lake City
1
  • Mark post as helpful
  • send pies
    Number of slices to send:
    Optional 'thank-you' note:
  • Quote
  • Report post to moderator
we're rocking a few thousand feet of t-tape (drip) and a big section of old school ditch irrigation. not to mind blowing but its very effective for very large spaces in the mountain west.
 
gardener
Posts: 3257
Location: Cascades of Oregon
816
  • Likes 1
  • Mark post as helpful
  • send pies
    Number of slices to send:
    Optional 'thank-you' note:
  • Quote
  • Report post to moderator
This is one of our self watering beds. We were using an old horse trough as a water feature against a straw bale wall along one side of our patio. After one too many drowned chipmunks the wife asked me to come up with something else. I ran a coil of 4 inch corrugated drain tube in the bottom. Covered that with weed barrier and a placed a terra cotta flue pipe through the weed barrier reused the 12 volt fountain pump that was in the water feature inside the terra cotta pipe. Drilled a drain hole slightly above the corrugated pipe level and a hole throuh the back side well above that level for the pump wires to go through. On top of the weed barrier compost and soil were added. The flue pipe base is below water level and the pump gives the sound of running water from the resevoir created by the corrugated pipe. Rainbow chard mixed in with flowers gives us another attractive servicable raised bed. The pump isn't necessary and doesn't have anything to do with the watering it just makes noise and adds visual movement to the feature.
fountain-in-bed.JPG
[Thumbnail for fountain-in-bed.JPG]
selfwatering-bed.JPG
[Thumbnail for selfwatering-bed.JPG]
 
Rachell Koenig
Posts: 71
2
  • Mark post as helpful
  • send pies
    Number of slices to send:
    Optional 'thank-you' note:
  • Quote
  • Report post to moderator
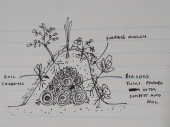
A friend of mine told me about "water-wise" gardening. You dig about 2 foot deep and maybe 2 foot wide hole (please correct me if you know what i'm talking about, i might have this wrong), and then fill it with absorbent material (she used wood chips) then she put a rock on top of it. She said that when it rained, the extra water would collect there, and in dry spells, it would move out to the rest of the garden.
I suppose you would put one in every 15 feet. ONLY guessing this stuff. I bet you could look up water wise gardening.
 
But why do you wear your googles indoors? While holding this tiny ad?
GAMCOD 2025: 200 square feet; Zero degrees F or colder; calories cheap and easy
https://permies.com/wiki/270034/GAMCOD-square-feet-degrees-colder
reply
    Bookmark Topic Watch Topic
  • New Topic