• Post Reply Bookmark Topic Watch Topic
  • New Topic
permaculture forums growies critters building homesteading energy monies kitchen purity ungarbage community wilderness fiber arts art permaculture artisans regional education skip experiences global resources cider press projects digital market permies.com pie forums private forums all forums
this forum made possible by our volunteer staff, including ...
master stewards:
  • Anne Miller
  • r ranson
  • Pearl Sutton
  • Jules Silverlock
stewards:
  • Nicole Alderman
  • Leigh Tate
  • paul wheaton
master gardeners:
  • Carla Burke
  • Nancy Reading
  • John F Dean
  • Jay Angler
gardeners:
  • Clay Bunch
  • Kristine Keeney
  • Christopher Weeks

Breaking "all the rules", and looking for input

 
Rocket Scientist
Posts: 4100
Location: Upstate NY, zone 5
421
5
  • Mark post as helpful
  • send pies
    Number of slices to send:
    Optional 'thank-you' note:
  • Quote
  • Report post to moderator
Lots of points for discussion!
I will probably take a few posts to cover them all rather than try to cram everything into one massive post.

Starting with the burn tunnel, I don't think the long S-shaped tunnel is going to work as well as a shorter one. The common rule of thumb for proportions is 1:2:4 or 1:2:3 (feed:burn:riser), and with two elbows included, figured at around 5' per elbow for duct runs, you have more like 1:2:2 or 1:12:2. Even discounting the drag of the elbows, most of the combustion will be over before the gases get to the riser. With the strong natural draft you obviously have, you may be able to get it to work, but I really want the input of one of the researchers on this, like Erica Wisner or Peter van den Berg.

How essential is it to you to keep the feed tube centered in the fireplace opening? That causes a bunch of contortions, increased complexity of construction and maintenance, and possible reduced efficiency. You will not have the bells cleanly separate from the fireplace opening anyway, as you need to have two channels connecting to each of them. If the feed tube is tight to the side of the first bell, you would have a simpler look with no lump of masonry in the middle of the fireplace.

The P-channel has a specific form and function in a J-tube, and should have about 5-7% of the total flow area. Restricting flow around the wood as it burns down is a recognized technique, generally achieved by sliding a brick across the top of the feed tube as desired. A J-tube naturally gets several times the air required for complete combustion, and is improved by restricting the flow either with a full load of wood or a top closure. The P-channel also is originally conceived to fit in a square opening, and might not adapt well to a round opening. Part of the effectiveness of a J-tube comes from the square corners of the flow path, turning abruptly from vertical feed to horizontal burn tunnel to vertical riser. Smooth elbows reduce the turbulent mixing here. The P-channel induces a small constant flow which is injected downward into the fire, and then the tripwire that works with it generates beneficial turbulence at the roof of the burn tunnel where the hottest gases are flowing.
 
Posts: 39
Location: Oregon
  • Mark post as helpful
  • send pies
    Number of slices to send:
    Optional 'thank-you' note:
  • Quote
  • Report post to moderator
Glenn,

THANK YOU!

I totally forgot about a 90 degree elbow accounting for 5' (?) length of straight duct! (Had the same issue designing the ducting for my solar heater!)

The drawing is not to scale, I had the feed tube planned to be as close as possible to the first bell with just enough room to pass the 1st bell's exit ducting between the left wall of the fire place and the feed tube as it was directed back into the fireplace then across to the other side, behind the feed tube (Thinking the burn tunnel would start at the feed tube and it's short horizontal burn "area" would then go directly to the first 90 degree elbow... From there it would come straight out towards the front just enough to clear the corner of the fireplace opening plus whatever it took to account for clearance (centering front to back), within the 1st bell. The last 90 elbow would be directing the flame up to the heat riser. )

With understanding the drag/friction of a single 90 degree elbow, it looks like I'm now back to square one... not giving up... Maybe it might help if I drew a scale drawing of the top, front and side views of what I'm "hoping" to use as my burn tunnel... (My goal is not to center the feed tube in the center of the fireplace... no need. I'm more concerned about creating an efficient system (doesn't have to be perfect, but I do want the higher temps, closer to 2,000.) I REALLY want the feed tube inside the fire place and at least half of the burn tunnel... Just have to look at my priorities again, reconsider compromises and search for "loop holes" if they exist.

Not what I "wanted" to hear, but totally recognize truth as what I "need" to hear!

Thank you!

Getting ready to eat dinner, so I'll have to come back. Probably print out your post so I can read it slowly... I do thank you so much for taking the time to explain what you have.

I'll be back (probably tomorrow)

Best,

Richard
 
Richard Jarel
Posts: 39
Location: Oregon
  • Mark post as helpful
  • send pies
    Number of slices to send:
    Optional 'thank-you' note:
  • Quote
  • Report post to moderator
had a couple of seconds before dinner is ready and re-read your post.

I don't have to have round ducting for my burn tunnel. I can mold and cast in any shape. (Creating molds and casting is one of my strong points.) Actually, square would be easier, especially with sharp corners at the turns.

I might be misunderstanding so I need to ask:

Is the second bell in the system for a completely separate burn tunnel??? I "thought" it was to capture hot air exiting from the first bell in a way that it would radiate to a larger surface to be transferred to collecting mass?

OK... final call for dinner! LOL!
 
Glenn Herbert
Rocket Scientist
Posts: 4100
Location: Upstate NY, zone 5
421
5
  • Mark post as helpful
  • send pies
    Number of slices to send:
    Optional 'thank-you' note:
  • Quote
  • Report post to moderator
Okay, bells.
Cob or brick around the metal bell enclosure will absorb some heat to be radiated slowly, but they will let less heat out than a bare metal skin. So the exhaust from a mass bell will be hotter than from a bare metal bell or duct.

You don't need to use stainless steel for the bell enclosure; plain steel will do fine. That's what an ordinary barrel is, after all, and they have lasted 20 years or more in that position.

The second bell is downstream from the first bell, and its hottest point will be cooler than the first bell's coolest point. Therefore the second bell gives off considerably less heat. Re your sketch, the second bell entrance is at the bottom, and air simply rises freely to the top, then falls as it cools. Ideally, the entrance should be just a bit higher than the exit (which should be as low as possible), and the entrance flow should not point at the exit. As you need both on the same side of the bell, I would put the entrance duct right on top of the exit duct.

You mentioned clearances from bells to the bookshelves on each side; This is a real concern as well as a code issue. The Masonry Heater section of the International Building Code specifies clearances to combustibles from various elements, and the only way a clearance of as little as 4" is allowed is if the outer wall of masonry is at least 8" thick and the flue channel walls are 5" thick. This is ambiguous, but it means that you need either 8" or 13" of masonry to fit code - obviously impossible in your circumstances. A 4" brick skin on the first bell with 4" of clearance to bookshelves would make me uncomfortable. 8" clearance with a steel heat shield spaced 1" away from the wood would not meet code, but in your situation I would probably be comfortable with it. That still doesn't allow bells clearing both sides of the fireplace opening. I think you may need to rethink what you can accept.
Remember that your current heat output is less than you will get with an efficiently burning rocket that approaches 2000F in the combustion zone. The top of the bell will see 1000F temperatures inside.

Oh, and on the burn tunnel temperatures and wood going out before being completely consumed, a refractory core with insulation around it will have more mass and keep the embers going after they would have died on their own. Two 6" completely cob rockets I have built and used, one of them a J-tube, will burn the fuel to mineral ash when left to go out by themselves.
 
Glenn Herbert
Rocket Scientist
Posts: 4100
Location: Upstate NY, zone 5
421
5
  • Mark post as helpful
  • send pies
    Number of slices to send:
    Optional 'thank-you' note:
  • Quote
  • Report post to moderator
You might enjoy a couple of examples of casting J-tubes. The first one is a 6" outdoor cob rocket cookstove, and I made the inner form from scrap wood and burned it out after forming cob around it. The second is an 8" cast refractory for my house RMH, with a reusable styrofoam inner form.
IMG_0591-w600.jpg
[Thumbnail for IMG_0591-w600.jpg]
6" core inner form in position
IMG_0592-w600.jpg
[Thumbnail for IMG_0592-w600.jpg]
construction details of form
IMG_0859-w600.jpg
[Thumbnail for IMG_0859-w600.jpg]
8" core inner form
IMG_0882-w600.jpg
[Thumbnail for IMG_0882-w600.jpg]
cast and outer form removed
IMG_0903-w600.jpg
[Thumbnail for IMG_0903-w600.jpg]
thin plastic bags made excellent mold release
IMG_0906-w600.jpg
[Thumbnail for IMG_0906-w600.jpg]
ready to install
 
Richard Jarel
Posts: 39
Location: Oregon
  • Mark post as helpful
  • send pies
    Number of slices to send:
    Optional 'thank-you' note:
  • Quote
  • Report post to moderator
Good morning,

Glenn: Again, Thank you for gifting me your time and for sharing! (Again, not what I "want to" hear, but what I "need to hear"! ) Especially about code... And I will ALWAYS be grateful for that! Your castings look great!!! Inspiring!

Bear with me as I'm only on my 1st cup of coffee and it takes a few to get my brain functioning, so what I'm sharing here will most likely fall into the 'random-free-thought" category...

So many "hurdles" to overcome...

Don't even know where to start, so I started by reading this thread again, from the beginning. Threw out any pre-concieved ideas, goals, plans, etc...

As a professional prototype developer, I ended up asking myself questions I would ask a designer that seemed "all over the place"...

(This means, my thought process is STARTING OVER, with a blank sheet of paper.)

I started with: "What are we searching for?" Answer: To offset use of our current electric heating system. Our existing fireplace, when used "normally" only heats the living room and a fireplace insert just seems so expensive, but worthy of re-examining especially if I can redirect the heat to be blown over to our central air intake.

(As you've seen by some of the photos I've shared here, Tresa and I are attempting to live a self sustainable lifestyle and began with food production. Currently we produce over 75% of all our food. (We are being sought after by many organizations to put on our teaching presentations to share what we've accomplished.) For me, "alternative energy" was the next direction in "self sustainability", attempting to get "off the grid" as much as possible while living on a residential lot in the city. I already "solved" our summer cooling, reducing our monthly bills from about $600 to $150. Next came heating in the winter:

I began to solve "my personal energy related goal" with solar heat. (Yesterday, my 'small' solar collector "experiment" heated our home most of the day and brought indoor temps up to 71 degrees. Indoor temps didn't fall below 68 until almost midnight (Outside was 38). I believe this is because of the thick lath and plaster walls acting as a mass heat collector. With the much larger solar collector I plan to build and install before this fall, this kind of performance should increase many times over.

Next, was what to do when the sun wasn't available which included night time. My "solution" was to explore rocket stove technology and keep whatever I built, within the footprint of our existing fire place.

Even though I cannot "technically" call this a rocket stove (because of it's low temp burns compared to the classic rocket stove), this system (as is), has really filled the "void" I was trying to fill... If I didn't have to worry about anything else, my prime focus with this current system, has been (still is), trying to store heat to last longer during the night. (Ex-firefighter here... I will NOT burn anything while we are sleeping. I complete our last burn for the night and leave the central heat set to 67 to kick in when indoor ambient temps drop to that level... probably means we're using our "grid energy" for heating for about 3 - 5 hours. Certainly much better than 24/7... That's a "start".

We're using about 1 cubic foot of hardwood per 24hr period. As a precaution, I disassembled the entire system yesterday to check for ash build up and creosote. Total ash measured was 3.5 cups of fine, powdery ash after burning for almost 1 month (This included our burn tunnel/feed tube area which I usually clean out every morning before starting.). The inside walls of the ducting were smooth and shiny (no creosote). Not saying that there won't be a build up over time, but for now, nothing. and still plan to check regularly.

This system brings our indoor temps to about 72 degrees which is decadent for us. (We never run our electric central heat system past 68). The heat is dispersed evenly throughout the house via the use of our central air intake and fan, running the heated air through our existing central air ducting and lasts for about 3 - 4 hours after the last burn and shut down (Closing up the feed tube after the embers have stopped glowing.)

Our CO alarms have never been triggered, and our vertical ducts are about 12" from the side book cases (I took a look this morning and I can extend that distance to about 15" - 16" and the outside temps of the fire brick towers, closest to the wood book cases, never exceed 100 degrees.

So what's wrong with this picture? What am I trying to achieve? What would I like different? (Still asking myself in random thought mode.)

#1: (This is what Tresa and I refer to as an "unguarded truth": I can't call it a "rocket stove" within this forum...! (That's my ego speaking and really has no place in what I create.)

#2: The first "real" disappointment with this system (so far), is not being able to collect and store more heat for longer, overnight 'warming" with this system "as is".

#3: This existing system is super easy to start and run. It provides "enough" (relative word... what IS "enough"?), heat to suit our needs. I've NEVER had any "blow-back", smoke, or flames creeping up the wood and coming up the feed tube.

(Note: I just re-fed our feed tube as the rocket sound had diminished... A couple sticks of Walnut were not in flames... Existing embers instantly ignited a few pieces of pallet pine when I opened up the side damper (for a few seconds), re-igniting the hardwood and it went back into "rocket sound".) I added more hardwood and it's running again.)

#4: It "seems" as if creating a true "rocket stove" within the footprint of our fireplace looks harder and harder to achieve. (Certainly with anything resembling what I've built and what I drew up as "version 2") I NEED to go back to the thread at the other website to review the fireplace rocket stove installation that had everything within the fireplace and closed up with an iron plate! If I can adapt that designers' system to our fireplace, that should certainly solve our "code" issues!) Like I've shared before, I don't give up and willing to do a 180 to start over from scratch!

#5: If I create a true rocket stove system, I'm concerned that we will create too much heat, creating a "hot spot" in our living room if I can't bleed off enough of the the "instant heat" into a mass collecting system for late night use.


I need to step back and re-examine everything form the beginning, including a possibility of: "So what's so bad about what I've built?"

Too much for this morning... I need to re-direct my thoughts to my current client's prototype build (due by the end of this month!)...

Any thoughts, input regarding what I've shared, always welcome...

Thank you!

Richard
 
Glenn Herbert
Rocket Scientist
Posts: 4100
Location: Upstate NY, zone 5
421
5
  • Likes 1
  • Mark post as helpful
  • send pies
    Number of slices to send:
    Optional 'thank-you' note:
  • Quote
  • Report post to moderator
If you are willing to change the look of the area from fireplace to masonry mass, you could build a fairly simple masonry heater with RMH core on your hearth, leaving a foot or so on each side to the bookcases. This idea is based on the Walker riserless core variation on Donkey's forum:
http://donkey32.proboards.com/thread/1690/walker-core-variation
r-jarel-rmh.gif
[Thumbnail for r-jarel-rmh.gif]
 
Glenn Herbert
Rocket Scientist
Posts: 4100
Location: Upstate NY, zone 5
421
5
  • Mark post as helpful
  • send pies
    Number of slices to send:
    Optional 'thank-you' note:
  • Quote
  • Report post to moderator
A 6" batch box in a bell is recommended to have about 65 square feet of interior surface, not counting the floor. This is for masonry; metal needs a smaller surface because it absorbs heat faster, maybe 2/3 of that size. This bell would have some metal surfaces as well as masonry, so my guess would be that 50 sf would be about ideal.
At 44" wide exterior x 48" high, and including the fireplace lined with firebrick, you would have roughly 30-40 sf of internal surface, less than ideal but you would just have a somewhat hotter exhaust. Adding surface area to the inside by brick fins sticking in would increase the surface area, and has been proven to work.
 
Richard Jarel
Posts: 39
Location: Oregon
  • Mark post as helpful
  • send pies
    Number of slices to send:
    Optional 'thank-you' note:
  • Quote
  • Report post to moderator
Glenn: BLESS YOU!!!

Thank you SO MUCH!!!

Honestly, I was getting ready to give up...

I like the look! I can live with that! I especially LOVE the refractory top to include a way to use a fan to blow the heat over towards our central air intake!!!

I saved and printed out the drawing (Did you create this??? Whether you did or not, THANK YOU! I do so much better with images. And I bookmarked the thread.

I'm guessing that I could cover the fire box with a glass wood stove type door to eliminate sparks as I've seen with other systems like this etc... but I'm also OK with extending the brick floor for added safety.


I will read the thread, study it closely as I will your drawing...

Please know that you changed my mind/heart 'attitude" for the better! (WAY BETTER!) My "Friday" will feel much more the way a Friday should... With a smile on my face! =D

Thank you!

This type of roller coaster development is EXACTLY why I came here to this forum... To find people like YOU!

Best,

Richard
 
Richard Jarel
Posts: 39
Location: Oregon
  • Mark post as helpful
  • send pies
    Number of slices to send:
    Optional 'thank-you' note:
  • Quote
  • Report post to moderator
Just got your added post regarding bell surface area and possibly using "brick fins" to increase that interior area..

I still need to take a break from all of this (Even "positive" excitement can let my brain loose to run amok which can be just as exhausting! LOL!)

After I study this more, I'll redraw the system as it fits within my usage context and post here for input.... Probably some time next week.

Thanks again!

Richard

When you say that my exhaust temp would probably be higher, any idea (guesstimate) what those might be?

Thanks again!
 
gardener
Posts: 3454
Location: Southern alps, on the French side of the french /italian border 5000ft elevation
184
  • Mark post as helpful
  • send pies
    Number of slices to send:
    Optional 'thank-you' note:
  • Quote
  • Report post to moderator
Richard, i'm not following much your thread. But your spark shield could be replaced by a "tray" where you can rake the ashes, have few embers which fall in there etc. And, if this might help. I'm not that old, fourty'ish. But my knees and hips are not in pristine shape. This meaning that i raised my firebox in my latest build, of about 12 or 14 inches. Can't remember. But it's still not enough for my liking.

Another thing on the hearth, it's good to have a whacking spot. Where you can split firewood, to make kindling to start your fire, split a log which is too big, and that you inadvertently brought inside etc.
 
Richard Jarel
Posts: 39
Location: Oregon
  • Mark post as helpful
  • send pies
    Number of slices to send:
    Optional 'thank-you' note:
  • Quote
  • Report post to moderator
Thanks Satamax! I hadn't thought about creating a "tray" in front of the fire box... I'll have to think about how to incorporate that... Makes sense!

Regarding splitting wood, I do it all outside... Looking at a small 5-ton electric splitter with great reviews ($299) to re-split already split Madrone, down to feed (tube or box) size... Leaves the living room much cleaner and MUCH easier on my wrists which have both been broken with pins ans surgeries. LOL!

Glenn: I just looked over your drawing (I just couldn't print it and not come back to my desk to look it over... I looked down at the right hand corner... You DID draw this! And (from the date), looks like you did this just for me! (Coming from a professional artist), your drawing is GREAT!!!

There's just no way to thank you enough!!!

OK... now I REALLY have to get back to work...

Richard
 
Richard Jarel
Posts: 39
Location: Oregon
  • Mark post as helpful
  • send pies
    Number of slices to send:
    Optional 'thank-you' note:
  • Quote
  • Report post to moderator
Just took my "lunch break" (I rarely take a lunch break, but what a great excuse to review your design and all the features in it...) LOL!

Just finished sharing with Tresa via email...

You hit so many birds with just one stone!

I'm guessing a system like this will provide a LOT more mass heat collection potential. I also looks like the top refractory fan duct will receive much of that stored heat allowing us to continue blowing warmer air towards are central air intake. AND, it fits on the existing brick ledge in front of the fireplace!

I'm just absolutely amazed!

I read the thread you linked in your post... I understand much of his system's details/features. but will still have to do some research to totally understand their dynamics and how they play into the system's efficiency, but I am no stranger to research... That. I can do!

Just wanted to thank you again... SO MUCH! (One very happy camper here!)

=D

Richard
 
Richard Jarel
Posts: 39
Location: Oregon
  • Mark post as helpful
  • send pies
    Number of slices to send:
    Optional 'thank-you' note:
  • Quote
  • Report post to moderator
Totally swamped with working on this new prototype project, but it's just too hared to step back from all of this.

Did some research this morning as I didn't understand the walker riser less concept. (Not sure that I still do! LOL!) I found about 10 pages/sites with lots of info... I'll be reading them when I can to better understand the "guts" / airflow and how it works and how to adapt to Glenn's design and how to adapt it to my fireplace.

Thanks!

Richard
 
Posts: 455
Location: climate zone 6b
3
  • Mark post as helpful
  • send pies
    Number of slices to send:
    Optional 'thank-you' note:
  • Quote
  • Report post to moderator
looks like you found your design. im glad you did. it looks like a attractive design. i told you Glenn was a sharp guy.
 
Richard Jarel
Posts: 39
Location: Oregon
  • Mark post as helpful
  • send pies
    Number of slices to send:
    Optional 'thank-you' note:
  • Quote
  • Report post to moderator
Yes he is! And I'm so grateful! I finally feel like I'm on the right track to design and fit a system that will provide everything I wanted, from long burns (using the secondary port concept), to a radiant heat I can tap in with using a small fan to blow the hot air towards our central heat air intake to getting more mass heat stored for longer warming during the night.... and, having it look "nice", not being visually intrusive into our living room! =D

Not sure if I shared this before, but over the past few days, I ran a test (of sorts), to see what kind of impact my solar heater and existing rocket heater was having on our power bill.

Took a reading at the meter as my "base line". Then ran our central heating system while not running the stove and disconnecting the solar heater. Ran it for 24 hrs and took the reading again... (We have dials on our meter and I have no idea what the numbers mean, but I was looking for a % ratio. I then turned off the central heat and only heated the house with the solar and rocket. The difference was 33% LESS poser consumption... (Very happy!) The solar heater was also an "experiment" like my first stove. The final solar heater for the same location will be 400% larger using an 8" (instead of 5") duct and will probably be pushing 300 to 400 CFM of heated air... That combined with the "new" rocket design, should make an even bigger difference!
=D
 
Glenn Herbert
Rocket Scientist
Posts: 4100
Location: Upstate NY, zone 5
421
5
  • Mark post as helpful
  • send pies
    Number of slices to send:
    Optional 'thank-you' note:
  • Quote
  • Report post to moderator
I'll be looking forward to seeing your implementation of the plan. I noticed that my sketch showed the riserless core unit a bit shorter than it actually would be to scale - its back would be 10" to 13" behind the face of the existing fireplace, or 9" to 12" clear to the back of the metal fireplace (- 1 1/4" or 2 1/2" for firebrick lining). This would leave just enough for the plunger tube connecting to the chimney.

Speaking of "plunger tube", did you run across the meaning of that? It is a chimney extension that reaches down from the top to force the final exhaust to come from the floor of the bell. You can find more discussions of it in other threads here and at Donkey's.

The measurements of DCish's unit look like 22 1/2" square by 16" high from firebox floor to top of firebox roof, so you could raise the whole thing by 10-12" to get the firebox door to an easier feeding position as Satamax suggested.

The spark shield is a commercial item that can be found in various shapes and sizes at woodstove suppliers. It is noncombustible and probably slightly insulating, but only a half inch or so thick.
 
Glenn Herbert
Rocket Scientist
Posts: 4100
Location: Upstate NY, zone 5
421
5
  • Mark post as helpful
  • send pies
    Number of slices to send:
    Optional 'thank-you' note:
  • Quote
  • Report post to moderator
Also, in reference to the bell area calculations, it might be reasonable to scale down the core slightly to 5" size, which would probably be more in balance with the rate that the bell could absorb heat. It would mean a slightly smaller load of wood and shorter burn time, but possibly no less heat actually put into the house per minute or hour of burn time. I would run that notion past the experienced batch box builders at Donkey's forum for the best opinions on it. The batch box has been found to scale well, as long as you pay attention to proportions.
 
Richard Jarel
Posts: 39
Location: Oregon
  • Mark post as helpful
  • send pies
    Number of slices to send:
    Optional 'thank-you' note:
  • Quote
  • Report post to moderator
Hi Glenn,

Thanks for the added info...

I am "familiar" with the plunger tube... found it mentioned in other threads and have an "idea" as to its' function...

I also know I have a LOT of calculating to do regarding surface area, batch box feed CSA etc....

First I have to fully understand how this riser-less system works... I've seen the brick layouts (layer by layer) in photos, but no real "plans" per se....

I was thinking of hot wiring a miniature version of the brick layers to get a better view from all directions (inside and out), to get a better idea as to how it works...

Unfortunately, my current client added some details to my prototype project that really have me super crunched for time... He leaves for China on the 7th or so and I need to get this to him in LA before then...

I'll not be "gone"... Just super busy! I'll come back here to read additional posts, but don't feel you're wasting your time if I don't respond... Just time management issues.

Thanks!

Richard
 
F Styles
Posts: 455
Location: climate zone 6b
3
  • Mark post as helpful
  • send pies
    Number of slices to send:
    Optional 'thank-you' note:
  • Quote
  • Report post to moderator
Glenn is on to something. i agree with him and I feel that "batch" boxes are superior to any J or L feed tube. Look into adding a batch box to Glenns plan it would not only look attractive but be a more efficient function for Glenns plan if you choose to use it.
 
Richard Jarel
Posts: 39
Location: Oregon
  • Mark post as helpful
  • send pies
    Number of slices to send:
    Optional 'thank-you' note:
  • Quote
  • Report post to moderator
I had "assumed" that Glenn's design was a batch box... After reading through several other threads, I had planned to discard the J-tube for a batch box... "From what I've read", a batch box will have longer burns (less feeding frequency)? Within the "secondary port" design thread, I thought I had read that walker was able to get burn times as long as 2 hours? That would sure be nice. (Right now, my best is between 30 and 50 minutes when using hardwoods, from best flame/draft. down to mostly coals and maybe a few licks of flame.)

Also (after speaking with Tresa), she really liked the idea of a glass door so that we could gain the "emotional atmosphere" of a "cheery, burning fire".

Just finishing breakfast after writing down today's step-by-step agenda for working on my project... Now I have a long list of tasks to get done.
 
Glenn Herbert
Rocket Scientist
Posts: 4100
Location: Upstate NY, zone 5
421
5
  • Mark post as helpful
  • send pies
    Number of slices to send:
    Optional 'thank-you' note:
  • Quote
  • Report post to moderator
The Walker riserless core is a version of batch box. It follows Peter van den Berg's proportions with the necessary modifications to have a different afterburner (horizontal instead of riser).

DCish's experiments included some neoceram (or whatever brand) glass to be able to see the process for testing, and you could have a piece of that as he has for the front of the afterburn chamber so you could see the flames. Neoceram on top of the afterburner would not be visible for your layout. You could also get a firebox door with a window; my sketch showed that ("glass" graphic convention is a few diagonal hash marks on a glass surface).
 
Richard Jarel
Posts: 39
Location: Oregon
  • Mark post as helpful
  • send pies
    Number of slices to send:
    Optional 'thank-you' note:
  • Quote
  • Report post to moderator
Hi Glenn,

Thanks!

It's that "horizontal afterburner" (Is this the same as the burn tunnel in this riser-less design?), that I'm trying to get my hands around mentally... I thought the riser (a tall one), was the heart of a rocket stove providing the draft to bring the temps up?

As for the glass, I'm totally fine with just a glass door at the batch box opening... safety and a little view....

I need to turn off the sound of my computer in my studio.... (or not LOL!), it "rings" me every time I get an email which includes notifications to this thread! LOL!

Got my strategy down and getting tasks done.... The hard part is not creating drawings before fabricating.... Some of my best "sketching" happens during the building.... I can see complicated 3-D transnational styling better as I create it... three-view drawings don't always take into account how the three views match up! (fear of proceeding and the fun of watching it come to life. Wish me luck!
 
Satamax Antone
gardener
Posts: 3454
Location: Southern alps, on the French side of the french /italian border 5000ft elevation
184
  • Mark post as helpful
  • send pies
    Number of slices to send:
    Optional 'thank-you' note:
  • Quote
  • Report post to moderator
Here's a link to a post by Patamos, about another type of riserless stove. And i would express the same concerns about other riserless slow burning systems myself. I haven't tried either of those systems thought.

http://donkey32.proboards.com/post/20675/thread
 
Glenn Herbert
Rocket Scientist
Posts: 4100
Location: Upstate NY, zone 5
421
5
  • Mark post as helpful
  • send pies
    Number of slices to send:
    Optional 'thank-you' note:
  • Quote
  • Report post to moderator
Max - I suggested the riserless core concept because the OP had demonstrated skill in complex design and construction, and reported that his chimney setup even with an all-metal loop-de-loop had excellent draft.
 
Richard Jarel
Posts: 39
Location: Oregon
  • Mark post as helpful
  • send pies
    Number of slices to send:
    Optional 'thank-you' note:
  • Quote
  • Report post to moderator
Speaking of "excellent draft"...

Today was the first time in almost a month of use, that I could not get this system going. (Note, before this morning, I've never experienced smoke back up the feed tube, while starting or re-starting.)

Cold air from the chimney, falling down and through the system was just too strong.

I usually fire this up using a propane torch (wide paint burning nozzle), to "prime" my draft instead of using paper to heat up the burn tunnel and first riser duct. The down draft was so strong that it blew the flames back from the nozzle... Not violently, but enough where I could see that if I lit anything flammable, the smoke would just enter the house, tripping off our alarms...

It usually takes about 1 to 2 minutes max (using the propane torch), to prime the system and switch over to a few light pine sticks to really get it going before switching to hardwoods... After 5 minutes of propane torch, the IR temps on the ducting would just fall rapidly when I removed the torch (I'm assuming from the cold air falling down from the chimney?)

Didn't check temps outside or barometric pressure etc.. Temps have been fairly mild the last couple of days... 39-40 at night, 55-60 day. Indoor temp is 68.

Any ideas on what's taking place?

Thanks!

Richard
 
Richard Jarel
Posts: 39
Location: Oregon
  • Mark post as helpful
  • send pies
    Number of slices to send:
    Optional 'thank-you' note:
  • Quote
  • Report post to moderator
Just wanted to add:

I've heard where wind blowing over and down the masonry chimney can cause this type of behavior ... No wind (Under 2mph at most).
 
Glenn Herbert
Rocket Scientist
Posts: 4100
Location: Upstate NY, zone 5
421
5
  • Mark post as helpful
  • send pies
    Number of slices to send:
    Optional 'thank-you' note:
  • Quote
  • Report post to moderator
That can happen where the chimney has gotten cold, and then the weather warms up enough that it is too hard to get the chimney warmer than outdoors to generate a draft. I don't know how that correlates with your weather recently.

If you experience this again, you may want to invest in an insulated chimney liner to ensure easy startup. Do you know the internal dimensions of your chimney? If it's too large, it increases the difficulty of establishing and maintaining draft in a relatively low-flow system. And is the chimney on an exterior or interior wall?
 
Satamax Antone
gardener
Posts: 3454
Location: Southern alps, on the French side of the french /italian border 5000ft elevation
184
  • Mark post as helpful
  • send pies
    Number of slices to send:
    Optional 'thank-you' note:
  • Quote
  • Report post to moderator

Glenn Herbert wrote:Max - I suggested the riserless core concept because the OP had demonstrated skill in complex design and construction, and reported that his chimney setup even with an all-metal loop-de-loop had excellent draft.

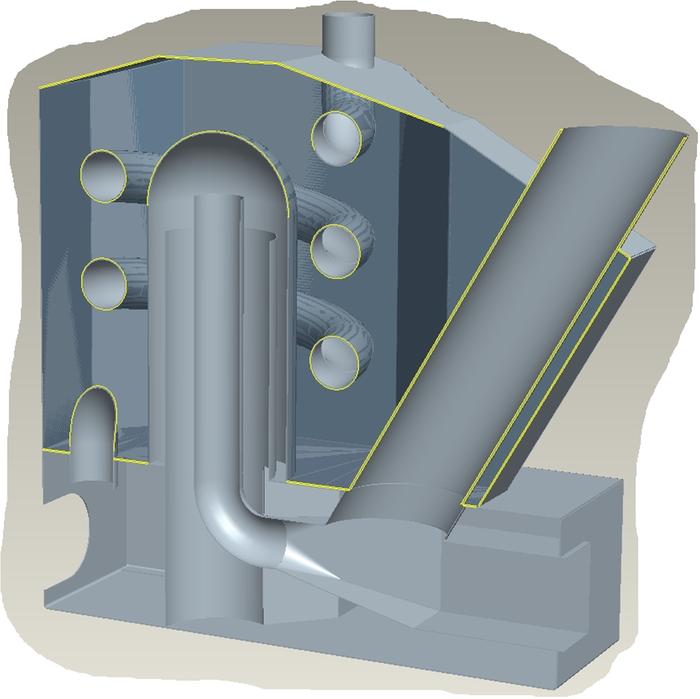
Glenn, you know how it is, people, facing new technology, are affraid. It's my case here. The smouldering graphs of the riserless core didn't impress me too much. The main reason behind my comment is. When i see how bad i can overload my workshop batch rocket, with a 1.5m heat riser. I wonder how bad i would do with a riserless core. I think Matt was on a far better track with the broken riser. Imho. And you might have noticed, i haven't been involved much with any of the riserless designs over at donkey's.
 
Richard Jarel
Posts: 39
Location: Oregon
  • Mark post as helpful
  • send pies
    Number of slices to send:
    Optional 'thank-you' note:
  • Quote
  • Report post to moderator
That totally fits our weather lately... and I totally understand.

It's been like this for a few days without any issues before this morning (although it has taken a little longer to get it started). I haven't been keeping track of the specific temps etc... I'm guessing we have been right on the "edge" of this phenomenon and today, it must have just crossed the line...

At least the solar heater kicks in on days like today! LOL!

Does this (can it), happen with other designs as well?

Is this where an insulated flue pipe going up the chimney or an insulated heat riser would help?

Thanks!

Richard
 
Richard Jarel
Posts: 39
Location: Oregon
  • Mark post as helpful
  • send pies
    Number of slices to send:
    Optional 'thank-you' note:
  • Quote
  • Report post to moderator
Hi Satamax,

Do you have any links for the "broken riser" design? I'm totally unaware of what this is and I'm willing to research and learn anything and everything before starting to lay out a new design.

Thanks!

Richard
 
Satamax Antone
gardener
Posts: 3454
Location: Southern alps, on the French side of the french /italian border 5000ft elevation
184
  • Mark post as helpful
  • send pies
    Number of slices to send:
    Optional 'thank-you' note:
  • Quote
  • Report post to moderator
http://donkey32.proboards.com/thread/1023/accidental-discovery
 
Richard Jarel
Posts: 39
Location: Oregon
  • Mark post as helpful
  • send pies
    Number of slices to send:
    Optional 'thank-you' note:
  • Quote
  • Report post to moderator
THANK YOU Satamx!

VERY interesting! I actually learned a lot about these low profile "riser-less" stoves... (This one makes more sense to me with the short 12" riser though at least starting the upward draft.

Thanks again...

(Sitting here waiting for client to lay out some lines on some photos I sent him so I can continue styling sculpting... Going back to continue some of the internal mechanisms.)

Richard
 
Posts: 1
Location: Clovis, United States
  • Mark post as helpful
  • send pies
    Number of slices to send:
    Optional 'thank-you' note:
  • Quote
  • Report post to moderator

My oh My love this concept... I see its been a couple of years since you did this any follow ups ?  I have a fireplace like this and sure could use the plans materials you have thus far created to use in later work up on this one.    

Richard Jarel wrote:Hello,

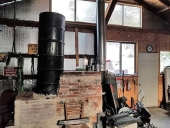
Let me first apologize in advance for such a long post. This system is far from ordinary,” breaks all the rules”, and is not shared as a completed project, but rather a proof of concept prototype.

I wanted to share here in hopes of getting some critique, especially about low burn temps, ash, creosote, safety etc… as well as getting ideas for further development. We’ve been running this system for just over a week now, burning less than 1 square foot of wood per 24 hour period and maintaining our indoor temps between 70 and 73 degrees, (It’s below 30 outside here this morning.)

I’ve spent many months reading through many websites, watching countless you tube videos (the good, the bad and the ugly), and reading through several books, including “The Book”… (Still reading.)

Brief Background: 25+ years as a professional designer and prototype developer with projects ranging from toys for Mattel & Hasbro, to deep sea diving equipment for the Discovery Channel, wind tunnel models for Northrop/Grumman, (background in aerodynamics), UAV design, designing & building three human carrying ultralight aircraft, two world land speed record vehicles and much more.

A few months ago, I built a 34” X 75” “zero pass” style, aluminum screen, solar heater and when the sun is out, it brings our indoor temps up to 70 degrees for only 21 watts (computer fan), while outdoor temps are 25. This doesn’t happen though when it’s super cloudy or raining or at night, so I decided to try and design a system using our existing fireplace a rocket stove.

My priorities included not having it be “visually or spatially invasive” to our living room (I did not want to use a large “barrel”!). I wanted a radiating heater as well as “some” mass heat storage

I am very aware of the issues using metal (especially using stove pipe for my burn chamber!), I’ve read countless threads focused on this very subject and have seen the photos of corroded Stainless risers and burn tubes. I plan to “evolve” this concept into a high-temp refractory final version, so please, any “positive input” is desirable, but I’ve read so many “wrist slapping” posts provided to those who have gone the “metal route”… This is a functioning, “proof of concept” model only, operating at lower temps (1,000 degrees at the burn tube)

I do some amazing mold work and plan to re-visit this concept using high temp refractory mixes to replace components in this system. I’m already experimenting with high temp silicone poured into platinum based silicone molds to create true sealing gaskets between refractory and metal components that won’t leak, will hold up to temps and contact and expand without cracking refractory components.

Regarding safety and operating this first generation rocket stove heater in our home: Before moving up to Oregon, I was a firefighter for LA County (experienced too many needless tragedies!). I purchased two digital Carbon Monoxide alarms just for this project (different brands and models in case there was a “defect,” in one, I didn’t want to discover the same defect in my ”back up” alarm). I am obsessive about safety, which is also an important reason why I’m sharing this here, looking for feedback and more information to work with.

I built and tested this basic design in my shop and was surprised by its performance!!! Especially while breaking so many “rules,” I was really surprised!

I built this “proof of concept prototype” design using 6” black stovepipe in less than one week. (I already have LOTS of improvements and changes I want to make and I’m thinking of many others as part of the development process.) It cost me under $400 for everything and that included all the “incidentals” (firebricks, stainless screws and fittings), and also included about $100 for two digital Carbon Monoxide alarms (We already had smoke alarms in every room of the house.) These alarms were “extra”: One in the living room closer to the insert than recommended (I’m fine with false alarms, especially while just starting out with this prototype, but so far, nothing.), the second, is just outside our bedroom.

Changes I already plan to make include building an angle iron frame for the current loose, vertical stacks of firebricks to prevent them from tipping over, screwing that frame into the existing white masonry ASAP. I fabricated aluminum standoffs, screwed into the white original fireplace bricks, and used SS hose clamps to secure the vertical pipes a few inches away from the existing white masonry. They are very secure!

I’m also researching creating cast j-tube systems and other components, possibly eliminating the bricks. This will probably raise over all temps through the system allowing me to burn hotter and cleaner but I have to see how that would effect heat transfer (radiant and mass), to our interior. I’ll be testing any high temp cast components/systems outside first!) Right now, indoor temps remain constant for about 3-4 hours after the last burn goes out… I’d like a little more (5 to 7 hrs?).

I’ll also be building a heat shield (perforated stainless sheet metal supported by angle iron frame), over this or any future horizontal radiating pipe, if it stays in the final system… I do like the instant, radiating heat, but I’ve already burned my forearm when I tried to support myself getting up while feeding the stove and operating the lower damper (I wasn’t thinking!)…. Nasty 2nd degree burn across my forearm!

I’ll be adding a second ash clean out at the bottom of the right side down tube for this temporary build… molded/cast, later on.

Right now, I’m burning a mix of hardwood (Madrone and Walnut, combined with pallet pine). Removing the side Tee cap where the bottom side tube damper is located, I sweep out 1 to 1-½ cup of super fine ash/dust before lighting it up each morning. (Last night, we burned primarily Madrone and I swept out even less than that.) After one week of using this system. I removed the top, cross tube to check for ash build up and emptied about 1-2 cups of fine powdery ash. I need to be able to burn at higher temperatures to correct this.

NOTE: I have NEVER experienced ANY smoke, blowback, smoky smell, or flames creeping up the feed tube! Ever! Flames are straight and horizontal going toward the riser.

After a week of use, I’m getting the following temps: (These are averages, depending on wood type, intensity and duration of burn.)

Bottom of Tee at burn area: 780 to 1,000 degrees I doubt it’s getting over 1,200 but my IR thermometer just reads “high” after 1,000, which I sometimes get… I’d say the average burn tube temp is about 750 to 950.

First riser (on left), 200 to 400 (Average is about 300)

Cross tube: 200-300 (I have a separate temp sensor that shows that the wood mantle (above the cross tube) never gets above 110 degrees.)

Down tube (on right): 200- 250

Additional ducting tubes towards back of fireplace: (175- 250)

Last vertical exit duct into existing chimney: 140 – 200

Height of vertical riser (from floor in burn tube to top of cross tube/first elbow) is 42”. Length of cross tube (along top) is 48”. Height of feed tube (Top opening to bottom of 6” Tee), is 18”.

I’d say draft is excellent. I get straight, horizontal flames like a jet engine afterburner and we can hear a nice “rocket roar” (Well maybe not a loud roar, but we can hear it from across the room)… Nice comforting sound for us!

All ducting is new black stovepipe. After I cut and fit the entire system together, I disassembled everything and baked all the components in our BBQ to about 800 degrees (Checked with IR thermometer). After the black stove pipe paint stopped “fuming”, I baked the parts some more until the black color turned to a flat, dark gray, then I baked it for at least 30 minutes more for extra measure. We’ve had zero paint fumes.

Our original fireplace damper was wide and narrow, so narrow, that I could not feed the 6” stovepipe through it. I used a piece of “backer-board” and created a “ceiling/roof” inside the fireplace, just a little lower than the original damper to seal it up. I cut it to be fairly tight fitting (1/8” to ¼” gaps to help bring it in and place it). I used 1” angle to support its weight and then sealed the gaps with 600 degree Hi-Temp silicone. The exit ducting has its’ own hole to extend through the backer board and the edges between the exit ducting and backer board were sealed using more hi temp silicone.

A great feature is that I can shut off our central heat system and leave the fan blowing. Its’ air intake is about 12’ from the fireplace and with a small fan (Seen just to the left of the top elbow), blowing air across the top tube towards our central heating air intake, our central air system sucks up the heat and distributes it evenly throughout the house! We’re averaging about 70-73 degrees inside, evenly and everywhere!

I still have a lot of general questions about acceptable amounts of ash, possibilities of leaking duct/elbow joints (So far, I’ve found no leaks (which goes against my prototype development and firefighting experience, but I’m still testing!), exit duct temps and concerns about Creosote build up and Carbon Monoxide production (especially burning this system, at much lower than the “classic” firebrick temps/designs). (I’d also like to get a Co monitor that measures levels well below alarm levels.)

I have been told and read many times that using metal is an absolute “No-No”… My expectations for this system as is, include replacing “at least”, the bottom “Tee” through the first two elbows and the riser tube within a year or two (at best)… I hope to design/develop a refractory molded replacement design before then.

With what I’m experiencing, I’m searching for a system design that produces radiant heat and stores heat in mass collectors. I want to go with “proper” high-temp refractory components for the burn chamber and a proper, insulated riser, but I’m concerned that any metal radiant tube across the top will give off too much heat.

My ultimate goals include keeping the visual design as intact as possible (aesthetics and not bringing anything into our living room like a bench or a barrel), burning at hotter, cleaner temps without elevating the heat in our living room too much, being able to store “some” heat (enough to last for at least a few hours, maybe up to 6 hours), and to insure safe operation.

I’m the type of person that thinks “outside the box” and willing to do the work, take the time to experiment, make mistakes (outside!), rebuild and do what it takes to reach a goal. (It’s what I do for a living…. And… the actual designing and building is what I live for as a favorite pass-time.)

Your feedback is very welcome!

Thank you!

Richard

 
pioneer
Posts: 313
31
chicken wood heat rocket stoves
  • Mark post as helpful
  • send pies
    Number of slices to send:
    Optional 'thank-you' note:
  • Quote
  • Report post to moderator
While I think it is pretty well established that this system is too small to be very practical, it does inspire my imagination as to the possibilities that might lay in store for my old fashioned heatilator fireplace on my main floor.  Just beneath my main floor fireplace is a fireplace in the basement which I am slowly converting to a batchbox/bench system.   Considering that I will not be desiring to prop up my main floor for RMH weights, I can consider something like what you've done here, but on a much larger scale.  Constructing the feed box out of insulated refractory materials, an insulated riser that goes nearly to the ceiling and branches off  in both directions in a series of radiating branches that feed the flue gases back into the rear of the fireplace and into the chimney.  Not much heat storage going on here, with the exception of the stone face of the fireplace wall, but such a system would certainly be able to heat a large space.  Wonderful work you do.  You have my dream job.
 
Thomas Tipton
pioneer
Posts: 313
31
chicken wood heat rocket stoves
  • Mark post as helpful
  • send pies
    Number of slices to send:
    Optional 'thank-you' note:
  • Quote
  • Report post to moderator
I keep thinking about what you did there with the miniature j-tube fireplace insert.  What if one were to encase a 6 inch j-tube in a barrel or structure that would enclose the feed and burn channel sitting on a fireproof hearth stone laid directly in front of the fireplace.   visualize that the bottom third or fourth of the barrel is hollow.  I'll come back to that.  the flame path travels through the burn channel and up through an extended 5-minute riser that connects to a stove pipe tee.  (I am assuming 6 inch stove pipe to follow in accordance to the cross sectional area).   I would probably choose to reinforce the inside top part of that tee with a bit of ceramic blanket just to be sure it won't overheat.  Extending from the tee on both sides are stove pipe extensions, lets say 2 feet on each side, Then each side has an elbow pointing downwards.  Followed by more stovepipe on each side.  Followed by a tee on each side, returning the stove pipe back to the bottom of the barrel through openings that have been cut on each side to receive them, as well as providing a clean out on each side.  On the back side of the barrel is another short section of stove pipe that passes through a cementitious board or panel that seals the interior of the fireplace from the living room.

The idea of course being that the extended stovepipe area does what the typical barrel would do.  But it would do it in less space and in a profile that will stay close to the wall and not protrude too much into the living space.  

The stove pipe could be suspended from wires attached to the ceiling, or from brackets mounted to the wall.

My living room has an old inefficient fireplace enclosed within a sandstone faced wall.  It would be nearly perfect for an application such as this.  Maybe one day I'll try it.  Thank you for the inspiration.

EDIT..... Have to laugh at myself.  I had forgotten I had already commented with almost the exact same thoughts five months ago.  Lol.
 
Yeah, but is it art? What do you think tiny ad?
Rocket Mass Heater Jamboree And Updates
https://permies.com/t/170234/Rocket-Mass-Heater-Jamboree-Updates
reply
    Bookmark Topic Watch Topic
  • New Topic