• Post Reply Bookmark Topic Watch Topic
  • New Topic
permaculture forums growies critters building homesteading energy monies kitchen purity ungarbage community wilderness fiber arts art permaculture artisans regional education skip experiences global resources cider press projects digital market permies.com pie forums private forums all forums
this forum made possible by our volunteer staff, including ...
master stewards:
  • Nancy Reading
  • Carla Burke
  • r ranson
  • John F Dean
  • paul wheaton
  • Pearl Sutton
stewards:
  • Jay Angler
  • Liv Smith
  • Leigh Tate
master gardeners:
  • Christopher Weeks
  • Timothy Norton
gardeners:
  • thomas rubino
  • Jeremy VanGelder
  • Maieshe Ljin

csa ok?

 
Posts: 9
  • Mark post as helpful
  • send pies
    Number of slices to send:
    Optional 'thank-you' note:
  • Quote
  • Report post to moderator
I finally got to test my 6" heater outside yesterday. I expected it would be more rockety and want to make sure it's a good build before i install it inside on Saturday.
Will someone give me feedback on these csa's:
burn tunnel = 4.0625 x 4 = 16.0625
riser =6.25" x4.5" = 28.125
manifold entry 10" x4" = 40 / manfold exit 6" circle =28 .
It is a 6" system with a 30gallon barrel surrounding the 39 1/4" heat riser ( height of floor of burn tunnel to top of heat riser) with a 55 g barrel over it & exhausting to a small clay brick bell (no cob bench for this build).
THANKS!
 
pollinator
Posts: 4154
Location: Northern New York Zone4-5 the OUTER 'RONDACs percip 36''
67
hugelkultur fungi books wofati solar woodworking
  • Mark post as helpful
  • send pies
    Number of slices to send:
    Optional 'thank-you' note:
  • Quote
  • Report post to moderator
Gus Miller : Add another brick laying on its side to the burn tunnel, to increase the CSA there, At that size you are restricting the amount of wood you can burn.
its like you changed your mind and decided to go with a 4'' system !

Why no mention of the Vertical Feed Tube? With a horizontally fed Rocket system, you will end up spending MORE time poking sticks into the fire, and have MORE
chance of blocking your Burn Tunnel with Charcoal, embers and ash !

Open that puppy up and let it breath ! then listen to the roar ! For the Crafts ! Big AL

late note: Pictures would be a big help 1 A.L.
 
gus miller
Posts: 9
  • Mark post as helpful
  • send pies
    Number of slices to send:
    Optional 'thank-you' note:
  • Quote
  • Report post to moderator
Hi Big Al! Thanks for your reply.
The height of the vertical feed tube from ash grill to top of feed tube is 4.5". The csa is 4"W x 4 1/16"L but is adjustable as 3 of the 4 bricks forming the feed tube opening can be slid to increase or decrease the size of the opening.
I took note of Ianto saying the csa of the burn tunnel "should be the tightest part of the intestinal system" and when ernie said: "I try to make sure the burn tunnel is as short as possible... if i could get it on all the systems the burn tunnel would not be more than a third of the heat riser height..." while piecing together the bricks I had to work with to form this configuration.
However, I'm hoping you can help me integrate your advice while considering the limitations of my resources : }
The dimensions for the bricks I'm working with are: Firebrick = 9x4.5x2.25 (comprimising almost all of the burn tunnel&riser & supplimented with clay brick = 7x3x2.5 . I only have 1 spare firebrick and ~20 clay bricks remaining.
How/where are you saying to add another brick laying on its side to the burn tunnel? To increase the csa like you're suggesting would mean widening it or increasing the height which would require multiple firebricks (right?) but I only have one left so how could I achieve this with the clay bricks considering their difference in dimensions?
I'll try to upload some pix as soon as I can.
tx
 
allen lumley
pollinator
Posts: 4154
Location: Northern New York Zone4-5 the OUTER 'RONDACs percip 36''
67
hugelkultur fungi books wofati solar woodworking
  • Mark post as helpful
  • send pies
    Number of slices to send:
    Optional 'thank-you' note:
  • Quote
  • Report post to moderator
Gus ; even though it is more of a challenge your Heat Risers brick can be laid up while resting on their sides 4.5 inches tall and not 2.25 inches tall,
this may give you the bricks to add to the height of your burn tunnel.

Your ash pit and ash grill is a newbie's crutch that will help keep your Burn Tunnels small CSA from becoming constipated with charcoal, embers, and
ash, but I Believe that you will quickly learn to live without it, Rather than fill mine in with a 1/2 brick I have just let it fill up with ash protecting
the 1/2 brick that isn't there from excessive wear from the jabs, cuts and scrapes as the fuel wood is fed Through the Feed Tube !

Hope this is useful and timely ! For the good of the craft!

Think like fire! Flow like a Gas! Don't be the Marshmallow, As Always your comments and questions are welcome and Solicited ! Pyro-Magically Big AL
 
gus miller
Posts: 9
  • Mark post as helpful
  • send pies
    Number of slices to send:
    Optional 'thank-you' note:
  • Quote
  • Report post to moderator
Thanks Al. My firebricks are on edge.
After the first test of the heater yesterday morning, I increased the riser csa by moving the north & south vertically on edge riser firebricks ~1" to the north & south. Perhaps I will increase the width of the burn tunnel by moving adjacent N&S horizontally on edge tunnel firebricks ~1" to the north & south to increase the tunnel csa.
This will mean that these north & south firebricks that are horizontally on edge will have 1.125" surface area rather than 2.25" to support the roof of the burn tunnel, west side of the riser & both barrels surrounding the riser.

I can bolster both of these supportive firebricks by centering the clay bricks that are supporting the N&S riser firebricks between them & these N&S burn tunnel fire bricks that I'd move N&S to widen the burn tunnel. This would increase the csa of the burn tunnel from 16.0625 to 24.1.

Will these 2 stacks of 4 clay bricks each, on the N&S sides of the barrel that support the barrels, be adequate support to hold up the 2 firebricks forming the roof of the burn tunnel & the W sides of both barrels & the N&S sides of the heat riser?

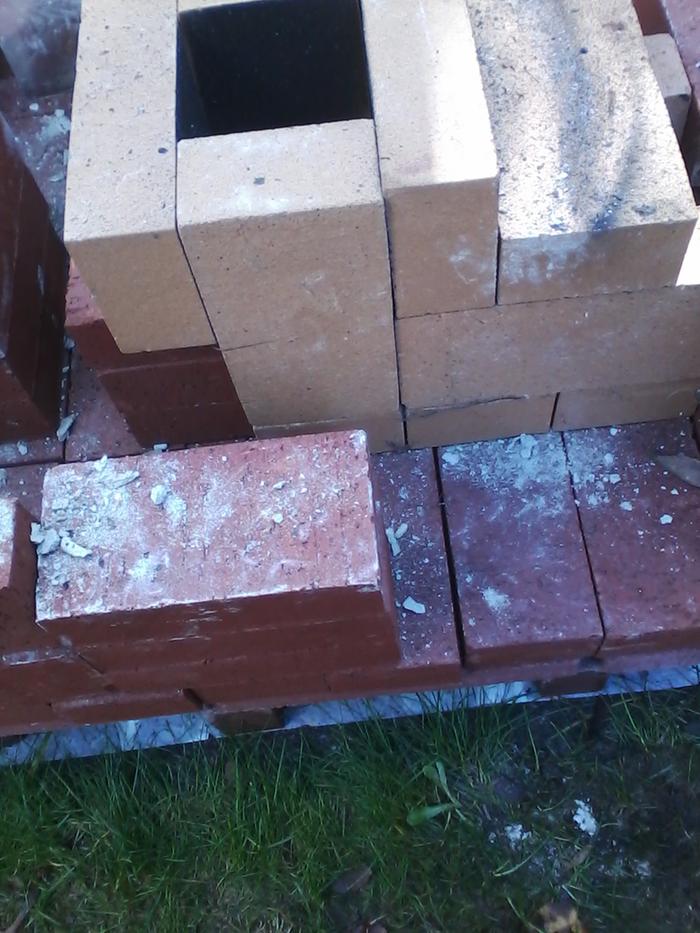
Here's those pix.

(edit = clay brick = 8 x 4 x 2.5 )
burn-tunnel-side-view.jpg
[Thumbnail for burn-tunnel-side-view.jpg]
burn tunnel side view
full-view-facing-S-(front-to-back).gif
[Thumbnail for full-view-facing-S-(front-to-back).gif]
full view facing S
 
allen lumley
pollinator
Posts: 4154
Location: Northern New York Zone4-5 the OUTER 'RONDACs percip 36''
67
hugelkultur fungi books wofati solar woodworking
  • Mark post as helpful
  • send pies
    Number of slices to send:
    Optional 'thank-you' note:
  • Quote
  • Report post to moderator
Gus M. : I Really like the way that you have created a thermal break under your Burner base, However, it is rare to find 1/2c thickness bricks and I am
a little worried that they and possibly All the rest of your Brick red Bricks are actually a Red stained concrete block that will be stressed close to or at the
point of failure ! while each brick manufacture is free to make bricks what ever size they want, these non-standard bricks also make me wonder about
their makeup !

Take a moment to Google Staggered Bond Brickwork while this is not always going to be possible it is an ideal usage that should be constantly strived for!

When you reach the height above ground of your burner base equal to the Top of the bridge over the Burn tunnel, -stop stacking fire brick, set the top of
the Barrel lid in place, possibly a little off set to give you the largest transitional area at the barrels base. The lid should mark an almost complete circle
around the combustion zone equal to the arc of the outside edge of the barrel ! Most of the space between the outside edge of the barrel and the outside
of the Firebrick that forms your combustion core ( Feed Tube Burn Tunnel, and Heat Riser )will be filled with a 50-50 mix of perlite and clay slip !

What is the inner diameter/CSA of the heat riser, and the outside diameter of the heat riser, the barrel shown is the outside wall of the Heat Riser ? You
are planning on using a 55 gallon drum? What is the air gap between the barrels ? In the 2nd picture I have no idea what the 'brick' structure beyond the
burner base represents, except to mention that it will probably block your 1st clean out and you need to plan for staggered bond brick joints !

please review the materials and questions covered, this has been one of those 'interesting days and I need sleep ! For the Good of the Craft! Big AL
 
gus miller
Posts: 9
  • Mark post as helpful
  • send pies
    Number of slices to send:
    Optional 'thank-you' note:
  • Quote
  • Report post to moderator
Hi Al, The very bottom of the setup are concrete bricks, next layer are concrete pavers, then red clay bricks from home depot :
manuf by mutual materials Model # RED0126MCO 8 in. x 2-1/4 in. x 4 in. Clay Brick
http://www.homedepot.com/p/8-in-x-2-1-4-in-x-4-in-Clay-Brick-RED0126MCO/100323015 .
My brain is probably a little worn from this tough week so maybe you can help me get clearer on some of what you're recommending.
What are you referring to when you say "1/2c" ?
I'm also having a tough time understanding your suggestions in your last paragraph, although I'm crystal clear and already prepared to fill the space between the heat riser & the 1st barrel with perl clay.
I searched for "staggered bond brickwork" but only found one listing which wasn't too helpful.
Do you think the "4-brick stacks" on the N&S sides of the riser&burn tunnels will be adequate supports?
Thanks Al
 
Rocket Scientist
Posts: 4526
Location: Upstate NY, zone 5
574
5
  • Mark post as helpful
  • send pies
    Number of slices to send:
    Optional 'thank-you' note:
  • Quote
  • Report post to moderator
I think by "1/2c" Al meant about half the thickness of normal clay bricks. Your description clears up the questions of material.
And I think "staggered bond" referred to the fact that the bricks you show are stacked one right on top of another; the joints need to be offset or staggered as much as possible to interlock them and make the construction stable. You probably know that, but it is hazardous to assume...
 
Glenn Herbert
Rocket Scientist
Posts: 4526
Location: Upstate NY, zone 5
574
5
  • Mark post as helpful
  • send pies
    Number of slices to send:
    Optional 'thank-you' note:
  • Quote
  • Report post to moderator
I have some concern about the red bricks at the end of the burn tunnel (bottom of the riser)... that is around the hottest part of the combustion zone, and I don't know how well those bricks will stand up to it. A more experienced voice is needed to give an authoritative opinion here. The feed tube really should not get so hot, so you may be able to get away with red brick there all right.
 
gardener
Posts: 3471
Location: Southern alps, on the French side of the french /italian border 5000ft elevation
194
  • Mark post as helpful
  • send pies
    Number of slices to send:
    Optional 'thank-you' note:
  • Quote
  • Report post to moderator
This is not the burn tunnel!


To me this is the feed tube, and to the right, i can see the burn tunnel ceiling made out of bricks, with an opening. If you burned it that way, no wonder that it smokes.

I think you need to get back to read the book.

CSA wise, equal CSA along the whole burner unit. A smidge narrower can be done at the burn tunnel, if you realy have a nice square cross section. May be 10% maximum.

You should stick as close as possible to square, or round. Large and shallow rockets proove nearly every time to be hard to run. Don't know about tall and narrow. But the shape should remain pretty much the same all over.

The burner unit should be insulated and bricks mortared too, for proper operation. I forgot, i see a barrel with no chimney, that's no good. When the barrel goes on, the chimney goes up!
 
allen lumley
pollinator
Posts: 4154
Location: Northern New York Zone4-5 the OUTER 'RONDACs percip 36''
67
hugelkultur fungi books wofati solar woodworking
  • Mark post as helpful
  • send pies
    Number of slices to send:
    Optional 'thank-you' note:
  • Quote
  • Report post to moderator
Gus M. : O. K., the easy one the ( 1/2c ) was a typo. it should have been (1/2). I missed that one! Then due to laziness I didn't share that any time I google
any physical object, I type in the objects name in the search engine, followed by the word images or picturesI review the picture and then there
is a link to that pictures site to visit for more information. It is like a whole 'nother Search Engine! Running Bond should be clear now !

It seems the picture with that strange barrel has caused several different mental images to form, My ultimate question is after you have built your brick
Heat Riser and insulated it, how much room will you have between the outside of the Heat Riser and the barrel that you plan on using! Again I can not tell
if the barrel we see siting there is going to be used to make-up the outside form of the clay/perlite insulating part of the Heat Riser, or is your final outside
Barrel, and I do not know if you have enough area between your as built Heat Riser and your final barrel for good flow of the hot exhaust gases !

''Max'' is telling us the picture confused him too, the evidence of ashes and the presence of a barrel led him to think you were farther along in your build,
the rule is when the barrel goes on (and is sealed at the base) The Vertical chimney must go up! This is a 2nd quick test, the 1st one being the firing of the
dry stacked bricks that proves that your rocket will work! Your test showed that you want a larger squarish Burn Tunnel. The 2nd test isolates the Burner
base from the Thermal Mass and proves that section of the build is functioning, there after, if you run into problems in the last part of your build, you know
that that is where you need to look for problems ! I hope we are all now on the same sheet !

I like doing multiple dry fittings of your entire Feed Tube, Burn Tunnel, and the entire Heat Riser using your cell phone for making a record of each course
of brick, this is very handy when you find that your 4th attempt does not look like your memory of the 3rd attempt! A few more pictures for the builders
album -that shows off your 1st build to share with other future Rocketeers is something you only get one shot at, don't miss your chance !

O.K., we've got this far and everyone is 'playing nice' lets hope the weather stays good where you are, and your build goes smooth, I too worry about the
type of red brick and its location in the build, but it will be easy to replace when a future failure happens !

The brick box of stacked bricks on the other side should be a final shell around your thermal mass, not something done at the same time the Thermal mass
is done, it can be done at the same time but unless you have made Masons skills it will show that they were done together. Later you only have to worry
about a good bond between the Thermal mass and the brick, and can work on a good looking job, plumb and level !

For the good of the craft Big AL !
 
gus miller
Posts: 9
  • Mark post as helpful
  • send pies
    Number of slices to send:
    Optional 'thank-you' note:
  • Quote
  • Report post to moderator
Thanks for all your replies. I appreciate your help with this heater. It was a rough week, wasn't it!

Since it was supposed to rain today I read thru all your posts and was organizing my thoughts for a concise reply. Then, the weather forecast changed so it was NOT supposed to rain all weekend so I had to get outside to make adjustments&test this again.
It took me 4 tries but the 4th try where i stuck 1 rolled up paper in the burn tunnel & 1 sticking out into the feed tube with kindling on top finally got the fire going.

Then, it started raining...argghh. Thankfully, I put up a "tarp hut" which could cover the heater without getting too close/igniting earlier in the week in the event it began raining during testing. Of course there was a downpour but I kept the fire going and now we are looking to finishing the flue install& getting this heater installed inside t-o-m-o-r-r-o-w, finally !
The firebrick riser will be surrounded by perl-clay which will be within a 30gallon barrel which will be within a 55gallon barrel with exhaust going thru a manifold (4x10 to 6" register from home depot) into a clay brick (staggered : ) bell with cleanout on the W end & finally exhausting thru the S end up thru vertical indoor flue then horizontally out thru thimble in wall & up into outdoor flue w/raincap.

The changes made today are:
reconfigured riser so the 2 clay bricks were replaced with the last firebrick
adjusted riser, burn tunnel &feed tube to widen them for these csa's:
feed: 6.25" W x 4" L = 25 (square inches)
riser: 6.25" W x 4 5/8" L = 28.90625
burn tunnel: 6.25" w X 4.5" H = 28.125

The test was initially done with the riser with the 30g barrel over it. 75 mins into the burn, we put the 55g barrel over it. 2.5 hrs after I got the test going these were notes i recorded: on a scale of -5 to +5 (where -5 is worst & +5 is best) +5smokeback +2rocketyness
fahrenheit temps: 300top of barrel; low bottom sides of barrel: 280W 134N 130E 120S ; top side of barrel 267W 227N 190E 218S ; burn tunnel exterior 370S ;
240clay brick on top of burn tunnel ; 290fire brick on top of burn tunnel ; comments:700F when i removed clay bricks in front of feed tube so could measure temp of floor of burn tunnel

Wish us luck tomorrow
 
gus miller
Posts: 9
  • Mark post as helpful
  • send pies
    Number of slices to send:
    Optional 'thank-you' note:
  • Quote
  • Report post to moderator
Hello,
I'm feeling kind of down right now because I've been working on this project for the past year to get it done in time for my partners bday (which is in less than 2 wks) and now I'm feeling like this isn't going to work out.

I thought our 1st run was going pretty well as i got the fire going/good rockety effect on the first try.
however , i'm really discouraged by the huge amount of smokeback with every downdraft.
It tends to get very windy here. when i went outside to see whether smoke or steam was coming out of the flue i heard a limb snap overhead from our huge evergreen.
What can I do to counteract this downdraft from causing smoke to billow back out the feed tube?

Also, there's condensation dripping down the back of the inside vertical flue run despite the downward slope of horizontal flue which has a hole drilled into the underside of it where elbow connects to outside vertical flue pipe.
what to do ?
Thanks
 
allen lumley
pollinator
Posts: 4154
Location: Northern New York Zone4-5 the OUTER 'RONDACs percip 36''
67
hugelkultur fungi books wofati solar woodworking
  • Mark post as helpful
  • send pies
    Number of slices to send:
    Optional 'thank-you' note:
  • Quote
  • Report post to moderator
Gus Miller : Many if not most of your fellow members had some of your problems during their build and Only had 'The Book' to help
solve their problems, we all were feeling our way along, in your case it would have helped a great deal if you had felt you had the
time to spend reading "the Book'' and grounding yourself more! I Think that we your fellow members may have even handicapped
you by being there with a fast answer. Irreguardless, we will get you through this !

I am definitely reading between the lines, a little more information please ! Your Burn temps are too low, Immediately surrounding
your burn tunnels Firebrick you have to have additional insulation. If that space is packed with a mix of clay slip and perlite, then
you simply need to run your system more to dry the system out which will increase temps only after the Burner Base dries out, the
other choice is you Tried winging it and did not plan to have enough insulation surrounding your Firebricks, this would require a
rebuild !

Also, it appears likely that the barrel is off-set over the top of the Heat Riser, causing you to have a marked difference in temps on
the sides of the barrel ! This is allowable only when it is done on purpose -to create an improvement in the flow of hot exhaust gas
to the Transitional Area ! You need to check that you have a minimum 2 inch spacing between the top of the Heat Riser and the
underside of the top of the barrel.

The transitional area should start with a CSA close to 80'', more if the Horizontal pipe begins at the floor of the transitional area so
if it is on the floor a rebuild is necessary!When you rebuild, raise your horizontal pipe to your 1st bell 3'' and build in large sweeping
generous curves to add the flow through this area !

Lets re-check these areas, we both have to Know these problems were addressed correctly to get you to a completed build in less
than two weeks! For the Good of the craft !Big AL

 
Satamax Antone
gardener
Posts: 3471
Location: Southern alps, on the French side of the french /italian border 5000ft elevation
194
  • Mark post as helpful
  • send pies
    Number of slices to send:
    Optional 'thank-you' note:
  • Quote
  • Report post to moderator
Gus, we need to see more pics.

General ones, where it's located, pic of the chimney, of every elbow etc.

I gonna be harsh but, so far, we have seen a big messy pile of firebricks and fake bricks. Not mortared. I'm also under the impression that you deviated from a tried and true rocket design, and tried to improve as you went along. There's no insulation either.

A rocket can be a lethal piece of equipement, and should not be joked about. And you haven't had one of thoses red nricks explode in your face yet.

So, off to work mate.

Get us pics, and we'll see what we can do.

Again , wide and low burn tunnels don't work.
 
That feels good. Thanks. Here's a tiny ad:
Rocket Mass Heater Jamboree And Updates
https://permies.com/t/170234/Rocket-Mass-Heater-Jamboree-Updates
reply
    Bookmark Topic Watch Topic
  • New Topic