• Post Reply Bookmark Topic Watch Topic
  • New Topic
permaculture forums growies critters building homesteading energy monies kitchen purity ungarbage community wilderness fiber arts art permaculture artisans regional education skip experiences global resources cider press projects digital market permies.com pie forums private forums all forums
this forum made possible by our volunteer staff, including ...
master stewards:
  • John F Dean
  • Carla Burke
  • Nancy Reading
  • r ranson
  • Pearl Sutton
  • Jay Angler
stewards:
  • Liv Smith
  • paul wheaton
  • Nicole Alderman
master gardeners:
  • Christopher Weeks
  • Timothy Norton
gardeners:
  • thomas rubino
  • Matt McSpadden
  • Eric Hanson

Need help with my Rocket mass stove

 
Posts: 12
  • Likes 1
  • Mark post as helpful
  • send pies
    Number of slices to send:
    Optional 'thank-you' note:
  • Quote
  • Report post to moderator
Hi all newbee here,
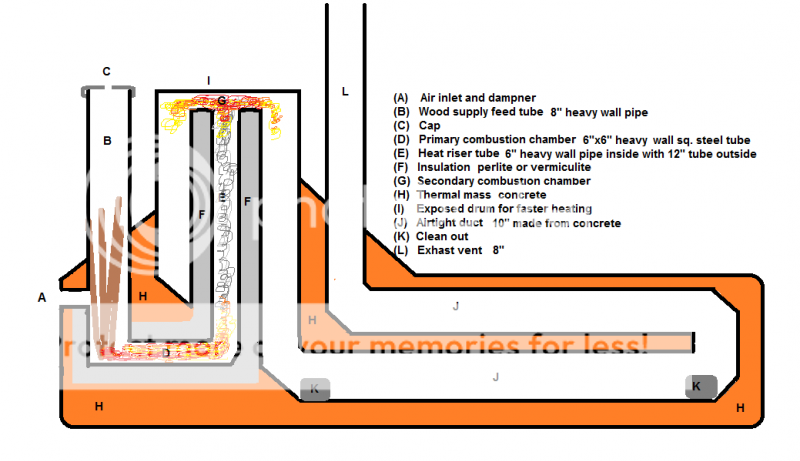
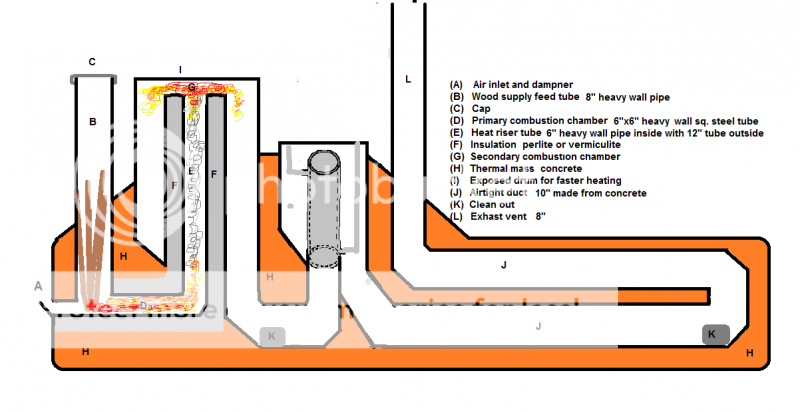
Looking for info and help on a rocket mass heater for my house I'm going to build next summer. I want to have a stove to heat a 1500 sq. ft. home in N. Idaho where it can get very cold at times. I want to to be somewhat self feeding and self temperature regulating. I have a basic plan of what I want and I want to made the main fire components out of heavy wall steel tubing and pipe, and the thermal mass out of concrete and some kind of filler. I have drawn up some plans that I'd like some opinions on. What is a good idea here and whats bad, I want to make the air intake open and close with a thermostat to regulate the house temperature in the winter. I'm also thinking of adding a pipe in a pipe heat exchanger to preheat the water going into my tank-less hot water system. But not sure how to add that to my current plan. I have seen some guys make a hot water heater by replacing the heat riser tube with the pipe in a pipe heat exchanger but i think that would cool the smoke in the secondary combustion chamber to much to get a good burn of all the remaining gases. Could I add a second heat riser tube to do this and then through the thermal mass? I plan to cover all the concrete in river rock to make it pleasing to the eye as well and make a reclining bench out of the thermal mass over the J duct work that will be covered with cushions like a couch. What needs to be done to the floor to hold up this kind of weight. I'm putting this into an addition to my current home that I have not started it yet, so I can build it as it needs. So any thoughts???

 
Posts: 19
1
  • Mark post as helpful
  • send pies
    Number of slices to send:
    Optional 'thank-you' note:
  • Quote
  • Report post to moderator
Hi! Have you seen the RMH water heater they constructed at Zaytuna farm? There are videos on youtube that explain it in detail. Pretty simple but effective..
 
Rick Lawrence
Posts: 12
  • Mark post as helpful
  • send pies
    Number of slices to send:
    Optional 'thank-you' note:
  • Quote
  • Report post to moderator
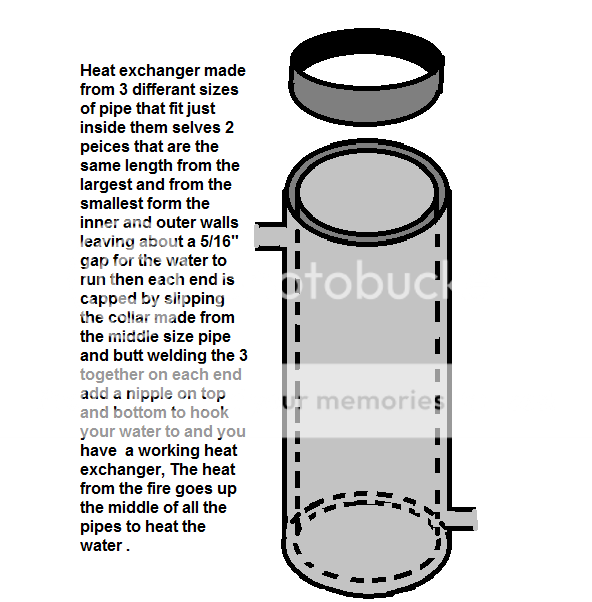
Here is what I had in mind for my heat exchanger for hot water it is made from a piece of 6" pipe and 8" pipe and the collars are made from 8" cut to fit, it leaves about 3/8" between the pipes for the water to flow.


Added it to my plans for my Rocket mass stove I'm hoping something like this would work this way the heat exchange has hot air on both inside and on the outside of it. The only thing I'm not sure of it would there be enough heat at this point to make it work and second if there is enough heat to get the water hot would it get hot enough to turn to steam and cause damage to the system when the water is not flowing for a long period of time, as in blow up? I want to preheat the water to the tankless electric water heater saving on electricity, but I want it to be safe and last for years. With this system I think it would use up every bit of heat and be near 100% efficient with no smoke.
Do you think this would work?

 
rocket scientist
Posts: 6190
Location: latitude 47 N.W. montana zone 6A
3132
cat pig rocket stoves
  • Mark post as helpful
  • send pies
    Number of slices to send:
    Optional 'thank-you' note:
  • Quote
  • Report post to moderator
Hi Rick; Where to start ... Do you have a copy of ianto evans book rocket mass heaters ? If not you should download or buy one. Lets see ...No metal will last long at all at the temps a good rocket produces. From your pictures your feed tube is way too tall, no extra air intake at the bottom. The feed tube / burn tunnel / heat riser and your duct work should be all the same size 6" or 8". If you want to heat water then you want to build a dedicated heater just for that (see zaytuna farm )although a simple pipe loop in your mass would help preheat for an on demand water heater. Concrete will work in your mass after your transition area but... why cob is so much easier to deal with, and it is easily removed later (concrete is not ) Trying to automate a rmh is not going to work... its all or nothing ! self feeding is something that a lot of people would like to have but other than a few people with wood pellets its not happening. As far as weight on your floor, yes add extra support , your mass will weigh in at several thousand pounds and you need to put good support underneath. There are several people in the north idaho panhandle with rmh's or batch type rmh , I am just 26 miles over the idaho border (near clark fork ) and would be glad to show you mine if you're over this way. These things REALLY WORK ! but you do need to build it properly. Get the book , read it repeatedly , Write back here and ask many question before you build and you will end up with a happy roaring dragon in your living room next winter!
 
pollinator
Posts: 4154
Location: Northern New York Zone4-5 the OUTER 'RONDACs percip 36''
67
hugelkultur fungi books wofati solar woodworking
  • Likes 1
  • Mark post as helpful
  • send pies
    Number of slices to send:
    Optional 'thank-you' note:
  • Quote
  • Report post to moderator

Rick Lawrence wrote:Hi all newbee here,
Looking for info and help on a rocket mass heater for my house I'm going to build next summer. I want to have a stove to heat a 1500 sq. ft. home in N. Idaho where it can get very cold at times. I want to to be somewhat self feeding and self temperature regulating. I have a basic plan of what I want and I want to made the main fire components out of heavy wall steel tubing and pipe, and the thermal mass out of concrete and some kind of filler. I have drawn up some plans that I'd like some opinions on. What is a good idea here and whats bad, I want to make the air intake open and close with a thermostat to regulate the house temperature in the winter. I'm also thinking of adding a pipe in a pipe heat exchanger to preheat the water going into my tank-less hot water system. But not sure how to add that to my current plan. I have seen some guys make a hot water heater by replacing the heat riser tube with the pipe in a pipe heat exchanger but i think that would cool the smoke in the secondary combustion chamber to much to get a good burn of all the remaining gases. Could I add a second heat riser tube to do this and then through the thermal mass? I plan to cover all the concrete in river rock to make it pleasing to the eye as well and make a reclining bench out of the thermal mass over the J duct work that will be covered with cushions like a couch. What needs to be done to the floor to hold up this kind of weight. I'm putting this into an addition to my current home that I have not started it yet, so I can build it as it needs. So any thoughts???


Rick Lawrence : Welcome to Permies.com, our sister site Richsoil.com and the Rocket, Wood Stoves and Cob Forum Threads! With 28,000+ Fellow Members
Worldwide you should be able to come here 24 / 7 and find someone who wants to talk about what you want to talk about !

Thanks for the clear well labeled pictures, It does make things a great deal clearer, and being able to 'read off of the same sheet of music' always helps.

You have come to the rift place we can help you sort through this, and help You find what will work for you. I can promise that you will not get a lot of 'But, we have
always done it :::-----> 'this way', this is your build, but we have seen most of the possible design variations and someone will point out its flaws/ problems if any!

The RMH was designed as a space heater for small homes in third world countries, with the house being built around the Heater. Basically you are hoping to Add a
RMH into your house and heat the most of it ! Food for thought, if a regular box wood stove cannot be centrally located and heat the whole house, a RMH will not
do much better.

Your addition should allow you to create the opportunity for some additional air circulation through your existing lay-out !

At best, This is kinda like golfers swing where he makes 5 mistakes on the upswing (present layout) and corrects 3 of them on the way back down , there will be
trade-offs.

Unfortunately the freaky high Temperatures the Rocket Mass Heater RMH, works at will cause All Types of iron/steel to rapidly fail at A, B, C,D, and the inside
wall of " F ", You can Google "High Temperature Hydrogen Attack'' and Hydrogen/Steam Embrittlement as representative of the rapid failure process !

So, I was brought up in a house with 1930's era coal furnace in the basement, (upgraded to late 1950s Tech) and it had the type of thermostat controlled damper
you want to have with your RMH, The attachment point for this flapper would be at your point A !

This allowed the home owner to 'jack up the the thermostat' and get more heat -right now- by providing more air flow to a banked fire, this banked fire was very
inefficient dirty, smoky, and coated the inside of the pipes with black soot that required cleaning each year before the start of the heating season, in hopes you
would get-through to spring with out having to tear-down and clean !

Add the burning of wood in this type of furnace and you often made creosote and had creosote or chimney fires !

So that technology was tried and found wanting, this has been tried in a Rocket and by creating smoldering fires you lose the great efficiencies of the rocket and
cause it to burn dirty!

Basically, any additional air flow at A needs to be closely regulated by close owner/operator attention - more, not less !

The Cap (C) on the top of your 'Feed Tube' (B) is problematic for several reasons ! It can be a trap for hot highly flammable, lighter than air gases, removing the
Cap will introduce needed oxygen and you are lucky if all you lose is you eye brows !

'B' should only be 1/4 of 'E' , otherwise, you will get smoke back and flames burning up inside 'B', there is a handy work around, you can install a forced air fan to
make feed air with a fan just below "C" or pulling air through the system and located at " L ", Any failure of this fan or loss of electricity to it will result in smoke back
and flames inside " B "

While it could be possible to increase the height of the Heat Riser " E " with some positive gains, You will quickly run into headroom problems, as a plan for infrequent
disassembly and cleaning most be planned for and loading long wood into your Feed Tube " B " at an elevated point " C " will quirky create headroom issues and
loading problems.

At " F " Perlite is marginally more effective than vermiculite, both are loose granular products and need stabilization. Generally some clay slip is added to create a
lasting Heat Riser. this reduces the insulation so more thickness is needed !

" H " is a problem, basically anywhere in the RMHs body that is in contact with the Firebrick of the combustion chamber, the internalTemperatures will cause the
Portland Cement Types of Concrete to fail ! You can google Concrete degradation and thermal damage to get the whole story here !

In your Sketch there should be a deep ash pit just to the left of your clean out at [K], this also helps in the flow of your vertically falling hot exhaust gases, as they
transit horizontally into your Thermal Mass !

Please do check on the working conditions allowed for your tankless water heater, most have a requirement to be downstream from a water softener to prevent
the formation of hard water deposits on the 'coils', many have minimum and maximum water supply temperatures, if this pre-heated water needs to be stored long
it needs to be separated from the Domestic water supply and flow through a separate water to water heat exchanger to eliminate the dangers from Legionnaires
Disease !

A couple final words, like all wood stoves this unit should be located in the very heart of the home, and not out of sight out of mind. Located there, they needs of an
RMH are automatically tended to as one goes through the days tasks of home-ownership with no more thought needed than you would give to adjusting a pair of
reading glasses !

Tending a centrally located RMH is much like having an ample Savings account into which you deposits small very dry fine split wood and receive automatic
withdrawals of bone warming heat! A properly built and tended RMH will for little attention over 3 -6 hours give you overnight to 24 hours of Heat enegy Radiation
off of your Thermal mass.

For the Good of the Craft !
 
Rick Lawrence
Posts: 12
  • Mark post as helpful
  • send pies
    Number of slices to send:
    Optional 'thank-you' note:
  • Quote
  • Report post to moderator
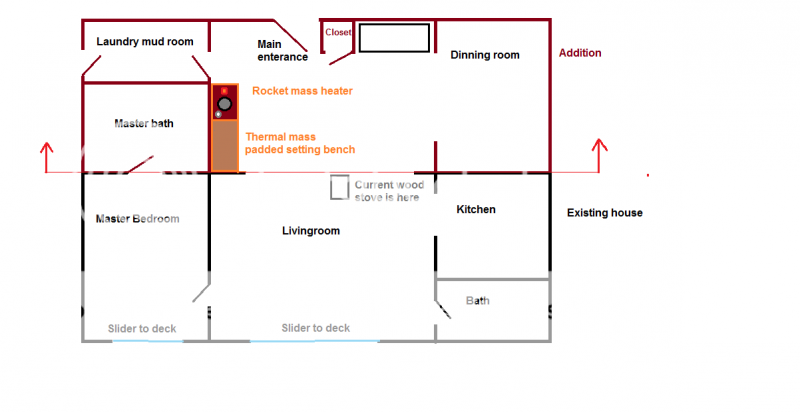
Ok, tnx to all that have replied to my post. First off here is my addition plans. The new rocket stove is as close to the center of the completed house as I can get it and keep my floor plan.
The addition is going to double the current house size. so everything above the red line will be new.


Second I don't understand why heavy walled steel tube would fail, when I see tons of rocket stoves made from basic stove pipe on the net?
I'm talking about 3/8 " wall steel here. Even at 1000 deg it will still hold up fine. I've been a welder and steel fabricator all my live so i have some knowledge of steel melting points and such. Granted I have never built a rocket stove so I don't claim to know it all, just trying to understand the whys. I want a stove that will burn for at least 8 hours that's why the long feed tube so I can stick a larger amount of wood in it and it would gravity feed into the burn chamber. I do not want to just sit and tend a fire all day just to keep the house warm. Somebody must have figured out how to do this. I have read a lot and I see a lot of different ideas on the best way to build a rocket mass stove and I'm hoping to find a happy medium. I do plan to build some small test stoves to work out some of my ideas over the rest of the winter to see what works and what doesn't.
One last thing I don't have any source of natural clay here that is why I was doing to use the concrete and I want to make it all look like river rock when done.
 
allen lumley
pollinator
Posts: 4154
Location: Northern New York Zone4-5 the OUTER 'RONDACs percip 36''
67
hugelkultur fungi books wofati solar woodworking
  • Mark post as helpful
  • send pies
    Number of slices to send:
    Optional 'thank-you' note:
  • Quote
  • Report post to moderator
Rick Lawrence : Again good sketch-up work ! Can we have an idea of dimensions/ Is this on a slab or is there a crawlspace under and is the wall next to the RMH
a load bearing wall? we are talking maybe 5,000 # of Thermal mass!

Are you planing on going from 1500 sq ft to 3,000 sq.ft ? This is a lot even for a 8'' Rocket Mass Heater RMH. Again this is your build, we will make practical
suggestions, and explain our reasons, in many cases we have made the mistakes we are speaking of, and now what we speak, most of use have 3 heating seasons
or less on our Rockets, but I would rather talk with a man who has Build one and LIVED with it than the man who built 10 in one year !

Please, 90% or better of the you-tube videos are look what I did with no follow-up to tell you that there flaming units of death failed completely within several weeks

The Rocket Mass Heater built to the standard of the day 20 years ago will quickly reach 2,000ºF, not 1,000ºF, and does so to create a clean highly efficient burn,
as such it is above the temperatures you are used to working at ! Todays top builds quickly climb to temperatures approaching 3,000ºF, at such Temperatures
iron and steel will fail totally and do this within several weeks heating the size house you are planing and the degree day heat load of your location ! We are not
talking about these metals meting but rather their intrinsic Crystaline structure being torn apart.

I understand that you want to try a feed tube '' B '' that is much closer to equal in length to the height of the Heat Riser " F ", this has been attempted many times,
the working height of the Feed Tube " B " will always create Smoke back and flames burning up the wood when it exceeds 1/4 of the height of the Heat Riser " F "
unless the system is modified to run constantly as a forced draft system, this isolates the Feed tube and makes by ear adjustments of the air fuel mix impossible.

Obviously if your personal situation makes doubling the size of your house, you are planning on spending more time there than just shit, shower shave, out the door
evening meal and bed. All the RMH asks for is that you give it 'pride of place' in the center of your home so that while you are performing all the small tasks and
pleasures associated with being a home owner you can trade a few seconds attention now and then scattered over 3-6 hrs to get 24 hrs of heat without any further
work! This is better service than your present wood stove can give you !

Regarding local clays, any excavation contractor with 5 years business in your area knows all about the soil types and locations within probably 150 miles of his
location, He is even paying to have it hauled away, and maybe even to dump It! You can also check with local highway crews who know were certain road cuts turn
into mudslides in heavy rains, and know just how many men and equipment is necessary to deal with that mess this time ! Clay is not hard to find when you want
it bad enuf !

Here is one more vote for going to Rocketstoves.com to Download your copy of " Rocket Mass Heaters ", I promise if you see something there it can
be done, and It will not self destruct in a very short while ! For the Good of the Craft ! Big AL
 
Rick Lawrence
Posts: 12
  • Likes 1
  • Mark post as helpful
  • send pies
    Number of slices to send:
    Optional 'thank-you' note:
  • Quote
  • Report post to moderator
Tnx Al for the info
I went to Rocketstoves.com and looked at the info and will get the download when i get a few extra bucks.
The house is currently about 750 sq ft and will be 1500 when done. the current part of the house is on a foundation with a half basement. The addition will be post and pier with a 2 to 3 ft crawl space. There is a wall behind the stove, but it will not be load bearing to any real degree. The house will be 42 X 36 when complete.
I didnt think that a wood fire could reach 3000 degrees so I can see why steel would fail at that kind of temps. so I will change my plans to firebrick and cement or cob if I can figure out how to get the clay and how to make it.
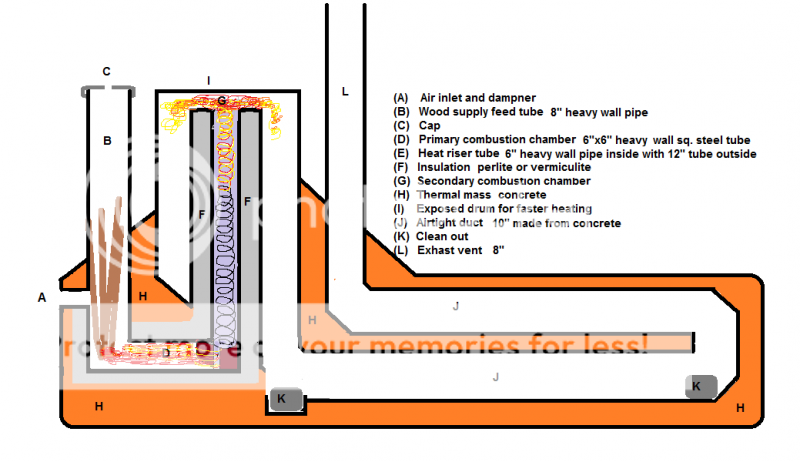
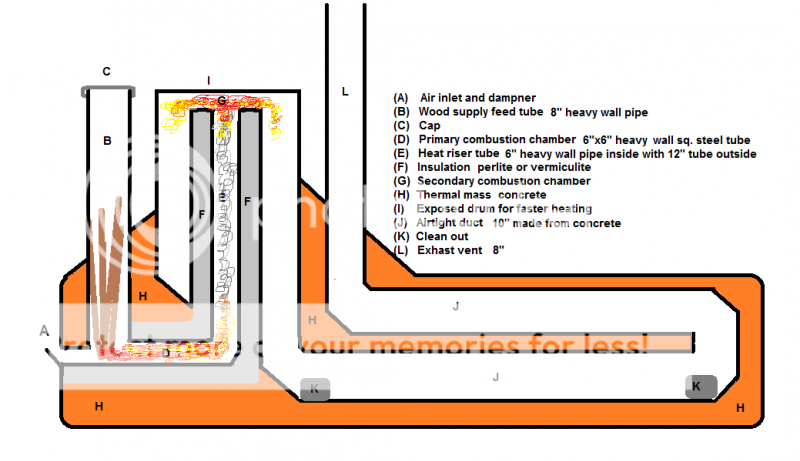
I had another thought on the wood supply tube that might solve the trapped hot gas you talked about. Take a look at this and add comments


Basically the feed tube will act like it is only about a foot tall as the air is coming in at that point. The burn chamber will be 2 feet long and the heat riser tube 3 ft long for a
1, 2, 3, ratio that's what I have heard is the best. I also added a small hole to the cap on top so it will suck a small amount of air in and keep it gas free.
The reason the mass air duct (J) is larger is to slow the air down it this section to allow more time for it to transfer heat. I got this from a guy that built a working RMH and he said it worked well, he also had a smaller combustion tube (D) to speed up the air at that point.

If I use fire brick to make the heat riser tube does it still need to be insulated? can the firebrick be mortared together with cob or mortar mix?

How hot is cob good to and what does it do when it gets overheated?
 
allen lumley
pollinator
Posts: 4154
Location: Northern New York Zone4-5 the OUTER 'RONDACs percip 36''
67
hugelkultur fungi books wofati solar woodworking
  • Mark post as helpful
  • send pies
    Number of slices to send:
    Optional 'thank-you' note:
  • Quote
  • Report post to moderator
Rick L. Great, 1500 is certainly doable, and you have a few things to try before your main build ! Actually the weight load and the way it is spread on
the floor is much like a water bed, just something to plan for!

I can see no reason not to try your extended length Feed tube, " B " , you are probably going to have to stand on a ladder to load it and then there is/
are issues with ceiling height.

Your Burn Tunnel " D " should be no more than 2Xs the height of the feed tube " B " or 2/3rds of the height of the heat riser " F.E.F ", that ratio works
well, and a lot get built 1, 2, 4

Also, and I admit we ARE close to 'but we have always done it this way -and it worked', The Cross-sectional areas through out Your build should be the
same, with the Cross-Sectional area at your Burn Tunnel " D being the smallest, here it is slightly better to err a little on the side of narrow and Tall,rather
than Wide and short. I am glad that you found someone with experience to help you with your build !

From a through to G we are trying to make Turbulence, as time, temperature and turbulence is how we mix the air and wood gas fuel to create our freaky
hot burn ! The Amount of Turbulence is detected by how load your rocket roars. From " G " on we do not want Turbulence, to much Turbulence especially
in a cold RMH can actually cause the gas flow to stall, going to 10 here " J " will create Turbulence.

Good cob comes from a mix of good clay and Builders or Sharp sand, the ratio will vary from one area to the next, so you will have to learn how - goggle it
- to do ''soil sedimentation tests'' and test your clay for its playability ! THis is not a big issue a good mix locks the sand and cob together very much like
adobe, and their are multi-story buildings from the 1500s in our American South West !

With a less than perfect mix you may see some cracks, easily patched, but that is the mix -not a reaction to heat.

Think like fire! Flow like a Gas! Don't be a Marshmallow! For the Good of the Craft ! Big AL

*On a good cold day with your room darkened you should see a dull red glow at " I "

Late note : Free RMH build plans click on the link below, follow the prompts this is a new benefit of being a member :

http://www.richsoil.com/email.jsp

Have a great day A.L.
 
Rick Lawrence
Posts: 12
  • Mark post as helpful
  • send pies
    Number of slices to send:
    Optional 'thank-you' note:
  • Quote
  • Report post to moderator
Here is a design I came up with for a heat riser tube made from firebrick stacked inside a 10" pipe.
Will this hold up to a rocket stoves heat for a extended period of time and what could I do to improve it.

 
Rocket Scientist
Posts: 4495
Location: Upstate NY, zone 5
563
5
  • Mark post as helpful
  • send pies
    Number of slices to send:
    Optional 'thank-you' note:
  • Quote
  • Report post to moderator
It is good to minimize mass in the core and riser, so if you are going to use firebrick in the riser, try "splits" - 1 1/4" thick bricks. Then you have more space for insulation between the brick and the 10" duct enclosure.
 
Posts: 26
Location: Colorado Front Range (7000')
  • Mark post as helpful
  • send pies
    Number of slices to send:
    Optional 'thank-you' note:
  • Quote
  • Report post to moderator
According to my new friend - http://www.pagetutor.com/octagon_layout/ , you'd have to trim the outside tips of 2" brick a bit to fit into a 10" pipe. (Perfect cuts would require a minimum 10.75" ID pipe with untrimmed 2" bricks). From everything I've read, metal should hold up OK on the outside of the heat riser.

Is your fire brick hard & heavy, light & soft, or somewhere in the middle? The lighter/softer (insulating) type might not need any extra insulation (or metal pipe).

Thinner, heavy, hard firebrick will benefit from extra insulation ( & maybe a pipe to contain it) - as Glen just mentioned.
 
allen lumley
pollinator
Posts: 4154
Location: Northern New York Zone4-5 the OUTER 'RONDACs percip 36''
67
hugelkultur fungi books wofati solar woodworking
  • Mark post as helpful
  • send pies
    Number of slices to send:
    Optional 'thank-you' note:
  • Quote
  • Report post to moderator
Speaking as an old cheapskate, I have no problems with building an RMH with what comes to hand, Ideally the floor of the combustion core should have
some hard dense fire brick for durability,and a case can be made for including them in the heat riser to promote a good strong draft and easy relighting

Having said that the less mass to absorb the heat the more of the heat energy that will be reflected back into the combustion zone, the quicker it will come
up to temperature and the Cleaner the total burn will be!

See Link below :

https://permies.com/t/42108/rocket-stoves/Heat-riser-material

4 th Crafts Big AL


Rick Lawrence
Posts: 12
  • Mark post as helpful
  • send pies
    Number of slices to send:
    Optional 'thank-you' note:
  • Quote
  • Report post to moderator

Arlyn Gale wrote:According to my new friend - http://www.pagetutor.com/octagon_layout/ , you'd have to trim the outside tips of 2" brick a bit to fit into a 10" pipe. (Perfect cuts would require a minimum 10.75" ID pipe with untrimmed 2" bricks). From everything I've read, metal should hold up OK on the outside of the heat riser.


Did you read my post at all? Like it says 2" firebrick cut at 22 1/2 degrees 3 7/8" long.
 
Rick Lawrence
Posts: 12
  • Mark post as helpful
  • send pies
    Number of slices to send:
    Optional 'thank-you' note:
  • Quote
  • Report post to moderator

allen lumley wrote:Speaking as an old cheapskate, I have no problems with building an RMH with what comes to hand, Ideally the floor of the combustion core should have
some hard dense fire brick for durability,and a case can be made for including them in the heat riser to promote a good strong draft and easy relighting

Having said that the less mass to absorb the heat the more of the heat energy that will be reflected back into the combustion zone, the quicker it will come
up to temperature and the Cleaner the total burn will be!


Would it be better to use the soft firebrick for the heat riser tube or the hard stuff. I was planing to use the hard for the combustion chamber but not sure which would work best in the riser and hold up the longest.
 
Glenn Herbert
Rocket Scientist
Posts: 4495
Location: Upstate NY, zone 5
563
5
  • Mark post as helpful
  • send pies
    Number of slices to send:
    Optional 'thank-you' note:
  • Quote
  • Report post to moderator
The heat riser takes much less abuse than the feed tube or burn tunnel, so it should be safe and durable to use soft insulating firebrick for that. This would also decrease the mass.

There is a thread somewnere of an octagon riser with bricks cut at 45 degrees and lapped sort of like a pinwheel. I think he cut the bricks precisely in half so there was no waste.
 
Arlyn Gale
Posts: 26
Location: Colorado Front Range (7000')
  • Mark post as helpful
  • send pies
    Number of slices to send:
    Optional 'thank-you' note:
  • Quote
  • Report post to moderator
[quote=Rick Lawrence "Did you read my post at all? Like it says 2" firebrick cut at 22 1/2 degrees 3 7/8" long."

If you cut 2" bricks per your diagram, they won't fit in a 10" pipe without further trimming, and, perhaps more importantly, will only give you a 5-3/8" (inside) octagon.

[/b]For a 6" (inside) octagon, 2" brick should be cut (@22.5*) 4-1/8"(long) [/b]. The outer octagon would be 10".

10-inch-Octagon.PNG
[Thumbnail for 10-inch-Octagon.PNG]
 
Arlyn Gale
Posts: 26
Location: Colorado Front Range (7000')
  • Mark post as helpful
  • send pies
    Number of slices to send:
    Optional 'thank-you' note:
  • Quote
  • Report post to moderator
These wouldn't attach on the first try:
Diagram-calc-s.PNG
[Thumbnail for Diagram-calc-s.PNG]
6-inch-Octagon.PNG
[Thumbnail for 6-inch-Octagon.PNG]
 
allen lumley
pollinator
Posts: 4154
Location: Northern New York Zone4-5 the OUTER 'RONDACs percip 36''
67
hugelkultur fungi books wofati solar woodworking
  • Mark post as helpful
  • send pies
    Number of slices to send:
    Optional 'thank-you' note:
  • Quote
  • Report post to moderator
Arlyn Gale ; You certainly delivered on what you said you had found out how to create!

You template does not allow for the staggered bond style of laying bricks out, this prevents the mortar line/joint of one course of bricks From setting right above
the mortar joint of the layer above and below, this will increase the probability of them opening along these continued mortar lines due to expansion and contraction
Stresses !

I have not evaluated Ricks design to see if it has the same potential problem. For the Good of the Craft ! Big AL

Late note : Rick, while probably not ideal you can create an interesting spiral to stagger your mortar joint lines, this will increase turbulence and may or may not help
complete combustion ! A.L.
 
Arlyn Gale
Posts: 26
Location: Colorado Front Range (7000')
  • Mark post as helpful
  • send pies
    Number of slices to send:
    Optional 'thank-you' note:
  • Quote
  • Report post to moderator
Allen - yes, the staggered mortar joint makes the alternate courses interesting. A square outside/octagon inside, such as PvdB documents, addresses that issue.
octagon-brick-riser-1.PNG
[Thumbnail for octagon-brick-riser-1.PNG]
octagon-brick-riser-2.PNG
[Thumbnail for octagon-brick-riser-2.PNG]
 
Posts: 226
Location: S.W. Missouri, Zone 6B
8
  • Mark post as helpful
  • send pies
    Number of slices to send:
    Optional 'thank-you' note:
  • Quote
  • Report post to moderator

Rick Lawrence wrote:Ok, tnx to all that have replied to my post. First off here is my addition plans. The new rocket stove is as close to the center of the completed house as I can get it and keep my floor plan.
The addition is going to double the current house size. so everything above the red line will be new.


Second I don't understand why heavy walled steel tube would fail, when I see tons of rocket stoves made from basic stove pipe on the net?
I'm talking about 3/8 " wall steel here. Even at 1000 deg it will still hold up fine. I've been a welder and steel fabricator all my live so i have some knowledge of steel melting points and such. Granted I have never built a rocket stove so I don't claim to know it all, just trying to understand the whys. I want a stove that will burn for at least 8 hours that's why the long feed tube so I can stick a larger amount of wood in it and it would gravity feed into the burn chamber. I do not want to just sit and tend a fire all day just to keep the house warm. Somebody must have figured out how to do this. I have read a lot and I see a lot of different ideas on the best way to build a rocket mass stove and I'm hoping to find a happy medium. I do plan to build some small test stoves to work out some of my ideas over the rest of the winter to see what works and what doesn't.
One last thing I don't have any source of natural clay here that is why I was doing to use the concrete and I want to make it all look like river rock when done.


1) Regarding the layout.... You might consider changing the RMH to lay along the new addition, left-to-right, in the drawing, as opposed to top-to-bottom, along the wall of the master bedroom. That would get the mass of the RMH more centrally located in the living space.

2) Temps. I think you already got this point, but wood can theoretically burn as hot as 3,400 F. My test rocket stove burns over 1,700 F in the opening of the throat of the burn chamber (this is where the feed tube transitions into the opening of the burn chamber). And that is NOT where the fire will be hottest. Clearly, we are talking temps very much in excess of 1,000 F. At the same time, most builds do seem to allow fire brick to survive for years of use. That usually means 2200 to 2500 F temperature ratings of the fire brick (depends upon the amount of metal, etc, in the fire brick, so you really have to ask your brick seller for the rating of the fire brick you are buying).

I've heard of fire brick being rated up to 3400-3500 F, but it is not available in the town I live, so far as I know. I am using 2500 F rated fire brick.

3) Tall Feed Tube. I get what you are trying to do, make life easier! But I think you are barking up the wrong tree with your sketches. The idea of making the feed tube tall and long, with or without additional air inputs, is I think a flawed idea. Taking the best case, you have the tall capped tube, and smoke gets trapped in there. Then you add air intake at the bottom, and when opening you are risking a flare up. So maybe we add a hole in the cap? I don't know if that'll work or not, but it will work to the advantage of a second chimney, and from what I've been seeing in my test build, I really want to do everything I can to *discourage* smoke getting into the house.

I'd suggest something completely different.

Build a batch box style RMH. Read all the threads over at Donkey's forum posted by Peterberg on his designs. Really good information, and very well tested.

http://donkey32.proboards.com/

I'm actually leaning this way myself. I like fire, but you really cannot see it in the RMH design, so there's little emotional reward for me tending it every few minutes. I'd rather be reading. So, given my lazy nature, a standard RMH is not really a good choice for me, psychologically. I will be far better suited to a batch box style feed solution. This is much closer to a traditional masonry heater design. Load it up, fire it up, and let it burn to ash.

Of course, now I have to build one to test, which I have not yet done. But that is my biggest suggestion which I think really addresses what I perceive as one of your primary concerns. It is one I share (if I understand you correctly).

 
Rick Lawrence
Posts: 12
  • Mark post as helpful
  • send pies
    Number of slices to send:
    Optional 'thank-you' note:
  • Quote
  • Report post to moderator

Arlyn Gale wrote:[quote=Rick Lawrence "Did you read my post at all? Like it says 2" firebrick cut at 22 1/2 degrees 3 7/8" long."

If you cut 2" bricks per your diagram, they won't fit in a 10" pipe without further trimming, and, perhaps more importantly, will only give you a 5-3/8" (inside) octagon.

[/b]For a 6" (inside) octagon, 2" brick should be cut (@22.5*) 4-1/8"(long) [/b]. The outer octagon would be 10".


My figures are correct and you made a mistake in using a 10" octagon not a 10" circle, as they are not the same thing. A 10" diameter circle you could only fit a 9 1/4" octagon into. The circumference of a 10" circle is 31.42" and the circumference of a 10" octagon is 33". Standard firebrick is 9" long 4 1/2" wide and 2" thick, cut the 4 1/2" at 22 1/2 degrees to 3 13/16" for a loose fit or 3 7/8" for a tight fit.
 
Rick Lawrence
Posts: 12
  • Mark post as helpful
  • send pies
    Number of slices to send:
    Optional 'thank-you' note:
  • Quote
  • Report post to moderator

allen lumley wrote:

Late note : Rick, while probably not idea you can create an interesting spiral to stagger your mortar joint lines, this will increase turbulence and may or may not help
complete combustion ! A.L.


I wasn't planing to mortar the joints at all in this section as the pipe will hold it all together tightly and with insulation packed into any dead space there would be to way for it to expand, unless the pipe failed. As I understand it, the heat on the outside of the heatriser is far lower then up the middle. So a heavy walled pipe should hold up fine.
 
allen lumley
pollinator
Posts: 4154
Location: Northern New York Zone4-5 the OUTER 'RONDACs percip 36''
67
hugelkultur fungi books wofati solar woodworking
  • Mark post as helpful
  • send pies
    Number of slices to send:
    Optional 'thank-you' note:
  • Quote
  • Report post to moderator
Arlyn Gale : So you are designing for a batch loaded, horizontal burn RMH? Please keep us informed of your build as it comes along.

For my future needs even a 6'' Batch loaded RMH is too much especially with my limited hight problems, still a good design and a good
execution makes for a beautiful and Powerfull Rocket!
For the Good of the Craft ! Big AL
 
allen lumley
pollinator
Posts: 4154
Location: Northern New York Zone4-5 the OUTER 'RONDACs percip 36''
67
hugelkultur fungi books wofati solar woodworking
  • Likes 1
  • Mark post as helpful
  • send pies
    Number of slices to send:
    Optional 'thank-you' note:
  • Quote
  • Report post to moderator
Rick Lawrence :I find that I like your idea a lot, There is a school of thought that very much likes the Denser Firebrick for its ability to absorb and store heat energy
making relighting the RMH much easier, this is a trade-off from having the lighter less dense fire brick that is much more refractory and comes up to a ( slightly )
higher maximum temperature and does so sooner assuring a Faster high temp clean burn.

By putting a dense mass on the outside of your fire brick, you probably will have the best of both worlds, and gain on the total time the 55 gal barrel stays hot after
you let the fire go out.

I hope you have a little more extra slop in your 10 inch pipe then is shown in your sketch, or can trim a little thinner, Your Firebrick will expand ! Some room for
expansion must be allowed for !

In the past it was an accepted practice to use fire cement at both ends of the Bridge Firebricks over the Burn Tunnel, because of the extremely low ( planed for )

Expansion of the Fire Cement there was Chipping and Spalling with some breakage of those bridging firebricks reported !

For the good of the Craft ! Big Al
 
Rick Lawrence
Posts: 12
  • Mark post as helpful
  • send pies
    Number of slices to send:
    Optional 'thank-you' note:
  • Quote
  • Report post to moderator

Arlyn Gale wrote:Allen - yes, the staggered mortar joint makes the alternate courses interesting. A square outside/octagon inside, such as PvdB documents, addresses that issue.
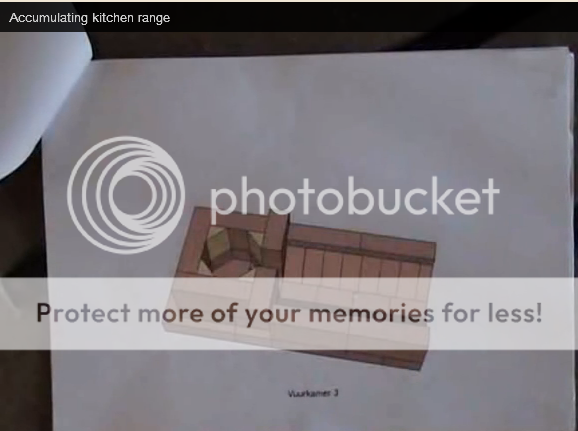
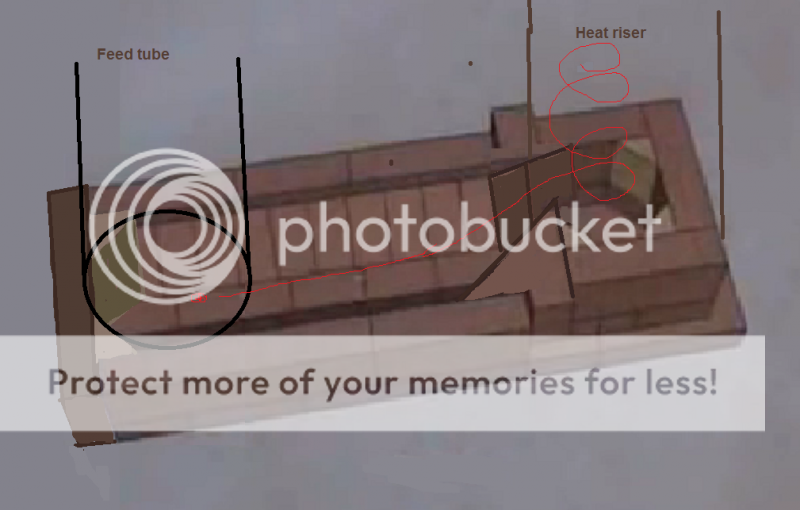


I like the layout of this but I had the idea to swirl the gas up the heat riser tube like this. Not a real good drawing I know, but hope you get the idea. I would still use a steel feed tube, (as in my other sketch) and a octagon firebrick heat riser.

 
allen lumley
pollinator
Posts: 4154
Location: Northern New York Zone4-5 the OUTER 'RONDACs percip 36''
67
hugelkultur fungi books wofati solar woodworking
  • Mark post as helpful
  • send pies
    Number of slices to send:
    Optional 'thank-you' note:
  • Quote
  • Report post to moderator
Rick Lawrence : Sending you a P.M. Big AL !
 
Rick Lawrence
Posts: 12
  • Mark post as helpful
  • send pies
    Number of slices to send:
    Optional 'thank-you' note:
  • Quote
  • Report post to moderator

allen lumley wrote:Rick Lawrence :I find that I like your idea a lot,

I hope you have a little more extra slop in your 10 inch pipe then is shown in your sketch, or can trim a little thinner, Your Firebrick will expand ! Some room for
expansion must be allowed for !


Hey Allen,
AKA Big Al
Do you think that firebrick expands more then steel when hot? They will both expand some I know and for the most part, the steel will be at a lower working temperature than the firebrick will be so I'm not really sure how it will effect it. I may modify my idea to use thinner firebrick as somebody suggested and more insulation on the outside to cushion the brick as it expands.
 
Glenn Herbert
Rocket Scientist
Posts: 4495
Location: Upstate NY, zone 5
563
5
  • Mark post as helpful
  • send pies
    Number of slices to send:
    Optional 'thank-you' note:
  • Quote
  • Report post to moderator
You are planning a 6" inside diameter octagon from 2" firebrick. This will make an outside octagon 10" across the flats (6+2+2). How do you propose to fit that inside a 10" diameter pipe? If you cut the bricks to your specified dimension, you will not have a 6" inside octagon. Splits 1 1/4" thick will let you do what you are wanting.
 
Arlyn Gale
Posts: 26
Location: Colorado Front Range (7000')
  • Mark post as helpful
  • send pies
    Number of slices to send:
    Optional 'thank-you' note:
  • Quote
  • Report post to moderator
Glen - well said. I knew my math couldn't be that wrong - cut brick don't lie!

As Rick points out, the largest octagon that will fit inside a 10" circle is a (~)9.25", which means a (9.25"- 4" of brick =) 5.25" riser, with 2" brick.

I went the other way and began building from the inside out. A 6" octagon, (two) 2-1/2" brick = 11" outer octagon, would barely fit in a 12" circle. I'm still in the dry stack stage, but initial test burns were impressive.
 
Erik Weaver
Posts: 226
Location: S.W. Missouri, Zone 6B
8
  • Mark post as helpful
  • send pies
    Number of slices to send:
    Optional 'thank-you' note:
  • Quote
  • Report post to moderator

Rick Lawrence wrote:

allen lumley wrote:Rick Lawrence :I find that I like your idea a lot,

I hope you have a little more extra slop in your 10 inch pipe then is shown in your sketch, or can trim a little thinner, Your Firebrick will expand ! Some room for
expansion must be allowed for !


Hey Allen,
AKA Big Al
Do you think that firebrick expands more then steel when hot? They will both expand some I know and for the most part, the steel will be at a lower working temperature than the firebrick will be so I'm not really sure how it will effect it. I may modify my idea to use thinner firebrick as somebody suggested and more insulation on the outside to cushion the brick as it expands.


I've seen masonry heater builders use corrugated card board to frame out space for expansion. I've seen that used both between facings of bricks (one side fire brick and the other the finished face brick as I recall) and between the fire brick and metal elements, like doors and similar hardware.

My impression is not a lot of room is needed for the expansion. I would think any compressible insulation would easily allow for it. Alternately, when working with clay, if you are able to lay up the clay (perlite-clay insulation, for example) when the RMH is going to be fired up hot, that at least sometimes allows the expansion joint to be formed "live" as it were.
 
Posts: 76
Location: central illinois
1
  • Mark post as helpful
  • send pies
    Number of slices to send:
    Optional 'thank-you' note:
  • Quote
  • Report post to moderator
Rick
i have a rocket mass heater in my shop which is 34' x 30', 8.5' ceilings. After building two traditional top feed heaters I built the current one which is a batch, side loading. It still has all the structural designs from Ianto Evans' book, 8" flue, barrel, etc. but the firebox is big enough to burn long pieces of wood totaling around 30lbs at a time. The firebox measures 12 in. x 12 in. x 38 in. the door is 9 in. diameter and I often load logs 36 in long by 6 in. diameter. The box is firebrick with vermiculite, all encased in cob. The heat riser is stainless steel double wall pipe from Menards, $100 2.5 years ago. I'm in my 3rd season and it is truly the best heater I've ever had! It puts out lots of heat for long periods on not much wood. The cheap thermometer on top of the barrel shows it runs at around 700F sometimes goes over 1000F but doesn't stay there more than 5-7 min.

I would make two important changes: I used 1/2 inch rebar as beams to carry the firebrick on the ceiling of the firebox. As you know since you're a welder, rebar will lose strength as it gets hotter. I'm in my 3rd season and the "beams" are starting to sag a little. I'm watching them and don't think they will fail this winter but I'm going to tear the firebox apart this summer and build a new one with a barrel vault shape. since i'm at it i'll probably add a glass ceramic window. The second is the riser: i plan on using splits for the riser since they should last longer and the fact that they are thinner will allow them to heat up faster than regular firebrick.

I have an old video on youtube you can watch that shows the stove; my camera broke but i'm going to get someone to help me do one more this winter before i tear it out. I'll go through it in more detail. good luck with your build.

https://www.youtube.com/watch?v=Q2sFParAFEc
 
Posts: 2
  • Mark post as helpful
  • send pies
    Number of slices to send:
    Optional 'thank-you' note:
  • Quote
  • Report post to moderator

allen lumley wrote: I understand that you want to try a feed tube '' B '' that is much closer to equal in length to the height of the Heat Riser " F ", this has been attempted many times,
the working height of the Feed Tube " B " will always create Smoke back and flames burning up the wood when it exceeds 1/4 of the height of the Heat Riser " F "
unless the system is modified to run constantly as a forced draft system, this isolates the Feed tube and makes by ear adjustments of the air fuel mix impossible


Hello Rick et all,

Is there a reason a cage would not work @ function B ? Something that would thwart leaners and not affect your pressure / gas dynamics ensuring a smoke-free environ. Allow gravity the honors!


^sans taper

The only concern I might have is back pressure causing the long sticks to light the ceiling - but in a room with 45 ft ceilings, would the cage not work ?

Would also: disnecessitate function A - the air intake / damper while allowing visual assessment of sticks progress to burn chamber from hundreds of yards away.

Alright, here's to hoping my first permies comment is NOTHInG but revolutionary

NMB
 
Glenn Herbert
Rocket Scientist
Posts: 4495
Location: Upstate NY, zone 5
563
5
  • Mark post as helpful
  • send pies
    Number of slices to send:
    Optional 'thank-you' note:
  • Quote
  • Report post to moderator
A cage like you show (even if straight, not tapered) would require perfectly smooth straight wood to ensure nothing can hang up on one of the rings and have a stick that burns up out of the feed tube.
 
allen lumley
pollinator
Posts: 4154
Location: Northern New York Zone4-5 the OUTER 'RONDACs percip 36''
67
hugelkultur fungi books wofati solar woodworking
  • Mark post as helpful
  • send pies
    Number of slices to send:
    Optional 'thank-you' note:
  • Quote
  • Report post to moderator
O. K., This is my night to be the lightening rod ! Follow along as I try to bring Honor , High Acclaim, and Recognition of it's Virtues to the Lowly Feed Tube!

When we speak about the best wood to feed our Rocket Mass Heater RMH we say Small *, Very Dry, finely split, and this describes the best starting load
we can have, the more fine split the more we can cram into the feed tube, We want an immediate hot fire to help with a strong draw which is observed
by the horizontally burning flames, we also have a strong audible signal in the RMHs roar, These clues tell us that we have the THREE "Ts" working for us,
Time, Temperature, and Turbulence

A good systems Engineer will immediately say ''oh no!" and "You don't want Turbulence, thats contrary to good flow and you will lose Work/flow energy as
heat and noise''! Well in this case we are building a heater, so making heat is- dare I say, Cool ? and with Turbulence comes more opportunities to mix our
Hydrocarbon fuels of choice (pyrolyzed wood gases) with temperatures promoting more heat and turbulent mixing and more heat and efficient burns !

If we have started our fire right, the sight of the fire burning sideways and the audible roar tells us good fuel mixing and highly efficient burns are happening.

Actually looking at the wood being consumed we see that it is all happening at the tips of the wood, with the air drawn into the fire actually cooling the upper
length of our sticks and being channeled over the hot coals.

With highly refractory firebrick we quickly reach the high heat conditions that allow us to increase the diameter of our mix of individual wood chunks as they
seem to burst into flame within seconds of being placed within the combustion zone that is now glowing a deep red to a cherry red ! At this point with less
chunks of larger fuel that do not completely fill the Feed Tube it is often necessary to use one or more bricks to restrict the opening and more directly
channel the flow of air over the wood fuel !

For the homeowner the immediate signal to adjust the air flow is usually a diminishing of the sound of the rockets roar, a simple adjustment of the brick
setting on or next to the feed tube returns the fire to hot brightness and the Rocket to its Roar, this action prompted by your rockets volume of sound is
easily accomplished as the RMH is located within the Heart of the home and is quickly noticed as the adults more around the house accomplishing Adult
daily living and homeownership tasks.

This action and the subsequent refueling of Your RMH's fire is done with no more conscious thought than you take in adjusting your glasses!

When long chunks of wood are used to fuel Your RMH, you will still automatically respond to the audible clues that your RMH needs an air adjustment or
re-fueling, BUT because the longer wood protrudes above the top of the feed tube opening this adjustment will be longer and will need to be done more
frequently!


Failure to perform this function with longer wood in the Feed tube will allow the air to enter willy nilly and actually cool the fire! This can weaken the draft
to the point that with inattention on the part of the operator, flames and smoke will Creep up the longer pieces of wood as they act like Chimneys and the
homeowner has a smoke back condition and the fastest way to deal with this problem, the complete removal of the longer burning pieces is impracticable.

The normally simple job of redirecting the air flow with bricks at the Feed Tubes top is made more difficult by the longer wood and the smoke in the
operators eyes !

Short version the height of the feed tube has a built-in fudge factor to allow the burning of one or more slightly longer pieces within the mix of other shorter
sticks, and the use of a brick or bricks to partially close and redirect to airflow through the combustion flame front is still possible ! Attempting to always
burn longer wood will turn around and Bite you on the ass ! (IMHO ) For the good of the Craft ! Big AL

* In this case Small Always means short ! A.L.
 
Merrinick Brown
Posts: 2
  • Mark post as helpful
  • send pies
    Number of slices to send:
    Optional 'thank-you' note:
  • Quote
  • Report post to moderator
Awesome. - thank you A.L., was fishing for a definitive response ! cheers.
 
Rick Lawrence
Posts: 12
  • Likes 1
  • Mark post as helpful
  • send pies
    Number of slices to send:
    Optional 'thank-you' note:
  • Quote
  • Report post to moderator
I had a thought and wondered if any of you have ever tried this> My thought was to add a fan in the outlet pipe ( L ) to suck air through the system and start the draw even with no fire. or put it on ( A ) the intake to blow air on the fire? I think that putting it on the exhaust would work best but just a idea at this point. I'm still looking for some material to build my first test stove to try out some of my ideas.

 
allen lumley
pollinator
Posts: 4154
Location: Northern New York Zone4-5 the OUTER 'RONDACs percip 36''
67
hugelkultur fungi books wofati solar woodworking
  • Mark post as helpful
  • send pies
    Number of slices to send:
    Optional 'thank-you' note:
  • Quote
  • Report post to moderator
Rick Lawrence : I used to be the guy that you got out of bed at 4 am ''when the heat went off'' - out of fuel - part failure -plugged nozzle, I was your guy !

I got to see a lot of systems that should have worked just fine, but had been modified way out of design specs by someone who did not know what he was doing-

A crutch that has developed within the Fossil Fuel Fired Furnace is the use of an exhaust gases Fan that fits within your Exhaust pipe, it is just exactly that - a crutch
that increases the number of ways a furnace can fail you !

If you are sick and go to the Dr. he looks at you, says 'yes you're sick', 'lets run some tests to see whats wrong' - of course he has to order the right tests !

Without the right tests/treatments he still can't tell you whats wrong with you - he will say " It's idiopathic '' - That means a condition with an un-known cause !

OR - He's a pathetic idiot who can't figure it out ! Thats my response when I see an aftermarket Exhaust fan blower installed on a furnace !

See link below :

http://www.ebay.com/itm/FASCO-DRAFT-INDUCER-7121-7986-FURNACE-FAN-BLOWER-EXHAUST-/181649113227?pt=LH_DefaultDomain_0&hash=item2a4b21808b

Consider that these fans run off of 110 volts, If you loose power during a ''Storm of the Century'' and your system requires an exhaust fan to work - you're screwed

I have not researched to see it 12-24 volt multiple speed electric motors for these fans are even out there - Even with used parts ( no warrantee ) this can get

expensive fast ! For the Good of the Craft ! Big AL


Posts: 153
10
  • Mark post as helpful
  • send pies
    Number of slices to send:
    Optional 'thank-you' note:
  • Quote
  • Report post to moderator

Rick Lawrence wrote:


Question for ya. Have you checked with your insurance company ? I would like to build a rocket in my house as well, but after building a good running rocket stove in the work shop - and this puppy works good ! - I have yet too find someone too w.e.t.t. certify the thing. My brother contacted his insurance company to build one in his house, and was told that if an electric lamp in the front room catches fire, and they find out he has a rocket in the BACK room, the insurance policy is null and void - tough luck.

The above picture, are you still planning on building it as is ? - I have tried to add more bricks to my stove - basicly making the feed tube higher - like yours - and I gotta say - DON'T ! I take a nice running stove, and turn it into a smoky - poor running - piece of crap. It's no fun having too open the outside door when you are trying to get warm ! - just too clear out the smoke. I would reccommend building the higher feed tube out of cheap (free) brick - or something like it - AFTER - you get the rocket stove running good . . . then if you run into problems, you can just take it off.

If you check out my thread . . . https://permies.com/t/40107/rocket-stoves/hot-barrel ..... in there somewhere, I mention installing a reversed exhaust fan in the shop, basicly pressurizing the entire shop, and boosting the draft thru the stove. . . I find I only need it too start a really cold stove, as once a properly built rocket stove is running, it should be self sustaining . . .

Build according to the plans - once you get it working great, then you can rip it apart and play . . . my 2 cents.


20150105_184524.jpg
[Thumbnail for 20150105_184524.jpg]
 
The glass is neither half full or half empty. It is too big. But this tiny ad is just right:
Back the BEL - Invest in the Permaculture Bootcamp
https://permies.com/w/bel-fundraiser
reply
    Bookmark Topic Watch Topic
  • New Topic