posted 10 years ago
I am not a mechanic. Any mechanic who reads this post will get a good laugh. There's nothing in this post for the mechanically-inclined. This post is for broke people who need a $200 gasoline string trimmer but whose budget barely stretches to the $5.00 cost of a cheap machete.
There's also nothing in this post you can't Google. Trouble is, learning what to Google can be quite a learning curve. I'm hoping to help folks through that part, maybe.
Like I said, I am not a mechanic. What I am, was raised in a family of scroungers and fixers and make-it-do types. My mom literally had a poster that she posted in our outhouse that said "Use it up, wear it out, make it do, or do without." My father was a genius mechanic. I don't have the skills to execute -- I was a bookish kid -- but I was raised to understand that there's no mechanical device that can't be fixed. You troubleshoot down to the broken part, and if you can't replace the part, you repair the part, and if you can't repair the part, you fabricate the part. Somewhere way down that road you get to where you might need increasingly specialized equipment (helium arc welders, drop forges, drill presses, lathes) and that's the only "acceptable" reason to give up on a repair. This is the attitude I inherited from my father, but like I said, I didn't learn the skills, I just stood around a lot holding flashlights and spare screwdrivers.
Fast forward forty years and here I am on 40 acres of land without (as my mother would have put it) "a pot to pee in or a window to throw it out of." Actually that's a considerable exaggeration, just as it was when she said it. But it's very much the case that I don't have all the power-tool toys that make land management fun for a middle-aged fat man. Hand tools and sweat have only taken me so far.
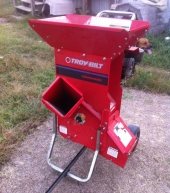
What pennies I have, I like to spend at garage sales; I get a whole lot more leverage out of them that way. And over time, I've come to find that old (10-20 years old) gasoline string trimmers can be had for cheap. Around here, typically they go for $5 from a motivated seller or at any "everything must go" kind of sale; a lot more are sitting at twenty bucks and up, but nobody's buying.
If you ask, each one of these string trimmers comes with the following story: "It was running the last time I used it."
Note #1: The reason that was the last time they used it was that the NEXT TIME they tried to use it, it wouldn't start. Nobody sells a working string trimmer at a garage sale. It will not run. Do not expect it to run.
Instead, buy only very cheap ones. Collect a whole pile. And then start working through them, teaching yourself to tinker them up to working condition.
Note #2: What you should do before buying a $5 string trimmer (or anything else cheap that's powered by a small 2-cycle gasoline engine) is pull gently on the starter rope. You want to make sure that the motor is not seized up and that the rewind works, since the goal here to is to get a unit that only needs minor tinkering, not major repairs. But consider: if you have those wasps that make mud houses in protected places, the unit may be "seized up" because it's got mud jammed in the moving parts. That's easy to fix; just disassemble, clean, and re-assemble. So if it doesn't turn over or rewind, peer in through any slots or holes and see if you can spot mud dauber nests. That's a unit you ought to be able to get for next to nothing (because "seized up") that may be quite easily fixable.
If the unit is not actually permanently dead (from a blown up engine) its mostly likely cause of death is fuel system problems. These are usually easy to fix.
Note #3: Modern gasoline usually has 10% or even 15% ethanol in it. Older string trimmers were not designed to tolerate ethanol, and the ethanol may well have turned gaskets and fuel lines into goo. In my experience so far, this is the most common cause of death of older string trimmers. If you get one of these, the goal is to replace the melted stuff and then (important!) use only 100% gasoline henceforth. (If they do not sell ethanol-free gas in your area, you can use aviation gas or those little cans of expensive 2-cycle fuel they sell at Walmart.)
I have four string trimmers so far. All four of them had gummy non-functional fuel lines (tiny plastic hoses). Two of them also have a little "rubber" primer bulb you push; both of those primer bulbs are cracked, gooey, melted, and non-functional.
So, step the first. Get your gasoline, mix it with the proper amount of oil (you can Google that), and pour a couple of tablespoons in the fuel tank. You're basically expecting it to come running back out somewhere around the carbureator and land on the floor; this is just confirming that the fuel system is melty.
OK, so now you've got gasoline everywhere and it's dripping out of hoses and busted primer bulbs. Yes! Now you know what needs replacing.
Note #4: Both Ebay and Amazon have sellers in China selling fuel system kits for small 2-cycle motors. Usually the shipping is free (and slow) because they are bulk-batching somehow for the trans-pacific leg of the trip. But for three to six dollars, you can get a padded envelope that contains enough fuel hose in both common sizes to replace fuel hose in two or three string trimmers, plus one or two brand new fuel filters. I need to look for similar kits that have the primer bulbs; it's on my to-do list.
Once you have new hose and filters, it's time to get to work!
Note #5: A string trimmer is long and awkward to work with. But if you loosen a few screws, it's usually really easy to take off the spinny end and the long shaft as a unit. Now you have a tiny little motor with a big handle, like a chainsaw with no bar. MUCH easier to work with. Don't put the spinny stuff back on until you've got the motor working properly.
The technique for changing the fuel hose and fuel filter in an old string trimmer is non-obvious. Filter is inside the tank, filter is stuck on end of hose, hose comes out through a little hole and is stuck on a metal pipe (technically a "hose barb") that comes out of the carb. You usually can get the tank off the unit by removing a few allen screws, but how do you get a new hose threaded through the tiny hole AND jammed onto a fuel filter that's inside the tank? I had to find a Youtube video.
Note #6: You cut the hose off the carb; it will be stuck there beyond removal. And then you shove most of the hose into the hole, until there's enough hose inside the tank that you can shake the fuel filter (still attached to hose) out through gasoline fill hole. Then you cut the fuel filter off the hose (you can clean and re-use that filter if you didn't get a new one) and now you can pull the old hose out of the tank entirely. Then you reverse the process: jam a lot of new hose through the hole until one end comes out the cap, attach the new fuel filter, pull most of that hose back outside the tank again (sucking the filter into the tank through the fill cap hole), then cut off your extra and jam the end onto the metal hose barb that goes into the carb.
Now you're ready to fuel your unit (fresh clean 100% gasoline, properly mixed with the right amount of 2-cycle oil, NO ETHANOL) and if you did it right, no leaks.
But does your trimmer run now? My results so far are that both of the trimmers that I've gotten to this point started right up. If they don't, there's lots of other simple stuff to do, like make sure the spark plug isn't dirty. But I'm going to stick to the travails I've gone through with the units I'm playing with.
With one exception: air intake. One of my units has a missing air filter. The housing is there, but the filter (just a little piece of foam rubber that you can see once you remove two screws that hold the housing on) was gone. All I needed was to scrounge another little piece of foam rubber to jam into the place provided. It turns out my local hardware stole sells them as a pegboard item for another brand of trimmer; I paid a dollar and change. It was worth checking, because if mud dauber nests are up in there, your unit will not run.
If you're tallying up my score, remember I've got two trimmers that have busted primer bulbs that are still awaiting me to scrounge up a cheap Chinese vendor. And now I have two with running motors.
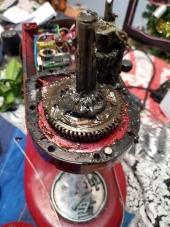
Note #6: See note # 5. One of my units immediately quit again because the spinny parts wouldn't spin. After removal of the non-spinning spinny parts, the motor ran OK, although it sort of didn't want to rev up. (More on this later.)
Note #7: If your spinny parts don't spin, take them apart. Mine had grass tightly wrapped around a revolving part, causing it to not revolve. Once grass was removed, revolving resumed.
Note #8: There are a lot of different kind of spinny heads, some of them quite mechanically complex, with self-feeding reels and such. I've not had much luck getting these complicated heads working again. You can buy replacements at Walmart, but they cost more than I'm paying for units. But one of my units has a very simple spinny head, just a disk with two holes on opposite edges. There's a sort of metal tooth arrangement you can flick open and closed with screwdriver by each hole. You just stick a short (eight inches?) piece of heavy-gauge trimmer plastic in the hole and close it up with your screwdriver. You rarely need to mess with it; it just spins down there and uses much less trimming line than the self-spooling heads. Eventually your pieces break and you have to pause and put in two new pieces. I love it.
So at this stage of my project I had one spinny end that worked and two motors that ran, but both of my motors ran kind of shitty.
Note #9: You will probably have to adjust the little screws on the carb. Fortunately, this is fairly easy.
I can't describe this well. There are excellent YouTube videos. Newer string trimmers hide the screws and you need a fancy tool to grab them down in the bottom of their little holes, but I saw a nice video for putting one of those plastic crimp electrical connectors onto the end of a screwdriver to substitute for the fancy tool. Anyway my old trimmers all have helpfully exposed screws, usefully labeled "L" and "H". So all I needed was a standard flat screwdriver.
Note #10: The "L" stands for "Low" and the "H" stands for high, and if yours are not marked, the "low" screw is usually the one closest to the engine.
I knew nothing about these little screws until this morning, except that they were there and I would probably need to fuck with them. Both of my running units would sort of crap out when I revved them up, and then die when I let off. I learned that I needed to adjust the "high" screw to make my engine run faster at high speeds, and my "low" speed screw to make it run better at low speeds. There's a third screw to adjust the idle speed; it's usually a little ways away and on a spring. Mess with that last, if you need to.
Mechanics talk about fuel being "lean" (not enough of it) or "rich" (too much of it). A real mechanic can tell by the sound which you're suffering from, but I don't have that talent. The screws we are tinkering with go deeper into the carb when you tighten them (turn them clockwise to the right) and block the fuel passages; you are "leaning them up" when you do this if you talk mechanic language. Or if you turn them the other way (left, counterclockwise) you are backing the screws out of the carb and out of the way of the fuel, making the mixture more "rich". Some mechanics will call this "taking out" the mixture or sometimes "richening it up" but what they mean is, turn the stupid screw the other way so that more gas can get through.
If your motor is starting and running, it's all trial and error from there. Quarter turn increments worked for me, especially on the "H" screw. Turn it a quarter turn, rev the engine, does it sound happier and more powerful than last time you did this? Awesome. Try a little more and see if it gets even happier. If it instead gets less happy, go back to where you were. Then maybe try less than a quarter turn, or an eight of a turn the other way. "Tune it" like this until it's sounding maximally happy when you hold the throttle down.
Adjusting the "L" screw I found trickier. This doesn't really matter; you don't trim much at low engine speeds. You just want the engine not to die when you are speeding up from idle or slowing down from max rev. At first I had trouble finding a setting that worked well on one of my units. But I found a YouTube video that said that on the WeedEater brand units (which are what I've been collecting) you won't go far wrong by leaning them all the way up (turning the screws in as far as they will go, don't force them at all, be gentle) and then backing them out 1.5 or possibly 2 turns. (1.5 worked for me.) That got me to where the unit would run at low speeds above idle, and then I improved it by a little bit of trial and error.
Note #11: Don't panic, and don't be in a hurry. These units are not complex. Tiny 2-cycle motors are not complex. They can be fixed, and parts are often very cheap. Plus, YouTube videos exist for every step of any repair process you care to imagine.
Today was probably the third time I've worked on these units. The first two times I learned stuff but kept hitting problems I didn't know how to solve yet. I also sabotaged myself putting 10% ethanol gasoline in the first unit, which had therefore stopped working again by the time I found the unit with the working simple trimmer head. The second time I worked on them I had my repair supplies from China but did not know how to adjust the carbs, or even that they were adjustable. Subsequently I watched some more videos, so this morning I started over with fresh clean gasoline, more repair supplies from China, and a basic theoretical knowledge of how to tinker the screws. I started at 8:00 AM and (with some interruptions) had a working unit running by 3:00. Then I spent an hour running all over my yard whacking specific clumps of weeds that were getting in the way of various functions and pissing me off and causing me to wake up in the morning with string trimmers on my mind. Then I spent another hour getting a second unit running smoothly, though I haven't got a second good (simple) cutting head for it yet.
But at this point I've gotten useful work out of a trimmer, I've got a working unit and a backup power unit and two more units that I haven't even dived into yet. Total money expended is like $22 for all four units plus several dollars in gas and oil, and I think I'm up to six or seven bucks in fuel system kits from China. So, thirty bucks.
And I have $5.00 gasoline spot tiller (the kind that tills a swathe about eight inches wide) to play with next. I'm hoping I can get it working and use it to cut little holes in old pasture grass in places where I want to plant clover and baby trees.
I hope there's something in all of this to inspire "frugal" people who don't consider themselves mechanics. If you've got more time than money, but you still enjoy a good labor-saving device, keep your eyes on the garage sales!


 7
7