• Post Reply Bookmark Topic Watch Topic
  • New Topic
permaculture forums growies critters building homesteading energy monies kitchen purity ungarbage community wilderness fiber arts art permaculture artisans regional education skip experiences global resources cider press projects digital market permies.com pie forums private forums all forums
this forum made possible by our volunteer staff, including ...
master stewards:
  • r ranson
  • Nancy Reading
  • Carla Burke
  • John F Dean
  • Jay Angler
  • paul wheaton
stewards:
  • Nicole Alderman
  • Pearl Sutton
  • Anne Miller
master gardeners:
  • Christopher Weeks
  • Timothy Norton
gardeners:
  • Nina Surya
  • Matt McSpadden
  • thomas rubino

Rocket Mass Heater for a Greenhouse

 
Posts: 37
1
  • Mark post as helpful
  • send pies
    Number of slices to send:
    Optional 'thank-you' note:
  • Quote
  • Report post to moderator
Hi!  I'm building an RMH for my wife's 12x10 harbor freight greenhouse.  We have a 6x8 GH attached to the front as a sort of airlock/buffer for entry during cold weather. I built a 6" RMH using refractory bricks into a 6" system (with the 12" refractory filled vertical) and a 55 gallon drum.    But I have some questions on the RMH...

1. Do I need to make the exhaust snake back and forth?  Right now it is going straight out, approximately 7' long.  Then up.  I am thinking of making it go up and out the roof instead, to capture more heat: is this a good idea?  But do I NEED to make it snake around, or is straight ok?  It seems like it is not giving off very much of the heat from the exhaust, but,  I do not have the mass around it yet...

2. What suffices for mass materials around the exhaust?  I am in the city, and don't plan on mixing cob (especially in 17 degree weather).  I have cinder blocks that I was planning on filling in with rock, and stuffing rock around the exhaust pipe (6"), but is that sufficient?  Will the air space between the rocks interrupt the conduction and transference of the heat, into the surrounding materials and then to the greenhouse?  Would filling in with sand in addition to the rocks increase efficiency?

3. When burning 1x2 or 2x2 scrap lumber (not treated!), I get smoke backing up and coming out the feed tube.  It seems to be because I got a super hot (white hot almost) bed of coals going and the wood above the normal burn zone ignited...   Smaller sticks don't seem to do this, possibly because the bed of coals doesn't build up, possibly because of surface area and burn rate...?  How do I fix this: any ideas?

4. Can I stack bricks around and/or on the drum to increase the slow release of heat for the greenhouse?   Will that interrupt the draft or efficiency of the system?  

5.  Do I need to surround the mass with cement or stucco or anything?  It doesn't need to be "pretty", just useful.  It's a greenhouse....

I have basically a 4x6-ish J of refractory bricks, then 6" pipe the rest of the way.  Approximately 12"/24"/36" dimensions of the J.  I seated the barrel into some door seal cording from a woodstove for sealing the bottom and making it easily removable (when cool).  (I can share how I did this easily if you are interested.)  BTW, that feature helped when I forgot to burn off the paint outdoors before starting up the first burn....    

If you have any ideas, especially for 1, 2, and 4 above, I would sure appreciate it.  I've learned a lot from Permies, and hoping to get some of these things corrected.

Thanks in advance for the help, everyone!
 
Joel Rutledge
Posts: 37
1
  • Mark post as helpful
  • send pies
    Number of slices to send:
    Optional 'thank-you' note:
  • Quote
  • Report post to moderator
PICS!!  
RMH-J-tube.jpg
[Thumbnail for RMH-J-tube.jpg]
J Tube
RMH-exhaust.jpg
[Thumbnail for RMH-exhaust.jpg]
Exhaust tube
RMH-helper.jpg
[Thumbnail for RMH-helper.jpg]
My helper
 
Joel Rutledge
Posts: 37
1
  • Mark post as helpful
  • send pies
    Number of slices to send:
    Optional 'thank-you' note:
  • Quote
  • Report post to moderator
More pictures.  Notice the exhaust tube in the pics above?  That's what I'm wondering if I need more than just river rock around it...?   These pics below show the central core, a 6" tube with a 12" tube, 2" below the top of the barrel in length.  There is a mixture of equal parts perlite and refractory cement packed in between while slightly damp.  The masonry work below and around the rest of the engine has 1.5 parts Portland, 2 parts perlite, and 2 parts sand; this was mixed a bit wetter for easier working and molding.
RMH-core.jpg
[Thumbnail for RMH-core.jpg]
Core
RMH-building-up-the-engine.jpg
[Thumbnail for RMH-building-up-the-engine.jpg]
Building up the engine
RMH-outlet.jpg
[Thumbnail for RMH-outlet.jpg]
Outlet, inside the barrel
 
Joel Rutledge
Posts: 37
1
  • Mark post as helpful
  • send pies
    Number of slices to send:
    Optional 'thank-you' note:
  • Quote
  • Report post to moderator
And finally, 2 pics of the gasket I used.  I took cardboard strips about 2" wide, and taped them to the inside AND outside of the barrel lip.  I put a 1/2" layer of the homemade refractory cement (with Portland and sand and perlite) across the area the drum would sit on to level it and give a reference.  I should have done this in stages and repeated that step to give a more even, level base, but it still worked out.  Then I placed the barrel on the wet cement.  I packed more wet cement around the outside up to the top of the cardboard strips, and let it all dry overnight.  When I pulled the barrel (the cardboard acts as a spacer AND keeps the cement from sticking to the drum), it left a 1/2" wide channel where the drum sits.  After it cured fully, I placed (no adhesive, just loosely pushing it in place) the fireplace gasket material in the channel.  It is braided treated fiber that resists up to 500 degrees F.  Now when I place the drum upside down on the whole unit, it seems to seal nicely, but is removable when I need it to be!    One of the pics also shows the outlet nicely, where the exhaust exits the barrel.  In spring, I plan on using more cement to make a smoother bottom and transition the gases out the outlet, but it was going to freeze in a few days, so I skipped that step.
RMH-gasket.jpg
[Thumbnail for RMH-gasket.jpg]
Gasket and outlet
RMH-gasket-material.jpg
[Thumbnail for RMH-gasket-material.jpg]
Gasket material
 
gardener
Posts: 3489
Location: Fraser River Headwaters, Zone3, Lat: 53N, Altitude 2750', Boreal/Temperate Rainforest-transition
690
hugelkultur forest garden fungi trees books food preservation bike solar woodworking
  • Mark post as helpful
  • send pies
    Number of slices to send:
    Optional 'thank-you' note:
  • Quote
  • Report post to moderator
I haven't built my RMH yet, but am researching.  I can certainly answer some of your questions, though.

1. Do I need to make the exhaust snake back and forth?  Right now it is going straight out, approximately 7' long.  Then up.  I am thinking of making it go up and out the roof instead, to capture more heat: is this a good idea?  But do I NEED to make it snake around, or is straight ok?  

 You do not have to make the exhaust snake back and forth.  it can be straight.  But 7 feet is quite short, so even with mass, you will be loosing heat beyond, up your chimney if you stick with such a short length.

It seems like it is not giving off very much of the heat from the exhaust, but,  I do not have the mass around it yet..

 So, are you saying that your final exhaust temperature at your chimney outlet is not hot?  That's interesting.  It seems like your final exhaust would be on the hot side, considering that you have no mass to capture the heat.  How hot is your barrel?

2. What suffices for mass materials around the exhaust?  

 When thinking mass, there are quite a few options.    

I have cinder blocks that I was planning on filling in with rock, and stuffing rock around the exhaust pipe (6"), but is that sufficient?  Will the air space between the rocks interrupt the conduction and transference of the heat, into the surrounding materials and then to the greenhouse?  Would filling in with sand in addition to the rocks increase efficiency?  

 Think of your 'mass' as something solid.  Rocks and Cinderblocks are solid, as are the grains of sand, but the air between them is not solid, so the air is not mass (although gasses have 'mass' too, but not for this purpose, since the gas particles are not solid, they are gasses).  The gaseous space between the solids act to insulate (or isolate) the structure of the solids from each other, and so you are right in thinking that this will interrupt the conduction and transfer of heat.  The further you can accommodate the solids being both in contact with each other and in contact with your exhaust gases, the more efficient the transfer of heat from the rocketted gasses to your mass, and the more heat you gain overall in your building.  Filling with sand will increase efficiency, when compared to having larger spaces around larger stones.  Sand is not terrible as a mass, but it does have some insulative qualities due to the air spaces around the sand particles.  It's not a bad choice, considering you do not want to use cob.  People use cob since all that air space is taken up by a substance that is both dense and malleable.  

4. Can I stack bricks around and/or on the drum to increase the slow release of heat for the greenhouse?   Will that interrupt the draft or efficiency of the system?

 Probably you should concentrate on storing and releasing heat from your mass bench, not putting mass around your barrel.  I think that your are likely to mess with your draft/efficiency, but I'm not sure.

5.  Do I need to surround the mass with cement or stucco or anything?  It doesn't need to be "pretty", just useful.  It's a greenhouse....

Since you are 'indoors' (meaning under a roof), I don't think you need to do anything in particular in this regard, except that it is best to seal the system, and that is another benefit of cob/clay.
 
gardener
Posts: 1295
Location: Little Belt Mountains, MT
249
hugelkultur purity dog hunting chicken wofati
  • Mark post as helpful
  • send pies
    Number of slices to send:
    Optional 'thank-you' note:
  • Quote
  • Report post to moderator
Ernie and Erica actually have some greenhouse-specific rocket mass heater plans. I've never built one myself, but apparently this kind of thing can get tricky because of the heat and
damp and roots and stuff all getting mixed together.

Sounds like you already have a plan in mind, but they do have these plans super cheap right now as part of this digital bundle: EEE Package: Greenhouse 8" Heater Plans (3 damp-tolerants heaters)
 
gardener
Posts: 3471
Location: Southern alps, on the French side of the french /italian border 5000ft elevation
194
  • Mark post as helpful
  • send pies
    Number of slices to send:
    Optional 'thank-you' note:
  • Quote
  • Report post to moderator
Well, first thing i notice, no insulation around the burn tunnel. Nor the start of the heat riser.

Second thing, the transition from barrel to exhaust could be better. I dont know if CSA is respected.

Then, for the heat extraction, i think a half barrel bell could work better. Or real bells.
 
Joel Rutledge
Posts: 37
1
  • Mark post as helpful
  • send pies
    Number of slices to send:
    Optional 'thank-you' note:
  • Quote
  • Report post to moderator
Satamax: thanks for the reply.  I used 1-1/2" thick firebrick for the burn tunnel, and it insulates great.  It gives off nearly no heat to the surrounding mass, which is just used to support the drum.  

The transition is 2"x12", giving a CSA of 24, compared to the CSA of 28 for a 6" pipe...  I didn't feel this little of a difference would affect it much?  It seems to draft well...

What is a bell or half barrel bell?  

To the other responses: thank you, keep it coming!  Maybe I should have titled this "Help fixing my GH RMS"...  Oh, and the barrell gets super-hot (can simmer but not quite boil water in a pan on top), and the exhaust is too warm; not giving enough heat into the bench.

To sum up some issues: not enough length of exhaust (mentioned above); I failed to insulate BELOW the RMH and bench; and I don't think the sand and gravel filler is going to do enough to transmit heat to the mass.   A 2-hour burn last night didn't give any appreciable heat to the mass, although the heat from the rmh barrel made it nice and toasty!  I need to find a better mass, and adjust the length of exhaust while I'm rebuilding...

Any ideas for a better mass for a city-dweller?  Some thing I can mix up from mortar, etc...?

Thanks!
 
Posts: 947
Location: Graham, Washington [Zone 7b, 47.041 Latitude] 41inches average annual rainfall, cool summer drought
56
  • Mark post as helpful
  • send pies
    Number of slices to send:
    Optional 'thank-you' note:
  • Quote
  • Report post to moderator

Joel Rutledge wrote:Any ideas for a better mass for a city-dweller?  Some thing I can mix up from mortar, etc...?


Nothing stopping a city dweller from mixing up a batch of thermal cob.

Nothing except availability of materials of course, buying them in might be complicated.

Perhaps fine sand mixed with straight Portland Cement would be a good [albeit hard and permanent] substitute?
 
Satamax Antone
gardener
Posts: 3471
Location: Southern alps, on the French side of the french /italian border 5000ft elevation
194
  • Mark post as helpful
  • send pies
    Number of slices to send:
    Optional 'thank-you' note:
  • Quote
  • Report post to moderator
Well, if you can't boil water on top of the barrel, something is wrong. Except if you have a huge top gap.

The burn tunnel and heat riser need to be insulated, to reach the proper temps, where dioxins tars and all hydrocarbons get burned.

On bells

http://www.stove.ru/index.php?lng=1&rs=16

http://batchrocket.eu/en/building#belltheory

Half barrel bell.

http://s65.photobucket.com/user/mremine/library/NYC%20Rocket%20Stove%20Build/#/user/mremine/library/NYC%20Rocket%20Stove%20Build?sort=3&page=1&_suid=148148049651509054888921061805
 
Joel Rutledge
Posts: 37
1
  • Mark post as helpful
  • send pies
    Number of slices to send:
    Optional 'thank-you' note:
  • Quote
  • Report post to moderator
Kyrt Ryder, have you used portland to do this?  I have plenty of Portland on hand and can mix it up without the perlite so as to not insulate.  Is this more or less efficient than the cob?  One to one, sand to portland?

Perhaps for time and cost efficiency, I should mix it a little thin and pour it around rocks, or perhaps mix the rock and gravel in with the cement mixture?  That would increase density or space used up, and rock is cheaper than portland.  What do you think?

Anyone else have experience with replacements for cob?
 
Joel Rutledge
Posts: 37
1
  • Mark post as helpful
  • send pies
    Number of slices to send:
    Optional 'thank-you' note:
  • Quote
  • Report post to moderator
Satamax: the burn tunnel and vertical flue are well insulated: firebrick barely even gets warm on the outside after burning, the refractory cement I mixed up insulated to 3000 degrees fahrenheit, and the core has the refractory cement with perlite between the 6" pipe and the 12" pipe.  

I don't see why someone would need the "bell" plans: overcomplicated and likely not much efficiency gain.  A proper RMH should do the job.  I subscribe to the KISS Principle: keep it simple.

The last link you gave was pretty cool: rmh bench in a restaurant.  What's with the horizontal drums for exhaust though? Unless they are filled with a just-right amount of rocks, I'd think you would have problems with CSR, expanding the cross section enormously.  And wouldn't it be difficult to get ash out of the rock mass later?  

I think I'll stick with fixing the known problems with my RMH design...    Thanks!
 
pollinator
Posts: 293
Location: US, East Tennessee
34
  • Mark post as helpful
  • send pies
    Number of slices to send:
    Optional 'thank-you' note:
  • Quote
  • Report post to moderator
The guys referring to insulating the J-tube rocket core, is because the photos of the fire brick look just like the very common non-insulating ones, fire brick "splits"  which are very hard, dense, heavy. I.e. the ones that measure about 1.25 x 4.5 x 9.0 inches and weigh about 3.5 lbs. each. They are commonly available as replacements for steel box stoves, and sold by hardware stores and home improvement places around the US. Because of their density, it takes a while for heat to travel through the brick. Properly insulated, these dense (standard) fire brick will often be seen glowing a dull red inside the burn tunnel from the heat accumulated from extended firing with really good dry wood fuel.

True insulating fire brick are very light and kind of look like a porous sponge type of construction. These rather special brick are usually available only from refractory and kiln suppliers. I use the 2600° F. rated version for constructing heat risers, since no additional "space robbing" insulation wrap is required.  
 
Joel Rutledge
Posts: 37
1
  • Mark post as helpful
  • send pies
    Number of slices to send:
    Optional 'thank-you' note:
  • Quote
  • Report post to moderator
Byron, I used the 1.25"x4.5"x9" fire bricks, but they are not as heavy as that.  They work really good, and I cemented them together with a tube of hi heat sealant.  
 
Byron Campbell
pollinator
Posts: 293
Location: US, East Tennessee
34
  • Mark post as helpful
  • send pies
    Number of slices to send:
    Optional 'thank-you' note:
  • Quote
  • Report post to moderator
Several ways to tell the difference, one being  this. Can you twirl a pencil by hand into the side of the brick and drill (rub) a hole right through it? If yes then it's IFB. If not, it's standard fire brick.
 
Joel Rutledge
Posts: 37
1
  • Mark post as helpful
  • send pies
    Number of slices to send:
    Optional 'thank-you' note:
  • Quote
  • Report post to moderator
Well I'm pretty sure it's not true refractory grade, I got the bricks at Menard's.  

Any other ideas for replacement for cob? Any proportions if I do use just sand and Portland?  
 
Byron Campbell
pollinator
Posts: 293
Location: US, East Tennessee
34
  • Mark post as helpful
  • send pies
    Number of slices to send:
    Optional 'thank-you' note:
  • Quote
  • Report post to moderator
Menards sells those either in a box of 6, or in multiples of 9 fire brick. They are the standard (dense) box stove replacement fire brick, and will work just fine for your J-tube combustion core, when properly insulated. Being very hard, dense, the advantage is that they'll stand up to abrasion of cleaning tools and stuffing wood into the wood feed and etc.

About insulation; to get the combustion core to come up to freaky hot typical RMH operating temperatures the whole J-tube will have to be insulated. On mine, I use fire clay stabilized perlite, several inches thick. Ceramic fiber blanket insulation, 1" thick can be used around the fire brick heat riser, but generally more expensive than a DIY clay/perlite heat riser. I.e. an inexpensive clay/perlite heat riser can be constructed as demonstrated by Matt Walker. Note that Matt's heat riser is for an 8" system, so for yours the inner form tube will be 6" OD, the exterior steel casing will be 10" minimum up to 14" (my pref.) in OD:

 
Rocket Scientist
Posts: 4575
Location: Upstate NY, zone 5
599
5
  • Mark post as helpful
  • send pies
    Number of slices to send:
    Optional 'thank-you' note:
  • Quote
  • Report post to moderator
As it hasn't been specifically addressed yet, I will mention that your transition from barrel to duct is definitely problematic. It is sharp-edged which causes friction in airflow (think about dragging a rope across a knife edge or across a smooth pipe), and it is smaller than the duct. The "manifold" (common term for this area) generally needs to be at least twice the duct cross section for good flow, because of the direction and shape changes.

Those half-barrels are not filled with rocks, but with air. The idea of a bell is to let the hot gases slow down, with the hottest rising to the top and giving its heat to the mass, then cooling and sinking, and exiting the bell at the bottom to the chimney connection. This gives less friction and possibly more effectiveness than a duct.
 
Joel Rutledge
Posts: 37
1
  • Mark post as helpful
  • send pies
    Number of slices to send:
    Optional 'thank-you' note:
  • Quote
  • Report post to moderator

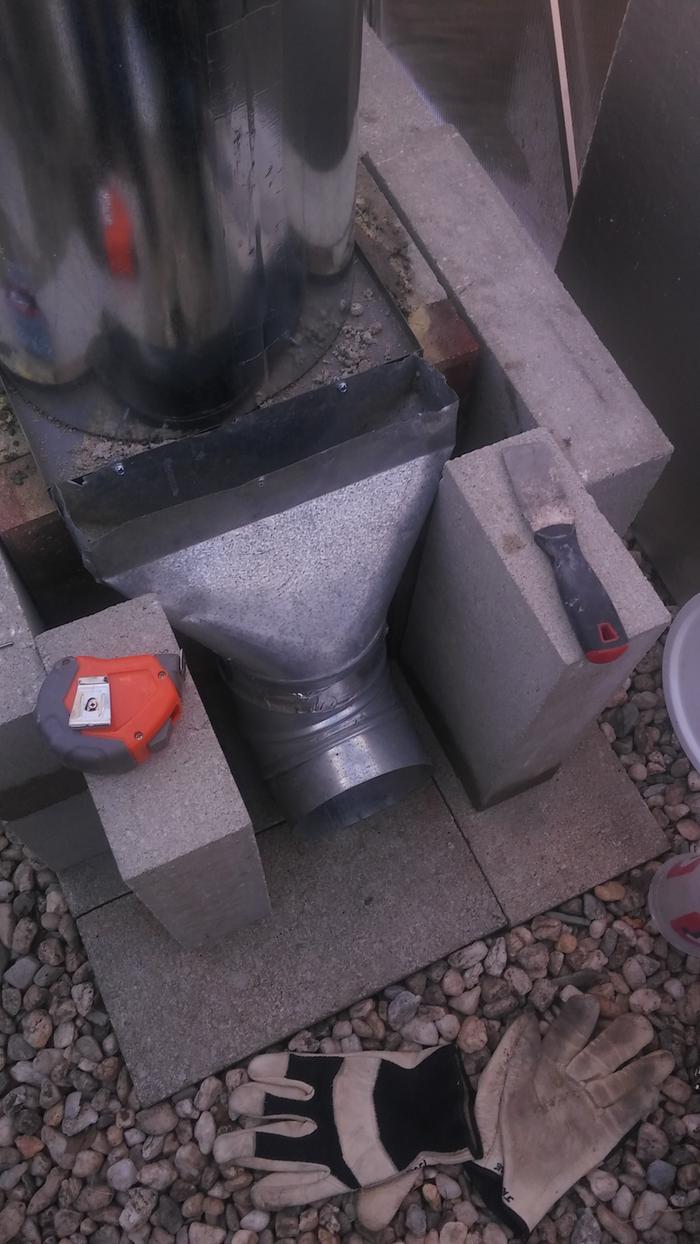
Glenn Herbert wrote:The "manifold" (common term for this area) generally needs to be at least twice the duct cross section for good flow, because of the direction and shape changes.


Uh oh.  I thought I was supposed to keep the cross section equal in all pipes...  I do plan on reshaping the floor to direct the air more smoothly, but is the cross section going to be something I can overcome?

The boot I used is 12" x 2.25" or 27 square inches cross section.  A 6" pipe has 28.3" cross section, which I figured would be close enough...  I guess not?

Anyone have any ideas on what to do about the manifold, or other suggestions for the best replacement for cob in the bench?  Thank you all!

 
Joel Rutledge
Posts: 37
1
  • Mark post as helpful
  • send pies
    Number of slices to send:
    Optional 'thank-you' note:
  • Quote
  • Report post to moderator
Byron I missed your message.  Yes, that is the technique I used for the core, but all I used around the fire bricks for the j tube is solid cinder blocks and bricks.  What kind of insulation do I need around it: the perlite cement mixture? How thick? Thanks!
 
gardener
Posts: 1068
Location: +52° 1' 47.40", +4° 22' 57.80"
455
woodworking rocket stoves wood heat
  • Mark post as helpful
  • send pies
    Number of slices to send:
    Optional 'thank-you' note:
  • Quote
  • Report post to moderator

Joel Rutledge wrote:The boot I used is 12" x 2.25" or 27 square inches cross section.  A 6" pipe has 28.3" cross section, which I figured would be close enough...  I guess not?


A 6" diameter pipe isn't comparable with a rectangle of cross section of 12" x 2.25" aerodynamically speaking, far from it.
First, the rectangle has a larger circumference, 1.5 times to be precise. So there's 1.5 times more friction along the walls of that rectangle shape, not counting the 90 degree corners which makes matters worse.
Second, inside a round duct there's a core where the gases are streaming faster than along the walls. That higher velocity core is very small in the rectangle duct, if it exist at all. So your duct is posing a lot more drag to the system as compared to a round one of the same cross section area.
In order to compare a square or rectangle duct with a round one there's a simple formula which goes like this: (2xLxW) / (L+W)= D. So, in your case, 2 x 12 x 2.25 divided by 12+2.25 = 3.79" fictional diameter.
To compare directly: 28.3" sq. cross section for the 6"round pipe versus 11.28" sq. for the 12"x 2.25" rectangle. So the gases have only less than half the *effective* duct space to stream through. No wonder why it isn't working optimally.

By the way, using this formula you'll see that a 6" diameter pipe is as effective as a square with sides of the same 6".

Edit:
Now I see you mean the manifold from the barrel to the horizontal pipe, not the bench duct itself. Here it is the same problem, a severe restriction in a very important place. This manifold should be much, much wider (about twice) in order to provide enough space.

The proportions which Glenn is mentioning (1:2:4) should be measured in the heart of the J, in order to be correct.
 
Byron Campbell
pollinator
Posts: 293
Location: US, East Tennessee
34
  • Mark post as helpful
  • send pies
    Number of slices to send:
    Optional 'thank-you' note:
  • Quote
  • Report post to moderator
Rocket stoves in a moist environment like a greenhouse, which I have no experience with, requires a little different approach to choosing construction materials than  the dwelling/shop indoor systems I normally build. Obviously there's the need to avoid clay based cob and clay stabilized perlite where it could take on moisture.

Clay stabilized perlite insulation around a 6" combustion core will typically be 2" minimum thickness. When using anything other than clay to stabilize perlite, it needs to be something that can handle the heat without breaking down. But all I've ever used, only building indoor systems, is fire clay. Maybe comb through the greenhouse specific RMH threads to see what's holding up for others. Here's one, and includes a bunch of related links at the bottom of the page:

https://permies.com/t/19178/Rocket-stoves-Greenhouses-forum-topic
 
Joel Rutledge
Posts: 37
1
  • Mark post as helpful
  • send pies
    Number of slices to send:
    Optional 'thank-you' note:
  • Quote
  • Report post to moderator
Peter how did you come up with 11.28 area for a 12x2.25 rectangle?  I see what you are saying about drag, though.  I have that part all cemented in though...  

Byron, I thought the perlite mixture was only for the core, not the bench?  We don't want to insulate the exhaust, we want to grab its heat...  My core is 3000 degree cement with perlite, so there isn't a problem with the core. I built it as the video and others have discussed. What I'm looking for is an urban equivalent of cob for my mass in the bench...
 
Peter van den Berg
gardener
Posts: 1068
Location: +52° 1' 47.40", +4° 22' 57.80"
455
woodworking rocket stoves wood heat
  • Mark post as helpful
  • send pies
    Number of slices to send:
    Optional 'thank-you' note:
  • Quote
  • Report post to moderator

Joel Rutledge wrote:Peter how did you come up with 11.28 area for a 12x2.25 rectangle?  I see what you are saying about drag, though.  I have that part all cemented in though...


According to that simple formula, the rectangle of 12x2.25" is comparable with a round duct of 3.79" diameter as far as aerodynamics are concerned. The csa of that one is 11.28"sq., can't help it but that could well be the bottleneck. A fat chance, I'd say, too bad it is cemented in.
 
Byron Campbell
pollinator
Posts: 293
Location: US, East Tennessee
34
  • Mark post as helpful
  • send pies
    Number of slices to send:
    Optional 'thank-you' note:
  • Quote
  • Report post to moderator
3000° castable / perlite blend, lots of perlite in the blend, and formed around the J-tube core to a thickness of 2 to 3 inches, should be just fine for insulation.

Sorry, no suggestions for a moisture resistant replacement for clay based cob.
 
Joel Rutledge
Posts: 37
1
  • Mark post as helpful
  • send pies
    Number of slices to send:
    Optional 'thank-you' note:
  • Quote
  • Report post to moderator

Peter van den Berg wrote:

Joel Rutledge wrote:Peter how did you come up with 11.28 area for a 12x2.25 rectangle?  I see what you are saying about drag, though.  I have that part all cemented in though...


According to that simple formula, the rectangle of 12x2.25" is comparable with a round duct of 3.79" diameter as far as aerodynamics are concerned. The csa of that one is 11.28"sq., can't help it but that could well be the bottleneck. A fat chance, I'd say, too bad it is cemented in.


I guess I'm still not understanding how you got a csa of 11.28"...   Because 12 x 2.25 = 27.  Maybe I have a different understanding of what CSA is: I thought that was the area of the hole...  Sorry to be daft...

I do get what you were saying with the drag and comparable size of duct.  When building, I assumed the similar area and smooth transition of the 12x2.25 boot would make a good manifold.  Should I have used a larger manifold, which would have moved my core offcenter in the drum?
 
Joel Rutledge
Posts: 37
1
  • Mark post as helpful
  • send pies
    Number of slices to send:
    Optional 'thank-you' note:
  • Quote
  • Report post to moderator

Byron Campbell wrote:3000° castable / perlite blend, lots of perlite in the blend, and formed around the J-tube core to a thickness of 2 to 3 inches, should be just fine for insulation.

Sorry, no suggestions for a moisture resistant replacement for clay based cob.


I may dissassemble the bricks surrounding the core (most of them are dry stacked, only a few have mortar on them), and mix up more perlite mortar...

But my biggest problem seems to be getting what heat I AM producing, to move into the mass instead of out the chimney...
 
Joel Rutledge
Posts: 37
1
  • Mark post as helpful
  • send pies
    Number of slices to send:
    Optional 'thank-you' note:
  • Quote
  • Report post to moderator

Byron Campbell wrote:3000° castable / perlite blend, lots of perlite in the blend, and formed around the J-tube core to a thickness of 2 to 3 inches, should be just fine for insulation.

Sorry, no suggestions for a moisture resistant replacement for clay based cob.


Oh, and I used a mix of 6 parts perlite to 4 parts 3000 degree mortar to make my core... Is that what you'd recommend around the j tube?

Also, I've read conflicting things online: some people recommend solid cinder blocks (or hollow ones, filled) for mass, while others claim cinder blocks are more insulative than they are mass...-ish...  
 
Peter van den Berg
gardener
Posts: 1068
Location: +52° 1' 47.40", +4° 22' 57.80"
455
woodworking rocket stoves wood heat
  • Mark post as helpful
  • send pies
    Number of slices to send:
    Optional 'thank-you' note:
  • Quote
  • Report post to moderator

Joel Rutledge wrote:I guess I'm still not understanding how you got a csa of 11.28"...   Because 12 x 2.25 = 27.  Maybe I have a different understanding of what CSA is: I thought that was the area of the hole...  Sorry to be daft...

I do get what you were saying with the drag and comparable size of duct.  When building, I assumed the similar area and smooth transition of the 12x2.25 boot would make a good manifold.  Should I have used a larger manifold, which would have moved my core offcenter in the drum?


The key word here is COMPARABLE. Your 12x2.25 is as good in transporting gases as a round duct of 3.79 dia. The csa of that last one is 11.28" sq. and that's what I am talking about.
The core offcenter would be OK.
 
Posts: 62
Location: Michigan
  • Mark post as helpful
  • send pies
    Number of slices to send:
    Optional 'thank-you' note:
  • Quote
  • Report post to moderator
I live in a farm house built by Henry Ford I. The house was originally heated with a would stove but the stove pipe went up then traveled through several rooms before going up the chimney. None of the local heating and cooling guys have ever heard of such a thing. I intend to build a RMH next summer but for now I have the wood heater on one end of my greenhouse and exiting out he other end, 22', and have a couple of small fans in the ceiling in the ceiling to blow down the heat. I realize I still loose a lot of heat but I'm not loosing it all up the chimney.
 
Joel Rutledge
Posts: 37
1
  • Mark post as helpful
  • send pies
    Number of slices to send:
    Optional 'thank-you' note:
  • Quote
  • Report post to moderator
Ok, Peter, I understand now.  I didn't realize that you had jumped from the CSA of the actual manifold to that of the effective value of that rectangle, and was showing the CSA of that relative (and smaller) round pipe.  The correlation makes sense to me now.  

So, if I broke out the existing mortar bed and moved it offcenter so as to use 6" round pipe the whole way through, would I just use 6" pipe there, or do I need to construct a manifold of some sort leading INTO the 6" exhaust pipe?  What dimensions should I use?

And, with a 12" center core and a 55 gal drum, how much space do I need to maintain between the core and the drum on the nearest surface?  

I may let that project wait until spring, and just try to get the heat that I *AM* generating, to move more efficiently into the mass....   Any ideas on a better design for my bench?  Or on replacement for cob, that could be mixed up from store-bought ingredients?  Can I just use a high-sand concrete?  Surrounded by brick maybe?  Or does solid cinder block work for the mass?  Thanks, All!
 
Satamax Antone
gardener
Posts: 3471
Location: Southern alps, on the French side of the french /italian border 5000ft elevation
194
  • Likes 1
  • Mark post as helpful
  • send pies
    Number of slices to send:
    Optional 'thank-you' note:
  • Quote
  • Report post to moderator
Joel.

You have this for the moment.


What i would do, being a hack.

Make a vertical cut in that back lip and triangle bellow, leading to the inside curve of the elbow. Bend all that so it's open of 6 or 7 inches in the center,  to make  a big D shaped  opening. I would take some roofing flat metal (i do roofing, carpentry and timber framing the rest of the year, out of the winter season) And rivet it to the reshaped flue transition.  
 
Joel Rutledge
Posts: 37
1
  • Mark post as helpful
  • send pies
    Number of slices to send:
    Optional 'thank-you' note:
  • Quote
  • Report post to moderator
Thanks, satamax. I was thinking I needed to do something, but your hack would be better than cutting the whole thing out.  Thanks!
 
Posts: 317
Location: North East Iowa, USA
91
  • Likes 1
  • Mark post as helpful
  • send pies
    Number of slices to send:
    Optional 'thank-you' note:
  • Quote
  • Report post to moderator

Peter van den Berg wrote:

Joel Rutledge wrote:I guess I'm still not understanding how you got a csa of 11.28"...   Because 12 x 2.25 = 27.  Maybe I have a different understanding of what CSA is: I thought that was the area of the hole...  Sorry to be daft...

I do get what you were saying with the drag and comparable size of duct.  When building, I assumed the similar area and smooth transition of the 12x2.25 boot would make a good manifold.  Should I have used a larger manifold, which would have moved my core offcenter in the drum?


The key word here is COMPARABLE. Your 12x2.25 is as good in transporting gases as a round duct of 3.79 dia. The csa of that last one is 11.28" sq. and that's what I am talking about.
The core offcenter would be OK.


I don't want to sound negative here Joel, but Peter van den Berg has pointed out the most obvious problem with the exhaust size restricting how ALL the rest of the stove works.  And towards the end of the post, a fairly good solution was presented...

When I built my first stove a few years ago, I had a few little problems, that I asked about, and got many varied answers, but only a few were based on pretty hard earned calculations (Like Peter's are)  In the end, I had Peter list 6 things that could be causing me problems and rank them from the biggest problem to the least.    That way I could change 1 thing, test, and if it did not work I would be stumped- but if it did improve, I knew I was going down the right track.   I did not question these changes, I just did them.

The first was the outlet problem,  Simply said, my outlet matched my inside flue size, but was to restrictive, for similar reasons as yours. Changed that to the suggested size and HUGE change in performance.. ONLY one change and double the results.
The second was distance between inside flue and the barrel,  changed that and more- positive results (but less gain than the first)
The third was shortening up the burn tunnel- again based on numbers by Peter, again I gained... but again, just a bit better.. (always good)  Your tunnel "looks long" and could have the same long flat rectangle problem as your outlet, yes the square inches might be there, but surface area much higher than needed vs square.

It was also tossed out that burn chamber and tunnel be insulated, with a fair bit of time spent on if or if not your bricks were the insulating kind, they simply are not insulating kiln brick if bought in Menards.  And yes, they  do not get hot right away (yours) but they will get super HOT, in time, thus insulation will play an important role.  Mineral Wool bat is another option.  But the way you made yours, might not be an option.  Just tossing it out.  

There were three more suggestions that I won't go into, but did on my second stove for even better results.
But the best non physical suggestion was to get the online book with the numbers,  If Peter is reading this, perhaps he can post the best way to buy this.


Glenn Herbert
Rocket Scientist
Posts: 4575
Location: Upstate NY, zone 5
599
5
  • Likes 2
  • Mark post as helpful
  • send pies
    Number of slices to send:
    Optional 'thank-you' note:
  • Quote
  • Report post to moderator
Your experience of making one change at a time, following suggestions from a master, and noting the amount of improvement, is highly valuable. Those of us who have done it know what works (usually ), and those who are trying it for the first time will almost always benefit from listening.

The best current book for specific directions, advice, and numbers is The Rocket Mass Heater Builder's Guide by Ernie and Erica Wisner. The classic which gives more background for the concept is Rocket Mass Heaters (third edition) by Ianto Evans and Leslie Jackson.
 
Joel Rutledge
Posts: 37
1
  • Mark post as helpful
  • send pies
    Number of slices to send:
    Optional 'thank-you' note:
  • Quote
  • Report post to moderator
Ok, it's revival time!  I'm hoping for some help narrowing down what is needed for fixing my GH RMH.  That's because it is starting to get cold, and last year I killed my wife's plamts. ALL of them....

Based on the great responses above from last year, here's what I think I need to do:

1) break out the manifold to provide a better exit for gases from the barrel with a smoother, larger transition.  
2) make the exhaust pipe fold back on itself so a total of three 8 foot runs and two 180 degree turns.  
3) mix fine sand with portland as thermal mass, to get rid of the air gaps in the rocks I'm currently using.  

Will that work?  
Do I need to worry about insulating BELOW the RMH, and if so, how? Is the above recommended insulation around the J tunnel to keep the flow going? (I'm not seeing why the menards fire bricks are of concern). Yes, the infeed and tunnel are slightly rectangular, but the vertical chamber is insulated and round...  So should I add some firebricks inside, to make the tunnel square instead of rectangle?

And, is there a better non-cob way to build thermal mass, using urban available materials?      I'm thinking the manifold restriction is the biggest issue: is there something else I'm missing?  

I like the "change one thing at a time" idea, but I think I may have to do more than one improvement before firing it up..   If someone who is experienced would care to give me a list of the needed changes in priority order, I would be amazed and grateful!  Thanks, permies!
 
Satamax Antone
gardener
Posts: 3471
Location: Southern alps, on the French side of the french /italian border 5000ft elevation
194
  • Likes 1
  • Mark post as helpful
  • send pies
    Number of slices to send:
    Optional 'thank-you' note:
  • Quote
  • Report post to moderator
Joël, look at this one.  A fine example of greenhouse rocket.

http://donkey32.proboards.com/thread/2317/first-build-tropical-greenhouse-hopefully
 
Joel Rutledge
Posts: 37
1
  • Mark post as helpful
  • send pies
    Number of slices to send:
    Optional 'thank-you' note:
  • Quote
  • Report post to moderator
Satamax, that was an awesome link.  When I pull things apart to repair, maybe I'll make a bell bench instead of exhaust tubes...  Would it work with a fine sand concrete instead of cob covering the bell?
 
Satamax Antone
gardener
Posts: 3471
Location: Southern alps, on the French side of the french /italian border 5000ft elevation
194
  • Mark post as helpful
  • send pies
    Number of slices to send:
    Optional 'thank-you' note:
  • Quote
  • Report post to moderator

Joel Rutledge wrote:Satamax, that was an awesome link.  When I pull things apart to repair, maybe I'll make a bell bench instead of exhaust tubes...  Would it work with a fine sand concrete instead of cob covering the bell?

Joel, i haven't given you all the tricks yet!

To make bells on the cheap.


http://s65.photobucket.com/user/mremine/library/NYC%20Rocket%20Stove%20Build/
 
permaculture is a more symbiotic relationship with nature so I can be even lazier. Read tiny ad:
A PDC for cold climate homesteaders
http://permaculture-design-course.com
reply
    Bookmark Topic Watch Topic
  • New Topic