• Post Reply Bookmark Topic Watch Topic
  • New Topic
permaculture forums growies critters building homesteading energy monies kitchen purity ungarbage community wilderness fiber arts art permaculture artisans regional education skip experiences global resources cider press projects digital market permies.com pie forums private forums all forums
this forum made possible by our volunteer staff, including ...
master stewards:
  • Carla Burke
  • John F Dean
  • Nancy Reading
  • r ranson
  • Jay Angler
  • Pearl Sutton
stewards:
  • paul wheaton
  • Devaka Cooray
  • Leigh Tate
master gardeners:
  • Timothy Norton
  • Christopher Weeks
gardeners:
  • Jeremy VanGelder
  • Matt McSpadden
  • thomas rubino

Designing my combination shop heater and maple syrup evaporator

 
Posts: 39
9
  • Likes 3
  • Mark post as helpful
  • send pies
    Number of slices to send:
    Optional 'thank-you' note:
  • Quote
  • Report post to moderator
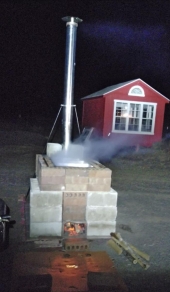
Some of you may have followed a thread I had last year about a rocket stove maple syrup evaporator. It can be seen here https://permies.com/t/54381/Rocket-Stove-Maple-Syrup-Evaporator

Well last year was a rather crude throw together of an idea, sap was basically flowing by the time I started and I just wanted to prove the concept. For what it was it worked fairly well. There were a number of issues though. For one thing the hotel pans didn't work very well because the flames were able to wrap up the sides. Ideally I want flames only on the bottom by coming up the sides its able to burn at the top where the sap tends to foam.

Another issue was the metal burn tunnel. This worked ok but I think I would have got hotter more rockety burn with a brick riser. There was some wear to the metal but I think with only maple season usage I would still see a 10 year or so service life so this aspect wasn't as much of an issue to me.

I recently (well actually still in process) built a new shop. I was thinking why not kill two birds with one stone and build a shop heater that doubles as my syrup evaporator. (I will build some kind of hood to get rid of steam during boiling but that is a separate issue from this conversation)

My plan is to build a heater that has a metal plate probably 1/4" steel, this could be lifted off and replaced by the syrup pan in boiling season, the reason I wouldn't just set the pan on the steel is steel really is not that great a conductor of heat and it will be more efficient to have the bottom of the pan directly in the flame path. The pan/plate size I think I am going to go with is 16"x40".

So unlike most common rocket stoves where the riser is in a barrel or drum of some sort and the flames come out and down in all directions, I am forcing the flames to take an immediate 90 degree turn and head down along the path of the bottom of the syrup pan (or shop heating plate).

I am planning to build the base from concrete cinder blocks, the front wall nearest the burn tunnel/feed tube would be concrete bricks for widths sake. I was originally thinking of just filling this with fill and or insulation but then I thought why not make it somewhat of a bell type idea. I will fill the concrete block holes for thermal mass. It will most likely be dry stacked with a coating of surface bond cement to make it air tight.

The things I am debating are whether to build this as an 8" or 10" system, I am leaning towards 10". For more of the year it will be running as a heater rather then an evaporator. The shop is a very big space. Its a modified (angled rather then round) Quonset hut style building with wooden end walls. Insulated minimally about to r-13. Its 32x50' footprint and 19' at the peak, I haven't done the math out for the shape of somewhere in the 20-25,000 cubic foot of air range. But its a workshop if its warm enough on cold days to work without gloves on (about 45 degrees) i'll be happy enough.

The second thing I cant decide on is what the optimal spacing for the flame path under the pan is. I am thinking somewhere in the 1"-2" range but I am unsure.

Anyway anyone have any thoughts?

attached is a rough picture to help visualize my ramblings


maple-2.0.jpg
rocket-stove-shop-heater-maple-syrup-evaporator
 
steward
Posts: 15369
Location: Northern WI (zone 4)
4759
7
hunting trees books food preservation solar woodworking
  • Mark post as helpful
  • send pies
    Number of slices to send:
    Optional 'thank-you' note:
  • Quote
  • Report post to moderator
Another benefit or stacked function of your proposed device is for canning food.  At my last place we're replace the syrup pans with 1/4" steel plates and then set our canners on it for outdoor summer canning.  We could have 2 canners, 2 kettles and a few small sauce pots on our rig at the same time.

One watchout was that the steel plate would warp significantly.  We combated that by cutting it into 14" pieces but the smoke still leaked out a bunch.  We were outside so it didn't matter for us.

I don't have any advice on the design other than that, sorry.  Good luck!
 
pollinator
Posts: 258
Location: ALASKA
39
  • Mark post as helpful
  • send pies
    Number of slices to send:
    Optional 'thank-you' note:
  • Quote
  • Report post to moderator
I would think you would want the flames/ most intense heat licking the bottom of the pans. This would be due to the fact of the faster the boil the faster you make syrup and the lighter it will be and the less fuel and time  spent per gallon of syrup. What the optimum is I am unsure of.  Do you have any experience with commercial sap evaporators?  If not, I would look at the oil or propane fired ones and see how they are built for boiling with flat bottom pans.  The closer you are without inhibiting the draft/flow of the flames/heat the better I would think.  I know I am probably telling you stuff you already know, but hopefully it will give you something new or verify what you already know.
 
gardener
Posts: 1868
Location: Longbranch, WA Mild wet winter dry climate change now hot summer
450
3
goat tiny house rabbit wofati chicken solar
  • Mark post as helpful
  • send pies
    Number of slices to send:
    Optional 'thank-you' note:
  • Quote
  • Report post to moderator
Some questions based on other threads on permies.  do you plan to set the steel plate/evaporator pans on fiberglas rope to seal in the flame and allow for expansion?  How do you plan to disperse the flame/heat uniformly around under the surface?  The broaudio
walker cook stove seems to be the closest to your design and it uses a circuitous path. It is a batch heater which may be more convenient in your shop because you wold not have to stop to feed it as frequently.
 
Posts: 20
Location: Ontario, Canada
1
forest garden fungi chicken
  • Mark post as helpful
  • send pies
    Number of slices to send:
    Optional 'thank-you' note:
  • Quote
  • Report post to moderator
My only suggestion would be to make your surface area as large as you can.   I only have 15 taps and usually boil on the weekends but that means I have to get through 80 - 120 gallons in a day and every time by around 8 at night I am wishing I had more surface area.   I also use 3 hotel pans but have made a cinder block stove, not a rocket.  I love the idea of using a rocket and I looked at your idea from last year about the double rocket which could be a game changer.  You could probably triple your output by using the 2 outside surfaces as boilers and the middle as a warmer. I don't know if this would still work for heating your shop but it looks like it could save a lot of wood and more importantly time.  Unfortunately, I'm new to the forum and don't know how to link to your plans but they were in your first thread.  
 
Rocket Scientist
Posts: 4422
Location: Upstate NY, zone 5
545
5
  • Mark post as helpful
  • send pies
    Number of slices to send:
    Optional 'thank-you' note:
  • Quote
  • Report post to moderator
Jeff linked to that thread at the top of his first post in this thread.

(You can go to the thread you want in another tab, then copy the address in the top and paste it into your message. The forum will automatically make that into a link. If you want to link to a specific post, click the little yellow page icon in front of the "posted...", and copy/paste that address.)
 
Jeff Watt
Posts: 39
9
  • Mark post as helpful
  • send pies
    Number of slices to send:
    Optional 'thank-you' note:
  • Quote
  • Report post to moderator

Walt Chase wrote:I would think you would want the flames/ most intense heat licking the bottom of the pans.  Do you have any experience with commercial sap evaporators?  If not, I would look at the oil or propane fired ones and see how they are built for boiling with flat bottom pans.  The closer you are without inhibiting the draft/flow of the flames/heat the better I would think.


I believe the smallest gap possible is best unless it slows draft an inhibiting the rocket effect. I do not know what this happy number is though. Commercial and smaller scale wood fired rigs generally just have the pans over the fire box and they burn a tremendous amount of wood. Most of the commercial rigs do not have a flat pan they have drop flues which get more surface area in the flames but that is beyond what I plan on this build.

Stew Haggerty wrote: My only suggestion would be to make your surface area as large as you can.   I also use 3 hotel pans but have made a cinder block stove, not a rocket.  I love the idea of using a rocket and I looked at your idea from last year about the double rocket which could be a game changer.  You could probably triple your output by using the 2 outside surfaces as boilers and the middle as a warmer.


Last year I had 3 pans but only the front two would boil the rear acted as a warming pan. hotel pans are roughly 265 square inches of surface area. This rig at 16x40 would be 640 sq in or roughly 2.5 hotel pans. so if i can keep the whole surface boiling I will be a little ahead of where I was last year. It should boil about 4.5 gallons an hour if I can get the whole pan boiling. My thoughts last year on a double rocket stove I still think is a good idea but I don't think its necessary for a rig of this size. If I end up scaling up beyond the 25 taps I am doing now I may build something like a 3x4' or 3x5' rig which I think may need a double rocket.

Hans Quistorff wrote: do you plan to set the steel plate/evaporator pans on fiberglas rope to seal in the flame and allow for expansion.

I do plan to use a fiberglass rope under the surface to make a tighter seal. Last year the pans were a very loose fit its not a huge issue the flames don't try to escape. but some heat is surely lost and I think cold air is actually sucked in as the flames create a venturi effect. so the tighter it is the more efficient it should be. I had not seen this Walker cookstove but thats pretty cool. I was originally thinking of a serpentine path like this but I think with a pan this narrow it wont be really necessary.

 
Walt Chase
pollinator
Posts: 258
Location: ALASKA
39
  • Mark post as helpful
  • send pies
    Number of slices to send:
    Optional 'thank-you' note:
  • Quote
  • Report post to moderator
Some small/home producers still use flat bottom pans and not the flue pans.  Have you looked at using a "commercial" small flat pan?  I found some a few years ago that were 2X3 and could be had even larger with a warming pan and dripper tube as well.  I abandoned the idea because I decided not to make syrup the next spring.  Up here we make birch syrup out of the sap of the white birch.  It is no where as good (to me anyway) as maple, or sorghum syrup (which I grew up with down south).  It tastes more like sorghum than maple, but with a bit more "bite".  You have it "easy" it only takes +-40 gallons of sap per gallon of syrup with maple.  It takes +-100 gallons of birch sap.  I'll be following your build closely as any way to cut down the amount of wood or time it takes to make syrup would be great.
 
Jeff Watt
Posts: 39
9
  • Mark post as helpful
  • send pies
    Number of slices to send:
    Optional 'thank-you' note:
  • Quote
  • Report post to moderator

Walt Chase wrote:Have you looked at using a "commercial" small flat pan? .


Yes this is how I actually settled on the 16x40 size these pans can be found on ebay fairly cheap with a drain port built in. I priced out building one but its almost the same price for just the raw stainless as to get a fully built pan and it saves me the headache and time of fab and welding.

heres one at 16x40
and another at 16x41.5

2x3' and 2x4' pans can be had as well but the money doubles and I think I would need a second rocket to keep a steady boil through the whole pan.  
 
Whip out those weird instruments of science and probe away! I think it's a tiny ad:
An EPA Certified and Building Code/UL Compliant Rocket Stove!!!!!
EPA Certified and UL Compliant Rocket Heater
reply
    Bookmark Topic Watch Topic
  • New Topic