• Post Reply Bookmark Topic Watch Topic
  • New Topic
permaculture forums growies critters building homesteading energy monies kitchen purity ungarbage community wilderness fiber arts art permaculture artisans regional education skip experiences global resources cider press projects digital market permies.com pie forums private forums all forums
this forum made possible by our volunteer staff, including ...
master stewards:
  • Carla Burke
  • Nancy Reading
  • John F Dean
  • r ranson
  • Jay Angler
  • paul wheaton
stewards:
  • Pearl Sutton
  • Liv Smith
  • Anne Miller
master gardeners:
  • Timothy Norton
  • Christopher Weeks
gardeners:
  • Andrés Bernal
  • Jeremy VanGelder
  • Matt McSpadden

Biochar making - various kiln designs

 
pollinator
Posts: 3797
Location: Kent, UK - Zone 8
684
books composting toilet bee rocket stoves wood heat homestead
  • Likes 1
  • Mark post as helpful
  • send pies
    Number of slices to send:
    Optional 'thank-you' note:
  • Quote
  • Report post to moderator
Hi Folks,

I've made batches of biochar at various points, using various different methods.

Periodically I like to look around and see if any new ideas have come up in kiln designs, as I have yet to be satisfied with the methods I have tried. They make batches that are too small, or too labour intensive, or require nicely dried wood (which I don't have). Basically I've been looking for something that can take big chunky prunings from our 6+ acres - a mix of hedge trimming, fruit tree prunings, heavier branches, general pruning waste, etc... without needing complex tools, or lots of labour. Most especially, I don't want to have to cut everything down to nice 6 inch lengths to stack in a kiln, given most of it is woody stuff a meter or so long.

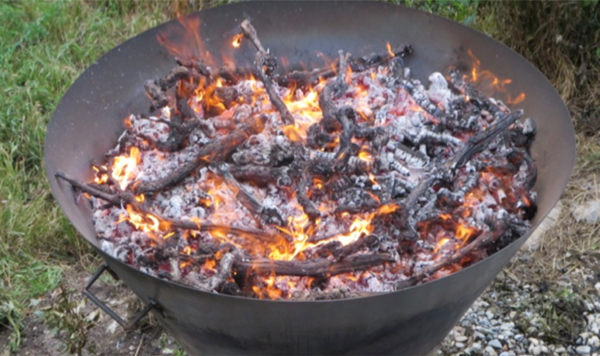
I have used open fires and pit - they meet the need for minimal processing of fuel wood, but are inefficient and tend to be a bit smokey.

The cone kilns which were first appearing two or three years ago looked promising, but a lot of our wood is long and would still need cutting to fit into a reasonably sized cone.
https://www.biochar-journal.org/en/ct/39


Today I came across these ones:
http://warmheartworldwide.org/new-type-fc-biochar-production-unit/


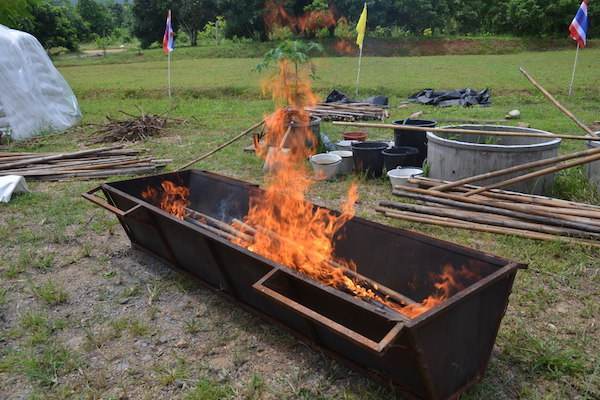
They use the same principals as the cones but are a rectangular cross section, and substantially longer in one direction, so you can fit your long logs without the whole thing being excessively oversized. Given that I haven't already gone ahead and had a cone made, i think I might go for something like this.
 
gardener
Posts: 5089
Location: Cincinnati, Ohio,Price Hill 45205
972
forest garden trees urban
  • Mark post as helpful
  • send pies
    Number of slices to send:
    Optional 'thank-you' note:
  • Quote
  • Report post to moderator
Neat! I wonder if this could be made from sheet metal or even plywood  and lined with concrete?
Tempatures should not  be high enough to need refractory materials.
Maybe just sheet metal would be enough,thus keeping it light.
If I understand the way this and the cones work, a carefully dug trench can do the same job.
I am just starting my biochar journey, so I will watch this subject with great interest.
 
Michael Cox
pollinator
Posts: 3797
Location: Kent, UK - Zone 8
684
books composting toilet bee rocket stoves wood heat homestead
  • Likes 3
  • Mark post as helpful
  • send pies
    Number of slices to send:
    Optional 'thank-you' note:
  • Quote
  • Report post to moderator
These designs are made to be hand portable, so you can carry the kiln to the work area. Important in developing countries where access to heavy machinery like tractors is unavailable.

As I understand it the raised metal construction does have benefits when it comes to clean burning and consistency of product; air outside the kiln is preheated by the contact with hot metal then is sucked into the flame front as it rolls over the lip of the metal. Preheated air burns more consistently, with fewer smoke problems. There are also advantages when it comes to quenching as a leaky dug pit will need a lot more water to guarantee a full quench than a sealed metal tank.
 
Posts: 27
Location: Spokane, WA
8
  • Likes 2
  • Mark post as helpful
  • send pies
    Number of slices to send:
    Optional 'thank-you' note:
  • Quote
  • Report post to moderator

Michael Cox wrote:Hi Folks,
The cone kilns which were first appearing two or three years ago looked promising....
https://www.biochar-journal.org/en/ct/39


I can see the benefit of a trench pit to handle longer pieces, encourage exploring that approach. The cone kin=ln better fits my situation. Some permie friends of mine, Best Biochar Kiln, in Stevens County, Washington, USA, make shippable cone kiln kits. I have two of the BBK kilns, typically running both simultaneously in a very urban backyard setting. With two and three story apartments on the downwind side, one has to deeply appreciate cone kilns for the ease with which they can maintain smokeless runs. A cone-kiln shaped pit in the dirt would work quite well also. A big wok, there are a number of ways to get the benefit of an open pan shaped firepit. I previously relied on enclosed barrel-in-a-barrel retorts, but the smoky start up, and the smoky hand off when transitioning from primary (outer sleeve) to secondary (inner vessel / retort) gases 20 minutes or so into the run. That meant I had to choose my days and times more carefully, needing to avoiding cold air temperatures and high humidity conditions that the cone kiln handles easily. That said the cone kiln is more sensitive to wind, I avoid 5 mph and above, whereas the barrel retorts were good up to 12 mph days. A windscreen can really help.

A cone kiln can throw sparks that an enclosed retort will retain. With climate disruption, and increasing incidence of red flag fire warning days of high temperatures, high winds, and extremely low humidity, open burn methods for making biochar deserve an added measure of caution.
 
gardener
Posts: 6814
Location: Arkansas - Zone 7B/8A stoney, sandy loam soil pH 6.5
1640
hugelkultur dog forest garden duck fish fungi hunting books chicken writing homestead
  • Likes 3
  • Mark post as helpful
  • send pies
    Number of slices to send:
    Optional 'thank-you' note:
  • Quote
  • Report post to moderator
 
This one just cries for a drop into place lid which would make the burn far more efficient for creating char, just a few holes (maximum of 4 - 1/4") drilled at one end for air to enter the burn chamber should give good results.

Making charcoal is more science than art, you just need to have a fire that can not get so much O2 that the flames run away and leave you with more ash than charcoal.
Bio char is fully cooked charcoal (no volatile compounds left behind) that has then been soaked with a good compost tea or just added to a compost heap so the microbiome finds places to live in your fresh carbon supply)
Properly activated biochar is a boone to all soils since it performs many functions; carbon sink, microbiome housing development, mineral source, water holding ability, O2 holding ability are among the impressive list of things biochar can do for soils.

Redhawk
 
Bryant RedHawk
gardener
Posts: 6814
Location: Arkansas - Zone 7B/8A stoney, sandy loam soil pH 6.5
1640
hugelkultur dog forest garden duck fish fungi hunting books chicken writing homestead
  • Likes 3
  • Mark post as helpful
  • send pies
    Number of slices to send:
    Optional 'thank-you' note:
  • Quote
  • Report post to moderator
I don't have a photo but I will give the description of one of the simplest "oven" designs that I've tried and found to work quite well for biochar production.

Use a steel 55 gal. drum with a retaining ring held in place lid, this is your oven (they last long enough to off set the small cost of buying a used one every time one wears out).
take a 2 foot piece of steel pipe (or anything that is usually used as a flue pipe, even the ones used for venting hot water heaters work well) set it in the center of the lid and mark around it so you can see the line.
remove the pipe and use a 1/4" drill bit to make a dozen or so holes in the lid inside the pipe's line you just made.
next is fastening the section of pipe you used to make your circle mark to the lid of the drum. (I used tin snips to make 8 tabs, remove the "waste" and then I drilled and pop riveted the vent pipe to the lid)
Use 4 8x16 inch concrete blocks spaced around the bottom rim so the drum will sit up off the ground (set these so the drum sits on the center reinforcement of the blocks)
Take the barrel off the positioned blocks and dig out the soil in the center so you have a pit for building a fire.

To use this for making charcoal or biochar you just fill the drum with your wood, packing it in as tightly as possible.(this is easiest to do if the drum is laying on its side, then stood up on top of the blocks and more sticks pushed in to really pack the drum)
stand the drum on the concrete blocks after laying the wood for the fire, place the lid on and use the clamp ring to fasten the lid to the drum.
Light the fire under the drum, keep the fire as hot as you can make it, once the wood heats up use a long match or stick to ignite the fumes that will be coming out of the "stack".

This is a pretty simple TLUD type of setup and it works.

Redhawk
 
pollinator
Posts: 403
Location: Missoula, MT
169
  • Mark post as helpful
  • send pies
    Number of slices to send:
    Optional 'thank-you' note:
  • Quote
  • Report post to moderator

Michael Cox
Post 1/22/2017 2:13:22 PM     Subject: Biochar making - various kiln designs
"[...] I have used open fires "


Two weeks ago I made about 150 gallons of charcoal in two hours using the open fire method aka "when the coals begin to turn white, put more wood on top of it."   I really liked how quickly I could produce a huge batch - much faster than any containerized methods i've tried.

After I hosed the fire out and soaked the coals real good, i drove the front wheels of my truck back and forth over it, picked out the few un-crushed pieces (mostly knots & super thick pieces that didn't char all the way through) with a pitch fork, hosed it down again and drove over it again. End product is a very fine material, largest pieces being about 1/4 inch.

I think open fire / truck crush is my favorite method for making charcoal to go in the compost.

Making dry charcoal for blacksmithing on the other hand... I don't see any way around using a kiln of some kind.
 
William Bronson
gardener
Posts: 5089
Location: Cincinnati, Ohio,Price Hill 45205
972
forest garden trees urban
  • Mark post as helpful
  • send pies
    Number of slices to send:
    Optional 'thank-you' note:
  • Quote
  • Report post to moderator
I've built a small TLUD from a 4 gallon stock pot, and a 1 gallon tin can.
I fill it to almost an inch of the lid , douse the top with accelerant and   light.
When I'm sure its lit, I cover it with the lid/chimney.
It burns about 45 mins, or an hour, I think, its been a while.
Lately I have only made char in the bonfire.
An old steel tool box stuffed with bones, bread, willow, cardboard, etc, goes in the bottom of the pit.
The willow turned out well, I hoping to monetize that in the future.

Bryant, does your setup continue to burn once the chimney gasses are lit?

The trough style has the advantage that you could add to it as the material reduces.
If you put a lid on that, you lose that feature.
I can see wanting a lid to starve the coals of air at the end of a burn but not otherwise.


I'm building a batch rocket powered black oven.
It occurs to me that it could make a fine biochar kiln.
One would want to burn off the gasses produced.
If you build it as white oven, you could re-route the gas produced into the rocket itself, for a self perpetuating process.
I wouldn't do this with a black oven, as the pyrolysis gasses would be mixed with the finished rocket exhaust, probably not a good mix.
 
gardener
Posts: 1774
Location: Los Angeles, CA
560
hugelkultur forest garden books urban chicken food preservation
  • Likes 1
  • Mark post as helpful
  • send pies
    Number of slices to send:
    Optional 'thank-you' note:
  • Quote
  • Report post to moderator
Looking at the shape of those cone/dish shaped burners --- why couldn't you just dig a hole in the ground in that same shape?  Dig a wide, somewhat shallow, dish-shaped cavity, and surround it with bricks to impede the flow of oxygen into the hole.  If you don't have bricks, make a simple rectangular form, put a bit of water and the loose soil back into the bottom of your hole, squash it with your bare feet until you get a thick mud, and then use that to make your mud bricks.  Squish the mud into your wood form, plunk the wet bricks down around the rim of your hole, and in 2 or 3 days, you'll have your biochar kiln.  Or if that's too complicated, just use your hands and form a mud "curb" around the outside of your hole in the ground.  Throw a big handful of straw into the hole when you are mixing your mud, and it' becomes cob, which much stronger properties (less likely to crack) than bricks made of just straight dirt.

Bada bing . . . done . . . and no expensive equipment needed.  When you are done, you don't have to find a place to store that big steel contraption.  

One of the reasons I'm so drawn to permaculture is because of the sustainability and transferability of these principles to the developing world where resources are scarce.  Appropriate technology doesn't get any more simple than a dish-shaped hole in the ground that is rimmed with basic mud bricks.  I would find it expensive to have a big steel biochar burner made.  How much more so if you are a simple farmer living on the side of a hill somewhere in Latin America or Africa?  
 
William Bronson
gardener
Posts: 5089
Location: Cincinnati, Ohio,Price Hill 45205
972
forest garden trees urban
  • Mark post as helpful
  • send pies
    Number of slices to send:
    Optional 'thank-you' note:
  • Quote
  • Report post to moderator
I think i asked the same question once.
If I recall, its just a matter of what works for you.
Digging a hole when and where you need to make some bio-char is one way.
Bringing your kiln with you, or bringing your feed stock to the kiln might work better in some situations.
Me, I bring my feed stock to the kiln, as I do not have acres of woods.
I do have a couple of yards, and I will probably build one on each property, with a emphasis on easy of loading , unloading, and utilizing the heat generated.
 
pollinator
Posts: 921
Location: Huntsville Alabama (North Alabama), Zone 7B
152
fungi foraging trees bee building medical herbs
  • Likes 2
  • Mark post as helpful
  • send pies
    Number of slices to send:
    Optional 'thank-you' note:
  • Quote
  • Report post to moderator

Bryant RedHawk wrote:I don't have a photo but I will give the description of one of the simplest "oven" designs that I've tried and found to work quite well for biochar production.

Use a steel 55 gal. drum with a retaining ring held in place lid, this is your oven (they last long enough to off set the small cost of buying a used one every time one wears out).
take a 2 foot piece of steel pipe (or anything that is usually used as a flue pipe, even the ones used for venting hot water heaters work well) set it in the center of the lid and mark around it so you can see the line.
remove the pipe and use a 1/4" drill bit to make a dozen or so holes in the lid inside the pipe's line you just made.
next is fastening the section of pipe you used to make your circle mark to the lid of the drum. (I used tin snips to make 8 tabs, remove the "waste" and then I drilled and pop riveted the vent pipe to the lid)
Use 4 8x16 inch concrete blocks spaced around the bottom rim so the drum will sit up off the ground (set these so the drum sits on the center reinforcement of the blocks)
Take the barrel off the positioned blocks and dig out the soil in the center so you have a pit for building a fire.

To use this for making charcoal or biochar you just fill the drum with your wood, packing it in as tightly as possible.(this is easiest to do if the drum is laying on its side, then stood up on top of the blocks and more sticks pushed in to really pack the drum)
stand the drum on the concrete blocks after laying the wood for the fire, place the lid on and use the clamp ring to fasten the lid to the drum.
Light the fire under the drum, keep the fire as hot as you can make it, once the wood heats up use a long match or stick to ignite the fumes that will be coming out of the "stack".

This is a pretty simple TLUD type of setup and it works.


Redhawk


Redhawk,  I would like to do this and will try to take pictures.  There are no other holes drilled into the barrel other than the ones where you fix the flue over the holes?  Should there be holes near the bottom for air to allow the wood to burn down to the bottom?  IT may take a while to find a food grade unlined metal barrel with a removable lid but there is a guy who makes a business out of selling metal and plastic barrels about 45 miles from me.
Thanks
 
pollinator
Posts: 182
Location: Colorado Plateau, New Mexico
38
fungi foraging composting toilet building solar greening the desert
  • Likes 4
  • Mark post as helpful
  • send pies
    Number of slices to send:
    Optional 'thank-you' note:
  • Quote
  • Report post to moderator

I don't have a photo but I will give the description of one of the simplest "oven" designs that I've tried and found to work quite well for biochar production.


So many great ideas here for so many different situations. I love this one for us because we have a metal barrel with a retaining ring lid, because it can make a fair amount at one go in an easily-controlled space, and because this doesn't involve any holes in the barrel itself, so we could maybe use it later to build a rocket mass heater once our house is done...

Here are my questions:

  • How do you know when the biochar is done? Is it just when the gasses have burnt off and the flue flame goes out?
  • Our barrel did not have toxic contents (it held hardware), but it is painted inside and out. I assume we need to do a 'pocket rocket' to burn off the paint before using it for biochar?


  • The only problem for us with this method is that it does require an open fire, and we live in a desert woodland in a drought, and this is the windy season, so we won't be building an open fire probably until July when the monsoon starts (fingers crossed). So here are a couple other questions on a different burn-barrel option in the meantime...
  • What would happen if you tried to use a cylindrical barrel in the manner of a cone kiln, by starting a fire on the bottom, and adding fuel when the top starts getting ashy? Would it just be a bit less efficient than a cone, or would it not work at all?


  • We have never made biochar before. We hope to use it in the garden, but also as an addition to the earthen plaster in our house, at least in the bathroom and kitchen. Any advice isi welcome!

    Kimi

     
    Michael Cox
    pollinator
    Posts: 3797
    Location: Kent, UK - Zone 8
    684
    books composting toilet bee rocket stoves wood heat homestead
    • Likes 2
    • Mark post as helpful
    • send pies
      Number of slices to send:
      Optional 'thank-you' note:
    • Quote
    • Report post to moderator
    Kimi - I vertical barrel with a fire in the bottom won’t work. It will smoke terribly, and won’t get a clean flame. The fresh air needs to be in much closer contact with the fuel.

    Suspend the fuel over the top of the drum and let the embers drop through a grill to the bottom. Should eventually collect enough char to fill the drum, at which point you let the fire go out and put a tight lid on the drum.

    I still think this will be a difficult fire to manage - you are trying to balance the fuel over a small grill. This obviously limits both the size of the fire, and the size of the fuel you can use.

    My preferred method now, having tried a few, is a drum chopped in half down it’s length, and laid on it’s side. Start a fire in it and just keep adding fuel. The fresh fuel and flames ensures that the layer of embers is protected by a layer of low oxygen flames.

    I have written about this here in some detail before.
     
    pollinator
    Posts: 4713
    Location: Canadian Prairies - Zone 3b
    1289
    • Likes 7
    • Mark post as helpful
    • send pies
      Number of slices to send:
      Optional 'thank-you' note:
    • Quote
    • Report post to moderator
    Kimi, welcome to the world of biochar. But be advised, it can become something of an addiction.

    You will definitely need to burn and then scrub the interior coating out of your barrel.

    Michael is right -- without an air supply at the burn level, it will be a nasty smoking beast. Though it would be convenient to pop an airtight lid over top when done burning. One option I have contemplated is a metal pipe driven by a small bathroom fan or perhaps even a couple of bigger computer fans. This would dangle down into the drum, supplying the amount of combustion air I deem necessary.

    For my current barrel, a discarded 55 gal oil drum, I kept it vertical. I cut the top out and cut an air-and-access hole in the centre section. This lets me put long branches in the top, and use a cut down shovel (from the dump) to continuously pack the coals and exclude oxygen. It's perhaps a little more ongoing work but I'm quite pleased with the quality of char (and low ash) that I'm getting. And I don't get smoked to death. And it's super portable. And I can put as many layers of metal mesh over top as needed, to break up sparks.
     
    gardener
    Posts: 4173
    589
    7
    forest garden fungi trees food preservation bike medical herbs
    • Likes 3
    • Mark post as helpful
    • send pies
      Number of slices to send:
      Optional 'thank-you' note:
    • Quote
    • Report post to moderator
    There are many designs, and I think it is important to find one that fits your situation.  Some live in the suburbs, like me. Others are in the city, some have large farm, others small farm.  I use a 55 gallon drum.  To make it TLUD, it has to be top lit up draft.  I made a chimney that is connected to and comes  out of the top.  This video gives a good intro. However, one question that was asked-how do you know when it is done? By trial and error, I have found that when the flames are about 6-10 inches over the last of the charcoal, that's when to put it out.   I used to douse it at like an inch or two above, on average but I got much less wood and more ash.   With 6-10 inches over, makes great char and little ash.  My guess is that 6-10 inches is probably about 14-22 cm.  The other change I make from this video is to just get your chimney, place it on the top lid, draw the circle, and then draw the lines for opening up to the chimney.  Then cut it open with your angle grinder.


    John S
    PDX OR
     
    pollinator
    Posts: 219
    Location: Clackamas County, OR (zone 7)
    126
    • Likes 4
    • Mark post as helpful
    • send pies
      Number of slices to send:
      Optional 'thank-you' note:
    • Quote
    • Report post to moderator

    Michael Cox wrote:Kimi - I vertical barrel with a fire in the bottom won’t work. It will smoke terribly, and won’t get a clean flame.


    I have actually had pretty good success with burning in a barrel. There is a tiny bit of smoke at start-up, but after a few minutes it gets quite hot and clean. The air gets sucked down the sides and pre-heats. I lined an old burned out barrel with cob, and that worked great. The lining needs to be patched up every now and again, but it will last basically forever. I use a thick steel plate on top to put it out. I put the lid on to snuff the last flames, then about an hour later when it has cooled somewhat I pull the lid off, put on a gasket made of crumpled tinfoil, and then replace and weight down the lid. Then the next day I scoop it out into a steel garbage can. If you are not in a rush to start another batch, it could probably be left in there to cool completely. Here is a short video - This version had insulation, but it is not needed.


    gardener
    Posts: 5306
    Location: Southern Illinois
    1424
    transportation cat dog fungi trees building writing rocket stoves woodworking
    • Likes 6
    • Mark post as helpful
    • send pies
      Number of slices to send:
      Optional 'thank-you' note:
    • Quote
    • Report post to moderator
    Kimi, everyone,

    First off, I really like that you revived this old thread.  I love seeing an old but useful thread getting updated.

    Secondly, I will give you a rundown on my own experiment making charcoal.

    I wanted to experiment, just try to see if I could make some char and I didn’t want to spend any money and I didn’t want anything barrel-sized laying about (I doubt my wife would be thrilled).  So I made a micro-TLUD out of 2 soup cans an empty can of beans I rescued from the recycling container and a 1 gallon paint can.

    The assembly was pretty simple.  I cut off both the top and bottom of the soup but left the rims.  These made the chimney.  I cut a little “X” in the lid of the paint can and pried back the 4 petals so they would loosely hold the chimney in place.  I filled the soup can with little pieces of oak that I split (about 1/2” by 1/2” by just a bit shorter than the soup can) and set it upside down in the paint can, and filled the rest of the paint can with more oak cuttings and covered the top with some oak kindling, started the kindling, waited for it to really start flaming hot, affixed the lid and chimney, sat back and watched the burn which took about 90 minutes.

    I started with 4 3/8” holes in the bottom of the paint can, but that yielded up a LOT of smoke.  I enlarged the holes to 1/2” and added about 8 more and drilled some holes in the chimney.  The second burn yielded almost no smoke.  

    It only gave me a soup can of char, but it was a simple, cheap entry point to making char.

    Eric

    thumb-IMG_0368.JPG
    [Thumbnail for thumb-IMG_0368.JPG]
    Simple TLUD
    thumb-IMG_0374.JPG
    [Thumbnail for thumb-IMG_0374.JPG]
    Batch of char
    thumb-IMG_0376.JPG
    [Thumbnail for thumb-IMG_0376.JPG]
    A charred piece of wood
    thumb-IMG_4634.JPG
    [Thumbnail for thumb-IMG_4634.JPG]
    A batch ready to go
    thumb-IMG_4659.JPG
    [Thumbnail for thumb-IMG_4659.JPG]
    Flare
    thumb-IMG_4664.JPG
    [Thumbnail for thumb-IMG_4664.JPG]
    Down the hatch
     
    Posts: 1
    1
    • Likes 10
    • Mark post as helpful
    • send pies
      Number of slices to send:
      Optional 'thank-you' note:
    • Quote
    • Report post to moderator
    I wanted to echo Carl's post about using a basic drum to make charcoal.  An unmodified 55 gallon barrel works great as a 'flame cap' burner.  No cutting, no welding, no modification of any kind.
    Tip it a little and feed gradually.
    Save yourself time and money and give it a try!
    "flame cap" is an important search term.

    Video of unmodified drum char making:


    Some links to 'flame cap' burners:
    Flame Cap tub burners
    Small scale biochar kilns
    ChuckW
     
    John Suavecito
    gardener
    Posts: 4173
    589
    7
    forest garden fungi trees food preservation bike medical herbs
    • Likes 1
    • Mark post as helpful
    • send pies
      Number of slices to send:
      Optional 'thank-you' note:
    • Quote
    • Report post to moderator
    These look like great entries into the world of biochar making.  Eventually, someone may want to move onto another method with greater flexibility or less smoke making.  I would like more people to see a way to get into it.  It took me a few years until I could really see a design that got me to thinking, "I could do that!"  55 gallon barrels are easy to find on Craig's List, often for free.

    John S
    PDX OR
     
    gardener
    Posts: 1236
    359
    7
    trees wofati rocket stoves
    • Likes 2
    • Mark post as helpful
    • send pies
      Number of slices to send:
      Optional 'thank-you' note:
    • Quote
    • Report post to moderator
    Thanks for that Chuck, definitely the best combo of cheap/simple/portable I've seen! A person could use a dolly, attach a metal wire around the barrel to hold it, and make a simple tripod from a few sticks to lean it on.
     
    Michael Cox
    pollinator
    Posts: 3797
    Location: Kent, UK - Zone 8
    684
    books composting toilet bee rocket stoves wood heat homestead
    • Likes 2
    • Mark post as helpful
    • send pies
      Number of slices to send:
      Optional 'thank-you' note:
    • Quote
    • Report post to moderator

    Eric Hanson wrote:
    I wanted to experiment, just try to see if I could make some char and I didn’t want to spend any money and I didn’t want anything barrel-sized laying about (I doubt my wife would be thrilled).  So I made a micro-TLUD out of 2 soup cans an empty can of beans I rescued from the recycling container and a 1 gallon paint can.
    .
    .
    .
    It only gave me a soup can of char, but it was a simple, cheap entry point to making char.

    Eric


    I'd love to see a side by side test of this vrs a much simple flame cap type system. Take the same fuel load total, light a small fire in the bottom of your paint can, then gradually add fuel. The flames on top protect the lower layers from charring. Then quench with water. I'm pretty confident that the latter approach will give comparable char quantities.
     
    John Suavecito
    gardener
    Posts: 4173
    589
    7
    forest garden fungi trees food preservation bike medical herbs
    • Likes 1
    • Mark post as helpful
    • send pies
      Number of slices to send:
      Optional 'thank-you' note:
    • Quote
    • Report post to moderator
    Part of the input on paint can or other can retort vs. a barrel is how much time do you have, and when do you need the biochar?  I like to see how people incorporate these systems into the rest of their lives.  I have a suspicion that people who can put a retort into their say, wood stove, that they are using anyway, will find that one more overall efficient. I also guess that those who don't have that set up will find a greater overall efficiency with the barrel.  I'm with Michael, though, I'd love to see a comparison side by side.

    John S
    PDX OR
     
    Michael Cox
    pollinator
    Posts: 3797
    Location: Kent, UK - Zone 8
    684
    books composting toilet bee rocket stoves wood heat homestead
    • Likes 2
    • Mark post as helpful
    • send pies
      Number of slices to send:
      Optional 'thank-you' note:
    • Quote
    • Report post to moderator
    We have a woodstove for our winter heating. I can't see myself making char in it as a matter of routine. When I char in the garden I use low grade brash, typically leaving it in long (6ft plus) lengths. Trimming that down to size to fit a small box is a lot of work. That is why I moved away from outdoor drum systems in the first place. It's a trade off I guess; if you have the right materials to char that don't need extra processing, then adding biochar making to your daily routine could be viable.
     
    pollinator
    Posts: 820
    Location: South-central Wisconsin
    327
    • Likes 4
    • Mark post as helpful
    • send pies
      Number of slices to send:
      Optional 'thank-you' note:
    • Quote
    • Report post to moderator
    I make my char using soup-can retorts in the wood stove. But I'm usually making it from things other than wood, so cutting the material down to size isn't a factor.

    I have tried TLUDs and flame-cap systems, but the crop debris I'm trying to char doesn't seem to burn hot enough. I'm still tinkering with it, hoping to find ways to boost the temperature without adding wood, but haven't had any successes yet. I would love to be able to burn a barrel-full at a time!

    With the flame-cap, there's the added problem of material being light-weight enough that the chimney-effect makes pieces fly out. It needs a screened lid in order to contain everything.
     
    pollinator
    Posts: 3651
    Location: 4b
    1319
    dog forest garden trees bee building
    • Likes 3
    • Mark post as helpful
    • send pies
      Number of slices to send:
      Optional 'thank-you' note:
    • Quote
    • Report post to moderator
    Biochar making really is a matter of finding the way that fits into your lifestyle I think.  I love using my retort.  I load it up, start the fire in the outside barrel, and go work on whatever I want to be working on.  I don't even look at it again until the next day when everything is cooled off and the charcoal is ready to come out.  The negative is, I can't make as much as a person using a trench.  You just have to find your sweet spot between the amount of charcoal you can make and the amount of tending it needs.  People seem to get tied to one method and I've seen arguments about the "best" way get pretty heated.  My own view is that it isn't all or nothing.  You can use multiple methods depending on your circumstances at the time.  I will absolutely have a trench to work with this summer to make larger amounts when I have a few hours to "babysit" it, but I won't throw away my retort system.  My advice, try different methods, see if one speaks to you, but don't close your mind to other ways and ideas.
     
    William Bronson
    gardener
    Posts: 5089
    Location: Cincinnati, Ohio,Price Hill 45205
    972
    forest garden trees urban
    • Mark post as helpful
    • send pies
      Number of slices to send:
      Optional 'thank-you' note:
    • Quote
    • Report post to moderator
    Ellendra, what crop residue are you working with?
     
    Eric Hanson
    gardener
    Posts: 5306
    Location: Southern Illinois
    1424
    transportation cat dog fungi trees building writing rocket stoves woodworking
    • Likes 2
    • Mark post as helpful
    • send pies
      Number of slices to send:
      Optional 'thank-you' note:
    • Quote
    • Report post to moderator
    I just updated my previous post HERE:

    https://permies.com/t/62124/Biochar-making-kiln-designs#1254939

    with some pictures of my experiment.  

    Just new pictures, no new actual content,  but I got to talking with people last night about biochar and I thought that these pictures might be worth a view on this thread.

    Eric
     
    Ellendra Nauriel
    pollinator
    Posts: 820
    Location: South-central Wisconsin
    327
    • Likes 1
    • Mark post as helpful
    • send pies
      Number of slices to send:
      Optional 'thank-you' note:
    • Quote
    • Report post to moderator

    William Bronson wrote:Ellendra, what crop residue are you working with?


    The past 2 years it's been mostly bean vines and empty bean shells. They always seem like they should burn well, but they just kind of smoulder.

    This year I'm planning to grow flour corn, sunflowers, and walking stick kale. All three of those have some part that works well as firewood, so if I can get enough I might be able to layer it with the bean straw in a flame-cap system. But that's a big "if".

    I'm trying to ramp up my bean production, so there may be a time soon when I have huge bales of bean straw to deal with. I'd like a way to turn those into biochar without too much fuss or extra labor.
     
    Posts: 70
    Location: Algarve, Portugal
    23
    duck forest garden tiny house bike wood heat homestead greening the desert
    • Likes 2
    • Mark post as helpful
    • send pies
      Number of slices to send:
      Optional 'thank-you' note:
    • Quote
    • Report post to moderator
    There's many ways to make biochar and which one is most suitable all depends on your available materials and goals.

    I'm currently using 3 different methods each with various scales.

    Two flame cap kilns, one a 100x100cm pyramid kiln (about 200 liter volume) the other a 170x80cm trough made from an old solar hot water storage tank (roughly 550ll liter volume).
    These are used for garden brush.
    Currently working on a third pyramid kiln with only a 85 liter volume which will mainly be used for demonstrations/workshops.

    Then I have multiple mini TLUD gasifiers which I can use in my indoor cookstove. A 500ml gasifier, three 1 liter gasifiers and a 1.3 liter gasifier.
    The three 1 liter gasifiers I also use outdoors to heat a hot bath of water. Or two of them in my diy pizza oven.
    These mini gasifiers run exclusively on stovepellets.

    Aside from that I have a 60 liter retort (will upgrade to 110liter soon) which I build with the main goals of wood vinegar collection, to make bonechar and novelty items.
    This retort is heated using a 20 liter TLUD gasifier, again using stovepellets although this gasifier could also run on other inputs, I just like the energy density and output that the stove pellets offer me.

    And finally I often put a 1liter retort inside the 20 liter TLUD gasifier for some very specific high quality biochars.
     
    Martijn Jager
    Posts: 70
    Location: Algarve, Portugal
    23
    duck forest garden tiny house bike wood heat homestead greening the desert
    • Mark post as helpful
    • send pies
      Number of slices to send:
      Optional 'thank-you' note:
    • Quote
    • Report post to moderator

    Ellendra Nauriel wrote:
    I'm trying to ramp up my bean production, so there may be a time soon when I have huge bales of bean straw to deal with. I'd like a way to turn those into biochar without too much fuss or extra labor.


    My recommendation would be a flame cap kiln. Straw type material burns hot and fast, just keep layering it in and maintain that flame cap.

    If this particular straw, which I don't have experience with, really doesn't burn well then you'll have to layer it in while burning other stuff.
     
    John Suavecito
    gardener
    Posts: 4173
    589
    7
    forest garden fungi trees food preservation bike medical herbs
    • Likes 1
    • Mark post as helpful
    • send pies
      Number of slices to send:
      Optional 'thank-you' note:
    • Quote
    • Report post to moderator
    Martijn,
    You have a wealth of kiln designs. Maybe you could call it a quiver.

    One statement that I would like to edit from earlier is that I have found that the best time to douse the fire in my TLUD 55 gallon barrel is when the flame  goes about 6-10 inches above the last of the charcoal. I get way more char from the wood. There is a small bit of uncharred wood. Sometimes I just wring the char off of the outside of a few pieces and burn it the next round.  I think I was just burning some of the char into ash when it was just an inch or two above the black char.

    John S
    PDX OR
     
    William Bronson
    gardener
    Posts: 5089
    Location: Cincinnati, Ohio,Price Hill 45205
    972
    forest garden trees urban
    • Likes 2
    • Mark post as helpful
    • send pies
      Number of slices to send:
      Optional 'thank-you' note:
    • Quote
    • Report post to moderator
    Made a #10 gallon can into a TLUD because i was hoping to warm/dry out some cast material in the greenhouse.
    I added two cups of pellets and started it with fat soaked egg carton.

    Not only was it too hot, I hadn't burned it before and there was something on or in it that smoked and stank.😬
    In retrospect, cans have a thin plastic liner...

    I used some pliers, took it outside.
    It settled down and burned cleanly .
    I added sticks, which seemed to catch nicely.
    I quickly turned two more cans into short pieces of ductwork and plopped them on top.
    The wee beastie roared with approval!

    When it seemed done, I poured it out into a pan of rainwater, even the sticks has been converted to charcoal, which is notable to me.
    Tluds run best on fuel that is very regular in size, but it seems  they might  be less picky once they get going.
    That could lower the amount of purchased pellets needed on any given burn.

    I'm gonna build a double walled one next, they are supposed to be more effective, and from what I can tell they are more or less identical to one of those twig burning gasifiers.


    20211116_152934.jpg
    Little Beastie Burning...
    Little Beastie Burning...
     
    Martijn Jager
    Posts: 70
    Location: Algarve, Portugal
    23
    duck forest garden tiny house bike wood heat homestead greening the desert
    • Likes 1
    • Mark post as helpful
    • send pies
      Number of slices to send:
      Optional 'thank-you' note:
    • Quote
    • Report post to moderator
    The issue with less uniform fuel in TLUDs is that you can end up with too much air in the primary combustion zone which means ash formation.
     
    pollinator
    Posts: 129
    Location: Desert southwest USA
    66
    cat hunting cooking building woodworking
    • Mark post as helpful
    • send pies
      Number of slices to send:
      Optional 'thank-you' note:
    • Quote
    • Report post to moderator
    I have been making charcoal for a few years now for use in my solid fuel forge and steel remelting process (you can actually turn mild steel into high-carbon tool steel in your back yard!) I posted the pics in another thread. I don't want toI don't want to duplicate the post and use up Permies' server space, so here is a link to my system: https://permies.com/t/155659/Idea-Making-charcoal-retort-rocket#1336500
     
    Posts: 4
    1
    • Mark post as helpful
    • send pies
      Number of slices to send:
      Optional 'thank-you' note:
    • Quote
    • Report post to moderator

    Mark Brunnr wrote:Thanks for that Chuck, definitely the best combo of cheap/simple/portable I've seen! A person could use a dolly, attach a metal wire around the barrel to hold it, and make a simple tripod from a few sticks to lean it on.


    Hello - I am new to the forum and new to biochar. I have been reading up a bit over the past few months.

    This angled barrel design seems the easiest and cheapest I have seen, yet seems effective and has a decent volume. So I was thinking - would having multiple of these allow easy big batch creation if needed?

    My property has plenty of sloped areas. Easy to create a small retaining wall ~2 feet high. It seems it would be possible to create multiple drum models, each on single swinging stands that would allow three (3) primary positions:

    1) upright (out of use/cooldown)
    2) 60o for pyrolysis
    3) -120o for easy unloading into a wheelbarrow

    I created a (poor) SketchUp to show what I mean (see attachments)

    I am sure I could create this very easily, and be sure to strategically place it on and area with:

    - easy wheel barrow access to front, lower section
    - upper section good to piling feed stock

    thoughts?

    Biochar-3-Drum-flame-cap.jpg
    [Thumbnail for Biochar-3-Drum-flame-cap.jpg]
    Biochar-3-Drum-flame-cap2.jpg
    [Thumbnail for Biochar-3-Drum-flame-cap2.jpg]
     
    John Suavecito
    gardener
    Posts: 4173
    589
    7
    forest garden fungi trees food preservation bike medical herbs
    • Mark post as helpful
    • send pies
      Number of slices to send:
      Optional 'thank-you' note:
    • Quote
    • Report post to moderator
    I love these adaptations that each person is making.   I make a little bump out of wood chips to angle my char when I'm dousing it.  These look like they would work well.  John S
    PDX OR
     
    Mark Brunnr
    gardener
    Posts: 1236
    359
    7
    trees wofati rocket stoves
    • Likes 3
    • Mark post as helpful
    • send pies
      Number of slices to send:
      Optional 'thank-you' note:
    • Quote
    • Report post to moderator
    I used the tilted barrel method last year at the lab, and it was super effective! We used trimmings from junk poles and even feeding in green material that was still wet worked, so long as you didn't put in a bunch at once. I highly recommend a barrel and a rock or two for propping it at the right angle over anything fancier or more expensive.

    Edit: and if you have the cool down time to wait, putting the lid on to smother the burn when done works well. You come back later when it's cooled and no water is needed.
     
    Trace Oswald
    pollinator
    Posts: 3651
    Location: 4b
    1319
    dog forest garden trees bee building
    • Likes 1
    • Mark post as helpful
    • send pies
      Number of slices to send:
      Optional 'thank-you' note:
    • Quote
    • Report post to moderator

    David Hillcat wrote:

    Mark Brunnr wrote:Thanks for that Chuck, definitely the best combo of cheap/simple/portable I've seen! A person could use a dolly, attach a metal wire around the barrel to hold it, and make a simple tripod from a few sticks to lean it on.


    Hello - I am new to the forum and new to biochar. I have been reading up a bit over the past few months.

    This angled barrel design seems the easiest and cheapest I have seen, yet seems effective and has a decent volume. So I was thinking - would having multiple of these allow easy big batch creation if needed?

    My property has plenty of sloped areas. Easy to create a small retaining wall ~2 feet high. It seems it would be possible to create multiple drum models, each on single swinging stands that would allow three (3) primary positions:

    1) upright (out of use/cooldown)
    2) 60o for pyrolysis
    3) -120o for easy unloading into a wheelbarrow

    I created a (poor) SketchUp to show what I mean (see attachments)

    I am sure I could create this very easily, and be sure to strategically place it on and area with:

    - easy wheel barrow access to front, lower section
    - upper section good to piling feed stock

    thoughts?


    I made a post a while back outlining my take on this method here:  Tilted barrel biochar making   I really like it.  You can get high yields with little smoke, much more than I get from my retort.  I like your idea of making the barrel easy to tilt to different angles.  The one issue you may have is figuring out how to build the swinging mechanism.  This will be especially critical if you quench it with water.  The barrel full of charcoal and water is going to be very heavy, several hundred lbs.  The mechanism for tilting it will need to be pretty robust.

     
    David Hillcat
    Posts: 4
    1
    • Mark post as helpful
    • send pies
      Number of slices to send:
      Optional 'thank-you' note:
    • Quote
    • Report post to moderator

    Mark Brunnr wrote:I used the tilted barrel method last year at the lab, and it was super effective! We used trimmings from junk poles and even feeding in green material that was still wet worked, so long as you didn't put in a bunch at once. I highly recommend a barrel and a rock or two for propping it at the right angle over anything fancier or more expensive.

    Edit: and if you have the cool down time to wait, putting the lid on to smother the burn when done works well. You come back later when it's cooled and no water is needed.


    Idea: I could the tilt and empty/tip hot biochar straight into a water-containing vessel, that is on the lower level (metal wheel burrow containing some water)? Then tilt the (still-hot) drum back to 60o and go again? I suppose I am thinking that I would like to build up a large pile of feedstock, then have a day of producing many batches, in a constant stream of batches that I walk past and tend to periodically.

    This means labour must be reduced as much as possible, both on the feed and product sides.
     
    David Hillcat
    Posts: 4
    1
    • Mark post as helpful
    • send pies
      Number of slices to send:
      Optional 'thank-you' note:
    • Quote
    • Report post to moderator

    I made a post a while back outlining my take on this method here:  Tilted barrel biochar making   I really like it.  You can get high yields with little smoke, much more than I get from my retort.  I like your idea of making the barrel easy to tilt to different angles.  The one issue you may have is figuring out how to build the swinging mechanism.  This will be especially critical if you quench it with water.  The barrel full of charcoal and water is going to be very heavy, several hundred lbs.  The mechanism for tilting it will need to be pretty robust.


    good one - thanks!
     
    Attractive, successful people love this tiny ad:
    Learn Permaculture through a little hard work
    https://wheaton-labs.com/bootcamp
    reply
      Bookmark Topic Watch Topic
    • New Topic