
.png)
|

|

|

|

|

|
|
|
|
|
|
|
|

|

|

|

|

|
 1
1


 1
1

![[Thumbnail for peter-van-den-berg-minnie-mouse.png]](/t/62190/a/55358/peter-van-den-berg-minnie-mouse.png "Filename: peter-van-den-berg-minnie-mouse.png
Description: peter van den berg opens up minnie mouse")
![[Thumbnail for minnie-mouse-rocket-mass-heater-innards.png]](/t/62190/a/55359/minnie-mouse-rocket-mass-heater-innards.png "Filename: minnie-mouse-rocket-mass-heater-innards.png
Description: peter explains how the minnie mouse rocket mass heater works") 3
3

 2
2
Anne Christgau wrote:It's installed in my hut. J tube at present with no brick lining as yet.
1
bob day wrote:These are some comments from http://batchrocket.eu/en/building#bellsizing as you know, a batch monster is different from a j channel, so you may need to rethink any changes
The correct sizing of the bell was hard won by experimentation, and like all open source projects contributions came from many different people. Klemen Urbanija from Radomlje, Slovenia found out after a lot of tinkering that a 15 cm (6") system with a single bell with an internal surface area of 6 m² (64.6 sq ft), excluding the floor, gave an exhaust temperature 60 ºCelsius (140 ºFahrenheit). He built his experiment outside the house and changed it several times until the results were satisfying, then he tore it down and moved it inside the house. A new round of problems emerged due to the chimney stack being made of bricks, which extracted heat from the exhaust thereby killing the draw. This needed more tinkering and rebuilding of the bell in order to raise the exhaust temperature and restore the draw. The final result was a figure of 5.3 m² (57 sq ft) of 'heat absorption area'. This is important to grasp, and once grasped it can be seen that the floor area of the bell will not be part of the 'heat absorption area' as the flue exits above it. Equally, if the firebox is built into the bell then the surface area of the firebox within the bell won't play a role in calculating this area as no heat is absorbed there.
The term we use for the total area available for heat absorption within the bell is ISA, short for Internal Surface Area. As noted, this does not include the floor area as that floor does not (directly) absorb heat. The difference between a steel bell which is shedding its heat immediately and one that is storing heat in a mass of stone or brick is marginal in terms of ISA. My workshop heater (see article Three barrel batch rocket) is built out of three oil barrels which together are very close to the same ISA as Klemen's masonry bell and bench. Both systems have a comparable exhaust temperature.
Scaling up of these numbers posed a long-standing problem which was finally solved in 2015. It turned out that the same critical dimension used to scale the size of fireboxes up or down, the cross sectional area of the heat riser, can also be used to scale the bell ISA up and down from the base result determined by Klemen. 2015 was the year that the bell with two cul-de-sac benches was built during the MHA meeting (see article Bell with dead-end benches). The maximum ISA of that 20 cm (8") system and a masonry bell without chimney bypass turned out to be 9.4 m² (101 sq ft). The ratio of Klemen's heat riser CSA to the MHA riser CSA was 1 : 1.77, and the same ratio of 1 : 1.77 appeared in both ISAs. We had found it!
As a consequence we can use the following 'table', and simply extrapolate or interpolate as required. As far as we know, this method works within reasonable limits in both directions.
Riser diameter / Internal Surface area
12.5 cm (5") ISA 3.7 m² (39.8 sq ft)
15.0 cm (6") ISA 5.3 m² (57 sq ft)
17.5 cm (7") ISA 7.2 m² (77.5 sq ft)
20.0 cm (8") ISA 9.4 m² (101 sq ft)
22.5 cm (9") ISA 11.4 m² (123 sq ft)
25.0 cm (10") ISA 14.7 m² (158 sq ft)
1
4
Sander Krijnen wrote:How about creating some kind of a spiral with the exaust pipe and adding more mass on top of the barrel for more heat efficiency?
1
paul wheaton wrote:
Sander Krijnen wrote:How about creating some kind of a spiral with the exaust pipe and adding more mass on top of the barrel for more heat efficiency?
Adding mass to the top seems like a really good idea to me.
5
1
![[Thumbnail for blowholemass-side.png]](/t/62190/a/163463/blowholemass-side.png "Filename: blowholemass-side.png
Description:")
![[Thumbnail for blowholemass-front.png]](/t/62190/a/163464/blowholemass-front.png "Filename: blowholemass-front.png
Description:") 2
3
2
3
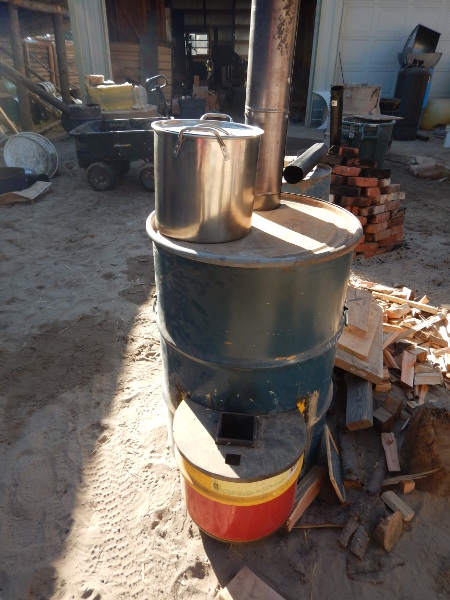
51° start @7:30
62° @ 8:45, 549° cherry, 200° lower exhaust, 120° top of exhaust, 180° front of barrel, 155° on sides of barrel
72° @9:30, 575° cherry, 255° lower exhaust, 142° upper exhaust, 203° front of barrel, 160° sides of barrel
80° @10:15 after corking, 625° cherry, 285° lower exhaust, 140° upper exhaust, 190° sides of barrel, 220° center of barrel
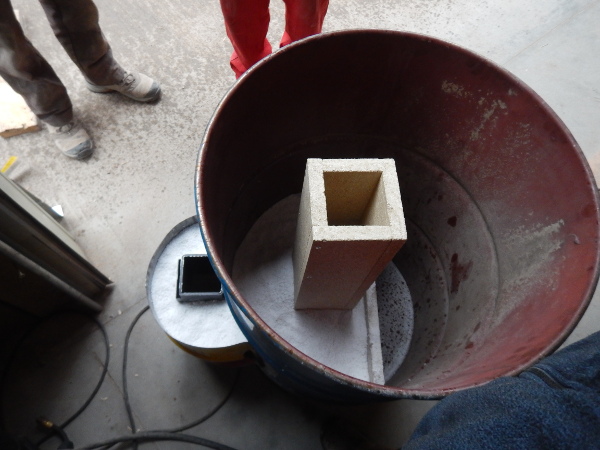
Photos included to show the points at which I measured
![[Thumbnail for minnie-mouse-rocket-mass-heater-cherry.jpg]](/t/62190/a/163517/minnie-mouse-rocket-mass-heater-cherry.jpg "Filename: minnie-mouse-rocket-mass-heater-cherry.jpg
Description:")
![[Thumbnail for minnie-mouse-rocket-mass-heater-front.jpg]](/t/62190/a/163518/minnie-mouse-rocket-mass-heater-front.jpg "Filename: minnie-mouse-rocket-mass-heater-front.jpg
Description:")
![[Thumbnail for minnie-mouse-rocket-mass-heater-side.jpg]](/t/62190/a/163519/minnie-mouse-rocket-mass-heater-side.jpg "Filename: minnie-mouse-rocket-mass-heater-side.jpg
Description:")
![[Thumbnail for minnie-mouse-rocket-mass-heater-side-2.jpg]](/t/62190/a/163520/minnie-mouse-rocket-mass-heater-side-2.jpg "Filename: minnie-mouse-rocket-mass-heater-side-2.jpg
Description:")
![[Thumbnail for minnie-mouse-rocket-mass-heater-exhaust-bottom.jpg]](/t/62190/a/163521/minnie-mouse-rocket-mass-heater-exhaust-bottom.jpg "Filename: minnie-mouse-rocket-mass-heater-exhaust-bottom.jpg
Description:")
![[Thumbnail for minnie-mouse-rocket-mass-heater-exhaust-top.jpg]](/t/62190/a/163522/minnie-mouse-rocket-mass-heater-exhaust-top.jpg "Filename: minnie-mouse-rocket-mass-heater-exhaust-top.jpg
Description:") 1
2
2
1
2
2
 So, any help is welcome, I just want to make my girlfriend not freeze
1
So, any help is welcome, I just want to make my girlfriend not freeze
1
![[Thumbnail for photo_2023-02-27_20-15-16.jpg]](/t/62190/a/203933/photo_2023-02-27_20-15-16.jpg "Filename: photo_2023-02-27_20-15-16.jpg
Description: \"Sač\" (eng.\"such\") is a traditional open fire oven from my region.")
![[Thumbnail for photo_2023-02-27_20-15-13.jpg]](/t/62190/a/203934/photo_2023-02-27_20-15-13.jpg "Filename: photo_2023-02-27_20-15-13.jpg
Description:")
![[Thumbnail for photo_2023-02-27_20-15-12.jpg]](/t/62190/a/203935/photo_2023-02-27_20-15-12.jpg "Filename: photo_2023-02-27_20-15-12.jpg
Description:")
![[Thumbnail for photo_2023-02-27_20-15-10.jpg]](/t/62190/a/203936/photo_2023-02-27_20-15-10.jpg "Filename: photo_2023-02-27_20-15-10.jpg
Description:")
![[Thumbnail for DIMENSIONS-DAMA.jpg]](/t/62190/a/203939/DIMENSIONS-DAMA.jpg "Filename: DIMENSIONS-DAMA.jpg
Description:")
 3
3
![[Thumbnail for photo_25-28-02-2023_17-56-48.jpg]](/t/62190/a/204334/photo_25-28-02-2023_17-56-48.jpg "Filename: photo_25-28-02-2023_17-56-48.jpg
Description:")
![[Thumbnail for photo_28-28-02-2023_17-56-48_thumb.jpg]](/t/62190/a/204335/photo_28-28-02-2023_17-56-48_thumb.jpg "Filename: photo_28-28-02-2023_17-56-48_thumb.jpg
Description:")
![[Thumbnail for photo_31-03-03-2023_17-25-47_thumb.jpg]](/t/62190/a/204336/photo_31-03-03-2023_17-25-47_thumb.jpg "Filename: photo_31-03-03-2023_17-25-47_thumb.jpg
Description:")
![[Thumbnail for photo_32-03-03-2023_17-25-47.jpg]](/t/62190/a/204337/photo_32-03-03-2023_17-25-47.jpg "Filename: photo_32-03-03-2023_17-25-47.jpg
Description:")
![[Thumbnail for photo_35-03-03-2023_19-08-04.jpg]](/t/62190/a/204338/photo_35-03-03-2023_19-08-04.jpg "Filename: photo_35-03-03-2023_19-08-04.jpg
Description:")
Cedric

|
The two armies met. But instead of battle, they decided to eat some pie and contemplate this tiny ad:
new feature: easy peasy thread boost stuff
https://permies.com/t/377515/feature-easy-peasy-thread-boost
|


![[Download DAMA-TA-ROCKET-STOVE-skp15.skp]](https://permies.com/templates/default/betaview/images/download-attachment.gif)


