• Post Reply Bookmark Topic Watch Topic
  • New Topic
permaculture forums growies critters building homesteading energy monies kitchen purity ungarbage community wilderness fiber arts art permaculture artisans regional education skip experiences global resources cider press projects digital market permies.com pie forums private forums all forums
this forum made possible by our volunteer staff, including ...
master stewards:
  • Nancy Reading
  • Carla Burke
  • r ranson
  • John F Dean
  • paul wheaton
  • Pearl Sutton
stewards:
  • Jay Angler
  • Liv Smith
  • Leigh Tate
master gardeners:
  • Christopher Weeks
  • Timothy Norton
gardeners:
  • thomas rubino
  • Jeremy VanGelder
  • Maieshe Ljin

Maple Syrup Stove (or Evaporator) Help

 
Posts: 20
Location: Ontario, Canada
1
forest garden fungi chicken
  • Mark post as helpful
  • send pies
    Number of slices to send:
    Optional 'thank-you' note:
  • Quote
  • Report post to moderator
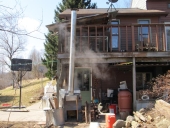
Currently I am about to start my 3rd week of making maple syrup and for anyone who has done this before you know what I am talking about when I say the one thing I think about every time is, how can I make this go faster!  My current evaporating technique is cheap and rough.  The stove is made of loose cinderblocks and I can quickly replace any cracked blocks each year.  I then have 3, 2' by 1' stainless steel restaurant pans that I found on kijiji for a total of $50.  2 are 8" deep and 1 is 4" deep and is used as a warming pan.  I have a lid for the warming pan as well to help it get up to boiling faster.

 I hate to buy anything new and definitely prefer to repurpose if possible so what I am looking for are ideas to speed this up while also being as frugal as possible.  If you have pics as well of your operation that would help give everyone ideas.  With my setup I can boil about 300 l (75 gal) in 22 hrs, 5 hrs of that is inside on the stove finishing off.   I am in my 4th year of doing this and really want to do this faster and more efficiently.  I am going to pick up a 50 gal hot water tank tonight and I am thinking of cutting it in half and using it as one large pan but I don't know yet if that will work.  

If anyone has any ideas I would love to here what you think.  I've tried to include some pictures so you can better understand what I mean.  
sap-stove-2.jpg
[Thumbnail for sap-stove-2.jpg]
sap-stove-1.jpg
[Thumbnail for sap-stove-1.jpg]
 
steward
Posts: 15505
Location: Northern WI (zone 4)
4846
7
hunting trees books food preservation solar woodworking
  • Mark post as helpful
  • send pies
    Number of slices to send:
    Optional 'thank-you' note:
  • Quote
  • Report post to moderator
I hear your pain.  Getting the boil rate up so that you can get to sleep before 11pm is a worthy goal.

Are you good at soldering and metal work?  If so, copper drop tubes can just about double your boil rate on those buffet steam pans.  

I'd take the lid off the preheat pan so that it can steam off a bit.  Or leave it ajar to see if steam comes out.  Even if it isn't boiling I'm guessing it would lose some water as it simmers.

I think I get better boil rates when I run the pans shallower (1-2").

The boil looks pretty fierce so you're probably burning hot enough.  I like the hottest fire I can get and I usually am reloading wood every 5-8 minutes.

Another option is to build a preheater.  Folks wrap soft copper pipe around metal chimneys but they often flash to steam and vapor lock.  For my block arch set-up I soldered up a hard copper trombone shape that I snuck in between two blocks into the smoke of the fire (right below the last pan by the chimney).  I gravity fed sap down into the pipe loop through the fire and back up into the pan.  With a little needle valve at the end I could control the amount of sap flow into the pan and slide the trombone further into or out of the fire to keep the sap from boiling in the tube.  I was able to get the sap into the 150F degree range that way without using one of the pans as a preheater.

Another easy way to up your rate is to extend your arch and add a couple more pans.  

My system for 5 pans is to put the sap in the pan by the chimney and then ladle it forward towards the fire.  That way the pan over the fire (which boils the least hard) is the one that is nearly syrup.  Each pan in between is an increasing concentration.  Once the syrup pan is all the way to syrup stage, you can pull it off the fire and pour most of it into your filter and return it to the fire.  Leave some in the pan so that the pan doesn't burn.  Then you quickly ladle forward sap to replenish the front pan.  By doing it this way:
- You can draw off a quart or two of finished syrup periodically
- The syrup can be fairly precisely cooked down to finished density on the fire and avoid the 5 hours inside on the stove
 
Stew Haggerty
Posts: 20
Location: Ontario, Canada
1
forest garden fungi chicken
  • Mark post as helpful
  • send pies
    Number of slices to send:
    Optional 'thank-you' note:
  • Quote
  • Report post to moderator

If so, copper drop tubes can just about double your boil rate on those buffet steam pans.  


Thanks for your feedback Mike.  I've never heard of drop tubes before, what exactly are they?  I enjoy plumbing and have lots of copper pipe that I have salvaged over the years so I have the materials, I'm just lacking the knowledge.
Also I've thought of adding more pans but I'm worried that as the length of the stove or burn chamber grows that I may lose the draft or just not be able to get fresh wood down to the far end of the burn chamber.  I find that as it gets later in the day the coals build up and it is harder to get a hard boil as all of the coals end up choking the fire.  When I've tried to take coals out I get a lot of ash blowing around and in the pans which is never a good thing either.  How far is your fire from the bottom of your pans?  
 
Mike Haasl
steward
Posts: 15505
Location: Northern WI (zone 4)
4846
7
hunting trees books food preservation solar woodworking
  • Mark post as helpful
  • send pies
    Number of slices to send:
    Optional 'thank-you' note:
  • Quote
  • Report post to moderator
I'm not sure if this link will work but here's a google search for drop tube photos.  Google image

Basically you punch out some holes in your pan that are big enough for a 3/4" copper pipe to fit inside of.  Then you cut a bunch of 6" pieces of pipe (thin wall is fine), flare one end and drop the tubes down into the pan so they hang by their flanges.  I made a custom flaring jig so I could do a 90 degree flange, some folks I think do a "standard flare" but I don't have any experience with that.  You solder the tube to the pan and then solder caps on the tubes.

That all sounds easy but it's a real pain to do right.  Soldering to stainless requires an acid flux.  It works best when you tin the copper, tin the stainless and then melt them together.  The solder doesn't melt in the fire because the sap is keeping it a chilly 212 degrees.  Fair warning, you MUST keep sap above the solder in the pan when there's heat under the pan or you'll melt the solder and have instant leaks and other aggravations.

The tubes, being copper, transfer heat much better than stainless and really boil hard.  They will shoot sap 3' into the air.  That creates a mess and a bit of a burn hazard for bystanders so I made baffles to knock down the drops.  

I like Mapletrader.com and sugarbush.info for maple syrup forums.  There are plenty of threads on there that you can pick through to find more details of how to make "drop tube pans".  Or I can answer more questions but I wanted to give you more options.

As for adding pans, go for it.  I had 4 pans last year with a 4 or 5 block chimney and it drafted just fine.  My previous rig was 5 pans with an 8 foot chimney.  Traditionally you want the chimney to be twice as long as your pan arrangement but it has worked with less for me.

Don't worry about getting firewood to the back.  Professional arches only have the fire in the front 2-3'.  The smoke and burning gasses run along under the remaining pans on their way to the chimney.  Even with the fire in the front and basically a horizontal chimney under the back pans, those back pans boil the hardest.  

Most arches (that's what the cooker unit under the pan is called) have a fire box area and then the bottom ramps up much closer to the pans to force the heat up against the bottom of the pans.  Arch without pan I didn't bother with that on my last set-up and it worked fine.  Putting sand and rubble in there to create that ramp for your arrangement would work fine.

I put wood in until it almost hits the pan.  Fill 'er up.  Fire licking the pan is a good thing.

Putting a fire grate in there to hold the wood above the ashes really helps.  I used to use rebar but it burns up after a few days.  My current grate is welded angle iron so hopefully it lasts a few years.  Getting air in underneath really helps.

Good luck!
 
Stew Haggerty
Posts: 20
Location: Ontario, Canada
1
forest garden fungi chicken
  • Mark post as helpful
  • send pies
    Number of slices to send:
    Optional 'thank-you' note:
  • Quote
  • Report post to moderator
Thanks again for the advice.  Looking at the drop tubes I don't think they will work for me they way my stove is right now but I love the idea.  I'm thinking that I need to probably go 3 blocks high and build the horizontal chimney like you said or maybe do a total rebuild.  Right now I am only 2 blocks high and there is not enough room for drop tubes.  I checked out mapletraders for some pics and I see what you mean about the fire only having to be in the front.  I was thinking I needed to change my pans but I think the biggest change I have to make is to the stove itself.  If I can add 2 pans, put in a chimney and rebuild my stove to be more efficient that should save me some time.  I figure Sunday will probably be my last run for this year as we were hit really early so I'm going to be on the lookout for some possible stove shells.  
By the way, you keep using the word arch, I am thinking that that means stove or the fire part of the evaporator, is that correct?
 
Mike Haasl
steward
Posts: 15505
Location: Northern WI (zone 4)
4846
7
hunting trees books food preservation solar woodworking
  • Mark post as helpful
  • send pies
    Number of slices to send:
    Optional 'thank-you' note:
  • Quote
  • Report post to moderator
Yup, "arch" is the cooker unit that the pan(s) sit on.  It's everything from the door to the chimney.  They can be cinder blocks like yours and mine or fancy schmancy sheet metal ones.  
 
Posts: 36
1
  • Mark post as helpful
  • send pies
    Number of slices to send:
    Optional 'thank-you' note:
  • Quote
  • Report post to moderator
Sugar is a natural antifreeze. Put the bucket in the freezer over night. Throw out the ice the next day. Repeat.
 
Posts: 318
9
  • Mark post as helpful
  • send pies
    Number of slices to send:
    Optional 'thank-you' note:
  • Quote
  • Report post to moderator
Insulating your arch would save fuel, but for speed you either need to increase pan area or increase burn temps. Without a lot of work or money pan size area is the way to go, longer arch, more pans and only have the fire at the front with a limited amount of depth below the back pans so the smoke/heat has to rise and contact the pan surface instead of sneaking by to the chimney. I would avoid a water heater for boiling for toxicity sake. Saving time however can mean just not being there when it is boiling. On my setup I use deep pans and a large firebox. I am rarely near my boil more than 15 minutes per loading. I fill my pans, fill my firebox and leave to repeat either hours later or the next day. This does not give me a good gallons per hour boiling rate overall but my rate for boiling per hour I am there is decent.  My ideal is at least two fires per day, the first heats everything up and removes some liquid, the second while everything is hot removes much more in the pans overall. My rig is remote to my house so this works best if I am doing some other chores nearby like cutting firewood. Fire, cut wood for a couple of hours, repeat. On a day where I can fire four times I boil off quite a bit and only spend about an hour doing it. My pans are homemade stainless steel, about 8 inches deep and the stove has a firebox that will hold a small wheelbarrow of wood.
 
Posts: 38
1
  • Mark post as helpful
  • send pies
    Number of slices to send:
    Optional 'thank-you' note:
  • Quote
  • Report post to moderator
If you want it cheap, then Bettina's method is the one to use.  However, if you are a little more adventurous then consider doing what the North Easterner's do: put your sap through a reverse osmosis filter except that instead of keeping the water that goes through the filter as you would to get filtered water, you keep the concentrated sap that does not go through the osmosis filter.  This will not get rid of all the water, but it can take out 2/3 of the water you want to get rid of, substantially reducing your boiling efforts.
 
pollinator
Posts: 258
Location: ALASKA
39
  • Mark post as helpful
  • send pies
    Number of slices to send:
    Optional 'thank-you' note:
  • Quote
  • Report post to moderator
I will add that if you want to increase your production you really should look into getting a typical "commercial style" pan.  Small(er) ones are made specifically for home use.  I'd also agree that you probably need a baffle of sorts to get/keep the heat from your fire up closer to the bottoms your pans further back on your arch.
 
Stew Haggerty
Posts: 20
Location: Ontario, Canada
1
forest garden fungi chicken
  • Mark post as helpful
  • send pies
    Number of slices to send:
    Optional 'thank-you' note:
  • Quote
  • Report post to moderator
Sorry I didn't reply sooner but I was out boiling yesterday.  Thankfully it was a small batch so I wasn't out all day.

Sugar is a natural antifreeze. Put the bucket in the freezer over night. Throw out the ice the next day. Repeat.


This is actually the reason I was done so early was that we had a cold snap and there was an inch of ice on all the sides of my pail so I was able to get rid of a lot of the boiling.  Normally, I'm able to get rid of a lot of the water due to ice but this year it has been really warm.  I do have a freezer available though and I may as well use it.  

I would avoid a water heater for boiling for toxicity sake.


I'm not sure what the inside of a water heater is made of exactly.  I think it is lined with a ceramic coating which may be a problem  for cleaning but because it is household water I don't think I have to worry about toxicity.  I think my biggest worries will be surface area, mounting it and making sure it doesn't scorch.  

a reverse osmosis filter


I love this idea, I never thought of this.  Now, being as frugal as I am, surely there's a way I can build my own.  It may not be able to get as much water out, but there has to be a way to do this without paying the big bucks.  I think this will make a good project for next year.  

you really should look into getting a typical "commercial style" pan.


I have been looking around at different forums for ideas but I really hate to buy something I may be able to build.  I'm not much of a welder but I saw sheets of stainless at the scrapyard so I was thinking of trying my hand at making my own.  However, first I need to do some research to see how I would go about doing it.

Thanks everyone for your ideas.  If you have pictures of your setup I would love to see them for inspiration.
 
Posts: 79
7
  • Mark post as helpful
  • send pies
    Number of slices to send:
    Optional 'thank-you' note:
  • Quote
  • Report post to moderator
I wanted to share a recent sugar making experience I had in the tropics.

I toured a permaculture farm in Bali whose main income stream was coconut sugar production. They used simple cob rocket stoves and a big wok. They skimmed it, simmered it down to glue like substance, let it dry into cakes, then ground it. Of course they have the advantage of only needing a 6:1 reduction rate.

Really neat, simple, efficient. Cool stuff.
20170511_091401.jpg
[Thumbnail for 20170511_091401.jpg]
20170511_091423.jpg
[Thumbnail for 20170511_091423.jpg]
20170511_091427.jpg
[Thumbnail for 20170511_091427.jpg]
20170511_093459.jpg
[Thumbnail for 20170511_093459.jpg]
20170511_093122.jpg
[Thumbnail for 20170511_093122.jpg]
 
Walt Chase
pollinator
Posts: 258
Location: ALASKA
39
  • Mark post as helpful
  • send pies
    Number of slices to send:
    Optional 'thank-you' note:
  • Quote
  • Report post to moderator
That is really cool!!  Thanks for posting those pics.  It is interesting to see how other cultures do things.
 
You have to be odd to be #1 - Seuss. An odd little ad:
Switching from electric heat to a rocket mass heater reduces your carbon footprint as much as parking 7 cars
http://woodheat.net
reply
    Bookmark Topic Watch Topic
  • New Topic