• Post Reply Bookmark Topic Watch Topic
  • New Topic
permaculture forums growies critters building homesteading energy monies kitchen purity ungarbage community wilderness fiber arts art permaculture artisans regional education skip experiences global resources cider press projects digital market permies.com pie forums private forums all forums
this forum made possible by our volunteer staff, including ...
master stewards:
  • Nancy Reading
  • Carla Burke
  • r ranson
  • John F Dean
  • paul wheaton
  • Pearl Sutton
stewards:
  • Jay Angler
  • Liv Smith
  • Leigh Tate
master gardeners:
  • Christopher Weeks
  • Timothy Norton
gardeners:
  • thomas rubino
  • Jeremy VanGelder
  • Maieshe Ljin

Masonry heater build in tiny house

 
steward
Posts: 1897
Location: Coastal Salish Sea area, British Columbia
1057
2
books chicken food preservation pig bike solar wood heat rocket stoves homestead ungarbage
  • Likes 1
  • Mark post as helpful
  • send pies
    Number of slices to send:
    Optional 'thank-you' note:
  • Quote
  • Report post to moderator

thomas rubino wrote:Hi Jordan;
Your stove is looking very nice!
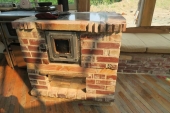
I just love the old brick, it has such character.

I have found that when using new fire bricks , no mortar at all works very well.

I remember working on my shop batchbox during the winter...
A propane heater helped and then about 3-4 hrs was all my hands wanted to do.


thanks thomas!

yea i am enjoying the project immensely.

Maybe 3% of the bricks were new. the rest are all used. Some of the full sized firebricks were from a recent RMH build which was put in the wrong spot of a house(basement).

The majority of the red bricks are Baker, some are Dominion, and some are Clayburn.
My favourite to put on the wall is the Clayburn and the Dominion. They are flat on both sides and are accurate ( dimension wise)

A lot of the Baker bricks are inaccurate.


I need to get the door on my tiny house first before i can even attempt to heat the space ! Sounds like it is going to happen this weekend.


Does anyone have any suggestions for cleaning the bricks? What i mean is after i finish mortaring them? I was thinking a spray bottle with some water to wet the mortar and than a spoon or something rounded to sculpt the joints. I know when they striking the joints with concrete they do it before they finish for the day.

John C Daley wrote:

Its an interesting job


thanks! When are we going to see your build?
 
Posts: 158
86
  • Mark post as helpful
  • send pies
    Number of slices to send:
    Optional 'thank-you' note:
  • Quote
  • Report post to moderator
VERY nice!
I have a couple of questions.
1) I see you are using a layer of cardboard between the firebrick and standard brick. Is this an expansion joint? Do they move so differently as to need that?
2) Is anyone doing these with cob? If not, why not? Is it a similar problem of thermal expansivity, or weaker wear?
 
pollinator
Posts: 293
Location: US, East Tennessee
34
  • Likes 4
  • Mark post as helpful
  • send pies
    Number of slices to send:
    Optional 'thank-you' note:
  • Quote
  • Report post to moderator
Nice build you have going there Jordan. Yeah, for cleaning mortared in place bricks of excess mortar, a spray bottle of water and a small brush, even an old toothbrush works well.

Re. April's question about the sheets of cardboard, yes, it's used to prevent mortar from falling into the air-gap and bridging between the core brick and outer brick "skin". Such mortar bridges, while the stove is coming up to temperature, would transfer unwanted force between the hot and expanding core to the much cooler outer brick body, resulting in cracks and fractures, and possible combustion gas leakage in certain situations.
 
Posts: 54
Location: Northern Ca
23
4
duck forest garden bike bee rocket stoves greening the desert
  • Likes 2
  • Mark post as helpful
  • send pies
    Number of slices to send:
    Optional 'thank-you' note:
  • Quote
  • Report post to moderator
Looking great Jordan! Any more progress on the stove? How abrasive are the Insulated fire bricks you are using compared to Ceramic fiber board? Do you think they will hold up well in the firebox?
 
jordan barton
steward
Posts: 1897
Location: Coastal Salish Sea area, British Columbia
1057
2
books chicken food preservation pig bike solar wood heat rocket stoves homestead ungarbage
  • Likes 6
  • Mark post as helpful
  • send pies
    Number of slices to send:
    Optional 'thank-you' note:
  • Quote
  • Report post to moderator
well after enjoying a break from doing things.(please come back snow! ;) ) i spent the last few days working on the stove. Finished putting bricks on it and capped the top. Cut the ceramic glass, started a fire without a proper door installed. Top of the cooktop got above what my temp gun can read!


Water was spewing out of the chimney. Closed up the windows and put a wool blanket over the door(still don't have the door installed}. Managed to get it to 75* F. Took my sweater off and was enjoying myself.
IMG_1348.JPG
Where i left off
Where i left off
IMG_1349.JPG
What the mortar looked like.
IMG_1351.JPG
Last row of bricks
Last row of bricks
IMG_1352.JPG
hardware cloth. Thanks Thomas!
IMG_1353.JPG
Super wool blanket cover
IMG_1356.JPG
Hardware cloth, superwool, 3/8 cement board, loose bricks
IMG_1357.JPG
Put super wool around the perimeter of the stove top
IMG_1358.JPG
Ceramic glass in its case
IMG_1360.JPG
after about 30 minutes of baking soda and TLC
IMG_1361.JPG
How i managed to cut the ceramic glass. I think i needs to be supported the whole way. I only supported it partly
IMG_1362.JPG
This didn't really work to get the flue going. Maybe if i waited longer. Everything was really wet....
IMG_1363.JPG
Sucess!
Sucess!
IMG_1365.JPG
Cheers!
Cheers!
IMG_1367.JPG
[Thumbnail for IMG_1367.JPG]
IMG_1371.JPG
The glow. Can't wait to see this more often.
 
jordan barton
steward
Posts: 1897
Location: Coastal Salish Sea area, British Columbia
1057
2
books chicken food preservation pig bike solar wood heat rocket stoves homestead ungarbage
  • Likes 4
  • Mark post as helpful
  • send pies
    Number of slices to send:
    Optional 'thank-you' note:
  • Quote
  • Report post to moderator
so the stove seems to be running ok. There is still smokeback upon start up. and if i leave the door open to long while reloading it will smoke back. Lots of pulsating and flame spitting out the primary air.


Today!!! i Figured out an error

I went with the window delete version. I ended up making the back wall all the same. Which gives me a channel about 1.5" x 9" Whereas when i look at this post on the proboards it say the minimun shall be 2.5"
https://donkey32.proboards.com/post/23678/thread

That gap where my secondary monitoring window goes is crucial. It must not be pinched there, so I set those two bricks back. I've been suggesting to other builders to go no less than 2.5" at the narrowest points. In the first corner that should be corner to corner, like I show measured in the slideshow. I'm not sure what that is in mm, and I don't know what the true minimum is, but it starts to get finicky as that gap narrows.


than matt goes onto say

The window-delete version is a bit awkward due to that set back. A builder could remedy that if desired by slightly enlarging the firebox, or shortening the center wall, or using splits in the set back location, depending on what was behind it.


so i now think i have found my restriction!

2.5 x9 is 22.5
1.5x9 is 13.5!

Here is one example of what i could have done
 
jordan barton
steward
Posts: 1897
Location: Coastal Salish Sea area, British Columbia
1057
2
books chicken food preservation pig bike solar wood heat rocket stoves homestead ungarbage
  • Likes 4
  • Mark post as helpful
  • send pies
    Number of slices to send:
    Optional 'thank-you' note:
  • Quote
  • Report post to moderator
So i thought about it for a long time and came up with replacing the last brick in the center. I cut it out with a reciprocal saw blade. I ended up slipping a 1 1/4" split into the space. Now i have around 2 1/2"+ for the gasses to travel through.

The stove performed much better! I still have a poorly sealed door. However i did not receive any smoke back when i reloaded the stove. Which with the old gap of 1.5" I would get smoke back.

IMG_1452.JPG
Used reciprocal blades
IMG_1453.JPG
Slowly worked the blade into the gap between the bricks
IMG_1454.JPG
lots of slow back and forth with the blade
IMG_1455.JPG
Slowly edged the brick out. turns out i broke part of it when i way prying
IMG_1456.JPG
From me prying the brick to get it out.
IMG_1457.JPG
Brick split replacement.
IMG_1458.JPG
I basically put it in loose and placed some ash below it. Works great!
 
Joel Salatin has signs on his property that say "Trespassers will be Impressed!" Impressive tiny ad:
Rocket mass heaters in greenhouses can be tricky - these plans make them easy: Wet Tolerant Rocket Mass Heater in a Greenhouse Plans
reply
    Bookmark Topic Watch Topic
  • New Topic