• Post Reply Bookmark Topic Watch Topic
  • New Topic
permaculture forums growies critters building homesteading energy monies kitchen purity ungarbage community wilderness fiber arts art permaculture artisans regional education skip experiences global resources cider press projects digital market permies.com pie forums private forums all forums
this forum made possible by our volunteer staff, including ...
master stewards:
  • Nancy Reading
  • Carla Burke
  • r ranson
  • John F Dean
  • paul wheaton
  • Pearl Sutton
stewards:
  • Jay Angler
  • Liv Smith
  • Leigh Tate
master gardeners:
  • Christopher Weeks
  • Timothy Norton
gardeners:
  • thomas rubino
  • Jeremy VanGelder
  • Maieshe Ljin

first flush rainwater collection system that looked good on paper

 
pollinator
Posts: 239
Location: Le Marche, Central Italy
27
  • Likes 1
  • Mark post as helpful
  • send pies
    Number of slices to send:
    Optional 'thank-you' note:
  • Quote
  • Report post to moderator
Hello permies !

A year ago I installed my roof water collection & storage system.  

Storage consists of a 7.5 cubic metre underground flat tank by German manufacturer Graf.

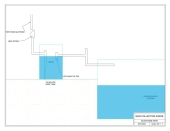
The rest of the system is my own design.  See the first drawing below, which at the time I passed on to my team of plumbers who then implemented it... based on their interpretation of the design.

My knowledge of valves was superficial, so I left it to them to sort out the specifics. But as always, the devil is in the details.

The result is illustrated in the second drawing.

Luckily, the tank is provided with a fine, easily washable filter, which keeps out a great deal of gross debris and even some of the finer particles.  But the finest dust (which should have been cleared away in the first flush) still ends up on the bottom of my tank...

What would you do in my place to remedy the problem?

I'll be grateful for any ideas !
Slide1.jpg
[Thumbnail for Slide1.jpg]
my sketch of the system
Slide1.jpg
[Thumbnail for Slide1.jpg]
sketch of the problem
 
Rocket Scientist
Posts: 4526
Location: Upstate NY, zone 5
574
5
  • Likes 1
  • Mark post as helpful
  • send pies
    Number of slices to send:
    Optional 'thank-you' note:
  • Quote
  • Report post to moderator
It sounds like you operate your valves manually? I thought first flush systems had some sort of automatic setup so the first X gallons go to flush, then the rest goes to storage. If you are always home to do the switching, I suppose it can work.

Without experience in first flush diverters, I would think to have something where the flush branch goes down a tiny bit and the storage branch goes up, just enough to positively send debris to the flush branch. Then they would both slope to their destinations. I would think the flush branch would want to be normally open, so an unexpected rain wouldn't send dirty water to storage. If that is the case, and the branches are oriented as I described, you would probably not need a valve on the storage branch. With a slightly leaky valve on the flush branch, any trapped water would drain away eventually so as not to have standing water. You would really want some sort of control on the valve that would automatically open it when water stops flowing, rather than have to remember to switch it after every rain.
 
Levente Andras
pollinator
Posts: 239
Location: Le Marche, Central Italy
27
  • Mark post as helpful
  • send pies
    Number of slices to send:
    Optional 'thank-you' note:
  • Quote
  • Report post to moderator

Glenn Herbert wrote:It sounds like you operate your valves manually? I thought first flush systems had some sort of automatic setup so the first X gallons go to flush, then the rest goes to storage. If you are always home to do the switching, I suppose it can work.


Yes, the switch is manual, which may seem inconvenient but it's not. As you say below, the flush branch is normally open, I only switch after a day or so of rain, if the tank is not already full.  

Glenn Herbert wrote:Without experience in first flush diverters, I would think to have something where the flush branch goes down a tiny bit and the storage branch goes up, just enough to positively send debris to the flush branch. Then they would both slope to their destinations. I would think the flush branch would want to be normally open, so an unexpected rain wouldn't send dirty water to storage. If that is the case, and the branches are oriented as I described, you would probably not need a valve on the storage branch. With a slightly leaky valve on the flush branch, any trapped water would drain away eventually so as not to have standing water.


This sounds like a well thought-out plan, thanks for the suggestion!  Though I can foresee that getting myself - and the plumbers - to go back and re-do those segments of the flush and the storage branches, with the digging and mess that involves, will be a bit of a pain - now that we've already partly landscaped the front yard.  

Glenn Herbert wrote:You would really want some sort of control on the valve that would automatically open it when water stops flowing, rather than have to remember to switch it after every rain.


I'm not enthusiastic about automation, and not being very knowledgeable about valves, this idea is something I don't immediately connect with - but I'll give it some thought.

Thanks again for your ideas, Glenn !
 
Posts: 14
Location: Indianapolis, IN
2
hugelkultur urban woodworking
  • Likes 2
  • Mark post as helpful
  • send pies
    Number of slices to send:
    Optional 'thank-you' note:
  • Quote
  • Report post to moderator
I hear your concerns about digging up your work, I believe you can fix this topside. The best first flush system I have seen runs parallel to the down spouts, a slight disadvantage in your case because of the multiple down spouts. Here is an image I found on line, baby crying... Let me know if you have questions
FirstFlush.gif
[Thumbnail for FirstFlush.gif]
 
Posts: 6
Location: Southern Louisiana
2
  • Mark post as helpful
  • send pies
    Number of slices to send:
    Optional 'thank-you' note:
  • Quote
  • Report post to moderator
We have had our rainwater collection in place for about a year. The system includes four gutter drains and we have first flush systems like the ones in the photo at two of the gutter drains. Not like the French drain diversion. The other gutter drains are not currently being used.
The gutters have coarse screen to catch leaves, but not small stuff. Each first flush has a finer screen to catch most of the smaller stuff. I have to clean the first flush screens A LOT. The rainwater then goes through another screen at the top of each 2,600 gallon rainwater tank. That screen also has to be cleaned very often and then I scrub it with a small stiff bristle brush to keep the pores between the wires that make up the screen free of debris and stuff that seems to stick to the wires. From the tanks the water goes through two finer filters before it gets to the water pump. These filter units have to be cleaned every month or two. After the pump the water goes through two additional ultrafine filters and a UV light system. This all works pretty good, but it is a lot of work. We have a lot of dust and dirt in the air around here.
 
Posts: 13
  • Likes 1
  • Mark post as helpful
  • send pies
    Number of slices to send:
    Optional 'thank-you' note:
  • Quote
  • Report post to moderator
Since you're doing it by hand anyway you could add a set of valves to backflush valve A. Take water from your supply, for instance, and use a set of valves to isolate and inject water between valve A and the storage tank, then open A and B. You're reversing the flow to carry out the debris. You would have to have additional valves to do this when it was actually raining though, and I'm not sure how easy it is for you to add valves to isolate the different parts of your system. You might be able to do it with minimal digging. This is basically what you do to backflush an irrigation pump that gets water from a pond or something where it can pick up crud, or it's one way anyway.

The drawback of the downspout first flush systems is the difficulty in diverting enough water to do the job if you have a sizeable roof. You're lucky to divert 10 gallons or so if you just use one 4" diverter pipe, assuming a one story roof. I've heard you should try to divert 1 mm of rainfall, so I should be diverting 30 gallons or so from my 1200 sq ft. roof. It's better than nothing, though. I think that's right, it's been a while since I figured it out. I considered adding a small storage tank in parallel to the pipe, that could work if it is done right. I guess you could have 4 diverters, seems silly though.

I'm not a expert or anything but the fine dust ending up in the bottom of your tank is probably just tree pollen and crap like that, not horrible. Every tank has biosludge in the bottom eventually and in fact I think it helps keep the water clean. The trick is not to disturb it.
 
Posts: 2
  • Likes 1
  • Mark post as helpful
  • send pies
    Number of slices to send:
    Optional 'thank-you' note:
  • Quote
  • Report post to moderator
So, I have a good bit larger system, as we live on our rainwater, but I use an in ground first flush diverter that comes from Australia that I found online. It is just two caps for a piece of 12" PVC pipe, on one end, there is a tiny drain hole on a piece of PVC that can be removed to let out the debris, on the other end, there is an inlet hole that gets plugged with a ball when the tank is full. When the rain starts, the 12" pipe fills up, then the ball plugs the hole and the rest of the water gets sent to the tank. When the rain stops, the first flush slowly drains out the tiny hole in the other end. The 12" PVC holds 6 gallons per foot, so you can make your first flush tank however big you want it. This works really well, and doesn't require much attention. I am guessing you will never get to where you do not have any fine stuff going into the tank, that is why there are so many tank cleaning businesses all over Australia...
http://www.rainharvest.com/rain-harvesting-pty-first-flush-diverter-for-in-ground-systems.asp
 
pollinator
Posts: 596
Location: Southern Arizona. Zone 8b
79
fish bike bee solar woodworking greening the desert
  • Likes 2
  • Mark post as helpful
  • send pies
    Number of slices to send:
    Optional 'thank-you' note:
  • Quote
  • Report post to moderator
The simplest first flush design I've seen uses a bucket and a length of gutter on a pivot.  The piece of gutter is weighted so that normally it is vertical, there is a bit of string attached to the gutter that goes up over a pulley and down to the bucket.  The counter weight on the gutter is just heavy enough that a full bucket of water will just pull the gutter over to horizontal.
When the gutter is horizontal it connect the roof to the grey water tank, when it's vertical, the water from the roof falls into the bucket.


You can drill a hole in the bucket to make it self emptying, or simply dump it out on a tree/bush/etc after the rain stops.
 
Posts: 17
  • Mark post as helpful
  • send pies
    Number of slices to send:
    Optional 'thank-you' note:
  • Quote
  • Report post to moderator
I suggest the ferrocement.com rainwater chapter as a good place to start any rainwater project

http://ferrocement.com/tankBook/ch14.en.html
 
Posts: 30
5
  • Likes 1
  • Mark post as helpful
  • send pies
    Number of slices to send:
    Optional 'thank-you' note:
  • Quote
  • Report post to moderator
The no moving parts standpipe first flush design is a highly preferred solution. Keep it simple, and then make it simpler.

This is in the Texas Guide to Rainwater Harvesting, pp. 8-9 have relevant text and diagrams:
http://www.twdb.texas.gov/publications/brochures/conservation/doc/RainwaterHarvestingManual_3rdedition.pdf

It's been in the TGRH since the first edition from probably a couple decades back at least, and copied into most books/articles since then with minor modifications (some of them devolutionary, see further below).
I thought everyone in permie-land knew about this reference by now but apparently not. Spread the word. It's free!
Note the information on rainfall intensity needed to actually move material off a roof; also the recommended diversion amount (1-2 gal per 100 sq. ft. roof). The 3rd edition even gives you gal. capacity per length for various standpipe sizes, but do the math anyway, it's good for your neural network health!

This is basically the same as the standpipe diagram posted above. But it's easier structurally if you let the standpipe stand on its own base and have the ground support the weight of the water (especially for large capacity standpipes) rather than hanging in the air. I use a wye cleanout at the bottom and set it on stone or drain gravel. If you hang the standpipe (which is then a hangpipe) on the structure, you have to support the weight of it full of water with brackets and what not - less simple, more work & materials.

You can skip the ball in most cases. Only very light fluffy debris that doesn't wet out quickly or floats when wet will float up and go into tank. If you have a lot of that then the ball may be worth it.
Simplest is to have the ball float up into a reducer fitting on top of standpipe - the TGRH diagram is more complicated than necessary. You don't need anything to keep the ball from going down.

AND, tank cleaning is part of living on catchment. You will not keep everything out and that's OK. It's easier to periodically clean out the collected organic matter (and apply it somewhere nearby to growing things or add to compost) once in a while than to apply every possible device & gadget that still won't keep everything out. Consider that one secondary function of a catchment tank is organic matter collection (as with gutters, and the standpiple of course).

You can do a manual drain (tap to turn or plug to remove) as shown in the TGRH diagram. You can buy a fancy expensive dripper end for the standpipe as shown in the diagram posted above to make it self-draining. You can just drill a bleed hole somewhere above the clean-out debris level to make it self-draining (this may need a poke with a nail once in a while if you let the debris accumulate too long/too deep - or just use a plugged bleed hole as "time to clean" indicator).

Some design mistakes you'll see in poor adaptations of the basic design:
Horizontal runs of "standpipe" ("laypipe" or "liepipe"). Debris accumulates all along the length. A total PITA to clean out. Doesn't self-drain well either - pressure depends on depth, near zero pressure in a horizontal pipe.
No bleed hole or drain mechanism.
No simple & directly accessible cleanout.

The Designer's Manual bucket-with-hole-pivoting-gutter thing is a nice Rube Goldberg type drawing or a fun kids' science fair project or if you really want to make one just to watch it work a few times. Then put in a no moving parts standpipe.

I will attempt to attach a few images of this kind of standpipe installation...


img_0675-350w.jpg
[Thumbnail for img_0675-350w.jpg]
Small standpipe system full view
img_0676-200w.jpg
[Thumbnail for img_0676-200w.jpg]
Small standpipe base & cleanout detail
img_0096.jpg
[Thumbnail for img_0096.jpg]
Larger standpipe system full view
 
pollinator
Posts: 814
Location: Central Virginia USA
78
  • Likes 1
  • Mark post as helpful
  • send pies
    Number of slices to send:
    Optional 'thank-you' note:
  • Quote
  • Report post to moderator
Yes, your underground valve placement is problematic, and if you don't want to put first flush systems on each standpipe, one option might be to change which part of the y configuration handles which destination/supply.

Hopefully those are ball valves and do not obstruct the flow at all when open.  

imagine the top right branch of the y coming downhill from the supply, the straight through water runs to the pond valve all the way at the bottom of the y,  the slightly uphill (at first) part of the top left branch of the y is shorter and goes to the valve for the tank (after which it turns back down to the tank). This flow pattern should create a back water in the tank supply section, and while the first flush water is running to the pond it agitates and removes any debris accumulation. If the slopes and flow patterns are working for you, there might even be a tendency for some heavier debris to naturally settle out of the flow stream into the stagnant branch leading to the pond when the tank supply is open.

The main principles here are lengths of the different pipes from the intersection to valve, slopes and flow pattern at the intersection. Imagine the tank valve doesn't exist, and try and picture a system that would have the natural flow of the water be to the pond  with no water diverting to the tank until the pond valve closes.

Other factors that might influence this would be constrictions/ obstructions in the line, and any joints that might be open to infiltration of sediment


Posts: 44
Location: Porto, Portugal
5
  • Mark post as helpful
  • send pies
    Number of slices to send:
    Optional 'thank-you' note:
  • Quote
  • Report post to moderator
This seems to me a lot of work for nothing. Graf is selling filter for their rain collector  They ae working fine for me since the installation 3 years ago.
http://www.graf-water.com/rainwater-harvesting/filter.html

The germans are very good engineers : just buy the right thing or write them an email for help
Jean Pierre
 
Garrett Connelly
Posts: 17
  • Mark post as helpful
  • send pies
    Number of slices to send:
    Optional 'thank-you' note:
  • Quote
  • Report post to moderator
Rainwater is best stored above ground in sunlight. Sewage, pollution and disease drain away from stored water, plus there are no fittings to leak inward and contaminate.
 
Levente Andras
pollinator
Posts: 239
Location: Le Marche, Central Italy
27
  • Mark post as helpful
  • send pies
    Number of slices to send:
    Optional 'thank-you' note:
  • Quote
  • Report post to moderator

John Schinnerer wrote:The no moving parts standpipe first flush design is a highly preferred solution. Keep it simple, and then make it simpler.

This is in the Texas Guide to Rainwater Harvesting, pp. 8-9 have relevant text and diagrams:
http://www.twdb.texas.gov/publications/brochures/conservation/doc/RainwaterHarvestingManual_3rdedition.pdf

It's been in the TGRH since the first edition from probably a couple decades back at least, and copied into most books/articles since then with minor modifications (some of them devolutionary, see further below).
I thought everyone in permie-land knew about this reference by now but apparently not. Spread the word. It's free!
Note the information on rainfall intensity needed to actually move material off a roof; also the recommended diversion amount (1-2 gal per 100 sq. ft. roof). The 3rd edition even gives you gal. capacity per length for various standpipe sizes, but do the math anyway, it's good for your neural network health!

This is basically the same as the standpipe diagram posted above. But it's easier structurally if you let the standpipe stand on its own base and have the ground support the weight of the water (especially for large capacity standpipes) rather than hanging in the air. I use a wye cleanout at the bottom and set it on stone or drain gravel. If you hang the standpipe (which is then a hangpipe) on the structure, you have to support the weight of it full of water with brackets and what not - less simple, more work & materials.


I downloaded the TGRH ages ago.  Some of the recommendations seemed pertinent to my situation, others not.

My gutters and 4 downpipes are made of sheet metal. Downpipes are fixed to the walls with brackets. That's customary around here - practically no-one uses plastic gutters - that said, it's also true that no-one that I know of is harvesting rain water in any significant amount (not beyond a tote container or two).  Historically water used to be abundant here, there were plenty of springs and wells - but not any more.  They still need to get used to a new way of thinking about water.

Sounds like I would need to replace my whole gutter system if I were to use a first-flush solution like the one you / the TGRH describes ...

 
Levente Andras
pollinator
Posts: 239
Location: Le Marche, Central Italy
27
  • Mark post as helpful
  • send pies
    Number of slices to send:
    Optional 'thank-you' note:
  • Quote
  • Report post to moderator

John Walsh wrote:

I'm not a expert or anything but the fine dust ending up in the bottom of your tank is probably just tree pollen and crap like that, not horrible. Every tank has biosludge in the bottom eventually and in fact I think it helps keep the water clean. The trick is not to disturb it.


The fine particles may include bird droppings and smoke / any stuff that comes out of my chimneys (I burn wood in my cooking stove and boiler). That's what I'm keen to get rid of with the first flush. I'm not so worried about the very fine soil particles or pollen.

I would guess that a great deal of all those things get flushed out, and only a small amount of them would get behind the valve that feeds into the cistern, before I open that valve. However, I don't know what impact that "small amount" can have on water quality over time.

I'm quite ignorant about the chemical and microbiological processes around bird droppings - i.e., what happens over time with bird droppings that get washed by rain water into the water tank - what happens with the nitrogen and the microorganisms in the droppings, and what amount of the stuff can have an impact.
 
Levente Andras
pollinator
Posts: 239
Location: Le Marche, Central Italy
27
  • Mark post as helpful
  • send pies
    Number of slices to send:
    Optional 'thank-you' note:
  • Quote
  • Report post to moderator

Jean Pierre Michotte wrote:This seems to me a lot of work for nothing. Graf is selling filter for their rain collector  They ae working fine for me since the installation 3 years ago.
http://www.graf-water.com/rainwater-harvesting/filter.html

The germans are very good engineers : just buy the right thing or write them an email for help
Jean Pierre


As I wrote above, I do have the Graf filter installed.  Indeed, it's doing a great job in filtering out soil particles - but it doesn't keep out bird droppings and other fine particles (dust, smoke)...  That's why I thought that a first-flush system still has a role to play.

 
John Walsh
Posts: 13
  • Mark post as helpful
  • send pies
    Number of slices to send:
    Optional 'thank-you' note:
  • Quote
  • Report post to moderator
You're probably right that bird droppings could be a problem though, I would think one of the things you would want to avoid was nitrates.
I guess the easiest thing for you is to make sure the water that goes down there is already well filtered.
 
Skool. Stay in. Smartness. Tiny ad:
12 DVDs bundle
https://permies.com/wiki/269050/DVDs-bundle
reply
    Bookmark Topic Watch Topic
  • New Topic