• Post Reply Bookmark Topic Watch Topic
  • New Topic
permaculture forums growies critters building homesteading energy monies kitchen purity ungarbage community wilderness fiber arts art permaculture artisans regional education skip experiences global resources cider press projects digital market permies.com pie forums private forums all forums
this forum made possible by our volunteer staff, including ...
master stewards:
  • r ranson
  • Nancy Reading
  • Carla Burke
  • John F Dean
  • Jay Angler
  • paul wheaton
stewards:
  • Nicole Alderman
  • Pearl Sutton
  • Anne Miller
master gardeners:
  • Christopher Weeks
  • Timothy Norton
gardeners:
  • Nina Surya
  • Matt McSpadden
  • thomas rubino

Semi-buried open rainwater tank

 
Posts: 17
14
fungi foraging trees tiny house food preservation building
  • Mark post as helpful
  • send pies
    Number of slices to send:
    Optional 'thank-you' note:
  • Quote
  • Report post to moderator
Hi all,

I am setting up gutters on my house, and building a tank to have water for the garden. I have done quite a bit of research, and decided to go for a semi-buried ferro-cement tank, with a construction process very similar to that described in this document (http://www.itacanet.org/doc-archive-eng/water/Buried_water_tanks.pdf).

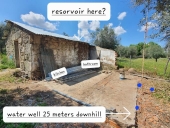
I've dug most of the hole, but need to build walls and support them with earth to get a reasonable volume and water level compared to the veggie garden.
The idea is to do pretty much like on the pictures:
- build a brick (or stone ?) wall around the hole (with cement)
- Bring in quite a lot of earth to pile on the external face of the walls, for support.
- Coat the inside with a structure of metal rods, chicken mesh and cement, like described in the document linked above. About 6-8cm total thickness.

I have however a few hesitations I'd like to clear before I continue with the project:
- Does that look feasible given the setup ?
- Shall i build the wall with terracota bricks -- isn't there a risk of decay when in contact with soil/humidity -- or stones ?
- I am guessing about 10m3 of earth will be enough to build the supportive slopes around the wall, does that sound right ?
- Anything else I should be aware of ?

Thanks a lot for your help !
Yannick
P1010854.jpg
[Thumbnail for P1010854.jpg]
P1010855.jpg
[Thumbnail for P1010855.jpg]
 
gardener & hugelmaster
Posts: 3750
Location: Gulf of Mexico cajun zone 8
2013
cattle hugelkultur cat dog trees hunting chicken bee woodworking homestead ungarbage
  • Likes 2
  • Mark post as helpful
  • send pies
    Number of slices to send:
    Optional 'thank-you' note:
  • Quote
  • Report post to moderator
Using some rebar through some of the bricks would help strengthen it.
 
Posts: 76
Location: central illinois
1
  • Mark post as helpful
  • send pies
    Number of slices to send:
    Optional 'thank-you' note:
  • Quote
  • Report post to moderator
What a great project Yannick!
I looked at the pdf you linked to. a few questions:
Will you pour a concrete beam around the hole? what size, also what kind of steel reinforcement in the beam? Assuming you do, I would embed probably two pieces of rebar to reinforce it, make a ring. I would also put some steel pegs (could be little pieces of rebar, scraps, etc) into the top so they stick out and hold the roof when you pour it.
How high is your wall? The higher, the stronger it will need to be.

What about drains, cleanouts?

Art Ludwig has a really good book you might want to look at. If you apply ferrocement you might want to do a small project first, say, a thin slab or something creative. Ferrocement will last 100s of years if cured properly. Ludwig goes into much more detail in his book than the pdf you cited.

Best of luck to you! Keep posting.
 
yannick le page
Posts: 17
14
fungi foraging trees tiny house food preservation building
  • Mark post as helpful
  • send pies
    Number of slices to send:
    Optional 'thank-you' note:
  • Quote
  • Report post to moderator
Hey Michael,

Sorry I hadn't been here for a long time ! Thanks a lot for your answer and advice on the Art Ludwig book.
The plan was indeed to pour a concrete beam around the hole, with barbed wire reinforcement, but I have shoulder issues so I had to stop that project until I get better, not soon !
Thanks again a lot and have a good week end !
Yannick
 
yannick le page
Posts: 17
14
fungi foraging trees tiny house food preservation building
  • Likes 7
  • Mark post as helpful
  • send pies
    Number of slices to send:
    Optional 'thank-you' note:
  • Quote
  • Report post to moderator
Hi everybody,

I finally finished the pond ! 4 years later... it was in standby for a long time. Below is a picture and a short video of launching day.
It's been doing good so far, first fill was fall 2023, the gutters of the house lead to it so it fills up quick with a few rainfalls.
I let it go naturally, a few species of water bugs colonized very early, water striders and backswimmers in particular. Got a mosquito larvae boom right at the beginning, but then disappeared I guess with the others bugs eating them.

I don't have pictures of the construction except the early ones in the original post, but here is a quick description:
- I kept doing the wall as in previous post, with 4-5 lines of barbed wire on the external side.
- I did a first layer of concrete inside, very rough and thin.
- I layered chicken mesh in the inside and outside.
- I also reinforced with some barbed wire and other metal rods I had.
- I covered all with about 5 cm of concrete, not much but so far it's doing ok.
- I finished with 2 thin layers of waterproof cement (the actual name: 1-component flexible cement-based waterproofing slurry).
- I piled up dirt around the external wall, for extra support.


Pon1.jpeg
[Thumbnail for Pon1.jpeg]
Pond2.jpeg
[Thumbnail for Pond2.jpeg]
Pond3.jpeg
[Thumbnail for Pond3.jpeg]
Pond4.jpeg
[Thumbnail for Pond4.jpeg]
 
pollinator
Posts: 5499
Location: Bendigo , Australia
495
plumbing earthworks bee building homestead greening the desert
  • Mark post as helpful
  • send pies
    Number of slices to send:
    Optional 'thank-you' note:
  • Quote
  • Report post to moderator
Nice outcome
 
master pollinator
Posts: 1838
Location: Ashhurst New Zealand (Cfb - oceanic temperate)
564
duck trees chicken cooking wood heat woodworking homestead
  • Mark post as helpful
  • send pies
    Number of slices to send:
    Optional 'thank-you' note:
  • Quote
  • Report post to moderator

yannick le page wrote:Hi everybody,

I finally finished the pond ! 4 years later... it was in standby for a long time. Below is a picture and a short video of launching day.


Good things are worth the wait and I am impressed with how this turned out. Well done and that is one beautiful little swimming hole.
 
Hear that? The pitter patter of tiny ads.
Binge on 17 Seasons of Permaculture Design Monkeys!
http://permaculture-design-course.com
reply
    Bookmark Topic Watch Topic
  • New Topic