• Post Reply Bookmark Topic Watch Topic
  • New Topic
permaculture forums growies critters building homesteading energy monies kitchen purity ungarbage community wilderness fiber arts art permaculture artisans regional education skip experiences global resources cider press projects digital market permies.com pie forums private forums all forums
this forum made possible by our volunteer staff, including ...
master stewards:
  • Nancy Reading
  • Carla Burke
  • r ranson
  • John F Dean
  • paul wheaton
  • Pearl Sutton
stewards:
  • Jay Angler
  • Liv Smith
  • Leigh Tate
master gardeners:
  • Christopher Weeks
  • Timothy Norton
gardeners:
  • thomas rubino
  • Jeremy VanGelder
  • Maieshe Ljin

How to fix leather that has cut right through?

 
steward & author
Posts: 38460
Location: Left Coast Canada
13711
8
books chicken cooking fiber arts sheep writing
  • Likes 2
  • Mark post as helpful
  • send pies
    Number of slices to send:
    Optional 'thank-you' note:
  • Quote
  • Report post to moderator
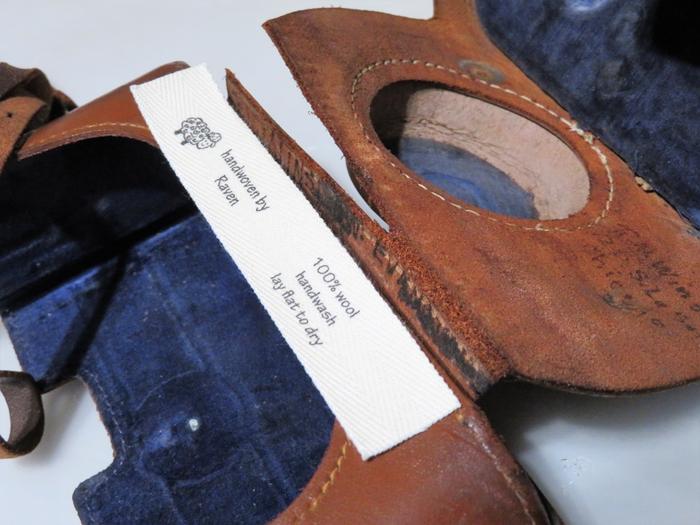
this is the case from my vintage Argus C-3 camera.  Part of the leather has worn all the way through and has just about ripped off.


I want to repair this rip, but I don't know how.  Worse, I don't know the magic words needed to ask google how to fix this.  I even tried saying please.  But a rip, cut, or tear and leather repair all give me how to repair surface cracks.  

What are your thoughts on how I might repair this?
 
gardener & hugelmaster
Posts: 3697
Location: Gulf of Mexico cajun zone 8
1972
cattle hugelkultur cat dog trees hunting chicken bee woodworking homestead ungarbage
  • Likes 4
  • Mark post as helpful
  • send pies
    Number of slices to send:
    Optional 'thank-you' note:
  • Quote
  • Report post to moderator
I would suggest the first thing to do is buy or make a good leather restoration & conditioner goo before handling it much more. It looks dry & almost ready to crumble. A little TLC can save it.

Hard to tell from just a picture but it does look like one could sew a strip (or two) of new leather across both sides of the rip for a reasonable & functional repair. Suede is easy to work with & would make a nice hinge. Worn stitching on mass produced leather goods is usually fairly easily to replace &/or patch up. You probably already have some flax thread:) I would probably just duplicate & replace the strap unless the intent is to resell it as a collectible item. Noticed that vintage camera in another thread. Looks like a fun & worthy project.

 
gardener
Posts: 3073
Location: Central Texas zone 8a
818
2
cattle chicken bee sheep
  • Likes 2
  • Mark post as helpful
  • send pies
    Number of slices to send:
    Optional 'thank-you' note:
  • Quote
  • Report post to moderator
Pumch holes on each side. Use sinew with a needle to stitch through the holes.
 
pollinator
Posts: 2142
Location: Big Island, Hawaii (2300' elevation, 60" avg. annual rainfall, temp range 55-80 degrees F)
1064
forest garden rabbit tiny house books solar woodworking
  • Likes 2
  • Mark post as helpful
  • send pies
    Number of slices to send:
    Optional 'thank-you' note:
  • Quote
  • Report post to moderator
Around where I am we have saddle makers who will repair leather items for people. We don't have any shoemakers here anymore, so the saddle makers fill that nitch.
 
r ranson
steward & author
Posts: 38460
Location: Left Coast Canada
13711
8
books chicken cooking fiber arts sheep writing
  • Likes 2
  • Mark post as helpful
  • send pies
    Number of slices to send:
    Optional 'thank-you' note:
  • Quote
  • Report post to moderator
For the stitching around the lens cover, I was going to use a leather awl.  
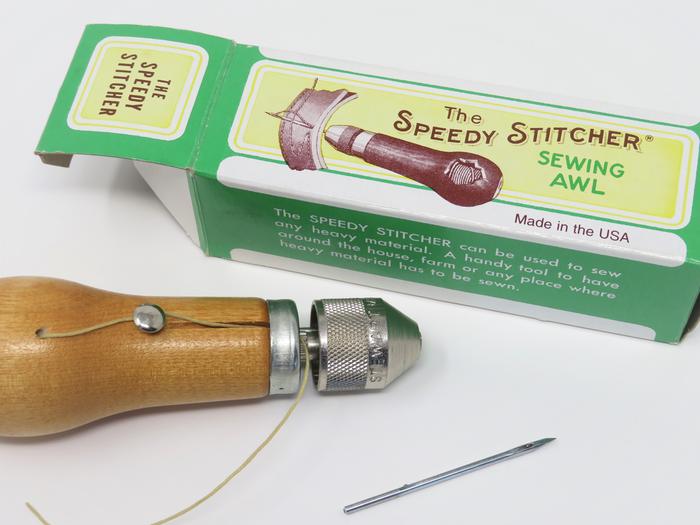


it works like this.
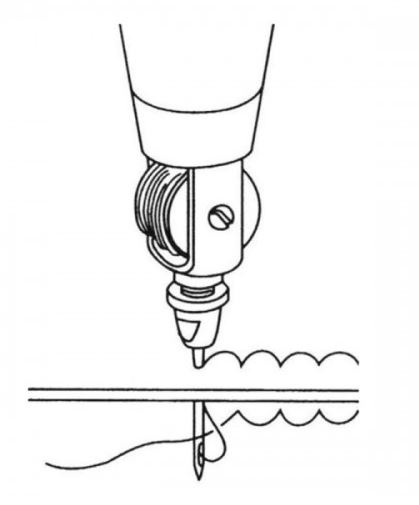


This is a great tool for fixing leather stitching and I've snatched up many a bargain at yard sales due to busted stitches.  The owner takes the leather case to the local shoe or leather repair shop and they say it's going to cost fifty dollars or more to fix this stitches.  So they put it in the yard sale free pile or quite often charge the crazy price of one whole dollar for the item.  I take it home and spend 20 minutes with my awl and repair the stitches.  

I don't know if you can see, but it looks like someone used this tool to repair the top of the camera case.  The stitches are twice as long as the rest of the case and the thread four times as thick.


When I went to fix the stitching around the lens cover, I noticed that if I used the needle from this awl, it would tear the leather apart.  It's far too big.  But it's my only source of waxed thread and I'm far too lazy this week to wax my own.  But what I can do is to cut a length of waxed string and unply it.  The thread that comes with the awl (and fits in the handle of the awl for easy access), is made of two plys of two plied yarn.  Which means it's a four-ply cable yarn - which is very strong and perfect for this kind of work.  I'll cut a length of this and untwist it so that I have only one of the four strings.  This looks like it exactly matches the original thread.  After that, I'll find a strong enough needle and thimble to sew the leather.  

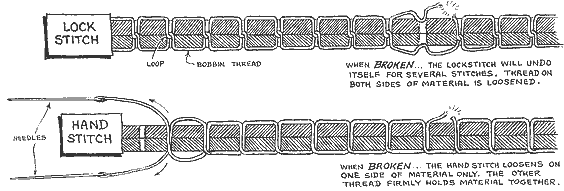
I'll use a lock stitch because there's less bulk. Also, this part of the leather doesn't get much strain, so it should be strong enough to last another 70 years.  If this was part of the case that had to support the weight of the camera (like a strap), then I would use the two needle method.


But before I start work, I'm going to moisten the outside of the leather, being careful to avoid getting any oil on the inside because I have a plan for fixing that tear that might involve glue.
 
pollinator
Posts: 217
Location: Western central Illinois, Zone 6a
121
3
hunting trees solar wood heat rocket stoves ungarbage
  • Likes 2
  • Mark post as helpful
  • send pies
    Number of slices to send:
    Optional 'thank-you' note:
  • Quote
  • Report post to moderator
Raven, I do a pit of leather work and would recommend conditioning that leather before any heavy stitching. If it's too dry it will break up during the stitching process. Been there, done that. Tandy Leather has been my go to source for leather supplies. If you have one near you it can be worth the trip to stop in. They typically have bins of scrap that you can pick from to get small odds and ends of different types of leather that would be the perfect size for a project like this.
I second the idea of using a strip of leather to make a hinge for the already broken piece. Bonding a piece of fabric could also work.

I look forward to seeing how it turns out for you.
 
pollinator
Posts: 340
Location: northeastern New Mexico
86
wood heat woodworking homestead
  • Likes 1
  • Mark post as helpful
  • send pies
    Number of slices to send:
    Optional 'thank-you' note:
  • Quote
  • Report post to moderator
Interesting project Raven.
I too worked in leather. Quite extensively in fact. I began apprenticing in a Head Shop in Long Beach in the 70's. That style of stitcher is awesome. You might benefit from a multi-tip hole punch. What I see that you have there is a perfect set of templates for replacing pieces. It may be easier to replace a piece than repair it, as you've noted the leather is no longer pliable. Conditioning it before working the leather, as you also stated makes it impossible to glue. Hand stitching leather is rough work even on supple leather, it can be aggravating on leather that is old and dry. It is amazing that Tandy Leather is still around, take advantage of that resource if it is nearby. Conversely you can cut pieces out of other leather goods for the replacement pieces.  
Whether you are stitching new or old leather that hole punch will help you penetrate the leather with little effort.      
Multitip-hole-punch.jpg
[Thumbnail for Multitip-hole-punch.jpg]
 
r ranson
steward & author
Posts: 38460
Location: Left Coast Canada
13711
8
books chicken cooking fiber arts sheep writing
  • Likes 2
  • Mark post as helpful
  • send pies
    Number of slices to send:
    Optional 'thank-you' note:
  • Quote
  • Report post to moderator
I used mink oil to moisten the leather.  I wanted to use neatsfoot oil because I like the result better.  It seems to absorb into the leather faster.  But that was in the workshop so I went with the mink.  

Being very careful to only oil the outside of the leather, I did several light coats of oil instead of one thick sloppy coat as I would normally do to soften the leather.  Once it stopped being crumbly I sewed the lens cap back on.

Because I didn't get any oil on the back of the leather, I was able to glue a strip of twill tape on the inside of the case.  This acts like a hinge and worked like a charm.  Thankfully I had a bit of twill tape exactly the right size.


The problem is the twill tape is white, so when the case is open, it's now really obvious.  I'm going to seek out some old shoe polish and see if I can change the colour of the twill tape.  If I do this again, I would probably dye the cloth with some arbutus bark and coffee to match the colour before glueing it together.

But the fix works and it looks perfect from the outside.  If I can find a bit of leather thin enough and the right colour, I may sew it on the outside later, but this fix might be enough on its own.  Time will tell.  

 
pollinator
Posts: 154
52
5
books food preservation fiber arts
  • Likes 3
  • Mark post as helpful
  • send pies
    Number of slices to send:
    Optional 'thank-you' note:
  • Quote
  • Report post to moderator
Instead of using the awl you can get leather needles  that are smaller and using two needles, one on each end of the sinew. For the first stitch go through a hole until the sinew is even on both sides then you will put one needle through the next hole and pull all the way just until the stitch is made. Put the other needle in the SAME hole from the other side. After you make the stitch you then can pull on both of the sinew threads until tight.   You could also get very small punches and make the wholes a little bigger but this leather may not be ideal to do that.   I would do as others have said and condition it first.  I make moccasins and after I am done I rub in some beeswax.  Not sure if you would want to do this or not but you could try a small area and see how you like it.  I do it to help water proof them and it helps keep them soft.  I will sometimes mix a little refined coconut oil with it.  I know some don't like this as much as other oils but I have not had any problem it with.           If you find that conditioning isn't working and you don't want to completely replace some of the parts I have used thin leather ...like pigskin, to lay on top of the original leather sometime on both side and stitch through these and the original one at the same time.  It just give a little more strength to the piece and can  improve the appearance.    Good luck with your project.  
 
Posts: 1
  • Mark post as helpful
  • send pies
    Number of slices to send:
    Optional 'thank-you' note:
  • Quote
  • Report post to moderator
I know this is a year old thread, but because i am embarking on the same kind of repair myself, i am wondering what the final product looks like. If your interested, I'll post pictures of mine.
 
I remember because of the snow. Do you remember tiny ad?
Announcing The World's Largest Collection of 16,000 Woodworking Plans
https://woodworking-plans
reply
    Bookmark Topic Watch Topic
  • New Topic