Chad Douglas

+ Follow
since Nov 28, 2012
Merit badge: bb list bbv list
For More
Apples and Likes
Apples
Total received
In last 30 days
0
Forums and Threads

Recent posts by Chad Douglas

I just watched this CFL Video.

What were the final results of the longevity test? It's been long enough now that I would think that all of the bulbs should have died.
11 years ago
Lol. They got that at Wal-mart?

haha. I'd be careful with tin, too. It's not the healthiest of metals to come in contact with.

12 years ago
Well, my plan was to do exactly as you suggested. Perlite and Fireclay slip, so that when the metal fails, the riser won't.

Been looking at also covering the outside with a blanket so that the riser cools more slowly to hopefully prefent (or reduce) thermal shock.

I built a small rocket stove prototype out of some fire bricks and was burning pellets with little trouble. As the OP pointed out, the feed mechanism is also somewhat fiddly. For my testing, I was just tossing a handful in periodically to get an idea of what kind of rate I would need. I discovered that too slow or too fast is death for the burn. It seems that there is a decent-sized window for rate, so coming up with a gravity-fed system should not be terribly difficult since ultra-precise regulation isn't needed.

As part of my other alternative heating explorations, I have been looking into burning waste oil. Specifically waste motor oil. It's usually quite plentiful. However, I was thinking to combine the wood pellet and oil burn into a single rocket stove. Most oil burners either use air flow to mist the oil into the burn chamber or they drip oil onto a steel plate that is in the burn chamber that gets so hot that no residue of the oil is left.

I thought of an alternative. Take some of the wood pellets and soak them in the oil until they are saturated. Some experimentation will be required to find the right ratio of oiled to non-oiled pellets, but it will allow me to get waste oil into the combustion chamber with nothing more than the gravity feed pellet system I want to use anyway. This also allows for easy switching between pure pellets and oiled/pure ratio mix or even pure oiled ones if that's doable.

I'd also like to design the gravity feed to be able to handle wood chips. Those are often readily available at certain times of year, or if someone is having a tree chipped, you could pull up in your truck with a shovel and offer to take the chips off their hands.

At any rate, I am still a newb to this, and have not het built a mass heater -- just a stacked brick (no mortar or sealant between them) rocket stove and I'm hooked. My understanding of thermodynamics (I'm no expert, but I've had some casual exposure) has given me lots of ideas on how to improve effeciency as well as design ways to burn alternate fuels. I'm doing this because my wife and I plan to move to the Texas desert and go off grid in the next couple years, and, there isn't an abundance of trees out there, let alone sticks. Since our coldest times will only dip into the 20s, we don't need a ton of heating capacity, but I could see us running the RMH to heat water or other tasks (perhaps heating oil to use in radiant baseboard heaters)

Right now, my attention has been drawn away from RMH to deal with another aspect of planning this move, but I'll circle back and once I have something that works (mostly) I'll post about it and solicit comment and suggestions for improvements.

Thanks!
12 years ago
How about this for an extraction method. Make the mold with a slide-out removable bottom. Then, once the brick is made, slide the bottom and use the press to push it out. You'd want to raise the apparatus up high enough to allow the brick to clear and for you to fetch it out of there. You might get a little "squeeze leakage" in the brick there, but once they've dried a little, you can trim it off.

Also, I'd add a long steel bar (use brackets so you can remove it easily) to the end of the wood lever. You'll have to move the lever a longer distance, but the effort will be less. If you do this with a couple helpers -- one on on the lever, one operating the slide bottom and fetching finished bricks and one shoveling the mixture in, I bet you could have a respectable production rate, and the cost of the changes to the apparatus would not be too terribly much more. Might go from $30 to $60. Still quite a bit cheaper than the other options.

The use of a shop press is a great idea too. The shop press method will be much slower, but you will be able to apply several tons of force to make a much denser brick. Perhaps use a shop press to make bricks that need to have more strength, and the apparatus-made ones for lower-load duties.
12 years ago
cob

John Zeron wrote:The research I've done indicates that cob for walls requires more thickness as you go higher. Some Welsh cob homes has walls 2 feet thick in the second and third stories. CEBs can be dry stacked and depending on their aspect ratio may not need much thickness for stability.


Interesting. I would assume that as height went up that thickness would need to increase, but I would figure that you'd need more thickness at the base and go thinner as you go up, to reduce the load, and the thicker base would be there to carry the load. It would surely be a strange sight to see an 18" base wall and a 36" second story wall. Seems counter-intuitive to the concepts of structural engineering.
12 years ago
cob
What about this:

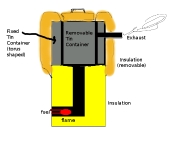
Use the 6" and 10" flue pipe, and instead of perlite and ground clay, look up a mixture for firebricks using fireclay, silica, perlite and some crushed up firebrick or ceramic fibers for strength.

Then, fill the void between the pipes with the mixture and allow to cure. Since they will be encased in steel, you will need yk let them cure longer than normal to allow the water to evaporate.

Once basically dry, heat them gently by building small, short fires without the chamber (basically a regular rocket stove) then, slowly increase the intensity of the fires and wrap the outside with Kaowool to slow the cooling process.

Once you're sure it's all dry and fired, put it in use. If the steel rots away, you should still have a nice ceramic flue.

Of course, I've never built one of these, but the physics should work well if you can avoid cracking of the ceramic you make.
12 years ago
Do you just paint this stuff onto steel to protect it? How thick?
12 years ago
Hmm.. I was planning on using stove pipe, as well. Is this inner pipe considered a consumable that needs to be replaced periodically, or is there a better way, with perhaps a thicker steel? Like Schedule 40 6" pipe or a derad oxygen cylinder with the ends cut off?

Has anyone tried lining the inside of one of these with ceramic thermal blanket? Some of that stuff is rated to 2600F or more. Fire brick would be good, but they can fail over time, too. I can't seem to find a source for firebrick that is inexpensive enough for me. Maybe I'm overthinking it.... How many firebricks do you need for a typical setup?

12 years ago
Rob,

You mentioned in your video taht you were having trouble with the inner chimney, and showed video of some rather crumbly stuff. What was that, and how did you correct it? I looked for another video about it and didn't find one.
12 years ago
Gravity-Fed Pellet Feeder:

https://permies.com/t/18515/stoves/Burning-Pellets-Rocket-Mass-Heater

Any gain in efficiency is good. That should translate into hotter temps in the riser, more complete combustion of gases, and more heat to sink into your thermal mass. Maybe it's a case of diminishing returns, and that the increase in efficiency is simply not worth the expense and trouble to build it with an outside air source.

I'm just thinking of my wife, who doesn't handle cold or drafts well. Maybe by putting a "controlled draft" near the air intake area would be a good compromise, so the rest of the structure would remain draft-free, and only the area right near the stove would be colder......
12 years ago