Von Sommerfeldt

+ Follow
since Nov 11, 2013
Merit badge: bb list bbv list
For More
Apples and Likes
Apples
Total received
In last 30 days
0
Forums and Threads

Recent posts by Von Sommerfeldt

Josh whatever you do DON'T order that fireclay. That's a huge ripoff. Call around all of your local mason supply stores. Trust me you'll find it WAY cheaper. I live in Oregon, and I can get 50lb bags of fireclay for roughly $8 a bag. $40 is just insane....

Also, you can cast your core and heat riser with a homemade recipe for "refractory cement"
3 parts perlite
3 parts portland cement
4 parts silica sand
4 parts fireclay
Handful or two of loose fiberglass for added strength

I cast both my burn chamber and heat riser from this mixture. Dirt, dirt, dirt cheap and works extremely well. It is brittle, very easy to chip or break, but once it's in place if you have a steel feed tube they work like a dream
10 years ago
Thanks for the responses guys!

Anyone else have some input to share? I'm welding in the divider plate tonight
10 years ago
Quick question that I couldn't find an answer to by searching:

I know that placing the barrel and heat riser slightly off center from each other is optimal (at least that's what I've gleaned), but how far off can you set them before it starts having a negative effect on the unit?

In my build, it would be optimal (concerning space) to have the barrel so far off center that the heat riser would actually touch one side of the barrel. Will this completely mess up my unit's function and draw? If it will, what is the minimal distance between barrel side and heat riser?

Thanks!
10 years ago

Jared McKee wrote:What is the thickness of the bottom of the cast? From the pictures I am assuming the board was attached to the cast to hold it away from the bottom same thickness all the way around?


If I remember correctly the thickness all the way around from wall to burn chamber is 1.5"

The wood on the bottom was part of the cast mold box, and we just left it on there through the burns so that after firing it for long periods of time we could pull the wood away and see if it was charred or burnt.
11 years ago

Willie Shannon wrote:I like it! Good job!

I'm interested in what you call Cast Refractory Cement, is that something bought from a kiln/refractory supplier? What temps can it handle?

I like that design, I think I could make something like that work for the design I was going for, but how long do you think it would hold up to the temperatures?

Are you going to cast a heat riser from the same stuff?

Bravo!


Willie,

Yeah I purchased it from a local supplier of refractory and insulation supplies (EJ Bartells in Portland, and I know they have other locations in the Pacific Northwest). The cement I used is rated to handle 2600 degrees which is only 300 degrees less than your standard firebrick.

I think it will hold up well. So far no stress cracks, or any visible damage. The stuff is hard as a rock without being brittle. It's always a good idea when you cast something to take the leftovers and save them for testing. I had 3 balls of the cement left over and I chucked them as hard as I could onto a cement floor......didn't even phase the little test pieces.

My understanding is the heat riser is where the majority of the temps rise to crazy levels, so to answer your question: no I won't be casting the heat riser from refractory cement. Not only would it be WAY too expensive ($60 a bag, and 3 cubic feet to pour just doesn't add up) I'll use vermiculite board then put a tube around the heat riser leaving between a 2-3" gap, which will be filled with perlite and a light clay slurry mix to really insulate that sucker.

11 years ago
In the last picture you can still see the wood form peaking through that was burned out. The end of the J tube is curved and smooth to create turbulence.

Recently added a 6" piece of steel square tubing to the feed chamber so the fuel isn't rubbing against the cement, and also helps with draft.
11 years ago

John Elliott wrote:That looks pretty hot! Are you going to share your recipe for refractory cement with us? And how it holds up for more burns? Inquiring minds want to know.
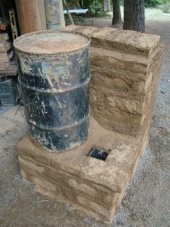


Sadly I went the cheater route and bought castable refractory cement so I have no recipe. Used two 55lb bags of KS4V+ (rated to 2,600 degrees) and mixed in about a 5 gal. bucket of perlite to reach the volume needed as each bag of cement was roughly $60. I built a 6" system, but if you went for a 4" the two bags alone would be plenty, and an 8" you'd probably want 3 bags plus a little perlite as filler. Mixed just like regular cement, poured just like cement, and after 3-4 prolonged burns there have been no stress cracks or signs of problems in the burn chamber.

The beauty of casting your chamber the way I did is you have no pinholes or leaks. You get an extremely efficient chamber for a fraction of the cost if you ordered one, and you don't have to mess around with bricks and clay slip.
11 years ago
So here's a look at the combustion chamber I recently cast for my first RMH build.

I used 1/2" chip board as it was inexpensive to build the mold of the inside chamber. Built it so the outside dimensions where 6" square, that way when the wood burned away on the first fire, the inside diameter of the chamber would be 6"

Using some waxed poster board we had laying around the shop from our sign painting days, I covered up the turbulence curve below the heat riser.

Then built a box to hold the cement in a uniform shape when poured around the combustion chamber.

Here's a video of the first burn. We waited 24 hours for the cement to cure, then only fired it for about 20 minutes. On the second burn, we put 3 hours worth of wood through the combustion chamber, and the outside of the cement was merely warm to the touch.

11 years ago
What's the update on this?

Love the idea. Have been thinking about making a Dragon Heater "Castle" build out of cob brick for the bells, as the flue liners are hard to come by and expensive out in my area.

How's it working? How long does it retain heat after a fire?

Thanks
Von
11 years ago
Thanks for all your help Al!

I'll be sure to post photos and updates as our new build progresses
11 years ago