Corey Vaughan

+ Follow
since Mar 31, 2015
Merit badge: bb list bbv list
Biography
I moved from the PNW to Atlanta, GA in 2017.  The new culture and climate have been a real treat to get used to!
For More
Atlanta, GA
Apples and Likes
Apples
Total received
In last 30 days
0
Forums and Threads

Recent posts by Corey Vaughan

In 2020 I dug a small pond for aquatic plants and animals. The resulting pile of clay sat covered for a year, drying out, protected from sun and rain.

In 2022 I used that pile to try making a cob pizza oven. For some reason, these ideas and motivation always seem to strike right in the middle of summer. I spent the hot and sweaty months getting the area leveled, building a base from flagstone, and building a small pavilion to protect from weather before I got into the cob.

The clay around this part of Georgia (Atlanta area) seems to be a really nice mix... I brought in a load of sand but really did need as much as I thought I would. It took less than a couple bales of straw for the entire oven. b

This first attempt at a pizza oven was an overall success! It's been a hit with the neighbors and this year I've been perfecting a dough recipe as well as learning to cook other dishes in the oven. It does take around 2 hours to get to a stable cooking temperature, so it's not something I can just get going on a whim. However, this summer I've found it to be the perfect way to cook a meal without turning on my stove and heating up my small house.

Rough dimensions of the inner dome are 27" diameter with a 16" height - the door opening is 10" tall and about 14" wide. Temps can easily reach a nice 700 degrees, and while I was still figuring things out, they were going much higher than that.

The oven still isn't done, and will eventually get a finish plaster, but I'm still deciding if I want to do something more sculptural and fun with the exterior - I'll say I really like the ability to come back and adjust, fix, or add on whenever the fancy strikes. I'll likely seal with a clay plaster this year, at the same time I'm working on some interior plaster projects.

The resulting pizzas have been well worth the effort! It's definitely different from cooking in an oven - the heat, smoke, and humidity from a wood fire combine to add an extra element to any food cooked inside.
1 year ago
cob

Rufus Laggren wrote:Maybe you have, but JIC: Give the roof, windows and door(s) a really thorough water test before closing the walls and ceiling. MUCH easier now.

Electrical before insulation. Probably nice to have a little breaker-box, but read up carefully about remote sub-panels and how they are wired and grounded. IIRC, the 4-wire service is what's required in many places now. Grounding in particular is not just a matter of "common sense".

Caulk all the seams before insulating. Meaning the bottom plate, the rafter plate, around the windows & doors (low expansion foam). You want to stop major drafts. If you can see roof sheathing joins (that don't fall on top of rafters) caulk them. A house is just like a really wide chimney - hot air rises, escaping on the top and sucking more air in all the holes at the bottom. Think breezes and more fresh air than you might wish. Caulk or foam anything (pipe, wire...) coming up from underneath through a hole in the bottom plate (or anywhere else, for that matter). Go around the bottom and try to find holes. Anything dime size and up can let in "guests" as well as air.

That looks like a ridge vent on the roof...? Is there a plan? Are you going to insulate the rafter bays or insulate a flat ceiling over the room (in which case the "attic" is "unconditioned", ie. outside temp). If insulating the ceiling, it's important, again, to seal all air leaks at the ceiling. You also need to frame down "light wells" under the skylights. It's also important to try to keep moisture controlled - interior moisture, that is. Moisture control is not the same thing as air (draft) control; moisture goes _through_ many materials. Reams of stuff online about this. Probably want to limit you searches to things published in the last couple years.

How much insulation can you put in? More insulation = less interior space. But enough insulation in the right place is an important part of moisture control as well as temp control. Simplest moisture control system is two open windows, but that kind of goobers up the temp control...

When you get into the "mad money", might put a little rain-roof over the door. Saves the door and makes fumbling w/the keys a calmer moment.

>bed
Hammock?

Cheers,
Rufus


Great points, Rufus!  The hammock is genius.  I've spent periods of time with a hammock as my sole bed before, and learned a few tricks for making that work.  They're also great in the summer when it's too hot to sleep under cover.

Re: the caulking and weatherproofing, I agree.  I've been out there during each thunderstorm that comes through the area to watch for leaks around those windows and the ridge vent.  So far, everything looks pretty good.  Even stayed dry during the last big storm (rain bands from Hurricane Michael.)

The front door will need some sort of threshold, it was installed pretty quickly and without much thought to water. Though there's a bit of protection via the gables, a rain roof would be splendid.  

So far, planning to insulate the rafter bays and install drywall / greenboard over that.  I'd like to keep as much open usable space as possible.  

Electrical needs are being figured out, and I do think I'll end up with a breaker box out there just to keep things tidy and easy to manage.  It will also allow me to have a couple key appliances, though everything will need to be able to run on 120V.

6 years ago

Gail Moore wrote:
two kinds of insulation I like to use are Roxul/ Rock Wool and the free closed cell/rigid foam
which I can get from a local SIPS/Structural Insulated Panel manufacturer. they give away discards,
so it is being reused/repurposed. You may be able to find SIPs making compnies in the Atlanta area.

the rock wool insulation is made from waste products. is awesome because it repel water, insects and rodents  don't burrow.eat it piss and poop in it. has many advantages. is super easy to install.

it cuts down on air passage. and it compresses, so it pops right in between the studs and holds tightly.

Rockwool.com  Roxul makes numerous


Hi Gail,

Thanks for your suggestion about Rockwool.  Though I've heard of it previously, it has slipped my mind to research more in depth.  Thanks for the reminder and sharing your experiences.  I'm assuming that the Rockwool would be more costly to install?  Though one nice thing about a space this small is that I can afford these small amounts of higher quality (and longer lasting) materials. I've just found an article that compares fiberglass and rockwool insulation, and I'm really liking the idea of rockwool (also known as mineral wool?)

I've thought a lot about what the "permie" way would be in some of these situations.  For this urban setting, and for the life of this structure, I want to place an emphasis on the reusability of this space, for me and for those who come after me.  I don't want to design a house solely around my needs and tastes (though it is very tempting) because I would like this structure to be welcoming to guests long after I've moved on.  I think designing a sound structure that can be used longer than the year or two that I'll be in it is a worthwhile endeavor.  And hopefully, my time and money doesn't go to waste.

I'll also look into rigid foam - it would be great if I could source offcuts from a manufacturer around here.

6 years ago
Now that I had most of the exterior walls installed and regained some floorspace from the whacky wardrobe, I could begin to rough out some floorplans and think through how I would like to fill the space out. Ideally, I wanted as much floor space as possible, but I didn't want to lose the access to a bathroom and mini kitchen.

My first layout shows the full sized bed, and how much room it would take up.  This inspired me to begin looking at alternatives...
6 years ago
There was an old wardrobe installed into one of the walls, however it was installed in a way that exposed it to the outside, and was used as support for some of the exterior panels.  Really odd.

Anyway, we pulled that out and framed out the wardrobe-sized hole properly.

The first skylight worked so well we decided to install another two.  One of which would be in the bathroom and allow venting to the outside via hand crank.  Next time, I'd definitely do this in a more streamlined manner:  strip the shingles, install skylights, and then install new shingles.  However, most of the resources I read assumed that the skylights were being installed into existing roofs, so I felt most comfortable going that route.  Also, replacing the entire roof in a day meant less risk of getting caught by the weather.  Once the roof was on, it took another day to install the other two skylights.
6 years ago
The walls were stripped of their drywall and insulation, and I was able to fully inspect what was going on underneath.

There were a couple spots in the roof that needed attention.

I installed a skylight on the southernly roof section to get a little more natural lighting in there.  We also decided to replace some of the exterior wall sections that needed attention.  Since the idea for now is to tile the bathroom/wetroom area, we wanted to be sure that everything is as square as possible.  Cutting these angles and boards made me realize how things can have a tendency to tilt...  And makes me think about how much easier it would be to have started from scratch!  

While I was doing this, I replaced all the shingles on one side of the roof as well as replaced a couple pieces of the plywood decking that had seen some water damage.  I also took the opportunity to install some drip edges where needed.

6 years ago

Joylynn Hardesty wrote:I am following this with interest, as we have a shed we want to convert to an apartment. Ours will be a multi year conversion though. I hope to learn through others mistakes.


Welcome, Joylynn!  If there's one thing I can promise, it's plenty of mistakes.  I mean "learning opportunities."
7 years ago
With the decision to take down the drywall and insulation, the next steps will be more tedious than anything else.  Taking down the trim, drywall,  insulation, and all the screws/nails/staples holding it all in place.

In the picture below, you can see the hole in the ceiling, showing damage from a rotted out joist.  Some of the most useful tools for this work are a crowbar, a hammer, and of course protection from the dust and fiberglass insulation.  I found a good rhythm of pounding away at a seam (between two sheets of drywall) to expose the screw heads.  Them working a crowbar under that to take off the sheets in large chunks, rather than small fragments.

Some of the walls were opened to expose a colony of ants, who appeared to be feasting on some sort of organic material.  They didn't seem to be harming the wood, so I let them disperse mostly of their own accord and they were gone the next day.  I encountered another two or three colonies, all of them doing their job of eating away at things that I otherwise would have had to clean up.

7 years ago
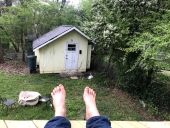
After clearing away ivy and tree limbs, the first thing I inspected was the roof.  It seems like water was wicking under the shingles back onto the eaves.  After a little reading, I chalked this up to lack of a drip edge.  I also learned the roof had some tree damage a few years ago and was repaired by the previous owner.  It sounds like it might have taken on some water before they got around to it.  So the decision was made to rip out the drywall and insulation and take a good look at what else could be needing attention.

The painted drywall on the inside wasn't in the best condition to begin with, so it didn't feel like too much of a loss.

7 years ago

Bryan Paul wrote:It doesn't seem like much work is required.  Does the inside need finishing to make it habitable?  It looks like it has electricity although the light fixture above the door is not the best choice.  Does it have insulation or internal fixtures?


I feel like you're right Bryan.  Before the house was put on the market, the shed was insulated and drywalled, and apparently inhabited for a short time.  Unfortunately that only covered up the problems, so my first step was actually to remove the interior insulation and drywall to check out the insides.  There was some obvious water damage from the outside and the previous owner came clean and advised we replace half the roof "very soon."  More on that to come.

There was previously electricity and water going to the shed, but was disconnected somewhere between 5-10 years ago.  The septic tank on the land was inspected, and seems to have been out of service for quite a while as well.  Currently researching insulation materials to replace what I had to rip out...

Anne Miller wrote:Cute shed!  I'm looking forward to hearing more about your plans.


Thanks Anne!  The focus for now is getting the structure squared up, I'm looking forward to getting the exterior finished (at least structurally) so I can start to tend to the details on the inside.  I'd like to keep the outside plain, allowing it to blend in and be just like any other shed in the neighborhood.  Luckily, we've got great and understanding neighbors.
7 years ago