Peter Chauffeur

+ Follow
since Sep 21, 2019
Merit badge: bb list bbv list
For More
Apples and Likes
Apples
Total received
In last 30 days
4
Forums and Threads

Recent posts by Peter Chauffeur

Hello Fellow Permies and “Frankenstove vertical RMH” enthusiasts!!!

Today was an absolutely exceptional day as I literally rolled “Frankenstove Mark 6” out of the Manufactorium and did an initial burn /test fire using hardwood pellets.  Using the wood pellets as the fuel source to continue the curing process will give me an idea as to how fast temperatures increase instead of propane which would mean using a “Tiger Torch” and may add way too many BTUs to of  refractory core too fast and do damage which is what I’m trying to avoid. Experiencing the increasing volume of the “roar” of this progressive and latest design was so rewarding and I cannot do it justice with words! A new design of a more robust pellet basket / carburetor has developed a consistent pulsating and reverberating echo that could be heard from a distance of 15 feet!, has made me feel that a giant leap for a rocket stove with a 4” ceramic riser a reality and welcome advance in the Frankenstove Family of low footprint vertical thermal rocket mass heaters!  
For those who haven’t been following this post from the beginning, it is important to “cure” the poured material by slowly cooking it with slow increments of heat and increasing time durations with cooling times between the cycles.
I am trying to avoid a “catastrophic failure event “ which occurred during my first “Frankenstove “ Mark 1 where a full blown fracture caused by uneven heat expansion.  This event caused a major crack in the refractory which I had to seal with high heat silicone which made me appreciate the “slow and steady” approach when dealing with proper building techniques and respect for research with respect to safely with refractory break-ins…. Without catastrophic breakages!!! Pun intended.
Also a new approach and design for a pellet basket / “carburetor “ has been designed to get around the “burnouts” I have experienced in my many previous basket designs and is interchangeable with the Frankenstove Mark 5 design. I took the interchangeable approach so I could evaluate its improvement even before the test firing of the Mark 6.
Upon rollout from the Manufactorium,  a propane torch preheated the combustion chamber and wood pellets were added down the feed tube and heated into nicely glowing bright orange embers with the classic horizontal flame accelerating progressively to the 90* where it hit the firebrick and proceeded up the ceramic riser. A short burst of smoke and then nothing but turbulent flames started up the riser. A short feed tube was filled with pellets and the roaring rocket sound amplified!  It was ant this moment I felt the elation,   And success that years of design through trial, error, thought experiments had cemented  my joy that this design has already exceeded my expectations!!!
So, please celebrate with me and view the photos below. The runtime of the first burn was jet to less than an hour with external burn tube reaching 700*F+ and top internal ceramic riser temp reaching 350*F.
An expected very small amount of steam was exiting the thin piece of sonotube ring at the base of the riser.
1 day ago
Metal Risers! DON'T DO IT!!!  UNLESS YOU HAVE A THING FOR FAILURE!!!

Yes, I made the mistake twice! The first time was out of ignorance and the second time was foolish!

What I learned that I was lucky and used a refractory mix surround the riser which basically sacrificed the metal riser as the form.

Learn from the mistakes of others; you won't live long enough to make them all yourselves.  

I suggest you look up my posts of my designs on this site to help you perfect you rmh.


6 days ago
Hello Fellow Permies,

Today, progress was made by securing a method to set the bulky (and heavy) Bell over the riser using an old crank winch from a boat trailer and the trusses of my Manufactory (tool shed). This allows for a safe and secure lift so one person can do the job alone.
Using a plumb line, the burner / riser assembly was centered and the bell was raised using a Tee fitting on the top of the bell. See the pics below as pictures are better illustrations than words. This method of placing the bell has been used in the Frankenstove Mark 5 build and there is a slight swing of the bell as the riser assembly IS directly under plumb line. The bell will be lifted off as this was done to insure the whole RMH would fit inside the aluminum box.
Measure Twice, fit, Remeasure again and celebrate the process before the welding begins!
1 week ago
More progress in the Frankenstove Mark 6 today!  The long awaited BELL was cut to fit over the riser and rough spots ground down ( the welds that held the base and valve protector ( which was repurposed to be the base of the 30 pounder)) I am also working on a manual winching system that will lift the bell above the riser and then lower it into position for welding to the base of the RMH. Here are some pictures of today’s progress
1 week ago

Fox James wrote:Very interesting build, did I miss read the bit about using re bar in the riser?


Hi James, Short answer, yes, three 1/2" spaced at 120* apart to take the stresses of off vertical rotation to move it like an acetylene cylinder 50 metres  from the Frankenstove Laboratory / Manufactorium " to greenhouse.
these rods are located at the extreme outside of the 10" sonotube and are fastened to 1/4 inch hardware (wire) cloth. which will prevent parts of the refractory from falling off due to continous thermal cycling daily. (preventative measures ) You will have to wait to see how the resultant casting of my refractory turns out when I remove the sonotube form. Expansion / contraction should not cause a problem due to its maximum distance from the ceramic core.
1 week ago
hello Mr. Weinberg,

Thank you for your barrage of questions regarding my "Frankenstove Mark 6 vertical thermal rmh" It is a pleasure to discuss my design and I look forward to you sharing your ideas about my build with me in "Moosages"  rather than involving the general population on permies.

I am using this thread as a "soft Launch" of my "Frankenstove Franchise" of Vertical thermal rmh prior to a series of " from the Ground Up manufacture on a youtube site and monitize my efforts on the plans.  This is not your typical build of the "mud and straw builds" that are ubiquitous on permies and I have a profound dislike of using thin gauge oil barrels as bells for the builds I see on this site.

1. my layout is similar to the F5 build earlier up the thread. my steps will be divulged in a future video series. Everything in the build sequence has been photographed and will be released, rest assured.
2. the bell will be the venerable thick gauge 100 lb. propane cylinder that will be welded to the section of the 30 lb. base.
3. the 4" heavy wall burn tube remains.  previous use of this material has survived relentless use in the F5 for years up to temps of 960*F and temp cycling to room temp daily. I have experienced some spalling on my smaller square tube burn chambers of previous builds of smaller dimensions.
4. there is some temperature adjustment via a proprietary sliding pellet basket; which has taxed my creativity to the limit that I will get into the video.
Thank you for your engagement in my design
Peter Chauffeur
1 week ago
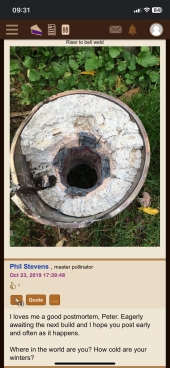
Well Fellow Permies, The refractory cement mixture has been given 24 hours to set and it is time to SLOWLY cure it by introducing a slight warming of the casting. To do this, I found one of my smallest propane torches and set it up to send heat down the centre of the square burn tunnel and then flow up the riser by convection where a slight restriction at the top would keep the riser temperature warm enough to speed up the drying but less than 100*c (UNDER BOILING POINT OF WATER ( 212*F) so it doesn't cause the casting to crack during the curing process.  Although the temp spiked at 160*F in the riser, I managed to get the riser temp to regulate around 130*F  by moving the lit torch back towards the mouth opening of the burn tunnel.(See Photos). I have left the 10" cardboard post setting tube forms in place to insulate the cast while it slowly cures. I also strengthend the vertical riser with reinforced with rebar and wire screening 1/4" (hardware cloth) during the pour  to keep chunks from falling off in the future. I will remove the form later once I can be certain everything is well cured.  I once worked for a chemical company that had to spray a refractory mix on the walls of a large thermal oxidizer and curing the refractory meant slowly adding heat to cure the mix once application was complete. This was called building a heat profile. Although I lack the engineering background, the process was to keep the internal temperature below the boiling point of water for 24 hours.  So, my rather small "thermal oxidizer" aka riser tube will also be kept below said temp until I can feel heat permeating the outside of the form  I will also drill a  borehole in the centre of the outer ring of the refractory mix to confirm that the heat is migrating in a radial direction. currently this temperature is around 101*F so I know it is working. you can also notice the colour of the cast refractory is also lightening up which suggests that there is less water in the mix.  i know that it is very important to do this process and not to rush it, as I experienced a crack in my original Frankenstove creation as I failed to dedicate due time for the mix to cure and no regard to building the heat profile to drive out excess water.  Steam is a powerful destroyer due to extreme expansion.
I will probably go through  6 bottles of propane to achieve this heat profile to be sucessful... that will give me time to fabricate the 100 lb bell from a repurposed propane tank in the next few days.
slowly but surely  Frankenstove 6 will come to life. stay tuned for more developments as the build continues
1 week ago
Hello Fellow Permies from the Canadian Pacific North West!

GREAT NEWS! Frankenstove Mark VI development reached another fabrication step and I would like to share it with you!  The main body has taken shape as I have massed the materials necessary to safely build on a shoestring budget but continue to use the best materials necessary.  Once again the riser is made up of 4" ceramic tubes and encased in a refractory mix that will act as my vertical thermal mass. This time it will be housed inside an aluminum truck box  and used inside an aquaponic greenhouse previously mentioned.  As pictures are worth the proverbial thousand words, feast your eyes on the build so far!
As you can see in the attached photo the 4" ID ceramic core rises 40" above the 3.25" x 3.25" ID thick walled firebox.  You will also notice two angled secondary air inlets that intersect the riser and horizontal firebox along with the 3/4" FIP at the bottom of the modified 30 pound inverted propane tank ( the bottom secondary air intake also acts as a fly ash extractor which keeps the 100 pounder repurposed propane tank bell clear of ash) This has proven successful in the Frankenstove Mark 5 and has been made more compact as previous experience in ash collection is very small compared to expectations.  Also it was made smaller to fit inside the available aluminum box.
The refractory is a blend of perlite, fireclay, silica sand, portland cement (and finely granulated refractory that was used to build Frankenstove Mark 2( recycled proven material to keep production costs down).

I know what you are thinking... why the second angled secondary air inlet? I thought you would never ask.  If you've been following this thread from the beginning, I was experimenting with atmospheric steam to reduce NOx and improve moisture in the burn tunnel.  Well I thought I would give that another try once I get this build dialed in. If I don't need it a simple cap will seal its fate.

So, this refractory core will take a while to cure as I do not wish to make the same mistake I did with my original Frankenstove Mark 1 causing the refractory to crack due to heat stress.  I am also working on building a better wood pellet basket and an improved secondary ember burning containment/ primary ash catcher!

I know this build is beyond the skill set of a lot of  the basic designs of rmh builds and many on this site say that a 4" riser system cannot function like larger diameter riser designs but this thread is testament to relentless trial, error and "what - if " thought experiments. This build can be done with a grinder, drill and a basic knowledge of welding along with basic hand tools and I encourage anyone who is handy to give this design a go with safety as the prime directive.

Stay tuned and thank you for 6,000+ views on this thread!
2 weeks ago
Hello Fellow Permies!  Great News up here in the Canadian PNW!  

“Frankenstove 6” has begun fabrication. I have been given the Grace of my Wonderful Wife Patti to shift some of the items on the Home Job List and I will be posting the progress of the build as I go!  I will try to keep the construction simple by using basic tools such as a drill, grinder, welder and hand tools. This project will use extensive welding to create a Vertical Thermal Mass Rocket Stove that will be used in an 8’x12’ greenhouse that is built over a 8’ diameter aquaponic pond to grow food like lettuce kale and arugula.
The main materials will be one 100 lb propane cylinder, one 30 pound cylinder, some square tubing, ceramic tubing and refractory cement and an aluminum toolbox! Yes! This will have the general look of the F5, but much more compact to fit in the greenhouse. Of course, it will be wood pellet fed and of course, not require any electricity to operate. I know my design strays wildly from the grassroots style of rocket mass heaters on this sight but it’s design may inspire others to push the envelope when the decide to build ther own!  I should also like to continue with the 4” diameter riser that has operated in Frankenstove Models 3, 4, and our current operational Frankenstove 5. So without further ado, here are some pictures of the start of the build. Stay tuned, be safe, be warm, be Kind!

4 weeks ago
Hello Fellow Permies!  
Here are the photos of the Frankenstove Mark 2 Autopsy I recently performed as promised... Finally figured out the picture attachment issue!  Yay!

The first photo shows the retired Frankenstove Mark 2. I did some work on the pellet feed and it proved I needed a larger opening for higher output temperatures.
Photo 2 shows all the parts that were in the refractory matrix
Photo 3 shows the split of the Vertical RMH where the horizontal burn chamber meets the vertical metal riser insulated with refractory.
Photo 4 shows an attempt to dig thru the refractory material which had the consistency of concrete!
Photo 5 shows the blast damage from the horizontal flame meets the 90* transition to the vertical riser! The intense heat burned a hole right thru the cast iron pan! Fortunately the refractory poured behind the pan and maintained the integrity of the heat shield to divert the flame vertically!
Now that you can see what I am talking about, you can see that metal has no place in the vertical riser in the world of RMHs! The extremely high temperatures cause severe spalling of the metal to failure and causing a major inconvenience to replace the "innards" of your stove.
I really hope that any newbie comes across this thread will research better riser materials in their build seeing proof that metal risers are a bad idea.
The Frankenstove Mark 2 lasted a few years heating a 2000 square foot home using wood pellets without issues; other than burning out pellet baskets. So, I still struggling to build the ultimate pellet basket that works without burning itself up.  The Frankenstove Mark 5 has improved on this issue and the lessons learned will be relayed to the development of the Frankenstove 6, which will be built to heat an aquaponic greenhouse.
Stay tuned as Frankenstove 6 is under design build and I am optimistic to share the build with all y'all.
peace health and happiness!
Peter Chauffeur
3 months ago