sonny morrow

+ Follow
since Feb 04, 2019
Merit badge: bb list bbv list
For More
Apples and Likes
Apples
Total received
In last 30 days
0
Forums and Threads

Recent posts by sonny morrow

Hey everyone! I built a rocket mass heater here a while back and it has been working wonderfully ever since. I used a ton of resources around these forums and I thank you all for that.


I figured some of you would like to see a nice video with the rocket mass heater featured in it! I hope this acceptable on these forums and I apologize if I am breaking any rules. I figure this should get the word out about some sustainable building methods as well as rocket stoves in general.


- Sonny
3 years ago
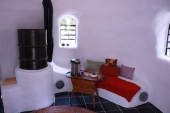
Alright, I ended up finishing this rocket mass heater a while back but never got around to posting the final pictures. Here is the finished product:


The outer layer has been rendered with type s lime plaster, identical to the walls. Everything has been limewashed with four coats and it all blends together very nicely. I'll post some more pictures once it is decorated with pillows etc.
5 years ago
Here is another update, although not a whole lot has been done since the previous one. I started giving the rocket mass heater some layers of cob as well as stuffing in some bricks that I had no use for:


I also properly mounted the chimney on the exterior and sealed the exit:


Pretty much all that is left to do on the rocket mass heater is shape the thermal bench and we are good to go. I have lit it another few times since the last post and it works amazingly and I can't wait to use it next winter.


5 years ago
Its been a month since my last update but things are now going great as of the past few days. I was able to accomplish a lot on the rocket mass heater and I even got to light it for the first time!


I took everyone's advice on insulating underneath the system to protect the floor and also to maximize the system's ability to heat the room.

I made a border out of clay and sand for the footprint of the whole system (including the shape of the thermal mass bench) and then added 2" of clay stabilized perlite and then added a layer of aluminum foil over the perlite.


Then I did a quick mock-up of the core of the system, to make sure the corbel of the dome wouldn't hit the barrel from the newly added height of 2" (from the perlite).


After that, I built the system for real and I also constructed a brick manifold in an octagonal shape and then connected the ducting to it. I then sealed the barrel with a clay-sand mixture.


After that, I installed the chimney on the exterior. It looks a little rough right now but I will repaint the surrounding areas as soon as the plaster fully cures:


Then it was finally time to test the system, indoors!

It must have taken me 15 minutes to get the system running normally, mainly due to my inexperience lighting rocket stoves but the draft was working pretty much right off the bat, even with the system being damp and cold. Once I got the system running nice and hot with some bigger pieces of wood, I noticed it was producing a lot of smoke but upon further observation, it was mostly water vapor coming from the wet mortar in the system. I ended up running the system for about 4 hours and it was working perfectly! I honestly cannot remember the last time where something I've built worked exactly as it was intended to, and what a nice feeling that is. I owe it to all of the wonderful resources on Permies as well as of Erica and Ernie Wisner. Towards the end of my burn session, I noticed it wasn't producing much of anything out of the chimney. I climbed up on the dome to feel the temperature of the exhaust, and I was easily able to put my hand on the exhaust without burning my hand. Now it is time to make this thing beautiful to match the rest of the dome. I will update in the coming weeks/month. Thanks for reading.
5 years ago

Aaron Tusmith wrote:Sonny your building is so cool, would fit right in on Tatooine


Thank you, and yeah I get that a lot! But I have to agree.

Update 2/15/19 Basic Floor Plan & Duct Work Progress:

A few days ago, I drew up some rough plans for my rocket mass heater. This should explain my design, though only to a certain extent, but more importantly, it will help me to keep this build in line and I will probably update it as I go.


In terms of actual progress, I have decided to route the chimney in the original location I had planned but I tried to keep it inside as high as possible. I understand that will affect my draft, but I have decided that it is one of my only feasible options. I will, however, be making my chimney taller than I had previously said on the exterior, and this should hopefully allow for a good draft. We will find out in the coming months.

Once again, here is a picture of where I intended to exit with the chimney as well as the core of the system:


I successfully carved a hole into the structure to exit the chimney with and installed the interior portion of it:


I continued on with the ducting and have stopped at this point:


I will soon build the core of the system so that I can connect the duct work to it and begin building the thermal bench for this heater.

Note: Before the final assembly, I will be insulating with perlite underneath the ducting, the core of the system, and most likely against the wall.

5 years ago

Glenn Herbert wrote:By code, the chimney is supposed to be at least 2' higher than any roof/structure within 10' and at least 3' above the point of exit. This is not just bureaucratic mumbo-jumbo, there are good reasons for it. With the pointed dome, you could probably be safe with a bit less than the 2' rule as it will not generate the kind of turbulence and downdrafts that a gable would. You would need to make the chimney secure against wind, which means either making it very strong and connected to the dome structure, or braced to the roof above.

I doubt you need to have the fan so high that there could be no space next to it for the stovepipe. A small ceiling fan should work fine for a space the size of your dome. I would hang the fan with 8" to a foot of clearance from the dome sides, or possibly slightly off center, and run the stovepipe up to near the top. Exiting there would give a less obtrusive look overall.

If heat in the summer is a serious concern, I might make a removable section of stovepipe so hot air could escape the top of the dome.


Glenn, I see what you are saying and not only will the ceiling fan be an obstacle but there are many other variables which would make exiting through the top of the dome a nightmare. It is sort of out of the question, unfortunately, and I am not disagreeing with you in the slightest bit. However, I have read Ianto's book which showcases many possible chimney designs, even a horizontal exit for example. I know that a lot of these chimney designs are far from ideal, but from what I have read they can work. With that being said, with my current idea of exiting next to the barrel, could my design work? I'm imagining on cold days, a cold start would be difficult and I might have to prime the system. Although once the system heats up, in theory, wouldn't my draft be sufficient enough? Could my barrel radiantly heat my chimney enough to provide a sufficient thermosiphon? I'm sure nobody can definitively answer this question, but I'd love to hear speculation only relating to the design that I've roughly outlined above.

Gerry Parent wrote:Sonny,   Glenn's comments about the chimney exit are all tried and true methods which would provide the most trouble free installation however, as your building is round and streamlined to the wind, perhaps downdraft may not be an issue for you? There are so many factors that make for a good draft. You could skimp on a few and still be OK but best to not make them unless you really want to accept the possible consequences (aka have a backup plan).
Sorry I couldn't add any assurance for you, but perhaps someone else may have more experience with a structure like yours.


Gerry, this is similar to how I am feeling too and I am not skimping on anything other than chimney design, as far as I know. I'm hoping that this will work, otherwise, I may have to really rethink this RMH's design. Worst-case scenario, I think that potentially it is possible for me to exit where Glenn is saying but it would be a huge challenge and I am not opposed to it at all especially if others feel that I would be screwing myself by not routing my chimney this way. As of right now, I haven't started this build and I won't until I've established where to install the chimney. Once again, I'd love some more input on this. Thank you all, I've learned many things from you all so far.


5 years ago

Glenn Herbert wrote:Cross posting... Good for insulating under the RMH. Making an actual air separation so air can carry heat from all sides of the mass to the interior would be best, but insulation is good. Aluminum foil is effective as a radiant barrier, but that only works when exposed to an air layer. Touching other material, it does absolutely nothing.

I'm curious what prevents you from exiting the roof at the peak with your chimney. You will need to go to the same height wherever you locate it, and anywhere else makes more pipe exposed to the cold exterior, and needing to be supported against wind.


Yeah, I understand that ideally, my chimney should exit right out of the highest point of the dome. However, there will be a ceiling fan mounted directly in the center of the dome which will hang down a few feet. There would be no way for me to make a chimney exit in that location. I'm curious if you think the draft would be sufficient if I located the chimney roughly where the silver stove pipe is in this picture:


Which would look like this on the exterior:


Although I understand that I would probably have to lengthen the chimney higher than my drawing shows. But aesthetically speaking, I am hoping that a short-ish chimney will work. This dome is dug 2' down in the ground too if that matters any. Choosing where the chimney exits is proving to be quite difficult, can anyone else provide input? Thank you
5 years ago

thomas rubino wrote:Hi sonny; Welcome to Permies!
Beautiful tea house you constructed for your brother !  Superb work !
As far as your thoughts on your RMH.
Under your core will heat up too much without insulation of some kind, and eventually destroy the concrete underneath !
Under your mass will not be that hot.
Your dimensions all sound good.
Making a thicker mix of fireclay and clean sand , then spreading it by hand on each brick works better for me than dipping in clay slip.
Making a brick transition area worked better for me. Others like using a barrel, its personal preference. As long as it is large enough!

Now about your bench. Have you considered using half barrels as a stratification chamber bench rather than a piped bench?  Faster heat, easier to build and no flow restrictions.  

Keep us posted with pictures as you build.


I will definitely be insulating underneath the core now that you have all chimed in and used some solid logic to convince me. This makes complete sense to me now, and yes I was thinking the slab would act as another "battery" so to speak to capture and retain expelled heat energy from the core. Now I clearly understand that it will be very important for me to insulate underneath the core in the long run. I'm thinking of using 2-3" thick of perlite mixed with clay slip underneath the core just as Erica and Ernie do and possibly line the floor with aluminum foil first. Then I'll lay my heater pad down and build the core. What do you all think of this idea? Also, in terms of heating the dome, would it be better to insulate underneath my bench thermal mass too? I understand that the concrete would most likely be fine in the long run if I didn't, but would it be smarter to insulate in terms of heating the space efficiently?

Thomas, I had not heard much about stratification styled rocket mass heaters before. I ended up doing a bit of research after reading your comment, and I would love to try this method in the future. As for the RMH in this thread, I have already bought 15' of stove pipe, crimpers, and elbows etc. So with that being said, I will be building with stove pipe as I originally planned. I did, however, find an excellent video explaining this style of RMH if anyone is interested. https://www.youtube.com/watch?v=vXHmcKWfFw4 I'm sure some of you have seen it before, but it definitely helped me understand the fundamentals behind it if anyone is curious.

Dillon Nichols wrote:Welcome to permies! Beautiful structure. Do you have a feel for how many work-hours are in it?

Thomas, do you have a reference handy for the suggested half-barrel option? I do not think I am picturing it correctly...


Dillon, I was honestly so concerned about getting the dome in question built that I did not even think about keeping track of the work hours. I couldn't even take a guess, I started it one year ago in January 2018 but there were times where months had gone by without any work done to this structure. I also built a few other structures around that time, while Tommy's tea dome sat untouched for quite some time. One of these structures I did, in fact, keep a record of the number of work hours that went into it but only in terms of building the structure. It took five of us to build this dome (below this comment) and it took 8 days. We each worked 8-9 hours a day, and this was even in 110+ degree weather in the Mojave desert! The size of this dome is 10' diameter with a 2' spring line which makes it about 12' tall, significantly smaller than the one I built in the previous posts although still quite similar comparatively speaking.


Brad Weber wrote:Hello Sonny and congrats on a cool design for your house. I have concerns with not insulating under the heater. I built one with the same thoughts as you that the floor would also act as mass. Boy was I right. The problem is nothing was done in advance to insulate under the cement. I see you did this also. The Earth is a heat sink and some of your heat will go through and keep going, never to return. Insulation under the mass or even better, elevation off the floor will go a long way at keeping the heat of your mass inside the room. Then the concerns of using building structure for heat. Will it take the expansion and contraction of the high heat and then cool? Was it built for that? In your case it might be fine. You will have to see. I would also like to have the chimney pipe exit higher if not right through the point. The ceiling will be the warmest there and the pipe will draw wonderfully even on cold start. Insulated pipe through the masonry and above.
Brad


Hi Brad, thank you for your comment and kind words. I feel that structurally, this dome will easily tolerate the constant swings in temperatures from the RMH. Though cosmetically speaking, we will see how well the interior plaster holds up to that. It is a type s lime plaster, which has some give to it and I feel that the RMH won't disturb it too much. In terms of the chimney, I am opting to exit vertically right next to the barrel. There would be no way for me to exit straight through the ceiling at its highest point, unfortunately. I'm hoping that the barrel further enhances this RMH's thermosiphon by having the chimney close in proximity to the radiant barrel.
5 years ago
    Hi there, my name is Sonny and this can act as my formal introduction to you all. I've been a long time lurker of this forum, and only now I feel I am ready to post my first thread. As I mentioned, my name is Sonny and I am 21 years old at the time of this post. I have studied and apprenticed at CalEarth Institute and taken every Superadobe course that they offer. Some of you should hopefully already know what CalEarth Institute teaches and for those of you who don't, they teach sustainable earth architecture based around strong shapes; such as domes or vaults. This is my passion, and I am so lucky to have already discovered what I want to do in life at such a young age. I know this could of course change, but I know for certain I am going down a good path; wherever it may unexpectedly lead.

My reason for posting this thread is that I, first of all, would like to document my progress on building my first rocket mass heater, as well as receive any advice from all of you knowledgeable folks here at Permies. I have read many books regarding the subject of rocket stoves/rocket mass heaters and I know the basic fundamentals and principles, and with that being said, I probably will not be asking many beginner questions. However, there are numerous questions that I do have, which are not easily answered by searching Google, or Permies for example. As I mentioned above, I build with the earth and I have a structure in particular that I built for my brother in Northern California. This structure is going to house my very first rocket mass heater. I have gathered 90% of the materials that I will need to build this rocket mass heater, and I am nearly ready to start assembling it. I figured I would post here first in order to straighten a few things out and organize my thoughts. Below, I will show pictures of the structure in which I will be building my rocket mass heater:

Note: if you are only interested in the rocket mass heater aspect of this post, scroll down towards the bottom and you will find where it says "Rocket Mass Heater Section"


As you can see, it is not by any means a conventional shaped building. This was constructed entirely out of earth, and once again for those of you who don't know, this is what CalEarth Institute teaches. This dome is a 12' diameter with a 2' spring line, and I know it is difficult to interpret how big or small this structure is so I will tell you it is 14' tall. The purpose of this dome is not to act as a usual home, but rather a change of physical environment for my brother Tommy who will use this structure as his tea house. I will quickly note that my brother Tommy suffers from muscular dystrophy and that I built this dome for him so that he can take his passion for tea to a whole new level. Here are some more pictures of Tommy's tea dome:


Below, I will show a brief reference to the building process. (In case it is unclear, this structure is built by filling long polypropylene bags with earthen material. Two compasses are used to ensure a symmetrical dome. Barbed wire is weaved between each layer of bag. Each layer is also tamped with a cast iron tamper to compact the material. The structure is then rendered and plastered leaving guests wondering what the structure is made out of.)

It all started with a scale model of what we wanted to build, a single dome with a short entry vault:


We then mapped out our building site and began digging the foundation:


Our first courses of bags:


Fast forward a few months:


And then fast forward to the completion of the bag-work:


That brings us to now, and it is very close to being a complete structure. All that it is missing is a source of heat, which is where this post is heading.


I'm going to draw up some plans for the rocket mass heater very soon, and I will edit that in. For now, I will post the original floor plan of the dome for reference:


Rocket Mass Heater Section

Here is a picture of the dome's interior where the rocket mass heater will be constructed:


I've narrowed the placement down to this spot between the center and left windows. The bench will run along the perimeter of the dome and it will stop at the very start of the window on the right:


Details About My Rocket Mass Heater And Questions For Whoever Is Reading


Hopefully, you can understand the shape I am trying to create for this rocket mass heater. It will be circular shaped, following the exact contour of the wall and it will be roughly 18" high and roughly 20" wide. As I mentioned above, I will draw the plans for the stove soon which should clarify my construction idea.

As of right now, there are a few things I am uncertain about. First of all, I plan not to insulate underneath my first layer of bricks or near the wall as this structure is all one big chunk of thermal mass which I want to heat up just like the bench. The floor is a 4" thick concrete slab with a vapor barrier underneath, and the walls are made out of adobe. I am curious on any of your thoughts regarding my ideas here, I believe I am correct in wanting to construct the stove in this manner. Let me know what you all think.

Second of all, I am uncertain of my chimney and how high it should be. In the picture above, I have a piece of 8" stove pipe that is 5' tall. I don't have a chimney yet but it will be placed roughly where the silver colored stove pipe is in the picture above. I'm going to carve an 8" diameter hole right above this pipe for my chimney to exit vertically. Is my chimney in the right place? How high should it be after it exits? These are things I have no way of researching as most people aren't building rocket mass heaters in dome-shaped structures.

These are my main two concerns at the moment, and I'm sure I will have more as I progress.

A few details I should mention are that I am building a J style rocket mass heater based off of Erica and Ernie's work. I have copied their 8" system dimensions leaving me with a 50" heat riser, a 24" burn tunnel that is 7.5" x 7", and a 16" feed tube. My barrel is stripped of paint, and ready to go. My bricks are refractory good up to 3000 Fahrenheit as well as my heat riser split bricks. I'm going to use clay mortar for all of my bricks, and this is something else I am a bit uncertain of. Should I use just clay slip, or clay and sand? The bricks are pretty symmetrical, only a few gaps here and there. I have a ceramic refractory blanket which will insulate some of my burn tunnel and all of my heat riser. This will be wrapped with a wire mesh. My manifold will most likely be made out of brick in an octagonal shape, although I am tempted to buy another barrel to use instead. Any recommendations on this?

My stove pipe will run about 15' before making it to the chimney. It will follow the wall to the far right window and then loop back towards the chimney. I'm going to utilize many 90 degree elbows in order to make this work.

Once the heart of this rocket mass heater is complete, I will be using cob to render the bench. I think that is the gist of my build and I am very curious to know what you all think. Once again, this is my first time building a rocket mass heater. Though I have done my research as much as I could before posting, as you can see I am working with some variables which are not all that common. I appreciate any feedback or advice and thank you for reading my long post if you made it this far.

- Sonny
5 years ago