Luke Mitchell

gardener
+ Follow
since Feb 04, 2020
Merit badge: bb list bbv list
Forum Moderator
Luke Mitchell currently moderates these forums:
Biography
I manage a smallholding in Pembrokeshire, Wales with my partner. We have established a small coppice (mixed species, mostly hazel) and are growing edible mushrooms on hardwood logs. The majority of the land is managed as haymeadow, rich in wildflowers. We grow a large amount of food on our small, polycultural vegetable area with a focus on perennial and low-input varieties. The site is a haven for wildlife and we keep conservation in mind whenever we make changes.
For More
Pembrokeshire, UK
Apples and Likes
Apples
Total received
In last 30 days
0
Forums and Threads

Recent posts by Luke Mitchell

Hi Lukas, thanks for commenting and for developing Pearl Jars!

I've just caught up with the comments about them and they look fantastic. I love the stainless steel rings on them as that's my biggest gripe about my (very) old Kilners - rusting metalwork.

There are some fantastic comments, particularly by Judith, and I second the views about more purchasing flexibility and detailed technical specifications (dimensions, etc.).

I'm glad to learn that they are available in the UK and I'll be picking some up when I next need some jars.
2 weeks ago
I needed to do some soldering today and I dug out an old, cheap soldering iron that I must have taken the plug from at some point. I wired in a new plug and snapped some photographs.
3 weeks ago
This is a very simple electrical panel that I built to operate my 12V DC water purification system. There is a large capacity, 2-pole breaker for isolating the supply (which is common practice where I live). I then have two individual, single-pole breakers (just the positive wire) for the circuits. I've included a shot inside the panel for anyone who is interested.

EDIT: I've added another photo with the 2-pole breaker labelled as the isolator
4 weeks ago
I've been gathering these measurements for a while now as I'm going to begin work on our off-grid electrical system this year. Some of the larger appliances will have to wait until we can run them - the electric heater, the kettle and the dehumidifier.

I was surprised by how much energy the printer drew (although it only operates for a very short period of time). I was also surprised to learn how much more energy my Makita fast charger used compared to the slower variant (~20% more!). This energy must be lost as heat.

In general the appliances used similar amounts to their specifications. A particularly accurate example is my "Phone charger A", a 15W fast-charger made by Anker. It peaked at 14.7W.

My power monitor is a no-brand made in China model rather than a Kill-a-Watt (which aren't available in the UK). It seems to be accurate and I have no issues with it.
4 weeks ago
I've always been lucky when it comes to rooting plants. Over here we say that some people have "green thumbs". I suspect it is more about having a feeling for what will work, rather than pure luck.

I tend to take semi-hardwood cuttings for perennials, meaning growth from the most recent growing season. Whenever possible I take cuttings when the plant is dormant, in the autumn/fall or winter. I usually try rooting in regular tap water (which has a small amount of chlorine in, sadly, although this will evaporate off quite quickly). As mentioned above, shading the new roots is a good idea although not necessary for all plants - some hardy species such as willows (Salix sp.), poplars (Populus sp.) and many house plants will root readily regardless of light levels.

I've heard of people using "willow water" as a natural rooting hormone. This is prepared by either re-using water that willow has been rooted in or by smashing up young willow growth and steeping that in water overnight. The willow cuttings have salicylic acid (aspirin) in them which is used by many plants as a defense hormone. They also have lots of plant rooting hormones in them (which explains why they can root so easily), a substance known as indolebutyric acid.

Another method that I use is to place large numbers of cuttings around the edge of a plastic pot filled with good-quality compost. The compost drains fairly well but stays moist (without being waterlogged). The cuttings are placed right up to the plastic pot so they are protected from drying out. I usually get good success rates this way and have used it for apples (Malus), cherries (Prunus), holly (Ilex), rose (Rosa) and many semi-hardy plants too.
4 weeks ago
Tony Wrench built his roundhouse up the road from where I live. The climate here is pretty mild, although it does get cold (for us) in the winters. I wouldn't expect to see negative numbers (-1C and below) for many days each winter though, and rarely below -6.

Straw bales are surprisingly good insulation. This thread here on Permies suggests that a single bale is around R28-R35, depending on its size and orientation. You could very easily double up on the straw bales, pegging them together with sharpened wooden stakes if you like, to achieve an R-value of 50 or more.

To add to this, the turf ("sod") layer will provide additional insulation. I don't have any figures to hand for that but it will be significant.

In terms of waterproofing, the EPDM/pond liner will want to be placed between the turf and the straw. Hopefully the reasons for this are obvious but the straw will fail very quickly if it is allowed to get wet.

The condensation issue might not be as severe as some imagine. The roof design would be described as a "warm roof", meaning that the insulation is on the inside and the cold, water impermeable layer beyond it. This means that there isn't a cold surface for the water vapour to condense on. Placing a vapour barrier between the straw and the rafters would remove any risk of water ingress but I would worry about the straw being unable to breath.

A final consideration is that Tony didn't have to consider large snow loads for his design. This will, of course, only add to the roof insulation but you should consider using larger timbers that he does to cope with the increased weight.
3 months ago
Hi Nancy,

I live in a big coffee-drinking household and we get through a lot. All of our spent grounds (once they have been used to make coffee) get composted straight in the heap, where they seem to do very well. We have picked up waste coffee from cafes too, as they often give away their grounds, but not so regularly.

It has been said that too much coffee in the compost will sour it (turn it acidic). I'm not sure how true that is and, certainly, it could be balanced out with some chalk/lime/wood ash (and our compost gets some the latter two).

I've also heard that slugs and snails don't like coffee grounds and will not crawl (slide?) over it if they can avoid doing so. I have tried to create rings of coffee grounds around sensitive plants but, to be honest, I've not noticed much of an effect.

A final thought is that it may be good for disguising plants for whom the pests discover by smell. Carrot root fly, for example, is famous for smelling out the carrots that it lays its larvae in and people often use a guild of aromatic plants, such as marigolds or garlic, alongside the carrots to discourage the fly. I wonder if coffee grounds in close proximity to carrots would help too?
5 months ago
This is a badge bit (BB) that is part of the PEP curriculum.  Completing this BB is part of getting the straw badge in Nest.

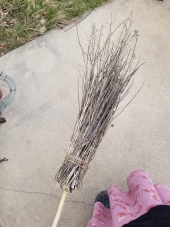
In this Badge Bit, you will make a broom. Broom bristles can be made from various different natural materials, such as "broom corn" (sorgum), branches (heather and birch branches are common, as are branches from the broom plant), weeds, or even fibres (like palm fibre). (More on the history of brooms can be found here and )

The bristles can be attached to the broom with various materials, from twine to string to wire.

This is a video on making a sorgum ("broom corn") broom with wire:


This one is made with branches (called a besom broom):


This one is made with palm fronds (note, it would need a handle):


This one is made from the ribs of coconut fronds (note, it would need a handle)


To complete this BB, the minimum requirements are:
   - must be made of untreated wood
   - must be sanded down to prevent splinters
   - must be oiled with a nontoxic oil (e.g. linseed oil)
   - must use natural fibers or materials on the broom head

To show you've completed this Badge Bit, you must provide proof of the following with pictures (or a video < 2 mins long):
   - before, during, and after of making a broom
   - demonstrate it meets the above stated requirements
6 months ago
I tried taking a load of cuttings in autumn last year but none of them took. I plunged them into the end of one of our vegetable beds and by the spring they had all succumbed to the frost. I would suggest trying to keep them somewhere sheltered and hopefully you'll have a better result.
6 months ago
Ulla, your squash look amazing as usual! I love the crooknecks.

I've not taken a serious venture into growing grains yet. There is a tradition of growing oats in my part of the world and I would like to try that at some point. I don't have the equipment that would make it viable at the moment though - I'd either need to shade off some of the grass for a year, till the soil to create a seedbed or, better, do both. I imagine (and hope) that I wouldn't need to till the soil each year and I can probably work out a rotation with legumes (broad beans!) to keep the soil healthy. That's a project for another year though.

Your sorghum looks great. Well done on getting such a good harvest.

As usual, the squash we are harvesting are taking over the house. Any flat surface has one on at the moment! I've attached a photo of our staircase for comedy value.
6 months ago