If you have signed up for the permies affiliate program, you can use trackers to evaluate the performance of your links and make them more efficient.
(If you are not signed up yet, you are missing out!
Click here to sign up to the affiliate program and make yourself a residual income stream).
What's all this?
Let's say you want to be an affiliate of a product in our digital market. So you grab your affiliate link and post it to 10 different sites. Maybe you also post it to a bunch of different social media sites. At the end of the month, you have made a grand or two! And it keeps going, giving you nice a residual income stream! Awesome!
At some point, you want to know which link drives in the most sales so you can focus more on that link. But, since you have posted your affiliate link on 50 different sites, you have no way of knowing which link made the most sales. Bummer!
This is where trackers become helpful. As the name suggests, this helps you track when people navigate through your affiliate link.
How do I track that stuff?
On the
affiliate console, there is a tab called "Trackers".
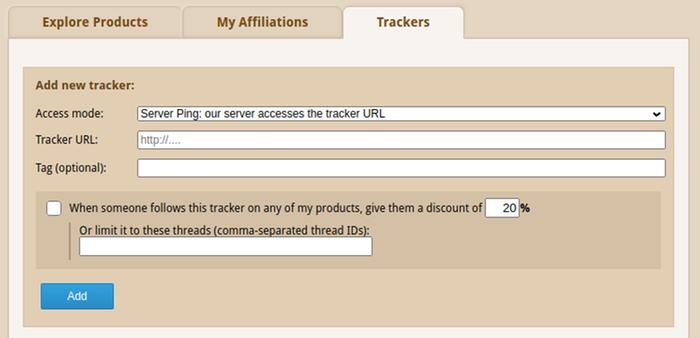
From this tab, you can add and monitor trackers.
You can create a tracker with three different access modes. Each access mode behaves differently.
"No access" mode
This is the simplest form of access mode for a tracker. When you choose this mode, permies keeps tracker information for you on its own servers. Unless you have your own tracker script hosted somewhere else, this is the mode you would want to use.
To use this mode, select "No access: internal tracking only".
The "Tag" field is optional, but specifying a tag helps identify it later.
For example, let's say you want to create a tracker for all the affiliate links that you post on Instagram. So, you select the "No access" mode and specify something like "insta" as the tag.

Click the "Add" button, and you will see a new item under the list of trackers, like this:
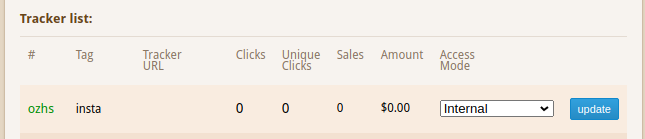
When you create a tracker like this, it automatically generates a unique ID for your tracker. You can see your tracker's ID under the "#" column. In the above example, the ID is "ozhs"

The "ID" here is an important part. More about this is explained under "how to use your tracker".
"Browser iFrame" mode
Use this mode if you have your own tracker script. When you use this mode, you have to supply a URL to your tracker script.
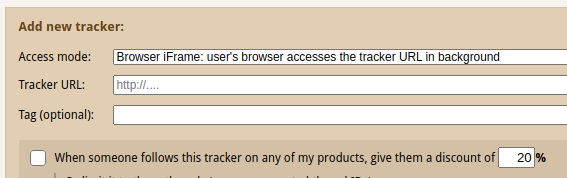
When a buyer makes a purchase, we include the supplied URL within an iframe on the buyer's browser, which
in theory makes the buyer's browser send an HTTP GET request to your tracker script. From your tracker script, you can obtain headers or set/read cookies on your domain, or that sorta thing.
BUT: Most of the modern browsers no longer let you set or read cookies this way - not even on your own domain. Your script can still read HTTP headers originating from the buyer's browser, but you will not be able to read or set cookies in most cases.
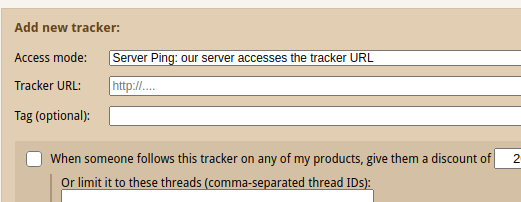
"Server Ping" mode
This is mostly similar to the "Browser iFrame" mode. But the only difference is that instead of having the buyer's browser send the request, permies' server sends the HTTP GET request to the supplied script URL:
 How to use your tracker
OK, you created your tracker. What now?
To use your tracker, go to the "explore products" tab or "my affiliations" tab. Click the "affiliate links" button next to the item you want to create an affiliate link for.

At the next step, choose your tracker from the dropdown list at the right. This gives you a bunch of affiliate links with the tracker code included:

Or, if you want to manually add your tracker ID to one of your affiliate links, simply append this to your affiliate link:
?t=your_id_here
But wait.... if your affiliate link already has "?" somewhere in it, you should use this format:
&t=your_id_here
For example, if your affiliate link is this:
https://permies.com/wiki/65386f8
You can add your tracker ID like this:
https://permies.com/wiki/65386f8?t=ozhs
When people navigate through your link, you will be able to see stats under the "Trackers" tab.
Individual tracker stats
After your trackers have made some sales, you can see stats on each tracker in a nice graph.
To see stats on individual trackers, click on the amount or number of sales next to your tracker:

This will take you to a new page showing stats for that particular tracker:
 What's with discounts
If you sell something on the permies digital market, you can use trackers to give discounts to some of your buyers.
To do this, select the discount checkbox and specify a discount percentage when creating a new tracker:
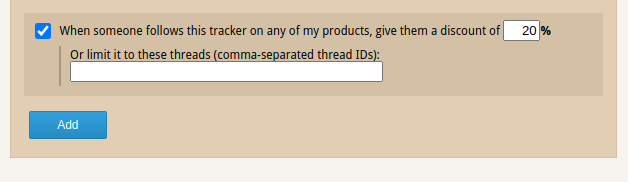
Obviously, you can only give discounts on your own products. :)
Now, when someone navigates through this tracker to buy your product, they get the discount you entered.
If you sell more than one product and want to limit discounts to just some of your products, enter the thread IDs in the given textbox.
Got a burning question? Reply to this thread and ask!


 5
5


