Keith Odell

pollinator
+ Follow
since Dec 09, 2012
Merit badge: bb list bbv list
For More
Apples and Likes
Apples
Total received
In last 30 days
0
Forums and Threads

Recent posts by Keith Odell


Thank you SO much for sharing this. How absolutely cool is that?! I have a couple of questions about your set up if you'd not be too bothered by me asking.

I am really into that. Super stellar.

L&R,
F
**************************************************************************
Faeryn,

You're welcome & thanks.  But first let me explain! No, there is too much. Let me sum up.

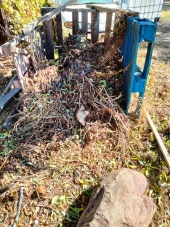
Cut a hole in the bottom of the front.  This is for air and harvesting.  
Above this, drill matching holes.  4 or 5 supports, double the holes on the front and back for the support for the false floor.
Insert support of your choice.  I've used all-thread, conduit, garden stakes and am currently using 16 gauge wire threaded.
Install false floor. I wrap 2-3 sheets of newsprint each way (front to back, side/side) with a piece of cardboard over that,  Makes a basket to hold the contents.
Add ~ 4" of bulky bedding.  Egg cartons, toilet paper rolls, shredded cardboard.
Add ~ 4" less bulky bedding.  Shredded paper.
Add food and worms.  Top off with bedding of your choice.
Pour 1 to 2 quarts of compost tea, rain, pond or non-chlorinated water, old coffee or tea slowly over the top.
Lay something over the surface.  Cardboard, burlap, newspaper or a plastic bag.
I like the plastic bag.  It keeps the moisture in and is a good indicator of worm activity - on the underside, you'll find poop, worm trails or worms.
After the compost has built up (4" to 6"), the false floor can be removed for light harvesting or gravity fed dropping.  Time varies, 3-12 months.
From then on just leave the supports, no false floor and let them do that thing they do, so well!

Food goes in the top, air from the bottom, worms work in the middle and good stuff comes out the bottom.

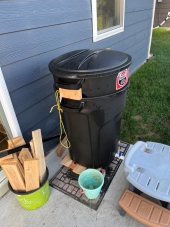
I make these in 11-gallon, 23-gallon and 55-gallon versions.
For the 11 and 23, I use a drill, utility knife and a hair dryer.  55, drill and jig saw.  To add the window, I also use sealant or caulk.

If you are going to only do 1 worm bin.  I would do this.  If you want to do multiple, do totes and then use this as your compost finisher/easy harvester.

Hope this helps.  If not, fire away.

Keith
2 months ago
A strong vote for worm composting.  A simple tote as-is or a kitchen trash can - set-up like a flow-thru - are very easy to own and operate.
Treat a new worm bin like a baby and you'll be just fine.  Keep it comfortable, not too wet, don't feed it too much and act like you like it.
After a month or so it will mature (they grow up so quick!) and then it will be game on.

The flow-thru with the window was made because I'm an engineer and my wife is an artist.
She said show me.  So after explaining it to her ALL day, I made this.

Good luck with whatever route you go.
2 months ago
Bill,  

Congrats on getting started with gardening and now - worms.  I'm rather good at worm composting but have only fleeting experience with the stacking systems.  I would set up the bin as soon as you can - some call it seasoning.  The thought are that it will be more hospitable to the worms than a new bin.  I don't buy stuff to rot, so I would use coir if I had it or it was on my property but I'm not buying it.  Worms will do just fine on plants, fruit/veggie waste, coffee grounds/filters, cardboard, paper and leaves.  I don't do shiny paper or cardboard but other paper and cardboard I use.  I don't have ENC's as I started with EF's and didn't have a reason to change.  ENC's are voracious but have a tighter temperature band and are slower breeders from what I've read.  I think that you can start the second tray any time.  I would probably wait until the first tray was about half worked over.  1lb should be plenty of worms to start and I always suggest to my customers that they pull some out and put in a bucket or other smaller container as either a insurance policy or a colony for another bin.  Sorry about being all-over the place but I think you'll be in good shape with your plan.  Holler if you have questions and I'll try to get you a good answer.

Good luck!
5 months ago
Jen, good news, good job!  

First - celebrate the good compost.  Then be glad that you have 'easy to accomplish' improvements.
Best is the enemy of good.  You have good...and a way to better.

I wouldn't worry too much about the bugs.
If you didn't add them to the compost, they were already there.

Maybe do a quick, rough screening with your finished stuff before you add it to your beds.
Or, leave it close to your first pile for a bit so the critters that want the fresh stuff can go back to work.

Again congrats!
7 months ago
Chris,

I think you should modify at least 1 of your trash cans similar to Nancy's set-up.  I make bins like that in 11-gallon, 23-gallon and 55-gallon sizes.  The air flow coming from the harvest hole on the lower side thru the compost increases the microbe/fungi/wee beastie reproduction which speeds up the production.  I would use garden stakes, all-thread or conduit to support a false floor of cardboard/newspaper above the harvest hole.  You would need a drill or something to make holes for the stakes and a jig saw, or utility knife to cut the harvest hole.   Then either buy a pound of worms or go to a horse farm to get some manure (almost certain to have red worms).  You set it up that way and they will be eating everything you can throw at them by the end of summer.  It's what they are made to do.
9 months ago
Chris,

Your design will work - eventually.  20 worms will take a while to make a difference.  In that time you will need to make sure you don't overfeed and create an Ammonia cloud - not dead worms, they just disappear.
Also, are you sure they were red worms and not earth worms or nightcrawlers.  Red worms will reward you eventually, earth worms or night crawlers, not so much.  
If we assume that you are feeding ok and they were red worms, the main issue is space.  It takes 2 to tango and the dance floor is huge for 20 worms.  They'll get there, it will just take longer.
I will start a small bin - 1/2 gallon with 20 worms so they can get to know each other.  Then when they have multiplied sufficiently, I'll start a bigger bin with them.
The other thing to watch out for is heat.  If your black worm bin is in the sun much at all it will cook your worms.
Good luck.

9 months ago
T - sorry your wormbin is not cooperating with you.  It sounds like you are overfeeding.  
I tell my customers that if they have liquid in the bottom they are either over-feeding, under-bedding or both.
I think either cooler will work well.  

You could freeze/thaw your scraps and then pour off the liquid and just use the mush.
This would both prep their food and reduce the liquid you are adding.
Another option is to let your scraps rot elsewhere and again pour off the excess liquid.

I use everything for bedding - cardboard, newsprint, junk mail (not shiny), office paper, paper towels, kleenex, straw wrappers, etc.
Some is more absorbent than others.  Add more of the stuff that absorbs well if you are having issues.
If I do get liquid, I push corrugated down the sides to wick it up and make more worm food.

I would also make a small bin as a safety net using a small bucket or container for 2 reasons.  
Now not all of your worms are in one "basket" and in a small bucket they will find each other easier and do that thing they do.

Good luck.
10 months ago
Congrats on the pond.
I'm green with envy.  Your pond is 6X's of my lot!
If I ever get a pond or a friend with a pond that is close,
I would 100% do floating gardens of some sort.
Good luck.
11 months ago
Arthur and John both gave you really good advice/information but drastically different in the amount of Jen time the compost will take.  
I'm really glad that you're trying again.  I also hope you don't stress over compost.  It should be very chill.  
Everything rots (I stole that!)  Is there a specific reason you are trying to get a hot compost?  
I'm a worm guy and you said it was loaded with worms.  Great job.  Spike the football and go work on something around your place that only will get done by you.  
Let the worms take care of your compost.  They will definitely get you useable compost by Spring.  
Keep them fed, wet and add lots of cardboard/paper/leaves and they will reward you for leaving them to do their work.  

Enjoy.  

I'm going to go chill and harvest my worms and compost.
1 year ago