• Post Reply Bookmark Topic Watch Topic
  • New Topic
permaculture forums growies critters building homesteading energy monies kitchen purity ungarbage community wilderness fiber arts art permaculture artisans regional education skip experiences global resources cider press projects digital market permies.com pie forums private forums all forums
this forum made possible by our volunteer staff, including ...
master stewards:
  • Nancy Reading
  • Carla Burke
  • r ranson
  • John F Dean
  • paul wheaton
  • Pearl Sutton
stewards:
  • Jay Angler
  • Liv Smith
  • Leigh Tate
master gardeners:
  • Christopher Weeks
  • Timothy Norton
gardeners:
  • thomas rubino
  • Jeremy VanGelder
  • Maieshe Ljin

Monks in a small pond

 
gardener
Posts: 787
Location: NE Oklahoma zone 7a
51
dog forest garden books urban chicken bike
  • Mark post as helpful
  • send pies
    Number of slices to send:
    Optional 'thank-you' note:
  • Quote
  • Report post to moderator
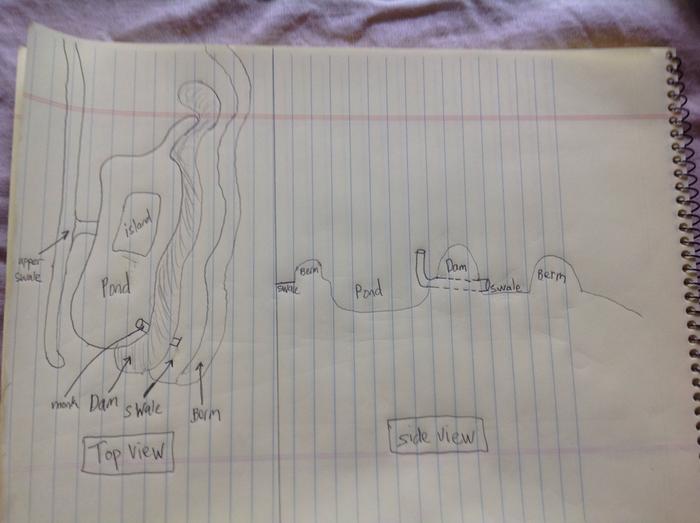
Hey everyone, i got ponds on the brain. I am diggin a pond that so far is about 3.5 feet deep in the deepest parts, has an island, and has a swale just above it and just below it, so water will enter the pond from the overflow of the top swale, and will exit the pond into the lower swale. The plan is to seal this pond by some natural methods after the winter is over. My question is about using a monk and a few come to mind.
From what i gather the pipe diameter is decided by how much flow is expected, which is hard to judge. This system will be intercepting multiple surface runoff flows that occur in heavy rains, which used to go under the house and puddle. The rains are usually not crazy here, but it seems to be more intense in the last few years, like record amounts of rain in a few days time. What size pipes are you guys using?
Another question is regarding the seal around the pipe, and the depth of the pipe. In pauls drawings the adapted culvert is riding fairly high on the dam wall, but in The pictures that zach weiss posted it appears to be riding quite a bit lower, into the heart of the wall. My dam wall as it is now is not that tall since i have dug the pond out in a higher elevation area, the downward slope away from the dam doesnt begin until several feet away. What variables effect how deep you want the pipe to go through the dam? Off the top of my head it seems like the pipe depth controls the depth to which you could drain the pond, is that it?


For anyone thinking, " what the monk is he talking about?" See pauls original monk thread from 09
 
gardener
Posts: 912
Location: North Georgia / Appalachian mountains , Zone 7B/8A
57
  • Mark post as helpful
  • send pies
    Number of slices to send:
    Optional 'thank-you' note:
  • Quote
  • Report post to moderator


I think Sepp Holzer needs the monks because he has constant water input to the ponds. The monks keep the surface at at consistant level.

I personallly have two small ponds that are filled from roof run off and direct rain. The downhill edges are just a tiny bit lower. When the ponds fill
too much in a heavy rain, the extra just overflows and goes down hill. I don't have constant input of water though, so I didn't see any need to
install permanent overflow relief like monks.

 
Posts: 400
Location: SW Missouri
86
hugelkultur duck trees chicken pig bee solar wood heat
  • Mark post as helpful
  • send pies
    Number of slices to send:
    Optional 'thank-you' note:
  • Quote
  • Report post to moderator
Your picture is correct. The pipe will go in at original ground level after the keyway is dug. You must build or install a baffle plate on the pipe. In the united states you will find them called an anti seep collar. That term will aid your internet research. I'm fixing to dig a giant ridge point dam, and like you, I was debating back and forth about a pipe. However I have decided against. At some point that pipe will fail. It could be 5 years or 150, but it WILL fail and at that point the entire wall must be reconstructed. The earthworks I want to put in, I want to be permanent and stand for hundreds of years without maintenance. You can always syphon water out of the dam for irrigation or pump
 
Zach Muller
gardener
Posts: 787
Location: NE Oklahoma zone 7a
51
dog forest garden books urban chicken bike
  • Mark post as helpful
  • send pies
    Number of slices to send:
    Optional 'thank-you' note:
  • Quote
  • Report post to moderator
Thanks cris and eric. Your thoughts are helpful.
I am thinking at this point i will probably stick with my original plan of having an overflow spillway near the location that the monk is drawn on the picture. Seems a lot simpler.
I might end up having a small air pump to run an airlift pipe for water oxygenation if needed, in which case i could just turn the pipe and shoot water through the spillway if i wanted to lower the water level of the pond.
Ahem, Fingers crossed for another outrageous rainy season so i can test the function of all these structures.
 
Eric Hammond
Posts: 400
Location: SW Missouri
86
hugelkultur duck trees chicken pig bee solar wood heat
  • Mark post as helpful
  • send pies
    Number of slices to send:
    Optional 'thank-you' note:
  • Quote
  • Report post to moderator
I need a good couple rains before I can start my next earthworks. It hasn't rained in so long I don't anything will compact.

Just to be clear when you say your going to put the spillway where the monk would be, you don't mean in the dam wall correct? You CANNOT have any water go over the dam wall.
 
Zach Muller
gardener
Posts: 787
Location: NE Oklahoma zone 7a
51
dog forest garden books urban chicken bike
  • Mark post as helpful
  • send pies
    Number of slices to send:
    Optional 'thank-you' note:
  • Quote
  • Report post to moderator
Well i am honestly not too sure about the final water height in my pond, let me explain and see if it sounds like i have my head in the right place. ( or even on my shoulders)

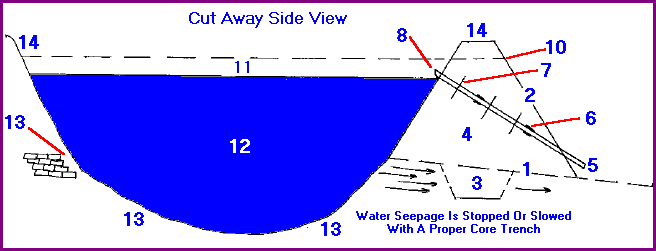
So when i see some farm ponds it looks like they took a place where the elevation was dropping rather significantly and pushed soil down the slope as they dug the pond to make the dam. So it ends up being like this image.


With this design the only thing holding the water is the dam.
i see what you mean water cannot go over the dam, because by that point the dam is holding too much weight and will probably fail. The difference in elevation between the top of the pond and the base of the dam is significant, so people add the culvert, or they have a part that is like a cutout significantly lower than the top of the dam. Aka spillway.

My pond is slightly different in that it is more like a hole dug out of semi level ground because the difference in elevation was minimal from the top edge to the bottom edge. So unlike the above picture the bottom edge of the pond is not entirely earth i have moved, since its a hole in the ground the lower few feet is just unmoved earth, then the dam wall sits on top of that. So the only water being held by the dam is water that is above the old ground level, which is only the top portion of water, if the water line ends up being that high.
So for example if i put my spillway level with the old ground or below (like water level a) no water will be held by the 'dam' it will be just a berm on the edge of the pond. But if i add a spillway above the old ground level (like water level b) then some water will be held by the dam. My plan is to have the spillway only slightly above the old ground level, so the water will flow around the dam and never fill up and go over. This is correct?
Is there a different name for a hole in the ground type pond, versus what is seen above in the first image?

 
Eric Hammond
Posts: 400
Location: SW Missouri
86
hugelkultur duck trees chicken pig bee solar wood heat
  • Mark post as helpful
  • send pies
    Number of slices to send:
    Optional 'thank-you' note:
  • Quote
  • Report post to moderator
I'm going to carefully think about this and give you a detailed response later tonight. If you have an overhead satellite view and somewhat close contour lines drawn in, along with where your earthworks are, would be super immensely helpful
 
Eric Hammond
Posts: 400
Location: SW Missouri
86
hugelkultur duck trees chicken pig bee solar wood heat
  • Mark post as helpful
  • send pies
    Number of slices to send:
    Optional 'thank-you' note:
  • Quote
  • Report post to moderator

Zach Muller wrote:Well i am honestly not too sure about the final water height in my pond, let me explain and see if it sounds like i have my head in the right place. ( or even on my shoulders)

So when i see some farm ponds it looks like they took a place where the elevation was dropping rather significantly and pushed soil down the slope as they dug the pond to make the dam. So it ends up being like this image.


With this design the only thing holding the water is the dam.
i see what you mean water cannot go over the dam, because by that point the dam is holding too much weight and will probably fail. The difference in elevation between the top of the pond and the base of the dam is significant, so people add the culvert, or they have a part that is like a cutout significantly lower than the top of the dam. Aka spillway.

My pond is slightly different in that it is more like a hole dug out of semi level ground because the difference in elevation was minimal from the top edge to the bottom edge. So unlike the above picture the bottom edge of the pond is not entirely earth i have moved, since its a hole in the ground the lower few feet is just unmoved earth, then the dam wall sits on top of that. So the only water being held by the dam is water that is above the old ground level, which is only the top portion of water, if the water line ends up being that high.
So for example if i put my spillway level with the old ground or below (like water level a) no water will be held by the 'dam' it will be just a berm on the edge of the pond. But if i add a spillway above the old ground level (like water level b) then some water will be held by the dam. My plan is to have the spillway only slightly above the old ground level, so the water will flow around the dam and never fill up and go over. This is correct?
Is there a different name for a hole in the ground type pond, versus what is seen above in the first image?


You are correct that most ponds are simply constructed the way you say, the farmers just pushed the dirt down hill and formed a bank and called it good. And some have success doing that. However if your trying to build a pond, you can hedge your bets that it will seal if you construct it properly.

What type of equipment are you using to construct the pond? Your best bet is a machine with tracks, whether its a track hoe, or track loader. Machines with tracks are capable of compacting the earth very well. These machines with an operator will run 125- 175 dollars an hour and can do a pretty tremendous amount of work in an hour.

Since you already have a hole dug, its wise to pull a soil sample in a jar and test the clay content. Place your sample in the jar fill the jar with water and shake it to complete emulsion and leave it to sit. Sands will settle first as they are the heavy, they form the bottom layer. The next layer will be silts and loams, and the third layer will be the clay. Your shooting for a target of 30%-35% minimum clay content for a good seal.

From the sound of what your describing, I think you are trying to build a contour dam. Dams in flat lands can be some of the largest bodies of water you can construct, because you have such a surplus of material you can excavate from under the water line. As you have already done, this makes for creativity with islands and such.

Here is how I would construct it. I would excavate out the entire dam wall and build a large core trench. the dam wall is going to be in a horseshoe type of shape because its a mostly flat landscape, and the wall has to wrap around pond to seal it. The "ears" of the dam wall need to go up all the way to the swale above it. All of this dam material needs to be put in, in 6" increments and track rolled tight. I would make the full water level of the dam to be the full water height of the swale, the pond NEEDS to be connected to the swale, and not filled by the swales overflow. Use the swale to your advantage, by integrating it INTO the pond, you can still fill it, but now you can set the dams water height, via the spill way made into the swale, which can be anywhere along its length. If you get a large rain event and the spillway in the swale gets washed out, its easily reconstructed. If your dam wall gets washed away, you have no clay to replace it, and the pond is gone.

These shallow contour dams, are supposed to be VERY good fish ponds, and you could place several along the length of the swale. It might be wise to think heavily about installing pipes in the dam wall(with anti seep collars) as a means to drain the pond and harvest the fish. Have you thought about producing fish?
 
Zach Muller
gardener
Posts: 787
Location: NE Oklahoma zone 7a
51
dog forest garden books urban chicken bike
  • Mark post as helpful
  • send pies
    Number of slices to send:
    Optional 'thank-you' note:
  • Quote
  • Report post to moderator

Eric Hammond wrote:


You are correct that most ponds are simply constructed the way you say, the farmers just pushed the dirt down hill and formed a bank and called it good. And some have success doing that. However if your trying to build a pond, you can hedge your bets that it will seal if you construct it properly.

What type of equipment are you using to construct the pond? Your best bet is a machine with tracks, whether its a track hoe, or track loader. Machines with tracks are capable of compacting the earth very well. These machines with an operator will run 125- 175 dollars an hour and can do a pretty tremendous amount of work in an hour.

Since you already have a hole dug, its wise to pull a soil sample in a jar and test the clay content. Place your sample in the jar fill the jar with water and shake it to complete emulsion and leave it to sit. Sands will settle first as they are the heavy, they form the bottom layer. The next layer will be silts and loams, and the third layer will be the clay. Your shooting for a target of 30%-35% minimum clay content for a good seal.


So far i am using a pick axe and shovel. And chickens. I have discovered that running the chickens over the pond in construction has been a great food source for them, and they help to loosen hard layers over the weeks. The area i live in is known for a good clay content, so i havent done the test, but you are right i should do it just so i know what i am working with. Im guessing its high clay, or pure clay down as deep as i am right now. The problem with using heavy equipment is one of money and access, itd be a real head scratcher to get a machine into this area, probably would have to take down a fence.

Eric Hammond wrote:

From the sound of what your describing, I think you are trying to build a contour dam. Dams in flat lands can be some of the largest bodies of water you can construct, because you have such a surplus of material you can excavate from under the water line. As you have already done, this makes for creativity with islands and such.

Here is how I would construct it. I would excavate out the entire dam wall and build a large core trench. the dam wall is going to be in a horseshoe type of shape because its a mostly flat landscape, and the wall has to wrap around pond to seal it. The "ears" of the dam wall need to go up all the way to the swale above it. All of this dam material needs to be put in, in 6" increments and track rolled tight. I would make the full water level of the dam to be the full water height of the swale, the pond NEEDS to be connected to the swale, and not filled by the swales overflow. Use the swale to your advantage, by integrating it INTO the pond, you can still fill it, but now you can set the dams water height, via the spill way made into the swale, which can be anywhere along its length. If you get a large rain event and the spillway in the swale gets washed out, its easily reconstructed. If your dam wall gets washed away, you have no clay to replace it, and the pond is gone.


I think i get what you are saying about integration of the upper swale and the overflow happening from there. Its not clear in my first drawing, but the general elevation around the contours of the swales are descending in elevation as you move higher on the page on my overhead drawing. So i could probably fit the swale spillway at the very bottom of the page, moving water from the upper swale around the pond and into the lower swale, which has its own spillway at the very top of the page.


Eric Hammond wrote:

These shallow contour dams, are supposed to be VERY good fish ponds, and you could place several along the length of the swale. It might be wise to think heavily about installing pipes in the dam wall(with anti seep collars) as a means to drain the pond and harvest the fish. Have you thought about producing fish?


Several dams along the length of the swale? Im not sure i totally see what you are saying on that. Several deeper sections in the swale that function as fish ponds?
I want to produce fish if i can get it to that level, that would be amazing in fact. I am just excited waiting to see water, let alone the aquatic plants and animals that come with the water.

Thanks for spending time with me on this eric, much appriciated.
 
Zach Muller
gardener
Posts: 787
Location: NE Oklahoma zone 7a
51
dog forest garden books urban chicken bike
  • Likes 1
  • Mark post as helpful
  • send pies
    Number of slices to send:
    Optional 'thank-you' note:
  • Quote
  • Report post to moderator
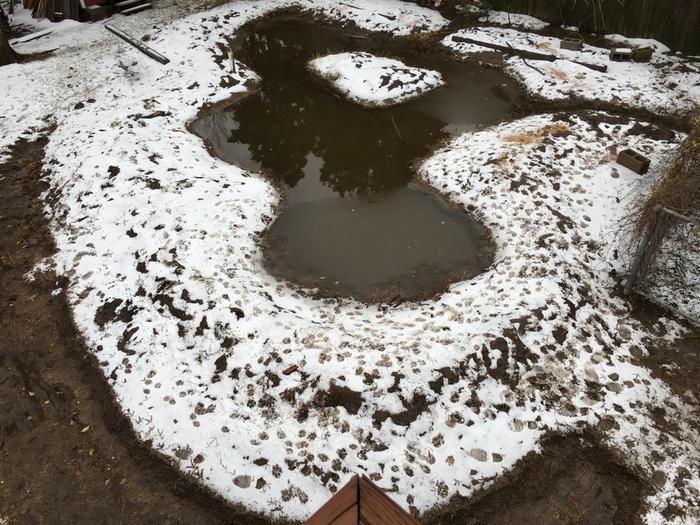
Here is how the pond is turning out. It is still under construction but i let it fill during the recent rains/snow


In this photo above you can see the drainage ditches that fill the pond in the upper right near those bricks. I decided to follow the advice on this thread and have the swale connected to the pond, which you see on the right side leading over to the fenceline. I cut its depth just in line with the ponds ideal fill height and things seem to be working great. Water flows in through the ditches, fills the pond and when capacity is reached the swale fills, and overflows over that fence and is caught in another swale below.


As it turns out part of the pond dips down to a lower elevation by about 5 inches, so if the water level is as the original ground level in the bottom part of the pond, the top still has 5 inches before it gets to the old ground level. Which means i am getting a water line up the dam wall by 5 inches when the pond reaches capacity. Not bad, as it seems my wall construction has been sufficient to hold during this testing and construction phase.

 
Posts: 18
Location: Kentucky Proud
1
  • Mark post as helpful
  • send pies
    Number of slices to send:
    Optional 'thank-you' note:
  • Quote
  • Report post to moderator
That island should prove to be a safe harbor to any ducks you have. This looks like a successful project! And you got all your information and design ideas from this forum?
 
gardener
Posts: 3489
Location: Fraser River Headwaters, Zone3, Lat: 53N, Altitude 2750', Boreal/Temperate Rainforest-transition
689
hugelkultur forest garden fungi trees books food preservation bike solar woodworking
  • Mark post as helpful
  • send pies
    Number of slices to send:
    Optional 'thank-you' note:
  • Quote
  • Report post to moderator
I would suggest lining your spillway, and the areas of the pond wall that are near the spillway, with stones. If there is a larger than expected rain event, then the stone will help prevent your dam walls from eroding. If you plant mint or some other rhizomatic moisture lover on the bank nearby, it will help stabilize the stones. You could do this where the water enters the pond as well.
 
Zach Muller
gardener
Posts: 787
Location: NE Oklahoma zone 7a
51
dog forest garden books urban chicken bike
  • Mark post as helpful
  • send pies
    Number of slices to send:
    Optional 'thank-you' note:
  • Quote
  • Report post to moderator
I was mainly inspired by the threads here in the ponds forum, specifically the gleying a pond with pigs one. I can't have pigs so I figured I would try the ducks, and if all else fails start adding clay or something, we will see. I want a system like sepp but on a smaller scale. I'm sure I'll end up with something totally different considering my climate, but this pond is one step in solving a major runoff problem during heavy rains, which we are getting a lot of lately.

Rocks! You are right about that, I have only a few rocks but am looking to add a lot of them into my landscape. I will be getting them free in small loads and building one rock at a time. Thanks for the tip on the spillway areas, incoming and outgoing.
 
Roberto pokachinni
gardener
Posts: 3489
Location: Fraser River Headwaters, Zone3, Lat: 53N, Altitude 2750', Boreal/Temperate Rainforest-transition
689
hugelkultur forest garden fungi trees books food preservation bike solar woodworking
  • Mark post as helpful
  • send pies
    Number of slices to send:
    Optional 'thank-you' note:
  • Quote
  • Report post to moderator
I too am very inspired by the pigs gleying the pond. I had been researching and asking about this method for a long time, and there is really very little actual examples of people doing this, and to see that project was... well it just made my whole time searching for it worthwhile. I can have pigs, and I might just do so this year! So much to do though. I may have to wait till next year.
 
Posts: 2
  • Mark post as helpful
  • send pies
    Number of slices to send:
    Optional 'thank-you' note:
  • Quote
  • Report post to moderator
Wow…what a great thread!  I am getting ready (hopefully!) to build my first pond in a few weeks but at am a loss of the best way to make it all work according to permaculture principles.  My pond will be built by widening a portion of an existing springfed brook in a relatively flat landscape between 2 hills (on either side of brook).  The pond will be long (300’) and narrow (100’) with essentially a contour dam all around it.  I am going to dig down maybe 20’ at the downstream end and leave the upstream end rather shallow (4’) and lined with rocks.  I will use it for general water security but may hope to also stock it with trout once it has “developed”.  The footprint will be irregular with lots of edge but likely no islands.  I thought about adding some “fingers” to provide shallow habitat for smaller fish but because of the existing topography (ie. hills on either side of brook) it would be tough to do.

I don’t think a monk will work because a) I need to have a good size culvert (12” or more) because of existing peak brook flow and to meet local code (100-year flood), b) my water levels on either side of my downstream dam are only going to be maybe 2’ to 3’ different – at best and c) I live in Canada and I can see those PVC monks getting cracked pretty easily with any amount of ice on the water surface (the brook always flows but it does ice up on the water surface).

Any other design ideas I should be thinking about to help with aeration?  To improve fish habitat?  As options to a culvert?  Thanks

 
pollinator
Posts: 2203
Location: Massachusetts, 5a, flat 4 acres; 40" year-round fairly even
302
4
kids purity trees urban writing
  • Mark post as helpful
  • send pies
    Number of slices to send:
    Optional 'thank-you' note:
  • Quote
  • Report post to moderator
Any updates Zach? Stephanie?
 
Humans and their filthy friendship brings nothing but trouble. My only solace is this tiny ad:
rocket mass heater risers: materials and design eBook
https://permies.com/w/risers-ebook
reply
    Bookmark Topic Watch Topic
  • New Topic