

|

|
|
|
|
Tiffaney Dex wrote:Thanks everyone for the replies. Gerry, height is a problem and excavating isn't an option. So we can't add more mass, except for a thin, finish layer. But perhaps we could put something insulating in the finish and that would help it? If we put marble powder in the finish layer, do you think that might provide a little bit of insulation?
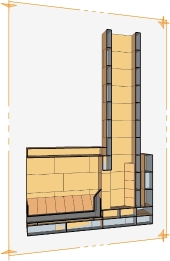
Benjamin Dinkel wrote:The chimney is a regular pipe but coated in cob and with a traditional "hat".
Peter van den Berg wrote:The numbers doesn't look like fixed figures, it could be that the figures are at least partly interchangable. Maybe, with an awful lot of turbulence induced both the other two T's, time and temperature, could be smaller.
Actually, I am convinced this could be the case, although I am unable to prove it.
Ahmet Oguz Akyuz wrote:Yes, I disconnected west panels one by one. Sorry for the typo.
The brand of the inverter is Lexron - it has a 6.2 kW rating and a MPPT voltage range of 90 - 500 Volt. I think my inverter was turned off when I arrived at the site from the on-off switch.
Ahmet Oguz Akyuz wrote:
We do have a 6.8 kW inverter and 5kWh lithium battery
.....But 0 was coming from the west side. I then disconnected all the east panels one by one and individually measured their voltages. 0 on all of them.

