Leslie Walper

+ Follow
since Nov 24, 2019
Merit badge: bb list bbv list
For More
Apples and Likes
Apples
Total received
In last 30 days
0
Forums and Threads

Recent posts by Leslie Walper

What's the oven? Is that a kit? Looks interesting.
11 months ago

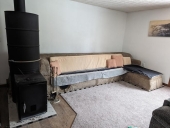
Cristobal Cristo wrote:Regarding problems with overheating ceiling, I would not try to shield anything but rather address the core of the problem - the barrel is too hot and too close to the ceiling.
In my opinion it should be rebuilt - for the peace of mind and safety.


Agreed, but adequate shielding is also effective.
1 year ago
What might be done, temporarily, is to use 4-5 small stones (1.5 inches) situated evenly around the barrel top edge and lay a large (full-sheet size 18x26"), steel baking sheet on top of the stones. Do that twice giving two layers of baking sheets with air gaps between. I'd also turn the top sheet 90 degrees to the bottom one encouraging some convective air currents around the setup. This could also be a more permanent solution if they were screwed in place with appropriate spacers. If you can get aluminum baking pans that will also do since aluminum melts at around 1200°F. Still need to do something about that back wall.
1 year ago

Sarah Flanagan wrote:Have you considered using a stove-top fan? You just place a heat powered stove fan on top.  And it kicks into action.


I have one on top of my Hearthstone heater—a gift from a well-meaning friend. It's a cute little toy, but not really effective for moving the amount of heat we're talking about. It spins, it's entertaining, but …

Coydon Wallham wrote:have you considered placing the largest pan you have, as full of water as practical, on top of the barrel?


I like the concept (might help the immediate issue, maybe?), but boiling water in an open pan over your head? Maybe not. Sounds like a recipe for disaster.

Coydon Wallham wrote:The latest theories on J tubes I've heard is that they also can benefit from a larger radiant chamber above the riser, but a 2-3" gap is minimum. I think the utility of that spot for direct heating of small items is tremendous, I have to wonder how much system efficiency could be gained from a larger 'bell'.


Improved system efficiency? Maybe? But there are limits — xx m² surface area per CSA of the riser diameter. For example, a 6" system can support 5.3 m² (57 sq ft); an 8" system can support 9.4 m² (101 sq ft) of heat absorption area. If you don't want to create any additional bell floor footprint size you can add columns inside the bell to increase the functional surface area within the bell, adding heat retention capacity to the bell, which heat can then be liberated over a longer period of time increasing the efficiency of the overall system. If you exceed this 1:1.77 ratio there are negative effects on draft and reduced heater performance.
1 year ago
My RMH is close to the wall—too close for combustibles. That wall is load-bearing (low load, but second storie floor) and was initially built from typical fir studs. Those wood studs were  removed/replaced with steel studs, covered with cement board/faux stone—all non combustible—and open on the back side for air circulation. The surface of the wall runs about 150-160° with heat soak through to the back side of about 130°. If this were gypsum board with screwed through heat conductive fasteners, it would be far too hot for safety.
1 year ago

Holly Michelle wrote:What would be a good target temp not to exceed?


Holly, I'm not certain what the "never exceed" surface temperature might be (I'm sure it's available somewhere??). The spontaneous combustion temperature table referenced earlier in this thread is interesting and instructive. There you'll note that "wood" combusts at 572°F, where "powdered-pine" is listed at 450°F. Not sure where one would get powdered pine (sawdust I suppose), but those temperatures are probably given at "normal" moisture content for kiln dried lumber - typically 6-8% for interior building materials (like what your house is made of). Continual heating above the RMH will drive that moisture content down with a consequent reduction in the spontaneous combustion temperature.  Heat conducting fasteners (nails/screws) penetrating the gypsum board can easily reach temperatures above that needed for combustion. Pyrolysis occurs around those fasteners further reducing the combustion temperature. Disassembly of an overheated  surface would reveal some scorching around the fasteners. Probably not in your case — yet, but . . .

It generally takes a bit of time for the drying/pyrolysis to occur (hours/days/months/years?) and before you know it, your "safely installed" RMH is sitting in a pile ashes and your house becomes a statistic, evidence that these heaters are "Dangerous and should never be allowed!" — when in fact, the heating appliance was not the problem, but the installation was.

Back to your original question— I'm pretty happy with 120°. Anything much more than that could be a problem. Anyhow, that's about what I'd aim for.

BTW: A little anecdotal story. I've been using wood heat off-and-on for the better part of 50 years with some quality stoves, so I'm not new to the game. I'm living in a new home construction where we had a kachelofen style , masonry heater installed, very similar to this, at the time of the house construction. It was unsuited to my space and has since been removed and replaced with one of these Hearthstone heaters which has been working quite well for me. (that's another story) However, as I was getting accustomed to burning the masonry heater I thought it would be a good idea to pre-dry my firewood in the warm (about 300°F) post-fire heater so that it would be absolutely dry for the next fire making the next fire easier to light. Since there was no fire or coals remaining in the heater I had also closed the damper. A couple of hours later that wood had reached spontaneous combustion temperature (whatever that was) and began to burn — with a closed flue damper. Needless to say, that was an exciting smoky few minutes. I'm glad we were home and could quickly open the flue damper or the new house would have been ashes.

You're playing with fire. Get some shielding on that barrel!
1 year ago

I'm not familiar with batch box design details, is there a necessity for the radiant chamber/bell being so tall? If it were a J tube RMH I'd say just remove the manifold section and cut it down as far as possible (perhaps it could even be done in place), leaving at least 2" of clearance to the riser, then clamp the upper barrel back on. The surface area for immediate radiation would be reduced while the distance to the ceiling would be increased, which should greatly reduce/disperse the heat reaching up there.


In my 8 inch system there needs to be a minimum of 12 inches between the top of the riser and the barrel top. From there, there are calculations for overall  bell volume and surface area. The RMH is a little bit different beast than the J-tube design.

We could offer better advice if we knew things like the cross sectional area of the system and such details. A side picture will help, as would any taken during construction...


Correct, it would be nice to know the system size, but in reality, the existing barrel height is good for either 6 or 8 inch systems. This installation simply needs to get some proper shielding. That would fix the local area (ceiling/wall) over-heat issue.
1 year ago

Coydon Wallham wrote:Have you checked the calibration of your temperature gun? I bought a new one from Harbor Fright that was on sale over the Holidays, and it reads significantly and verifiably off at ambient temperatures at least...


True, IR thermometers are not all created equal, but the fact remains, that ceiling is getting TOO HOT. Your current installation is unsafe!. Do not light another fire without proper shielding.
1 year ago
DuraVent - using their triple wall chimney - recommends a minimum 2" clearance to combustibles. Hearthstone. With proper shielding clearances to combustibles are given in detail. Again, NO FASTENERS ARE TO PENETRATE THE SHEETROCK TO THE WOOD. (How is your sheetrock attached to the ceiling/wall? With heat-conductive nails or screws.) Shielding is applied to the heating appliance, then allow proper/required clearance to combustibles.

Don't light another fire until you get some shielding installed.
1 year ago