bob ellis

+ Follow
since May 15, 2017
Merit badge: bb list bbv list
Biography
Moving to Prince Edward Island in a year or three. The plan is to make a hobbit hole with earthbags.
For More
TBD
Apples and Likes
Apples
Total received
In last 30 days
0
Forums and Threads

Recent posts by bob ellis

Your stove is sitting on the floor you want to heat, yes? Seems to me that you'd only get good flow if the heat source is lower than the heatsink, the floor in this case. The DHW setups I've seen depend on the hot water rising out of the heater, cooling as it transfers its heat to the floor, and then sinking back to be reheated. It's a neat idea, though, but you might need a small pump, otherwise the hot water will rise to the top where the heat is, and just stay there. I'd be tempted to put a coil right inside the stove pipe, as well as around it, to get as much heat as possible out of it. You should include a temp/pressure relief valve somewhere at the hottest point for safety- If the water stops moving for any reason, it could quickly boil and burst a pipe.
8 years ago
Hi Hans,
Attached is a pic of our cliff. We share the stairs with a neighbor, our plot is to the left of the stairs. There's a 5 foot band of red sandstone bedrock, overlaid with 15 to 20 feet of sandy red soil. In winter, the water near the shore freezes and the tides grind it into the bottom of the cliff. The province has aerial photography going back to 1935, and I've compared it to the most recent (2005) image, and frankly, there doesn't seem to be that much change, certainly not the 80 feet one would expect if we lost a foot a year, so I'm not overly worried about the bank erosion. Unfortunately, the county has passed an idiotic bylaw prohibiting cutting or trimming anything within fifteen feet of the bank, ostensibly to prevent erosion, but actually because some wealthy yuppies bought some cottage lots nearby and 'they don't like the look of piles of trimmings' on the beach. How they can tell which are piles of trimmings amongst the tons of other driftwood we get each year has never been adequately explained to me, nor has how letting dying trees fall naturally and pulling the bank down with their roots is supposed to prevent erosion.
8 years ago
I've been studying biodigesters for a couple of years now, reading everything I can find online, including academic papers, and while there's a fair amount on small single stage digesters, there's not so much about two- or multi-stage designs until you're looking at larger scale, farm or village digesters. Specifically, I can't find much information on a continuous-flow design, showing how the stages are separated chemically and environmentally from each other. I get that the first stage is relatively fast, requiring a retention time of only a few days, while the second [and subsequent, if any] stage takes longer and produces the methane, but how do you actually connect the tanks so that the oldest, most processed material flows to the second stage, while isolating the different pH levels between the two stages? It can't be as simple as sizing the tanks for proper retention times, connecting them up to feed one to the next, and letting the bacteria regulate themselves, can it?

My digester will be fed with blackwater [two people], kitchen scraps and garden/yard waste, possibly a few chickens or other small livestock. The quantity of gas we get is secondary; I'm approaching this as an alternative to installing a septic system, with fertiliser as the primary output. I intend to separate the blackwater/greywater streams, treating the greywater with this type of system: http://biorealis.com/biofilter/drumbiofilter/ and using it for irrigation purposes. To simplify things, I thought I might be able to treat the effluent from the digester as greywater, or should I sterilise it [as I plan to do for the sludge] before use on the veggie garden?
8 years ago
So I did the math for 4' deep, and it indeed looks like I can get away with it:

Earthmoving-cu.ft.

'Yard' - 30' x 50' x 2' = 3,000 +

2 main cones - 15'dx4' cyl. + 15'dx15' cone - 4'x4' cone x 2 +
707 + 883 - 67 x 2 +
3046

Utility cave - 10'dx4' cyl. + 10'dx10' cone +
314 + 262 +
576

Bath - 8'dx4' cyl. + 8'dx8' cone +
201 + 134
335

Pantry + Closet - 6'dx4' cyl. + 6'dx6' cone x 2
113 + 56 x 2
338

= 7295 - sqrt. approx 85

85' x 85' x 1' = 42' x 42' x 4' pile o' dirt, give or take. Oughta be enough.

8 years ago
OK! I thought so, wasn't sure so I figured I'd check before explaining what you already know!
8 years ago
Are you looking for instructions on how to use the transit level, or are you looking for volunteers to actually come and help? I'm nowhere near you, but I know how you can shoot your contours.
8 years ago
Hi, Glenn,

Yes, the large arcs at the top of the first diagram are retaining walls to hold the 'roof' on, and I planned a sloping front yard 20' or 30' up the slope away from the doors to level. The wife wants a couple of big hobbit doors with big windows for light, and that side will be facing south. (So my diagram is south up.) 6' up over 30' is a foot up every five forward. Too steep? (But see below: You're right, I might not have to go quite so deep, per your suggestion.)

The plastic panels will be removable for cleaning/maintenance, I suspect I will get the odd bug up there, but I'll be screening over the vents for those areas, so I don't think I'll get enough bugs to be an ecosystem. If there's only a couple of flies up there, they won't feed a spider for very long. The wooden frames will be sealed with a soft 1/2"x1/2" foam weatherstrip in a 1/4" deep notch - there's a detail of the edges in the upper left of the ceiling idea diagram, the foam is the dark gray, shown compressed to 1/4" by the panel - so there can be 1/4" of play before bugs could get through, well within the limits of my carpentry skills. I plan on venting the ceiling areas with the rest of the house to keep the humidity down, but I'll have to keep an eye out for condensation. Now that you've got me thinking about it, I think I'll vent the ceiling spaces with the 'raw' air from the tube (via the pantry), before the HRV and the rest of the house: It'll be cool and dry, having lost most of its moisture in the tube, and any heat that leaks through from below will get passed back into the house via the HRV. Thanks! That's a great idea!

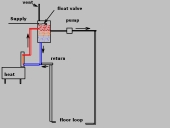
I chose the 12' depth for the utility cave because that's the depth my earth tube has about 6 months of temperature lag, according to the chart I found for Charlottetown (the closest location I could find data for), so my 'raw' air will be at its warmest in the winter and coolest in summer. The condensate drain has to go in the low spot, so the sump's got to be lower. . . The floor will slope slightly towards the stairs, and the low spot and sump will be just at the bottom of the stairs with a grate over it for easy inspection. I was going to just form and pour the sump as a 2'x2'x2' pit as I get ready to pour the floor. I plan to put a large garden shed over the stairs with an IBC or two to pump the sump up into for irrigation use, and another couple for effluent and sludge from the biodigester for batch sterilisation and use as fertiliser. It'll also have a sink/garburetor to feed garden scraps, lawn clippings, etc. to the biodigester.

Yes, the lot is almost perfectly flat, about 125'x400', then drops about 25' to the beach. I hadn't taken into account the earth from the 'patio' area, so you're right. . . I can probably go a bit shallower, eh? I chose 6' because it 'looked' about the right depth to get the amount of fill I needed (and fill the earthbags.) I think I'm going to have to do some math. . . Pi R squared, here I come! Even 4' deep would save a day or two with the excavator, and If it still went the 30' from the door, that'd be 1 foot up for every 7-1/2 feet forward. As far as depth and appearance go, I don't mind making a bit of a hill, but I don't want it to look too steep and artificial.

Thanks for your input! Food for thought.
8 years ago
Hi Doug,
Two reasons I don't want to drain to air: The bank is about 300' from where I'm thinking of putting the house, and a 12'+ deep trench 300' long is just too much earthworks to contemplate. Also, I'm planning to pump the sump up to a IBC container on the surface to use for irrigation.
I plan on making sure both layers of waterproofing are sloped away for drainage. I like the idea of a second layer in case the first ever leaks.
Good point about the stucco, I'll have to think of alternatives, maybe some sort of plastic coating. It'd have to be UV resistant. . . I don't want wood because of the carpenter ants, and I like the idea of something I can roll, spray or otherwise spread over a rounded surface. Any ideas?
Thanks,
Bob
8 years ago
Thanks Richard! Well tiles, you say? Do you mean the precast concrete ones? I actually ruled those out as being too heavy. If I recall, the 48"x48" ones weighed, literally, a ton, not something I can easily move . I can get a 48"x144" sonotube for about $500. I can cut it in half on an angle, and get both skylights out of it for $250 apiece, which is cheaper than a well tile too, if I recall. It'll be sat into a rabbet in the bond beam, with the angle cut on top facing south, and foamed and stuccoed in place, and topped with a sheet of plastic. I plan on a kind of a drop ceiling made of many layers of 6 mil plastic 1/4" apart to hold the heat down, and everything above the ceiling will be covered in foil, so it should be plenty bright.

I really like the flowerbed insulation idea! I was thinking of a waterproof layer of landscape cloth/plastic/landscape cloth about 6" down (and probably another a couple of feet deeper for redundancy) so could I lay sheets of 1" foam under the plastic? Is that the right idea?
8 years ago
Hi, Doug, and thanks for the two big comments!

So, concerning water: I know for a fact that the water table is about 25' down; First, the lot is up high on a bank overlooking the strait, and you can see the water level; and second, we do have a well on the property already drilled, and it hits water about the same depth. I'm only going about 12' down - halfway to the water table - at the deepest (the utility room), so I think I should have enough leeway. Most of the house will only be 6' down, relative to the original grade. Note in diagram 2 that I've included a perimeter drainage system (french drain/weeping tile) for the foundation to handle any runoff. I'll also be including one or more additional waterproofing layers over the whole thing as I backfill.

Concerning freeze/thaw: I've been on PEI only in the summer and fall, but I lived in Halifax, a similar maritime climate, for a while, and I get the privilege of painting the cottage from time to time, so I have a rough idea of what the climate is like and can do to buildings, which is why I want to isolate the house from the climate as much as possible!   . Most of the house will be under 4'(ish) of dirt, below the frost line, so I'm not too worried about freeze/thaw, except on the exposed areas, viz: Around the doors and skylights. The diagram doesn't show it, but except for the pantry, the domes will be covered with 4" (R20) of pourable foam, and 8" (R40) where there's less than 2' of soil cover, and the exposed foam will then be parged with stucco (smooth stucco: I don't like 'dash coats', it's less work to just trowel the finish coat smooth than to mix a whole 'nother coat to hide your trowel marks, and water just runs off smooth stucco).

So, I've put some thought into the issues you've raised. But is it enough?

I should also clarify: The ventilated rooms are all on the same level, so I'll need small booster fans to help the air along. One of the wife's edicts was: No stairs! So, except for the utility cave, there are no stairs.

Have a great day,
Bob
8 years ago