Jonas Fritzsche

+ Follow
since Feb 16, 2023
Merit badge: bb list bbv list
For More
Apples and Likes
Apples
Total received
In last 30 days
33
Forums and Threads

Recent posts by Jonas Fritzsche

Thank you for your kind and encouraging words!

@Coydon: Yes, the bypass is connected to the bottom barrel at the very top. This allows me to completely remove the top barrel when cleaning the heater. The riser extends only about 12 inches into the top barrel. The draft with the bypass open is sufficient for my needs. Only if the stove hasn't been lit for a while I need to light some newspaper in the burn Tunnel when starting the heater to prevent smoke back.

@Benjamin: For the core of the heater, I used a yellow-brown clay. For the finish coat, I came across a really beautiful reddish-brown clay. Both are from local soil in friends’ gardens. We generally have rather clay rich soils here. The fine plaster consists of 1 part red clay mixed with 4.5 parts fine sand, coated with linseed oil varnish. The barrel is painted with linseed oil varnish mixed with soot as a black pigment. I found the soot as a fine powder while cleaning the inside wall of the barrel and then read that black pigment sold as "carbon black" should be more or less the same product. So I tried it and it worked. When the oil is burned into the metal, it produces smoke and smells like burnt oil—so it’s better to do this outdoors over a campfire. Once it’s been burned in, however, it no longer smells and won’t stain. I did this procedure twice - first time without pigment, second time with the pigment.
1 week ago
This Rocket Mass Heater is finally finished. You find some pictures and thanks here: https://permies.com/t/372751/RMH-completed-fotos-big#3771354
1 week ago
Three years ago I started to plan my Rocket Mass Heater project and I posted a lot of questions and thoughts here: https://permies.com/t/40/210656/Questions-building-tube-RMH-tiny

The Heater worked since october/november 2023 but was just roughly finished. In the last weeks I finally did the last finishing work (fine plaster and a layer of lineseed oil varnish).

With this post I want to share some pictures and say big thanks to all of the wonderful people in this forum who helped me and who help others! Who share their knowledge without expecting anything in return. Spaces like this where people work together because they share similiar ideas or values are so important from my point of view. So: THANKS A LOT!

And I want to encourage anyone thinking about building a Rocket Mass Heater to just go ahead and do it. My tiny house has become so much more comfortable thanks to this change.

I'm also open to share more details about difficulties, experiences and how I realized different steps of this build although I'm not online in this forum that often.
1 week ago
Here are the pictures of the bypass damper. It is build like the ordinary throttle valves used in stove pipes but from a full round piece of metal and some CMS (calcium magnesium silicate) fibre sealing. The sealing is not visible on the pictures because I added them later and I'm not shure wheter they were neccesary because I think the passage through the bypass doesn't need to be closed almost airtight for the hot gases to get forced into the bench bell when closed. So I think maybe a well fitted piece of thick round metal screwed on a round bar of metal could work aswell. Other people in this forum may have more experience on that.
2 years ago
Hello Linden,

thanks 
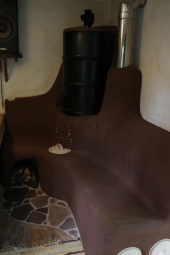
! Yes, the heater is working. It's not finished yet because a lot of the bench shaping and adding more mass still needs to be done, but the performance is already quite impressive to me. The bypass damper I finally build by myself because I have access to a good metal workshop and I developed a kind of construction that I considered easy enough to build on my own.

Attached you find some pictures of how the whole RMH looks at the moment. I will add some pictures from the bypass damper as soon as I have them on my laptop.
2 years ago
I finally build my perlite clay riser today. I decided to form an inner tube from cardboard stabilized by rings of plywood, so i can burn out this whole inner structure when dried. For the outside i used a sheet metal container (a ventilation duct) srewed in plywood as bottom for the perlite-clay. To keep the inner tube centered I added a form of plywood on the top that was removed when I got close to the top with the perlite-clay. Attached you find some pictures.
2 years ago
Thanks! Yes, it's Cone 10 and I also thought that a quite liquid consistency would be good for the inner coating. Maybe even as liquid that it would be possible to lay the riser on the side (after the liner is burned out or removed in another way), splash a line of the mixture and cast it on the surface by rolling it. The dried perlite clay will soak a lot of water I think so it shouldn't remain that liquid for long and will possibly build a more stable connection to the perlite clay as you suggested also. I will see and test it with my small scale version.
3 years ago
Is there a reason why the perlite riser shouldn't have a thin layer of fireclay mortar on the inside to prevent it better from crumbling in this area and for a smoother and more long lasting shape? The mortar I would use is rated for 2370°F. On the outside I will use a metal cylinder so crumbling on the outside won't be a problem. Someone got experience with that? From my understanding that layer would'nt absorb much heat if it has a thickness oft just 2mm or something like that?

Today I formed a little riser to test the building technique and to find the right mixture. It seemed to work but It's still enclosed in the cylinders I used to form it so I'll see the final result when removing the cylinders. I could test the idea of coating the riser with fireclay mortar with this small scale model.

And I found out that the ready mixed fireclay mortar doesn't work as clay slip for the perlite mixture since it contains too much sand and therefore isn't sticky enough. So I used a clay slip from fine stoneware pottery clay instead
3 years ago
The chimney will rise outside above roof level after leaving through the wall and end at a height of around 11,5 ft. See the attached second drawing of the chimney planning.
3 years ago
Thanks again!

I purchased 6" stove pipe and now got the question where to plan the connection of the pipe for the bypass to the radiant chamber. Glenn wrote "at the side of the Bell". But which height? I suppose that closer to the top oft the radiant chamber respectively the same height where the riser ends means better draft in cold starting conditions, right? But since I want the upper barrell to be removable a connection there would make it necessary to remove this connection for maintenance aswell. So I would prefer to place the bypass connection right at the end of the first barrell which will be in a fixed (cobbed in) position anyhow. So the hot Gases would need to sink down around 16" from the top of the riser to the middle of the pipe. See drawing attached. Do you think that will work?

I tried to find out where other builders placed this connection. If I understood it right Thomas rubino f.e. placed the connection on one of bis builds quite at the bottom oft the radiant chamber and said that it works good. Its described in this post: https://permies.com/t/159700/Retrofitting-Piped-Mass-Bypass-Install . I think the last pictures show the radiant chamber at the left of the pictures.
3 years ago