Nancy Wallace

+ Follow
since Dec 02, 2023
Merit badge: bb list bbv list
For More
Apples and Likes
Apples
Total received
In last 30 days
0
Forums and Threads

Recent posts by Nancy Wallace

Thanks everybody, for your compliments, comments and suggestions!
7 months ago
For ages I've been wanting to make a frugal rocket stove. Last Oct I saw simple directions for making one of wild clay.
Finally, a transferrable skill from youthful days stirring up mud-pie concoctions in the back yard!
I know a couple spots to dig up clay so I got started right away, reading more how to's and design tips as a few further inspirations found their opportunity to be included.
While I was tempted to get real deco with design, texture, and color on the surface, such as a dragon's head with flaming mouth, but decided to go pretty basic this time. With the clay being intentionally quite thick, I gave it several weeks indoors to dry, patched the cracks and let it dry a few more weeks before the maiden voyage fire-wise. As an air-dried, un-fired clay item, it may crack more or fall apart after a few fires. I don't mind if it does, it's been a rewarding process, the first fire in January was great, and I'm happy with how the project came out.
First Fire Laid. Used my hatchet to split one cedar shake scrap into a little pile of teeny tiny tinder, and another little pile of larger kindling. Also some dried elderberry twigs and sticks that I'd gathered during a dry spell and set aside. Upon a couple small balled up pieces of newspaper, I laid the first fire.A handy beeswax candle provided a steady flame to alight long kindlings for reaching in to encourage the fire to start. The wick being burnt low in the candle helped keep the wind from blowing the flame out till I didn't need the candle anymore.
As hoped, my little clay rocket stove heated water pretty quickly once it got going. Even a tiny fire burns fuel fast, and takes focused attention to keep it fed enough but not too much. I boiled two cups of water for a pot of tea, to see how long it'd take. I sat sipping as I enjoyed feeding the last sticks into the tiny hearth. When the fire had burnt out, the outside surface of the thick clay radiated the stored heat; a toasty warm lingers that is welcoming to cold hands.
Sorry for all the edits, my connection would only allow a couple photos to upload per edit.
That's all for now tho' it's cold outside and I'm feeling inspired to light 'er up again
7 months ago
Thanks, Thekla, and you're welcome!
It's proved very adaptable in my experience. I'd say basically any dried fruit, seeds and nuts would go well with it, even, though I haven't tried yet, various herbs and veggies, green powders, etc. I love to express my inner mad-for-diversity food scientist in the kitchen, and share the best.
Keep the good stuff rolling is one of my mottos.
In addition to what I've gleaned from various excellent sourdough focused sites, I've found so many great tips, ideas and tweeks for recipes in the comments sections...
1 year ago
Hello, and Thanks for this stimulating thread on bread!
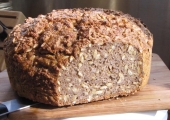
Here's my favorite recipe, which evolved as both nourishment and therapy during recent chaotic years. Photos show my latest batch; Fixing, and Done!
Sour Mountain Rye
Sourdough Bread, Vollkornbrot style
This variation uses extra sour dough and skips commercial packaged yeast from the store. (I figure; better a little flat than from a vat!)
Sour Mtn Rye is extra dense and moist bread, with all the seeds it's nutrient dense too. I was aiming for a nice hearty survival food or journey bread, like lembas in Elvish tales, with more whole grains.
Bake in round 10" Dutch oven or 9" stoneware pan with lid.

First day make Starter and Soaker
Starter:
2 cups ripe rye sourdough
1 cup water
2 cups rye flour
Combine, cover, rest overnight
Also start Soaker:
2 1/2 cups rolled rye (or rolled oats, etc)
1 1/2 cups lukewarm water
Combine, cover, rest overnight
Second day, Combine the Dough ingredients:
2 cups rye flour
1/4 cup lukewarm water
1 tablespoon salt
1/2 cup (or more) sunflower seeds
1/4 cup (at least) each flax meal, hemp hearts & pumpkin seeds. Or use your favorite mix of edible seeds & nuts. Optional, add 1/4 c dried cranberries or other dried fruit, for fancy.
Add Starter, Soaker and stir till mixed. Rye flour doughs don't need kneading, nor do they want it! Just stir till well combined.
Form the dough into rounded loaf and plop it in oiled & floured pan. Using wet fingers or moistened spatula, pat the surface to even it out. I used to oil my hands first, now I use wet fingers to keep the dough in it's place, otherwise it is very sticky.
Sprinkle top with flour or enhance with pumpkin/sunflower seeds, etc, optional/recommended
Cover with pan lid.
Let rise at room temp till it shows lift cracks, 4+ hours. Overnight even.
Towards the end of the rising time, preheat the oven to 450°F.
Uncover the risen dough and bake without the lid for 15 minutes. Then put the lid back on the pan and reduce the oven temperature to 425°F. Bake 60 minutes. The surface will be cracked and dark brown.
Note: Adjust bake time based on your oven and for different pan size, for instance a 10" pan would make the loaf flatter which bakes quicker or while a 9" pan makes a taller, thicker round which takes longer to bake.
Remove from the oven, take the bread from the pan and transfer it to a baking sheet. Lower oven to 400°F. Bake for another 20 to 30 minutes or so, until the loaf's internal temperature reaches at least 205°F in the center on an internal probe thermometer, which helps prevent the loaf being under-cooked in the center.
Remove the loaf from the oven and transfer it to a rack to cool completely. Wrap the cooled bread in a cloth or place it in a paper bag and let it rest for at least 24 to 48 hours before cutting and slicing. This gives it time for the internal moisture to distribute.
Storage: When completely cool and aged a day or so, cut the loaf into convenient hunks, I generally cut a big round loaf in quarters, then wrap in parchment paper & ziploc bag or other reusable wrap, and store on counter for up to a few days, in the refrigerator for a couple weeks. Make sure the wrapper isn't collecting moisture or it's more likely to mold. Freeze for longer storage.
Use a bread knife to slice thin. A little goes a long ways. Extra tasty toasted, and bumps croutons up a couple gourmet notches!
Next I'm going to try using it crumbled up with nuts and layered with apples in a German dessert called Apfelbettelmann.
1 year ago