CP Knerr

+ Follow
since Dec 27, 2024
Merit badge: bb list bbv list
Biography
I've been living on a farm in Western NY since 2003. Over the years I've grown vegetables for a CSA/Farmer's Market, berries, fruit trees and raised chickens for meat and eggs, pigs, beef cattle, bees, and milk goats.
I'm currently intensely interested in plant nurseries, composting worms, bees, and establishing silvopastures on our 74 acre farm as well as soil amendments such as biochar.
The reason I love permaculture is all of the outputs from one system can feed into inputs into other systems.
For More
Apples and Likes
Apples
Total received
In last 30 days
0
Forums and Threads

Recent posts by CP Knerr

Thanks for all your encouragement.  

The comfrey is very tough and like someone said if you keep the roots moist it does well shipping.  I cut off most of the leaves and ship them in sandwich bags with the tops sticking up, and a note to the effect "I have cut off the tops, it will send up new growth in a week or two"

For the crowns and roots I packed them in shredded cardboard soaked in activated EM-1 microbial inoculant.  It keeps them moist AND has a good start for the soil food web.

I also pack in shredded cardboard in 6" x 6" x 2" boxes and refrigerate 12-18 hours before shipping.  The thought being they are at least cool when they show up at UPS.  Boxes are about $1 each from uline.com, and I re-use other boxes for larger orders.

I also sell on Facebook for cash and word of mouth.  I do enjoy the interaction and not boxing, fees, shipping fees, etc.    

My vision is to have lots of operations like mine all over, where people can pay cash/barter for useful plants.    This operation I've described would take up a 35' long by 2' bed on the side of one's house.    You can imagine groups of people each propagating different useful plants and selling locally.  This is what I'm writing my book about.

Yes the fees, taxes, etc. stink, BUT, BUT, by putting myself out there in the online marketplace I can show people there is a different way with information on how to do it themselves if they are interested and they can have a nice little side gig selling locally.  Or compete with me on Etsy.  There is room!

There was a nursery near me about 20 years ago, Miller's in Canandaigua.  Each spring I'd go there and you could get a grafted, 6' tall apple tree for $18.  It's where I got the apples for my orchard.  Starks bought them out,   Now it's at least double if not triple the price, and it comes in a box in the mail.  I used to walk into a refrigerated warehouse with HUNDREDS of varieties of all sorts of fruit trees and pick what I wanted and talk to people who knew everything you'd want to know about growing them.

Blackberries: Look online and you can EASILY find them for $45/plant on fastgrowingtrees.com.  I can root hundreds for pennies and sell for a reasonable price, and show others how to do it.

And I could go on.  

I want to put myself out there and encourage and inspire others.
2 months ago
Here's the thread with links to the Comfrey I have left if anyone wants to try this:  https://permies.com/t/284718/Comfrey-Rooted-Starts
2 months ago
Comfrey Income Backstory: https://permies.com/t/284716/Comfrey-Etsy-Income

I have Comfrey Plants available as rooted plugs on my Etsy shop: https://www.etsy.com/listing/4318068100/bocking-14-comfrey-plant-plug-well  

I can only ship to the United States, East of the Mississippi River, and not to any states on the Gulf Coast (due to heat).  Sorry if you're outside of this area.

I have an email list going with a 40% off sitewide, 50% off Comfrey coupon for Permies: https://email.everbee.io/subscribe?shopName=FirstFruitFarm-BB4qf1&ref=lhQWfh0Vr  

In our household we've had need of some some extra income, so in late April I took a look at my comfrey patch and wondered, can I sell this stuff online?  I have sold some berry bushes here out of our little nursery area, but I wanted to try my hand at some online sales.  I figured comfrey would be a good bet.

Well, long story short, in 3 weeks I ended up with $1450 in my pocket.  I could have sold more but quite frankly I ran out of stuff to sell.

Here's the rough breakdown:
Total Sales: $3066.29

Expenses:
- Etsy Fees: $343.47
- Etsy Marketing: $153.77
- Shipping - Labels/Postage: $965.08
- Boxes and Shipping Supplies: $157.54

Earnings: $1446.43

I bought a bag of 50 comfrey roots from Twisted Tree Farm in 2018 or so and had planted them out.  One row in particular was 35' long with comfrey every 18 inches or so.  It's from this row I took $1450 out of the ground when we needed it.  

In this time in addition to digging and dividing plants, I had to figure out:
- Etsy itself, financials, etc.
- Boxes - what to order
- Packing - how to pack plants in boxes, organizing labels to get the right stuff to the right folks.
- Organizing all this stuff in our home.
- Fielding questions from my wife regarding store 38 boxes of comfrey in the fridge pre-shipment.

This seems small but in the midst of orders it's an extra bit above just raising plants.

I've come to see propagatable plant material as a savings account - Comfrey, willow trees, poplar, all your ribes, blueberries, hydrangea, weigela, etc.  The list goes on.  Once you figure out how to make more of them they are a savings account.  

Learn to propagate.  Still working on a book on this subject that will be out by the end of the year.

My thoughts on Etsy:
- Good place for small plants and starts like this that people are looking for.
- They do take fees, but the advantage is you don't have to spend time building a website.  I think in particular the marketing and brand recognition of Etsy and that it's an established marketplace make it worthwhile especially for experiments on what to sell before you build out a whole site.  In particular their handling of ads on Google for you is worth the time saved, in my humble opinion.  I'm not sorry for doing it.  
- Shipping, payments, sales taxes, all this is integrated and ready to go.  You just write your listings.
- The biggest issue I had was working out their payout schedule.  They hold funds for 14 days in reserve, but on top of that, if your business is growing rapidly, your current orders held in reserve are actually holding back the funds from your older orders.  It's hard to explain but let it suffice to say if you need cash quick, this is not the site to do it on.  At that point you should run Squarespace or something where you get paid a lot quicker.
- I learned (and am still learning) a lot about sales and FOMO/scarcity from this experience.   Sell something for $10? no sales.  Sell for $14 with 25% off?  People buy even though it's $10.50 now.   Have 25 of an item on Etsy?  No sales.  Only 9 left?  Sales.
- I am learning about how to do marketing with pictures more than words.... it's a few extra clicks to get to the description, so I've been embedding text in my images to describe the product and benefits.

I would do it again for experiments like this.  

Is this the end solution for me?  No, but it was a good way to do an experiment with less than a day getting listings written and in front of people.

I can dive into any topics anybody would like to know more about.

As I was not selling roots, I was busy planting more rows of comfrey and planting odds and ends pieces in 50 cell trays.  If anyone wants to start their own patch (and are in the US, East of the Mississippi, and not on the Gulf coast), I have about 200 of these little guys left that still need a good home, I'll post a link over in the products forum if anybody is interested along with a way to get a Permies coupon for comfrey on my Etsy shop.
2 months ago

Luetta Robinson wrote:Hi,

I am very interested in the silage idea as a way to feed my poultry in the winter. I have turkeys, geese, ducks, and chickens. I was wondering what your thoughts were on storing the silage in 55 gallon steel drums? I'm working on eliminating plastic from my homestead in the capacity of touching food - mine or my livestock - in any way. I have some questions...
1) Do you have to pack the container all at once, or could you add to it for,..... say, a couple of weeks to fill it as long as you added the product you mentioned between layers?
2) Do the containers of silage need to be kept warm?
3) Did the mold reverse itself or did you remove it?
4) Would this technique work with adding grass and other greens? Like dandelions, comfrey, other edible plants?
5) How much of the product do you add to how much green material?

Thank you for sharing such a great idea!

Luetta
Alaska


Thanks for the great discussion!

To answer your questions:

1.) Yes, a 55 gallon barrel would work, or a plastic pickle barrel.  
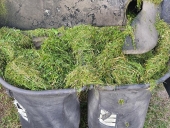
The important thing is it needs to be air tight.  I agree with removing plastics... I don't like buying plastic bags and then tossing them, this is more of an experiment.  In the future I think I will go with a pickle barrel since I don't need to throw it away and I can roll it.  These bags are really heavy to carry!
2.) I would think they would need to be kept warm.... but, I'm learning, nope!... even at 20 degrees F (-7C) they are not frozen.  They are not even close to freezing on the on the edges at this temperature.  They are stored in a barn, but that's open to the weather (all the windows are out, doors are off, etc.)
3.) I did not remove any mold.  I am dousing it with activated Effective Microorganisms (Look up Terraganix EM) right when I make it to try to avoid mold.
4.) I would think this would work great with other greens, so long as they are not puncturing the bag, I'd also not ensile a whole bunch of one type of plant, rather, naturally pull it in.  So if I'm gathering grass by my comfrey, toss the comfrey in front of the mower and bag it up.  My lawn for instance is mainly grass, with maybe 10% clover and dandelions, chickory, and plantain mainly.  
5.) I added about 1 1/2 gallons of activated EM I made to each contractor bag with about 4 oz EM-1, 4 oz blackstrap molasses, and the rest of the 1 1/2 gallon (40 oz) (unchlorinated) water from our well.  I'd say the bag was 1/2 full so it's probably 30? gallons of grass clippings in there, at least.  

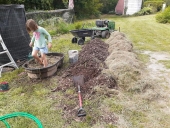
I'm transitioning my property to more of a silvopasture/food forest setup, hence my interest in silage and experimentation now as we go more towards beef cattle and ruminants I'd like to use this instead of hay.  The hay can get easily rained on here and with the trees, well, it won't dry too well either so I wanted a way to make feed more reliably (eventually).

Regarding the Vitamin B Deficiency some thoughts... well, one element of the EM-1 I'm introducing when ensiling the grass is brewer's yeast which is very high in Vitamin B-12, so I'm hopeful that would not be a problem.  I sort of let the animals choose what to eat and give them as much variety as possible and let them figure it out.  Especially with nutritional values of feeds, it's useful as a starting point but even corn is not corn; the older varieties will have more protein than modern hybrid types so I let the animals choose.

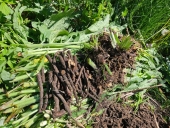
I have fed the silage to our waterfowl and they clean it up, especially in winter.

Improvements I'll be making:
1.) Use pickle barrels.  This will help me roll them and protect them.  It's hard dealing with a heavy bag of grass while trying not to tear the bag.
2.) (lightly) salt the silage with sea salt for minerals.
3.) It's a pain to mix the EM in while packing the bags.  So instead, I will spray it on the lawn grass before ensiling it to ensure a good mix as it's being bagged.   I think this would also require less EM-1 this way.

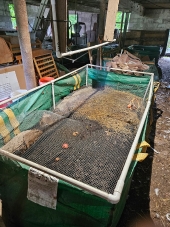
Attached is a photo of the bag dumped for the pigs a few days ago, on a 20 degree F morning.:

8 months ago
I had collected some images from our Johnson Su composting process.  We set up this system 2 years ago now.   This process is not good for creating yards of compost, it was more of an experiment for us and I used the finished compost in our nursery to introduce biology to the mix.

This system is a pile that you don't need to turn, and uses worms as the finishing agent.  To get air to the pile, as you'll see in the images, you form vertical air channels with pipes.  The idea is no compost in the reactor is further than 1 foot away from air.  

The container is made of 2x4 welded wire with landscape ground cloth fixed to it.  The whole thing sits off the ground on a pallet, and holes are cut in the pallet to allow air to flow up into the vertical channels.

The materials were rotted wood chips and grass clippings, mixed about 50/50.  I also added in some native soil and some nearly finished compost to help get the process going.

My daughter was on mashing duty, stirring up the materials in water to saturate them.

After she mashed the materials together, I filled the container with the pipes situated above the holes to form channels.  The challenge here was keeping the pipes in place while packing in the materials.  

After the whole thing was full, we waited a couple of days and then pulled the pipes out.  The result was formed channels through the compost.

Then we measured temperatures.  they rose to about 165 and stayed there for 3 or 4 days, then dropped back down.  When the top 6" of the pile were about 80 degrees, I added in a pound of red wiggler composting worms.

We built this in August and let it work the rest of the year and the whole next year.  I kept it watered daily with a soaker hose.

The finished compost was like the finest worm castings, almost like dust when dry.  When it is damp, it's almost a clay like material, it really broke it down.

This option is great if you don't want to do any turning and want to use your compost more to introduce biology to soil.  As far as bulk compost, this method would be more space and time intensive to build the bioreactors and let them sit for a year or more.
9 months ago
Thanks for the welcome, guys and gals!

I'll see if I can get to some homesteading festivals.   I did a presentation on composting worms for a local group and I really enjoyed the company and people.
9 months ago
Attached is a PDF on getting started with vermicompost or vermiculture.  

It takes you through my last 4-5 years of vermicomposting/vermiculture up into the realm of where I'm at now with homemade continuous flow through bins and 96 square feet of vermiculture space.    I have some pics of the bins so you can see what you're getting in the presentation.

This system would be suitable for a heated or unheated garage in the northern US.  The breeding bins are stored in an unheated, open barn throughout the winter (protected from the wind but not the cold temperatures), and insulated with chopped leaves.  It's been 5 degrees F outside here but the bins are still at 55-60 degrees in the interior where the worms are.  No supplemental heat at all.

I gave this presentation for a local homesteading group.

Please feel free to offer suggestions or share any comments.

Also, feel free to share or use as you see fit!
9 months ago
Here is another idea if you have an old leaky water trough or two about: Homemade Continuous Flow Through Bin, this one is out of a stock tank with 3/4" EMT conduit for the bottom.  I drilled holes with a hole saw and bent the conduit over so it wouldn't fall out.  

I also spaced the conduit so it would be spaced for the tool I'm using to scrape the castings out, in my case, an old corn fork to pull the cobs down out of a crib.

To start it out, you put in a layer of cardboard, some bedding, and your worms.  

Then you scrape the castings off the bottom and keep adding your feed and fresh bedding to the top.  The castings can sit on the ground to dry for a few days before sifting.

The bedding is rotted wood chips, compost, and shredded (non-glossy) paper.


9 months ago
I've been using these bagster worm bins ala Meme's worms on Youtube.  The internal frame is 3/4" PVC piping and fittings.  They are permeable on the bottom so moisture won't pool.   If I remember correctly it was about $35 for the bagster and then maybe $20-$25 in fittings/pipe.


We started with 5 lbs of worms and they eat all of our kitchen scraps and other old veggie scraps from a food pantry operation, as well as all of our cardboard and paper scraps.  Grass clippings.  Pig and cow poop and straw bedding.

I also fed them some old spoiled feed from the feed store.  

We have a mist system set up to multiply the worms.  I think this plus the permeability of the bag is key.

This fall I split the one bin into 3.  In the middle of the bin they had multiplied such that if you stuck your hand in near some food, it was a wriggling mass 1 inch thick.  You could literally pick up a pound of worms in your hand with a scoop or two.

9 months ago